I seem to be going round in circles with scratch building these seats for the rear section of my huey. Its my first attempt at scratch building, i want to get it right and i could really do with some expert advice off you guys.
The problem i have is im building a 1/32 slick and i cant seem to work out the right scale for the seat poles and support poles, i have managed to get hold of some copper tubing in a few sizes and thought i had it cracked but i havnt.
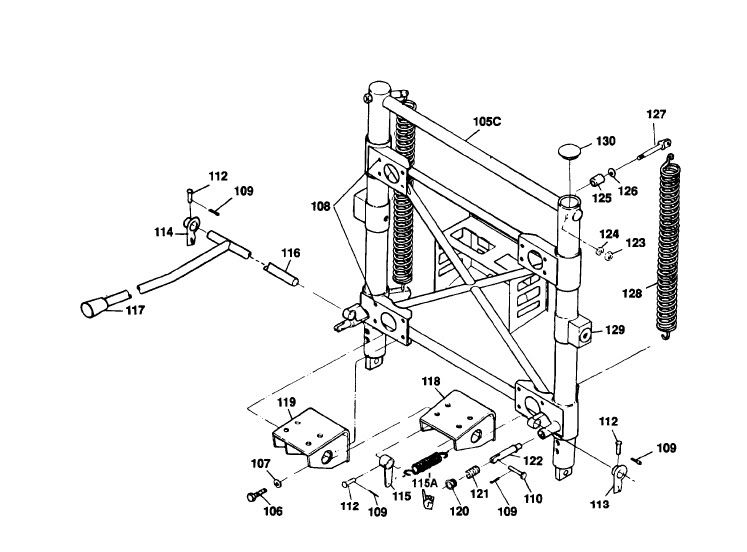
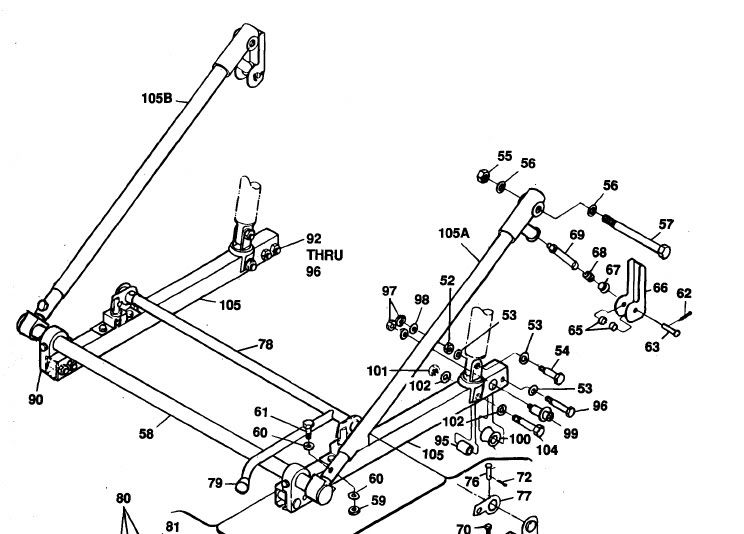
Going by the photos i have seen, the two support poles that usualy have smoke grenades hanging off them are the thickest, then there is the hollow tube on both sides that supports the back rests of the main bench seat and rests in the support poles, seperating the door gunner from the main cargo/troop section this looks slightly thinner than the main support poles it rests in.
Then there are the poles at the make up the front and back of the benches that have the canvass stretched over them to make up the seat, im not sure but is the rear pole thinner than the front pole?
Then there are the arched poles under the seats and the poles that rest on the floor.
To many poles[%-)]
The trouble is the copper tubing i found that looks spot on for the 2 hollow poles that cut across the main support poles is about 3 times thicker than the support poles they are supposed to rest in (the support poles that come with the revell 1/32 kit) so im baffled.
Please someone put me out of my misery and let me know what size tubes to use for what poles, should i scrap the support poles that came with the kit and make thicker ones or give up and take up knitting lol.
I hope this post isnt to confusing lol il try and add some pictures to show what i mean, i would love to finaly get this problem sorted as its been holding me up for ages.

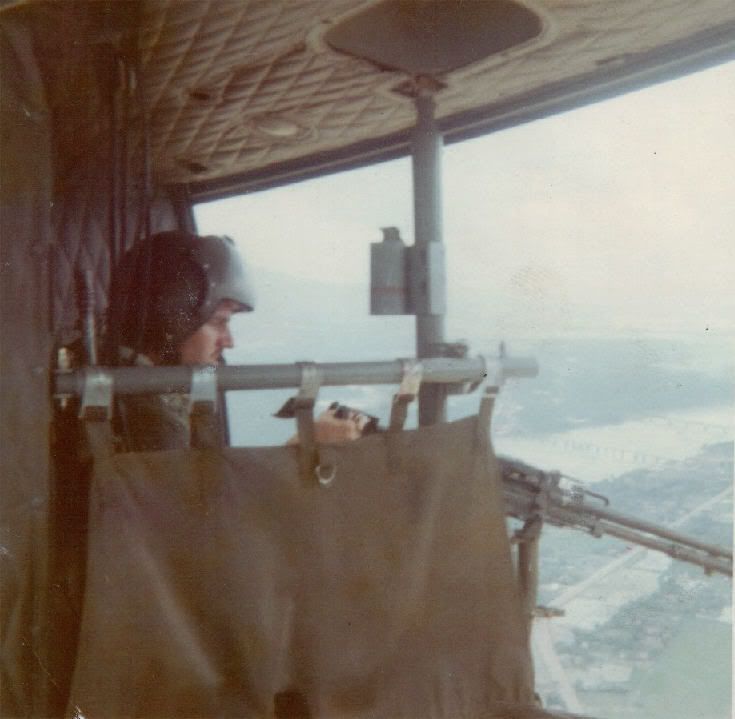
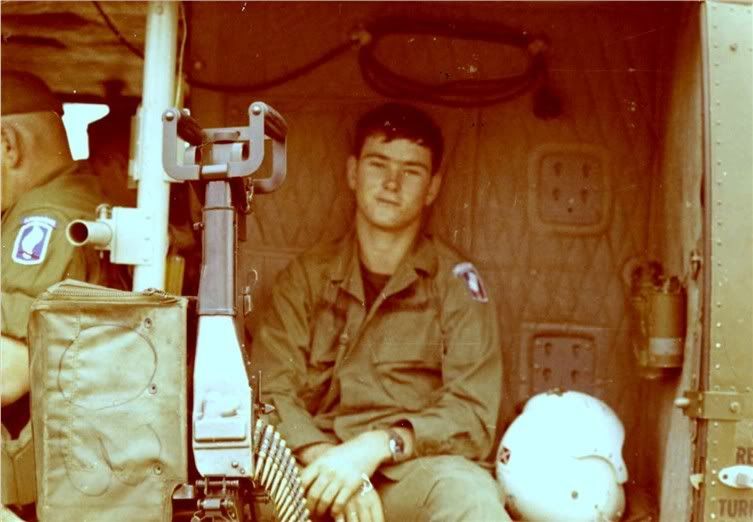
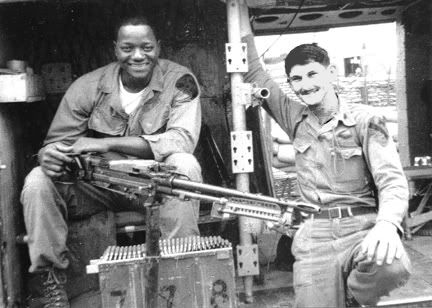
If you can give me an idea whats the best size to use for the hollow poles you can see in the last 2 pictures in 1/32 scale i may be able to work out the size of the other poles from that but im pretty poo with measurements so if anyone could do the hard work for me that would be great [:)]
many thanks
Andy
No idea what these come out to in copper tubing, but, I use stryrene rod on mine. The vertical poles I use 0.040 rod. The kit vertical poles are actually pretty good, I would use them. For the front and rear seat support poles and upper horizontal poles on either side of the center bulkhead, 0.030 rod. For the bowed cross bars and vertical seat legs, 0.030 rod as well. For the fabric on the seats, I use lead foil.
Hope that helps.
Thanks alot Gino.
That helps loads mate [tup] i will keep the vertical poles from the kit and use styrene for the seat poles maybe use a bit of the copper for the horizontal poles and save the rest for rocket launchers on the gunships.
Thanks again
Andy
Andy,
The dia. of the main support pole is 2". It tapers to 1" at the top and bottom. Top actully had a telescoping piece for adustment so it can be installed in several different locations for different applications. The bottom seat support bracket is for a 1" dia tube, the top for the back of the seats is 1 1/2". Bottom support backet is 3 in. wide centered at 12 1/2 in from bottom. Top support bracket is 3 1/2 in wide centered at 33 1/4 in from bottom. Bottom bracket extends from pole 1 3/4 in. Top bracket 1 1/2 in. Clear as mud, right! The dia of the front part of the seats I can’t help you with. I don’t have any of those! Heh, heh! Best guess is 1 1/4.
Mel
Thanks alot for those measurements. Where on earth did you find them? or have you got a main support pole next to your pc [:)]
Now if i can work out what a 1 inch pole would be scaled down for a 1/32 model i can get things spot on.
Thanks again [tup]
Andy
It would be 1/32 of an inch, or .03125 in. wide.
Thanks empeter i dont suppose you have any idea what 1/32 of an inch would be in styrene or copper tube language as im looking at copper tube measurements here at 1/16, 3/32, 5/32 and they mean nothing to me [D)]
whats the best size tube to go for to represent 1 inch in 1/32 scale
Thanks
Andy
That is the measurement he has given you. 0.03125 inch is basically what I use, 0.030 inch styrene rod. Check on line for for a scale calculator. These allow you to input actual dimensions, and give you any scale dimension you are looking for.
Oh right. Thanks Gino [:)] when it comes to numbers i hide behind the sofa and point at someone else lol. il have a look for one of those calculators i can see it being used quite alot with me lol.
Thanks Gino you guys on here are great [tup]
Andy
Andy:
Send me an email and I will send you detail shots of the Pilots seats, armored version.
Ed
I miastakenly deleted an email requesting some pictures. Please resend email. Sorry
Ed
Andy, how did you guess! Can’t divulge what I actually have! Heh, heh! Sorry I’ve been gone for my Unit Reunion and before the wife had me busy with “honey do’s”. I’m having neck surgery Thur. May 3rd so had to take care of some things I won’t be able to do for a month or two. Maybe I’ll be able to scratch on some plastic after a few weeks! Probably be “off line” for a little while. Only supposed to be in the hospital for two days. I’ll be off work for 3 to 4 months since I’m still doing “manual” labor! No such thing as “light duty” offshore these days! I enjoyed the first 2 days of the Reunion but then ended up with gout in the little toe and a stomach virsus that keep me “grounded” for the next two days! Bummer! Heck getting old!
Ed
Thanks for the picture, i was hoping to get the Cobra company armored seats now that i have the rear seats sorted but i couldnt have timed it worse  Looks like i will have to try and scratch build them as the seats in the 1/32 Revell are terrible. If you have a detailed picture of the rear of the seat that would be very handy too.
Thanks
Andy
Mel
Glad you enjoyed your reunion (even if your little toe didnt) lol. Hope that everything went well with the neck op and that you’l be back fighting fit on the forums very soon.
All the best
Andy
Ed
Thanks for posting the pictures, Great stuff [tup]
Andy