How do you guys mask off the front section of a Vietnam era 500 lb bomb to paint it yellow?
I thought of using a circle template but there is no way to hold it level while you airbrush it. The bomb tip is also tapered so masking won’t work very well.
Any tricks you have learned to do this?
Two methods.First, try cutting a custom circle template, small emough to rest on the nose without having to be held. Then spray yellow. When dry, cut another, smaller circle template, which produces a yellow band of the required width, and spray OD. When dry, remove and touch up as required.
In 1/72, these circles will be quite small, so a punch and die set might be helpful.
Second, mix up some yellow paint in a shallow container. dip nose of bomb in paint, and let dry, nose down. When dry, mix up some OD paint, and repeat process, achieving yellow ring of required width.
Paint the whole bomb yellow and then paint the non-yellow parts some other color [:)]
Are you using acrylics or enamels? This doesn’t work that well with acrylics. Push the circle template over the nose, hold the nose with your fingers and kind of snug the circle template down at the same time. Brush liquid mask on the BACK side of the template and when dry trim it with an Xacto knife.
Push the circle template over the nose and use some rubber cement, BlueTack or Silly Putty on the back side to hold it while you spray it.
The problem with using a circle template on bombs and missiles is that while the bomb / missile nose is tapered the circle template is punched square. The back side of the template will be resting on the surface but the front side will be slightly off the surface so if you aren’t careful you’ll get a slightly soft-edged line.
Thanks for the answers guys.
I am using Model Master Acryl paints by the way Scott.
Chris,
I thought about dipping them as you stated but I have six 500 lb bombs with extended fuses so that wouldn’t work too well. [;)]
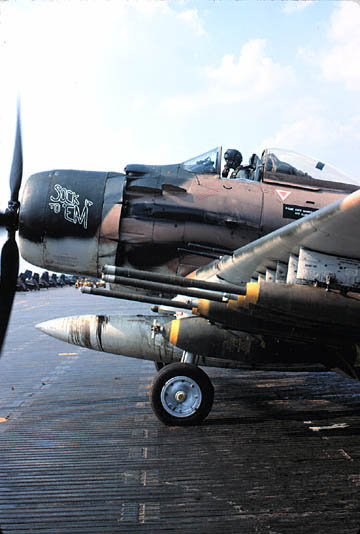
I think I will try making a circle template as you said. It is not a stripe on the bomb, it is just yellow at the tip as this photo shows:
Go to your freindly Orthodonist & beg or buy some of the very small Retainer rubber bands. Paint the bomb yellow, carefully place the rubber band where you want the stripe, making sure it’s flat to the surface & square all the way around. Paint bomb OD. Remove rubber band. Works for me.
If you want the whole front painted yellow, mask the area forward of the rubber band with liquid mask or small strips of masking tape.
Royal Model is a company that makes templates out of metal sheet so there is no width as with plastic templates . I think that Eduard and Airwaves too make such products.
Ok, I’m not nearly as skilled with the airbrush as one must be to spray the tip of the bomb, even with a circle template, so I’ve resorted to Hasegawa’s excellent Weapons kits and have used the supplied decals with very good effect. They are opaque yellow and are appropriately curved to the shape of the bomb, so no wrinkled or stretched edges appear. Don’t kick me off this post: I know you asked how to paint the tips; not how to decal them, but it works pretty well anyway.
These bombs are from the Hasegawa Weapons: A set and there are no decals for the front of the bombs, there are only a few stripe decals for the cluster bombs.
Well, I think I might have a little pull on this question because all these yellow rings were handpainted, all 32 bombs’ rings were handpainted…
I just painted a rough ring of MM’s acylic zinc chromate yellow on the bomb, then went back with the olive drab and the back with the yellow if it needed it. I was careful not to show brush marks and once it recieved a flat seal you couldn’t see any evidence. I tried making my own stencil out of sheet styrene, but it’s almost impossible. Hope it helps.
MikeV, off this topic, if you don’t mind me asking, what can you tell me about MM acryl paints? I’ve only used one colour, and I really liked the finish. How is their OD? I only spray acrylics, and tamiya OD is just far too dark for my tastes. I used MM enamel OD before, and it was great, both out of bottle and ratttle can. I just wanted to know whether their acryl shades match their enamel shades?
If you can shed any light on this, I’d be forever indebted to you.
I use MM acrylics alot and they are excellent! Their easier to handpaint than tamiya acrylics, and thin down well with regular iso rubbing alchohol in the airbrush. The only problem is some of their shades seem to be off to me. They have a german uniforn grey, wich looks too aquaish for me, but most (basically all) of their shades are on the nail, their the right shade. My workshops full of tamiya acrylics and MM acrylics, and I use them both, so I’d get a couple more colors, hope it helps!
I think that would be similar to just using yellow decal material but it might be tough being that the bomb is tapered at the tip so the decal would have to be slightly curved in order to wrap around the bomb and stay straight.
I think masking like Rick said would be the best way to approach it.
Hey MikeV:
In your photo of the A-1H, the bombs on the outer 5 pylons are 250 pounders and the big one next to the landing gear is a M-117 750lb general purpose. According to my old tech-school info ( AF A/C Weapons Mechanic, Lowry AFB, CO., 1966 ) the yellow stripe on the M-117 was 3 inches wide. The stripes on the 500 lb. MK-82 GP’s and Snakeyes ,as well as the 250 lb GP’s would have been the same. The " Daisy-cutter" nose fuse extentions on the Snakeyes were 36" long ( not counting the length of the nose fuse ). The easiest way to put that stripe on is to glue the “daisy-cutter” on the bomb, then use it ot chuck the bomb into a drill. Then, while making the drill turn slowly, hold a fine tipped brush loaded with yellow paint against the bomb body. As a matter of info-- we not only used the nose fuze extentions on the 500 pounders, but also on the 750’s and 250’s. Your A-1 photo shows 250’s using them. The 250’s didn’t have much “blow” for the “go” and weren’t used as often.