Dan,
She coming along nicely. I really like what you’ve done so far. What are you using for rigging thread?
Steve
Dan,
She coming along nicely. I really like what you’ve done so far. What are you using for rigging thread?
Steve
Thanks Steve, certainly better than the OOB version I built 20 plus years ago, and I thought it came out pretty nice, but sites like this and the work of cats like Evan and Arnie, including Evan’s excellent research, as well as the experience and advice of John Tilley have taken me out of the realm of OOB and I will never look back. Even though I will not be going to the lengths they are going in terms of period correctness or detail, I have been inspired to redo the channels and build my own shrouds, alter the standing rigging, turn my own top masts and yards, and add various other features heretofore undreamed of by a casual modeler like me, the spar deck in particular I am pretty proud of and Evan had a distinct influence there. Still waiting for John’s response on sheet and bunt lines as I will be furling sails in the yards and rigging is where I really love to work and I want as much accuracy there as possible, and I do not believe in forgoing some rigging, I want all that is supposed to be there to be there.
As far as cordage goes, I actually have 2 spools of black Revell cordage left over from Cutty Sark, heavy and medium with more than enough I believe to do the standing rigging. It’s the good old stuff too, not that garbage they include in the kits now, I really like the way it looks when treated to look like it’s been tarred and it is a pretty hefty rope for standing rigging, it really stands out. I have a good supply of Artesania Latina but I’m not particularly impressed with it, so methinks the stuff Arnie is using from Cottage Industry Models ( http://cottageindustrymodels.com/?page_id=153 ) or the cordage at Syren Ship Model Company ( http://www.syrenshipmodelcompany.com/miniature-rope.php ) are likely the way I’ll go for running rigging, I am leaning toward CIM, at least 3 different sizes, if not more.
I am curious what John and Evan’s take on cordage is though and seeing as I have some time before I reach that point, I will await their input, but Arnies ship looks so good it’s hard to see how any other cordage would be better. I used the .5 Latina for rigging the cannons on the gun deck because they will be relatively unseen and so the less than authentic look of the cordage wasn’t a huge concern. Such will not be thecase topside, i want the best cordage I can find and so the 2 companies I mentioned are looking like the way to go.
Thanks for looking Steve and happy modeling!
Dan
Dan;
Looking really good. Your decks came out very nicely!
Just thought I would chime in about cordage. As you noted I am using almost entirely the cordage from Syren. I did order and try some from Cottage Industries, and it is pretty nice stuff except that I found it unravels pretty easily and doesn’t have the “feel” or look that the Syren cordage has. I am not sure what they make it from since they don’t say on their web site, but from working w/ it I suspect it is synthetic fibers or a mix. I am sure the CIM would work fine for you though, and it is less expensive. They offer a sample pack for a $2.00 shipping fee.
Looking forward to your next post.
I’m currently using EZ line on my steamship because it’s all taut. Looking through my “good” cordage, it’s mostly the Imai stuff that came with Victory (black), or Caldercraft (tan). I’m really happy with all of that.
Thanks Arnie, given the atrocious warping and bowing on these decks I am pleasantly surprised I was able to straighten them out. I still have to fill in the gap at the stern and the open gaps where the waterway and deck come together at the bow but overall it came out much nicer that I expected.
I was under the impression you were using CIM for your rigging and it looked so good in your photos that was what was swaying me that direction. I love the look of Syren cordage and knowing now that is what you are using I will probably go with it instead. I want absolutely the best most authentic looking stuff I can find as rigging is my favorite part of a full rigged ship and the modest cost of this product is not enough to sweat over, Blue Jacket belaying pins are far more pricey that cordage and if that is what it takes so be it.
Dan
I use pre-waxed button thread(hard to find)…but it can be found in many sizes and colors…and it is spot on accurate…in my view…not to mention imported black lacing thread(from India). I keep my eyes open in old sewing, upholstering shops and import stores.
Rob
Thanks Rob, I will check into that, I wax my cordage with pure paraffin wax, eliminates “fuzzies” and helps the line look taut even if you rig it a little loose, so pre-waxed in the right diameter would sure save me a step.
Dan
I know this may sound strange…but on the last CS I built…I used while nylon line and then stained each line after I installed it with an alcohol based stain(That looked so real). Once dry it took on a protypical sag as would be evident with real weighted line. The real issue is…if you try to get some sag initially…your line twists and tries to follow the spool contour. NOT good. But my technique allows the line to naturally sag under its own weight looking very convincing. This technique while it produces slight sag…it does not look droopy…but very even and natural.
Rob(Plus you can dye the line any color you wish)
Dan,
I have used the old Revell rigging line myself on some of my models and I agree it still holds up pretty well. On my Catalan Ship build I purchased Syren’s line for the entire rigging and used it on other builds recently and I love it.
On my Dreadnought thread I plan on using EZ line like GM, although I might try fly fishing line on some of the WW2 ships when I get to them.
In regards to the CIM line, I know Rod Millard uses it and has been very happy with the results. He also stains his line to the colors he needs. You can see the line in use on his Catalan Ship thread here:
cs.finescale.com/…/160320.aspx
I also checked out Morope which is also very nice but unravels unless you glue the ends. I really do not think you could go wrong with any of these lines for rigging.
Steve
Very nice progress Dan!
With regard to cordage… Like other modelers I quickly ordered up some sample line from Chuck at Syren when he first began taking orders and I was very impressed. It is beautiful stuff. I do plan, however, to use some of the CIM line in my build. I’ve been working a bit with William At Cottage Industries and I think his line will do well for the shrouds. I really like how his line has a bit of spring to it that will help keep tension on these critical lines. He uses a synthetic with no fuzz and no need to wax. Probably CIM line for standing rigging and Syren for running…
William is also helping me with breaching lines and the anchor cable. More to come soon…
I’m glad you’ve elected to stray from strictly OOB… You may never go back after getting bit by the Evergreen bug!
Good suff!
Evan
Dan
For the gun port lid hinges… I filled the spaces with snippets of styrene (applied oversized then snipped flush next day) and then applied a bit of filler and sanded it all smooth. You can see my method within my log.
I generally don’t use filler on anything except small cracks/gaps. Otherwise too much shrinkage and won’t hold if I need to drill into it later.
Hope that helps.
Evan
I agree Steve, for some reason when I bought the Cutty Sark 20 odd years ago it had a double supply of the medium and heavy (I think those were the only 2 offered) black cordage, so I have and ample supply of the old school stuff, it waxes really nice and it is stiff already so the way it represents taut standing rigging is very nice

My Cutty Sark sat for 18 years half finished, only had standing rigging and shrouds in place, and I ran out of the tan running rigging and as I was out of model building all that time and I didn’t know such amazing forums as this existed until AFTER I ordered Artesania Latina thread to finish her up. VERY unimpressed with it, super fuzzy and while it has a nice stretch, it looks inauthentic to say the least.
Then a modeling buddy of mine hipped me to this and a couple of other sites and now I am ruined for ever building OOB again [:D]. I simply will not scrimp on cordage, your link showed me how good CIM stuff looks but I think I may use Syren because it doesn’t sound like pre-waxing is needed and stain to the correct color and to give the lines a more authentic sag. But my old Revell black stuff is a no brainer for standing rigging, unless someone here can offer a better alternative. I’ve built 3 of these 1/96 Revell kits over the decades all with the old school cordage and the one I have left, Cutty Sark, has had the standing rigging on her for 20 years and it still looks great.
Dan
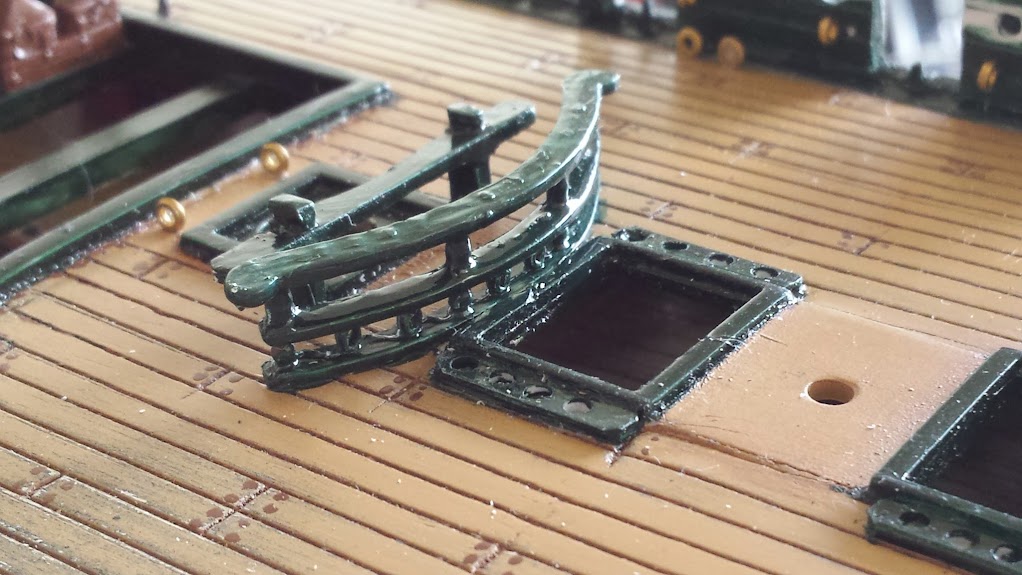
Thanks Evan, that means alot coming from you. When this kit arrived, the box was more beat up than advertised and there was some damage which, along with following yours and Arnie’s builds, really inspired me to think “outside the box” on this kit. The fore fife rail assembly was virtually shattered, to the point where only 4 of the stanchions were salvageable and so I rebuilt the whole thing including adding a pinrail on the fore crossrail and replacing the broken pinrails. I’ve already lamented the poor condition the decks were in, just happy I was able to make them somewhat serviceable.
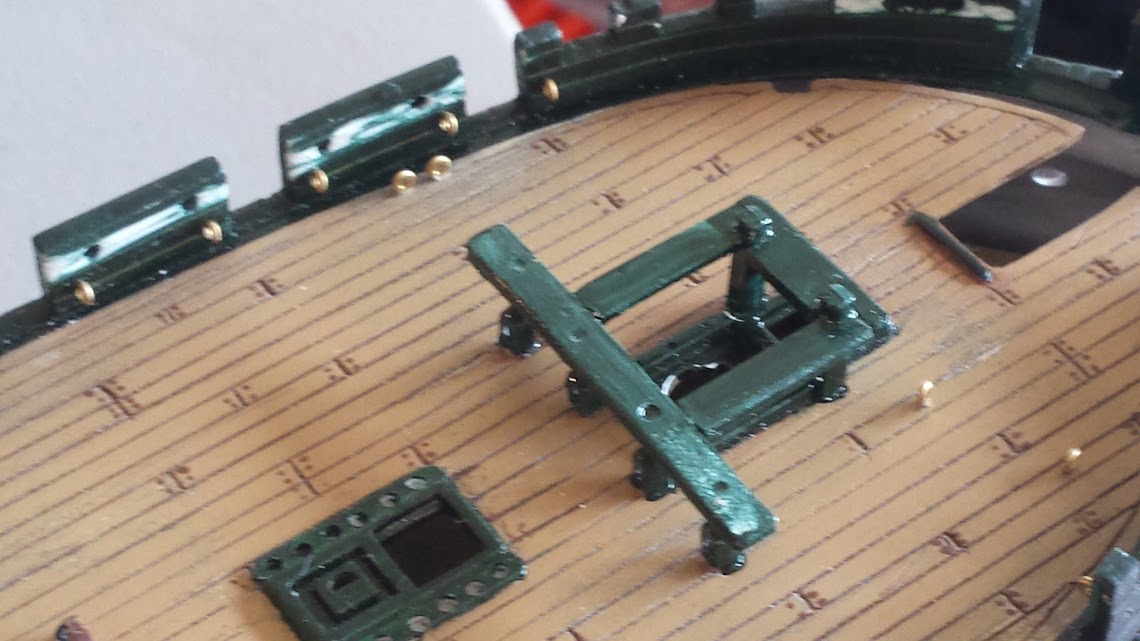
The main fiferail had broken feet and so I flush mounted it to the deck, and the monkey rail was in 3 pieces so I built a new one
I also had at least 4 other broken pinrails so I decided to replace all of them, as well as adding 2 more. They are a work in progress but I did build them out of .80 Evergreen and planed down the belaying pin surfaces, this will allow me to use 1/4" belaying pins from Blue Jacket as well as have a substantial surface area at the attach point to the bulwarks and MUCH bigger tabs to go into the holes I drilled in the .40 reinforced and thickened bulwarks.
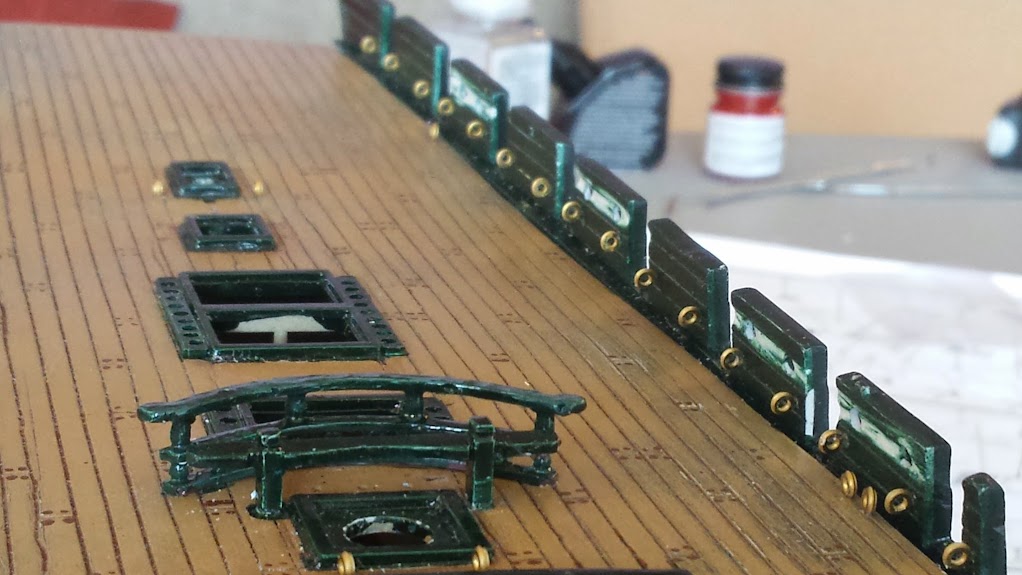
As you can see, I still have a fair amount of touch up and clean up work to do and I will post pictures of my take on adding strength to the pinrails later but I suppose my main point is Evan, without discovering this forum I never would have considered even this rudimentary amount of modification, the fact that now I am even planning on using non OOB deadeyes, shroud/ratlines and turned wood mastops and yards is giving my wife a headache [;)].
On a side note, I am curious what you think about leaving the eyebolts un-blackened? Personally I like the look. As you can see I ordered the next size up, slightly out of scale but much easier to work with. I also bought the smaller size and will use some with rings attached as well
Dan
Regarding cordage -
It’s been a long time since I’ve rigged a good-sized ship model. The most recent three (more years ago than I care to acknowledge) I rigged with silk thread, which in those days was relatively easy to find at good sewing stores. I could only find two sizes of it; I made most of the rope I used on the actual models with my primitive “rope-making machine.” That was an extremely crude contraption I made out of parts from an old Erector set. It was in two parts, the “whorls” and the “spinners.” I clamped each of them to a sawhorse, so I could put them at any distance apart for longer or shorter ropes. (For the topgallant backstays of the Soleil Royal, as I remember, I had to put the sawhorses on the opposite sides of our basement. As rope is spun up it gets shorter.)
One great advantage of making your own rope is that you can make it in just about any size you want. A real ship had rope in dozens of diameters. I won’t claim I made that many different sizes for the Soleil Royal, Bounty, or Hancock, but I made at least a dozen - black and brown.)
Employment, marriage, stepkids, and illness kept me away from large ship modeling projects for a long time. I did build the Model Shipways pilot schooner Phantom a few years ago. (At that time Model Expo was selling the kit with a resin hull. I really liked it.) The rigging of that ship doesn’t amount to much. I used Model Shipways’ “cotton-poly mix,” which I liked. It really does look like rope (though a little shiny), and it’s held up well since I finished the model.
Nowadays it’s harder to find silk thread. (I’ve googled “real silk thread,” and it can be bought, all right, but I haven’t had occasion to order any.)
My current model, a Gloucester fishing schooner, is going to need quite a bit of rigging (though not as much as a full-rigged ship). I’ve got quite a stock of Model Shipways stuff (bought when Model Expo put it on sale for ridiculously low prices), and some from Cottage Industries. Both look more than acceptable to me.
But I’m really interested in the newly-available cotton/linen line from Syren Ship Model Company. In the photos it looks superb, and I’ve read lots of positive comments on it here in the Forum. I’m going to order some in a few minutes.
Only one thing bothers me about the Syren line. In the pictures it appears that most of the sizes are cable-laid (i.e., spun up left handed). If you’re really into such things, that matters. (Hold a piece of the line vertically, and look at the strands. If they go up to the right, they’re hawser-laid. If they go up to the left they’re cable- laid. Here’s a link to a good picture: http://www.sweethaven02.com/BldgConst/Bldg02/fig0302.jpg ) .Nowadays almost all rope that’s sold for ship and boat rigging is hawser-laid. But in the seventeenth, eighteenth, and early nineteenth centuries much of the standing rigging of ships was cable-laid, while the lighter standing rigging lines and all the running rigging was hawser-laid. (There was a third kind. Shroud-laid rope consisted of three strands of cable-laid line spun up right-handed. Three cable-laid strands making a hawser-laid finished product.
If you make your own rope, you can control that - simply by cranking in opposite direction. In this picture of the Hancock you can see that most of the standing rigging is cable-laid and the running rigging is hawser-laid: http://i1360.photobucket.com/albums/r650/jtilley1/38890018_zps8e2d375f.jpg .
How much does this matter? That, as always, is up to the individual modeler. When I learned (from R.C. Anderson and C.N. Longridge) how to make my own rope, I got fascinated by it, and had a lot of fun with it. (I admit I got sick and tired of turning those little cranks, but Cincinnati Reds radio broadcasts helped a great deal.)
I’m going to ask Mr. Passaro if his rope-making machine can spin lines in both directions. It would be great if both hawser-and cable-laid rope were conveniently available. All the rigging of my current project needs to be hawser-laid. But I’ve got a late-eighteenth-century brig next in line…
Later: Just ordered seven packages of Syren line - along with a query as to whether Mr. Passaro can supply both hawser-laid and cable-laid. Will be back when it comes, which I’m sure will be quite soon.
Still later: Mr. Passaro got back to me with an answer to my question within a couple of hours. The two smallest sizes of line he offers are hawser-laid; the larger ones are all cable-laid. That makes the smaller ones appropriate for running rigging and the larger ones for standing rigging. If you need bigger running rigging (for jeers, halyards, etc.) it shouldn’t be difficult to spin the smaller sizes up into bigger hawser-laid rope.
Thanks John, I was hoping you would weigh in one the cordage, I guess I didn’t realize the significance of the difference between hawser and cable, now that I realize the difference I wish I could remember where I read about a company that can make it to order, wish I had bookmarked the page GRRR!
I had asked you on Evan’s blog about sheet, clew and bunt lines and how I should go about rigging these with the furled sails, I will paste those questions here and hope you can point me in the right direction. I love rigging and firmly believe it putting it all in place if possible so to do it correctly with furled sails is very important to the look I am attempting, here are the questions I posed on Evans blog:
On my last project, Cutty Sark, I did the whole furled sails thing in a manner I’m sure you disapprove of as they are wadded up in the yards and very prominent, instead of rolled neatly into the yards and I incorrectly shrouded the jibs up on the sheet lines rather than running them down to the bowsprit. Now that I know how they should be furled, and I will be furling them in the yards, I am curious what your take is on how to present the sheet, clew, and bunt lines and other running rigging used to work the yards and sails. On Cutty Sark I actually tied sheet lines to the sails and “hoisted” them, thus presenting them as I thought they would look with the sails furled. It came out OK but clearly not correct in how I presented the sails.
Revell’s instructions provide for no sails with instruction on how various sheet and clew lines were tied off when the salis aren’t in place. As I agree with you that furled sails look great I will be furling sails again (this time correctly), I foresee an issue with how to rig these lines as it will be very difficult to tie them to the silk span I will be using to represent the sails being as they will be rolled tightly onto the yards. I am months away from this part of the project however I would like your opinion on how I might accomplish this given the limitation of not actually “hoisting” the sails to the yards via the sheet and clew lines so as to ponder my options.
Also curious about your take on my nice shiny eyebolts [;)]
Dan
Dan,
Well, in order: clewlines and buntlines pretty much take care of themselves when the sail is furled. My custom is to rig them to the clews and bunts of the sail, rig the sail to the yard, rig the yard to the mast, and haul the clewlines and buntlines taut - in that order. The lines (don’t forget the leechlines, too) furl the sail, ready for the gaskets.
In case you haven’t already read it, here’s a link to my personal way of making and rigging furled sails: cs.finescale.com/…/33775.aspx . I think that technique would work fine on a big Constitution. Just remember that in order to work right, the sails themselves need to be a lot shallower - probably not much more than 50% the depth they would be if they were set. Lots of people make furled sail “bundles” far too thick.
There are lots of styles of ship modeling. I’ve seen plenty of good models with shiny - or not so shiny - brass fittings. You do know, though, that they won’t stay shiny for long unless you coat them with clear lacquer or something similar. If you leave them bare, they’ll turn either black, brown, or green, depending on the precise composition of the wire. That’s likely to happen before you get the model finished.
JT…your furling technique mimics my own. I found a long time ago that using 50% or less sail material in your furl will result in a far more protypical representations. Furling inward and making your furl random but balanced. I also use paper…crumpled till it is as soft as Egyptian cotton. This aids in representing a sail that was furled wet and retaining her wrinkles(though they are extremely small/soft) McNarry’s sails are as authentic as I could imagine…loose, fluffy, full of life.
Sometimes I will, cut the sail to size…detail with fine pencil…edging, joint lines and the like…then crumple the &*$% out of it. Reposition add rigging lines…and there you go. Pretty convincing sails.
This technique is not for everyone and it works best on smaller models…though I have used it on 1/96 scale.
Rob
It was pretty typical for commercial ships after 1900 to never take down sail, and in fact rarely furl it. Photographs of the clippers bear this out, With minimal crews, simply slacking the clew lines saved them time and money aloft, not to mention the risk of industrial accidents. These ships could not sail upwind. But that’s off topic.
Hello all, hope this post finds everyone well.
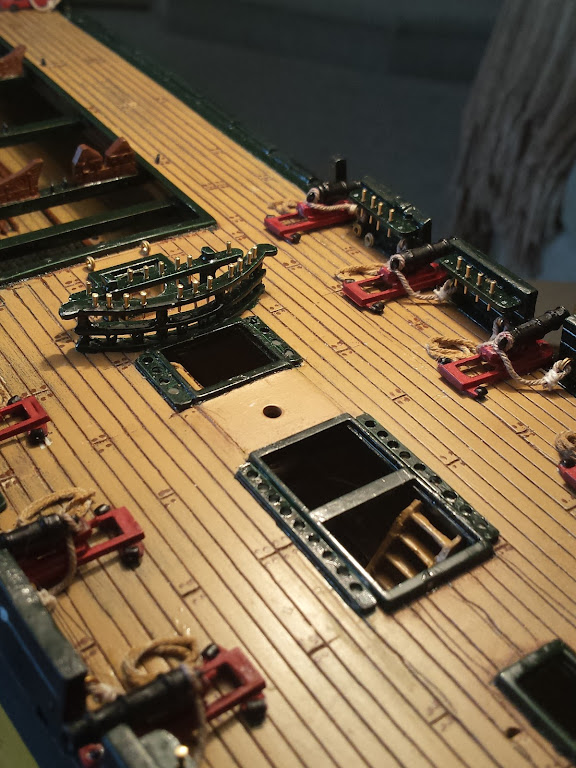
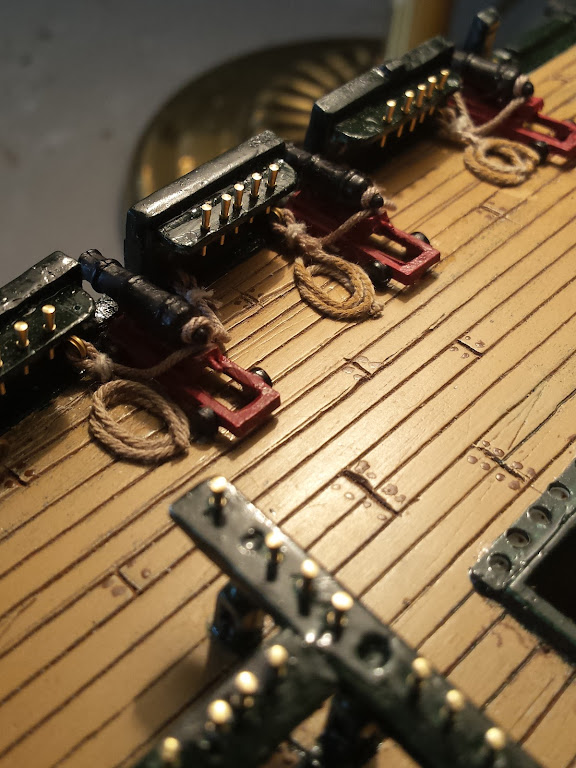
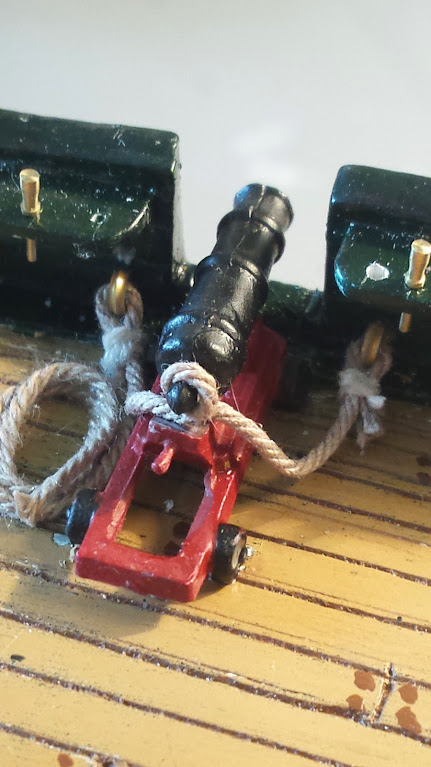
As I had previously mentioned spring summer and early fall are mountain biking and Moab rock crawling season, so work on Connie has been on hiatus. However, prior to her being put up for the season I had completed some work by the end of April beginning of May I failed to post pics of, so here they are.
These were test fits of the Carronades and finally rigging of them as well as fitting the belaying pins. I did seriously consider the rigging Arnie added but lacked the time to make such a huge effort. I did sieze the cordage and like how they came out, more authentic in detail. Anyway here’s what I accomplished late last spring, hoping to start up on her sometime this winter but I broke my rock crawler pretty bad and so will be spending time building my class 5 Blazer as well, looking forward to picking Evan’s and Arnie’s brain on the rigging to come.
Rigged and belaying pins installed
With rope coils
Repaired fore fife rail with brass pins
Siezed rope detail, wish the cordage wasn’t quite as fuzzy
Dan,
It is good to see you back and building again. However, maybe it is just my iPad, but nome of the pictures you posted except the last one came through.
Steve
