(I hope this is in the right section)
Ive been working on 2 small tv dinner tables for a while now, and Im pretty tired of it. Does anyone know of a desk within a $300 range thats well suited for modeling purposes?
(I hope this is in the right section)
Ive been working on 2 small tv dinner tables for a while now, and Im pretty tired of it. Does anyone know of a desk within a $300 range thats well suited for modeling purposes?
Check out Big Lots ( if you’re in the US. ) ours has lots of self- assembled computer desks for reasonable prices. Goodwill is another source to try.
I got a piece of damaged kitchen countertop from the big box store, two two drawer file cabinets to set it on. Top = $10.00, cabinets at the used office supply place = $25.00 each.

I use an Ikea table (5 feet x 2.5 feet) as my hobby desk. It looks good and is very strudy. I paid less than $100. My actual working area is the size of my cutting mat, so I use about 1/6th of the table.
Another vote for a kitchen counter slab. I use couple Ikea units to prop up the kitchen counter. I am in the process of setting up a whole workshop area in the basement.
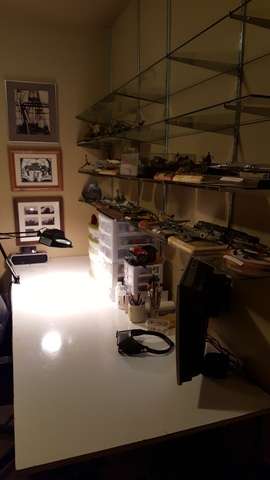
My room in the basement. About 8’ X 10’, plus space under the stairs for storage. Spray booth I built, vented to the outside. Cool in summer and warm in the Michigan winters.
The following pics show what I’ve done, maybe give some ideas to others. Kinda hard to get the whole layout in a small room. I’m very comfy in there.


EJ
My desk is homemade, and I really like it. It consists of two of those plastic drawer units sold at office supply stores. The top is to pieces of half inch particle board, 2 x 4 foot pieces, as a sandwich with ribs and longerons of 1 x 2 inch pine stock between. I wanted the top to be a couple inches higher than it would be just putting that top on the drawer units, so I made a couple of squares out of 1 x 2, and mounted those on top of drawer units under the top. A bonus is those drawer units come with castors. Those drawer units are frequently sold for about 15- 20 bucks a piece on sale. Cost for everything was a little over fifty bucks. I use white contact paper to make a nice bright surface on top- easily replaced when full of glue and paint spills.
I used a couple more pieces of 1 x 2 as uprights screwed to back of top, and mounted pegboard to them for tool rack.
If you’re able, you ought to build one. It’s not too difficult. This is mine:

I built this years ago, when I lived in a mobile home, and my modeling room was about 8’x10’. It’s basically a 2x4 frame, with a 4’x8’ sheet of plywood for the top. Here’s another shot, showing how the legs are attached:

It didn’t cost me more than the cost of a couple of 2x4s, because I scrounged the plywood.
When I finally bought a house, it was easy enough to strike the bench and re-assemble it in my cellar.
I still toy with the ideas of adding shelves to the back–what you see in the photo is a simple shelf made of pine boards, that I threw together for my dorm room in college (circa 1985)–and with adding some shelves under the bench, for storage. But for now, it’s still serving me well, and it took the space of an afternoon to cut the lumber and assemble everything.
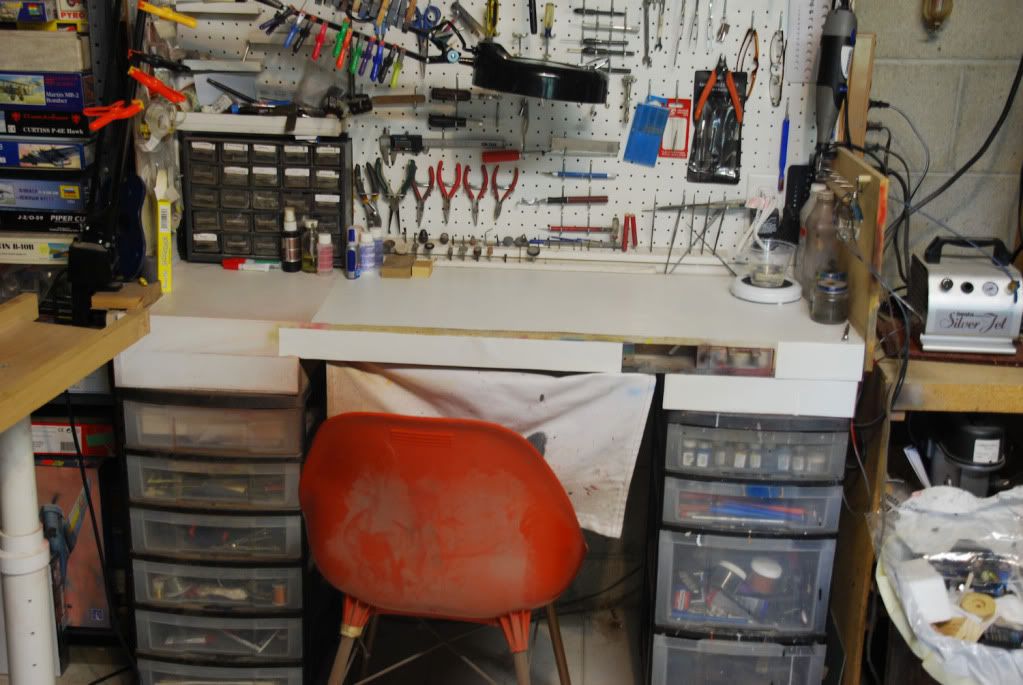
Here’s my new model work bench. I love it!
I started with two 18" wide lower kitchen cabinets (Oak), that I got from a local builder’s supply surplus store for $79.00 each. Each has a pull out drawer in the top and an a hinged cabinet door at the bottom. I spread them 8’ apart in an alcove of my man cave room.
Next, I bought two boards to make the apron; a 1x6x8 in Oak, and another in pine to connect the two cabinets together under the counter top. The Oak board for the front was finished to match the cabinets (Clear Satin Polyurethane) and the rear apron board (pine) was left natural, as it can’t be seen. I secured the apron boards to the cabinets with screws and four 90-degree L-brackets used to build outdoor decks.
Next, I bought an 8’ section of Formica Laminate kitchen countertop (with the integral back splash) from the same store for $90. I used Liquid Nails construction adhesive, L-brackets and screws to attach it to the top of the cabinets and apron.
The left cabinet holds my computer tower, network and WiFi boxes, while the right side houses my Bose subwoofer and my airbrush compressor. I drilled about a dozen 2" diameter holes in the backs of the cabinets for airflow for the computer and compressor. The drawers are organized with bins for Q-Tips, sandpaper, clothes pins, putty, extra paints, etc.
I used scrap wood from another project to build a 12" deep X 4’ long shelf to hold my paints, glues, thinners, etc. A musician’s old sheet music stand that I found in my attic is attached to the back of the shelf serves to hold my instructions or reference books.
I also added a 12" long magnetic block (not shown) to the wall (the same kind Chefs use to hold kitchen knives) and it works well to keep needle files, sprue cutters, pin vises and other steel tools within easy reach.
Two wall-mounted (plug-in type) dimmable track lights hold a total of 6 LED flood light bulbs, for PLENTY of light.
This bench is even big enough to hold my airbrush spray booth on the right side (not shown) that is vented out the window. I recently mounted my computer monitor on an articulating wall-mount arm, so reference pictures are always easy to see.
My airbrush, magnifying visor, dremel tool and other necessities are hanging on hooks within easy reach. I recently added some spruce shelves to the left side wall to hold reference books, in-work projects, etc.
I have a pretty sweet work space, and I’m pretty proud of it! [H] The cabinets, countertop, wood and hardware to make the bench cost me $300 and the lighting was $75, plus an additional $90 for LED bulbs.

Great looking benches! Felines and youngsters mean I need to be fairly compact and have the ability to batten down - large computer style rolltop from Craigslist fit the bill perfectly, one switch lights her up and fires the compressor. I use the keyboard tray as a slide out mount for dremel with cable drive, the printer drawer holds two small shelving units and an adjustable drawer organizer keeps tools organized and at hand. Paints in the second lockable drawer. Great for my needs, and when closed down it keeps the peace in the house!

I can’t recommend my work desk. It’s also hand made from Ikea shelf components, but in use its way too narrow with only about 12" effective depth, it needs at least another 6 to 8" in depth to really work, I am constantly dealing with things falling over the edge. I would suggest going to a thrift store and find a basic computer desk. I have seen decent ones for as low as $15-25.
and I thought I had a lot of modeling stuff…
My room is about 10x10 …have alot of paint shelving that I crafted my self …as soon as I get my new laptop. …I’ll try to post pictures. …my bench I made is 53inx32 in with an 18inch extension for those big projects like rc plains . And it holds my dremel jigsaw… pictures comeing soon [:D]
I LIKE RECYCLING! (read cheap, & PRESERVES Modelling & Beer tokens)
As above, kitchen worktops, old office desks file drawer units, lots of shelving, & 4 glass fronted book-cases for the essential reference materiel & ‘ahem’ finished models, (whatever they are… )
Essential are the LOCKABLE desk pedestals & Filing cabsinets, for all the SHARPs, PAINTS, THINNERS & stuff small fingers & paws shouldn’t find…
I work at an old painted drop-leaf table in my study. My magnifier light is positioned over it in this pic:

Here’s the corner where the work gets done:


Of course, it rarely looks that “clean”. [:D]
Some reference:

Whatever you end up doing, were I you I’d consider a worktop deeper than 24" if at all possible. I notice a couple of folks above have same.
My bench is two 24" x 5’ garage bench units from a big box store. A nice 10’ long setup, but I think 24" is too shallow for a good bench. Even for a general workbench, which is what mine really is. An extra 6" like Chris K and 5 High above mentioned would make a big difference.
Just my two cents.
I have three 2 X 6 folding tables from Sam’s. I am using them for now, since we have been in the house since the end of September. But, I plan to make a modular set of desks for my modeling. And the adjustment is to have the desk height at least 42", which keeps my back from getting sore.
My problem is, I am easily distracted to something else. Plastic ships, wood boats and ships, RC, whatever, so the collection just kept growing over the last 15 years. That’s why I finally moved the stuff to a dedicated room (originally organized fairly well) from the top of my drafting table in the office. I’m finally to the point - I think - that the exponential growth of “stuff” has slowed consideably, much to the relief of SWMBO.
EJ
Living in a 12 wide old mobile home, no dedicated area, so I have a piece of 1/2 inch ply I glued a piece of laminate on that was used by the wife as a lap desk/writing table Has a cutout to fit around the stomach. Looks somewhat like a kidney shaped swimming pool.
Otherwise do some over at work in the body shop.
Here’s mine. Just a 4X8 plywood sheet cut to 3X8 and lament glued on the top. Underneath is strengthened with 2x4 and the legs are the foldable kind that I bought separately. Works well for me.