Hi there,
I have heard several times about a technique to fill small seams and gaps, by using super glue. Can anyone tell me how this is done and which kind of super glue should be used for this? I mean do you use the liquid one or the more thicker one.
Thanks for your help and keep on modeling
It depends on the size of the gap. Place thick gap filling super glue into the gap. Hit with the setting solution, give it a few minutes and start sanding. The object is to sand before the glue sets up. If you wait too long it will be harder than the surrounding plastic. For large gaps, use plastic card as a shim along with super glue. I find this works better than other type of fillers, especially if you are painting a natural metal finish.
Berny
berny’s got it. I generally use ‘medium’ CA glue as the ‘thin’ stuff just doesn’t build up enough body to fill anything. I’m not sure how long it really takes for the glue to ‘cure’, but generally I make sure I’ve done the sanding within about 30 minutes after I’ve put the accelerator on the glue. No problems so far. Just don’t forget to sand a certain area and then come back the next day. Chances are that the glue will be harder than the plastic and you’ll end up sanding away more of the surrounding plastic than the filler. It can be done, but it takes patience and some protection of the surrounding plastic.
The great thing with CA glue is that it will dry rock-hard and can be smoothed out just like the surrounding plastic. Paint jobs that require a dead-smooth finish (like natural metal already mentioned) really benefit from using the CA in the seams.
M.
I have found a way that has work for me to fill gaps with thin super glue that works very well, and it should work for glue a little thicker as well.
I have found that if you use a film canister lid the super glue will not set and will not stick to the lid, I use a tooth pick sharpend to a blunt point not too blulnt, not a sharp point or the glue will not gather on the point, I use a bit of blue tack on one side of the bottom of the lid so as the glue gathers in one side of the of the lid and it also serves to hold the tooth pick when not in use if you stick it in upside down.
I also use this to hold my glue when making all my models as I run the tooth pick along the plastic and there is very little waste or mess.
That said, if I find I have gaps I gather a little glue on the end of the tooth pick and run it along the gap, it takes a while for the glue to build up but if you are careful you can get the glue just where you want it and there if very little sanding later on if any at all.
When you have finished with the lid wipe it out and use it again.
I hope this helped.
B. Cooper.
Hi,
Instead of superglue, I use a product called “No more nails”, which is an ecological glue thick as liniment, very gentle and do not harm plastic, it can fill wide or narrow gaps, and best of all, you don’t have to sand it off, just use a wet cloth to smooth it. No harmful vapors as far as I know. I haven’t tried to glue clear parts yet.
after dry, you can paint it with no problem… and if you mess it, just wipe it off and start again…
This thing is made by Schenkel from Germany, it should be easy to find on the supermarket or a hardware store…
For small gaps you can also use liquid paper (typewriter corrector).
bye
I don’t know if anyone else does this. When I have a gap to fill, I sand it a little until it fills in with plastic “dust”. Brush away the excess, and then run a little superglue in the gap/seam. This seems to reduce the amount of glue used and in turn speeds up the sanding process. It usually takes one application to fill even large gaps. I guess I like to have as much plastic in the gap as possible.
Darren
Here’s somthing I got from FSM. I now use super glue mixed with an equal amount of talcum powder (1:1). The talcum powder keeps the super glue from becoming rock hard. It will maintain the hardness of styrene or resin. The beauty of this is that you can put it on your model, go watch your favorite TV show or go to bed and when you come back the next day or next week it’s still only as hard as the styrene your model is made of. No more worrying about glue hardness. I use super glue that I get from my wifes press on fingernail kit. It’s thin and pink so it’s easy to mix and when I apply it to the model I can easily see where the the glue is and whether I missed any part of the gap or if I’ve smoothed the glue into the model enough so that I won’t see it when I paint. I can also use an eccelerator on it . Now I get all my glue for free thanks to my wife and a bottle of talcum powder will last me a life time.[:D][:)]
I have a nasty habit of not throwing much away, including most of the sprue left unpainted from various model kits. These are my styrene bits for various other projects, including gap-filling. I usually have a small box of stretched pieces, ranging in thicknesses of a hair to a half-round.
I like to test fit parts alot to make sure there aren’t any gaps, but some can’t be avoided. A good way to test-fit parts exactly as they would fit without damaging the internal pins is to hand-drill out the socket to a diameter just slightly larger than the pin. The pin will slide in with little resistance, but maintains some tension so the addition of glue will hold it. Test-fitting this way eliminates many of the gaps I’ll come across, as I can fix the two halves before setting them.
So on to the stretched sprue as a gap filler…I lay a very fine line of cement on the two parts to cemented, then trim and lay a line of stretched sprue on one piece. Model cement is more like a solvent than a glue, and actually “melts” the plastic, binding the parts together. Knowing this, set the two parts aside for a few moments to allow the cement to soften the plastic and “absorb” the string of stretched sprue on the one piece, but not long enough to let it cure completely. Then assemble the parts as you normally would. If done correctly, you’ll see a line of cement/plastic “squirt” out of the seam. Let it cure completely, as it will gum up if you work with it too soon, then sand it down. The finish should be completely seamless.
Now for the “where’d that huge gap come from” moments, mix Moon Sand with paint thinner in very small quantities to get a paste consitency. Moon Sand is considered a kids toy (I’m sure you’ve seen the info-mercials), but in reality is powderized styrene. It makes a perfect cheap spackling, and since it’s made from the same stuff most kits are made from, can be sanded, painted, cemented, etc. exactly as you would any other part once cured.
Happy building!
Let’s look at a really wide gap.

This was part of a kitbash and was self inflected. I use stretch sprue to fill the gap.

Which gave good penetration and strength.

Touch up with a little 3M putty, sand and polish and it is ready for rescribing and paint.

This method provides no dissimilar materials, so one doesn’t have issues with sanding or rescibing…one being too hard while the other too soft. No worry about shrinkage or breakage from a sudden jar or drop.


CA and miracle putties are fine, but when you want the strongest and most durable look at using original material. As bodymen say: There’s no replacement for metal but metal. So, there’s no replacement for styrene but styrene. [;)]
I guess we all have our own techniques. I for one use super glue (thin) I dont use accelerator. I want the glue to be easy to work with.
I find this glue at Al’s Hobbies in Illinois. I swear by this stuff.
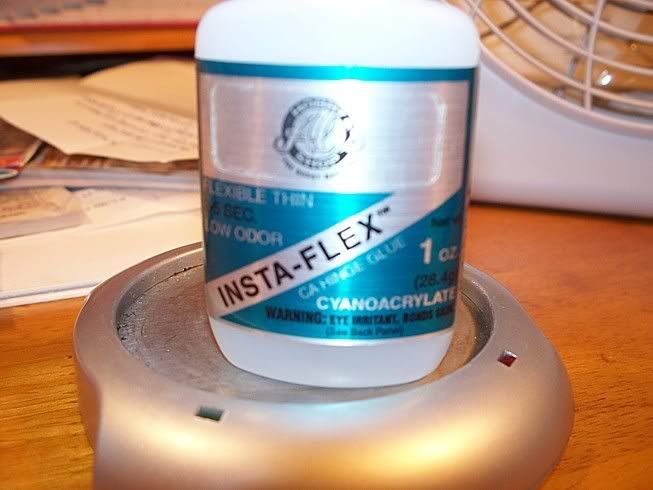
I fixed this gap using the thin glue. It’s great stuff.
Before:
After:
I simply put some glue on a pin, apply it to the gap, grab a fine round needle file and begin working the area. Apply glue as needed. As simple as that. The results are always great.
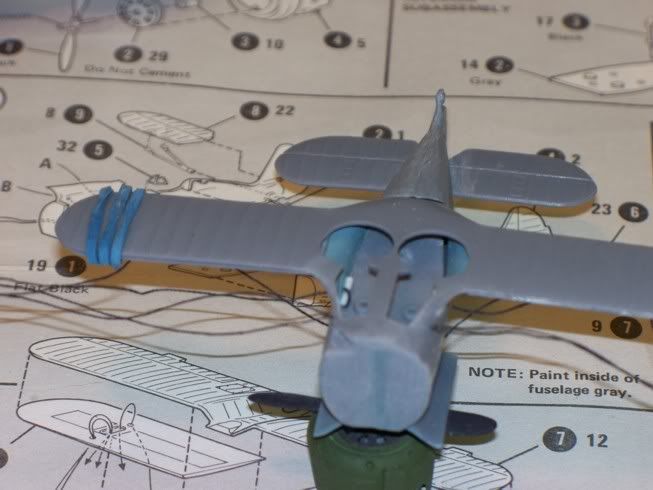
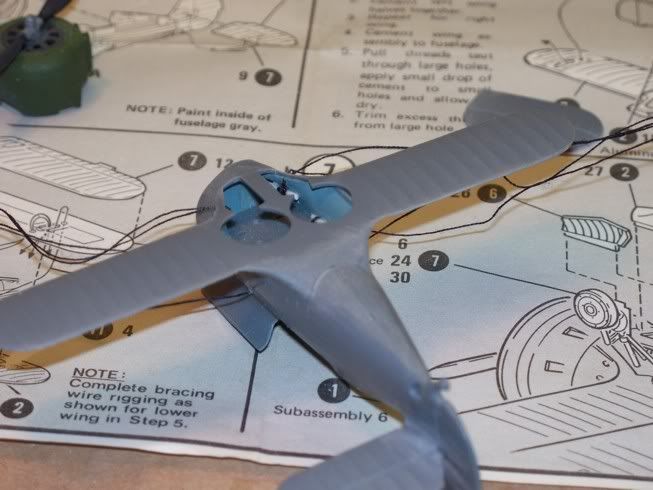
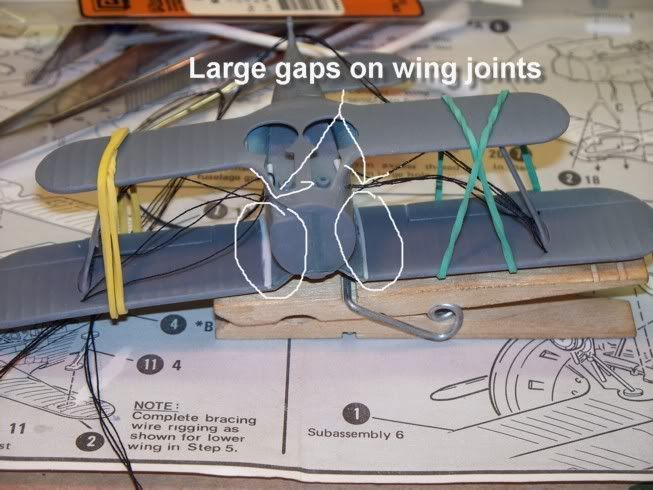
For large gaps such as the kind you may find when fitting wings to the fusleage, I use some styrene cut as close to size as possible then I use the glue to fill the rest.
Such as here:
Then your ready to roll:
I use regular superglue and baking soda. Fill the gap with baking soda. Brush the excess baking soda away with your finger tip. Place a drop of superglue on the baking soda. The soda will wick up the superglue. Continue until the length of the gap is covered.
Dries immediately and is sandable.
[:)]