What is the best way to represent small bolts or rivets on small surfaces?
I was trying to afix some very small bits of styrene to a wheel hub, to represent bolts (it was a wheel destined to be mounted on the vehicle body, not the axle, so the bolts are there to hold the thing in place). In my hamfisted approach, I couldn’t get the little Bas***ds to sit where I had the glue applied. I tryed CA and then a small (very small) dab of tube glue. Nada. Darn things would either bounce off the glue or slide once it was on.
So, I tried method #2, I thought I could use a dab of CA to represent bolt heads. I must have either been using CA which dries too slowly, or I mucked up the surface enough with the previous attempts so that my CA “blobs” bled into a little flat pool.
So, what is a fella to do, if he wants to do something small like bolt heads on a tire or small box?
What works well for me is to use CA glue with accelerator.
Put a tiny bit of CA glue where you want the part to sit. Once you have it in place put a small drop of Superglue with a dropper onto the rivet or bolthead. That thing will never move again.
I use plasitic hex rod or round stock and cut small slices for the bolt heads. I use liquid model glue to adhere them. Wet the area with glue first, then pick up the bolt with the tip if an xacto knife or tweezers and place it onto the piece. I usaully wait a few seconds then hit it with some more liquid glue to make sure it is held in place.
Ahhh, Grasshopper. It indeed pleases me to see you begin your lifelong journey into the counting of… rivets! After you get me some tea, sit at my feet and I will instruct you further!
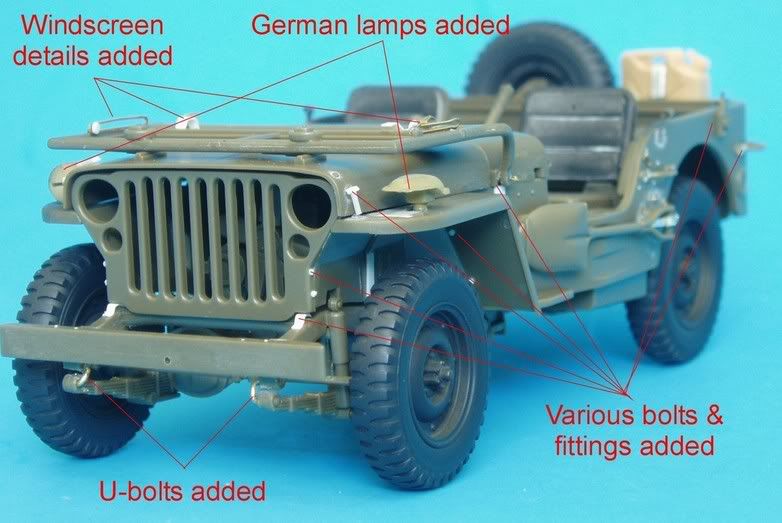
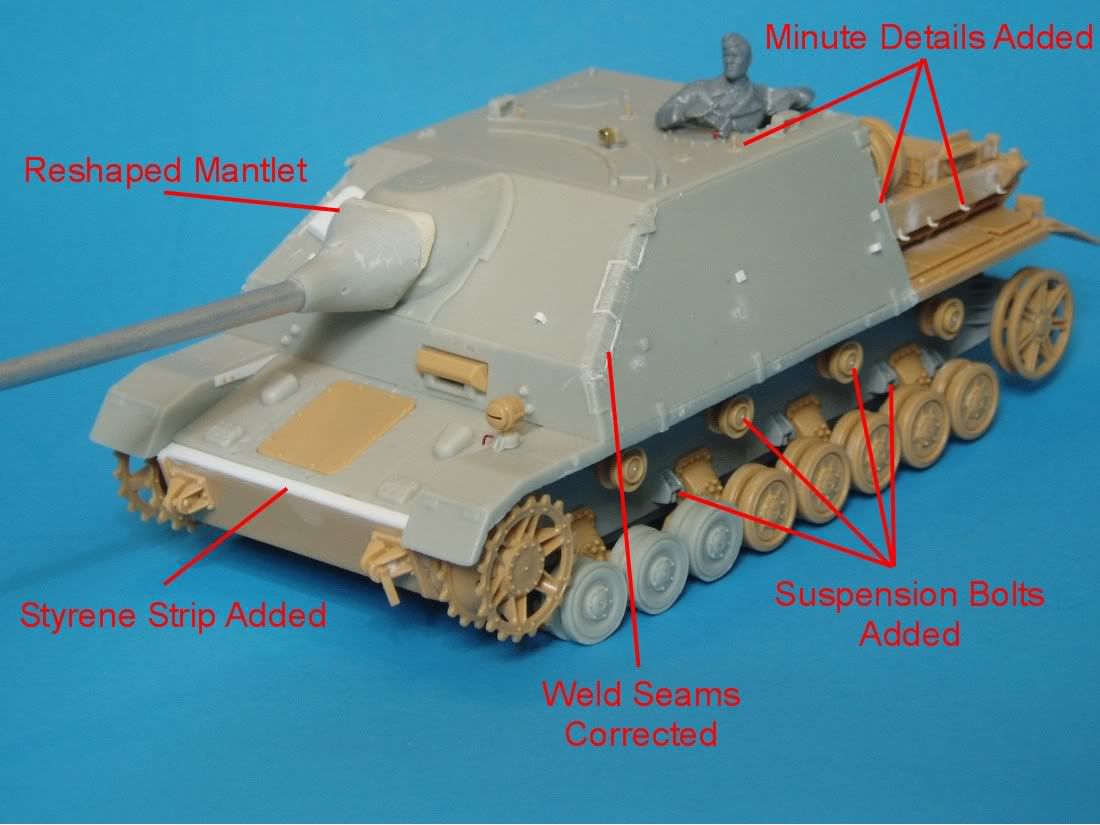
All kidding aside, I frequently add rivets or bolts. Here were some on some very small scales, a Willys MB Jeep and a 1/48 Jagdpanzer IVL70A (note the bolts on the return roller hubs)
Here’s what I do. I bought a bottle of Tamiya thin liquid cement. The benefit of this product is that it comes with an excellent fine tipped brush applicator. I used up the glue many years ago and I just refill it with other cheaper liquid cement. I’ll add a teeny-tiny dab of glue (maybe .3mm diameter). Then I’ll take get the styrene bolt by touching my tongue with the tip of a new #11 Exacto blade. I touch this to the bolt to pick it up. Then I carefully place it in the center of the hub. If the glue is giving you fits, try some future floor polish. Once you paint the thing, the tiny bolt doesn’t require a lot to keep it in place.
If you’re dealing in the future having to apply bolts/rivets to resin or PE, just use a sewing needle to apply medium viscosity CA (instead of the liquid cement).
HTH
Method #2 is too uneven in appearance. I wouldn’t go that route.
I cut bolts from a styrene rod, impale 'em on the tip of a #11 Exacto blade and dip them into a blob of thin superglue–they stick right where I put 'em no problem and don’t move.
Grandt Line has made bolts and rivets of varying sizes and characteristics (e.g., with or without washers, etc.) for years. They are primarily intended for model railroaders, but work superbly on 1/35 armor. And they attach with liquid cement.
Modelkasten used to (still do?) make a line of bolts, wing nuts, etc. You might check them out as well. Being plastic, they also attach with liquid cement.
I agree with the hex rod / tube method. The only thing that I do differently is that instead of picking it up with an exacto knife, I use the toothpick that I just applied the CA glue with… the rivet adheres really well to the trace amount of CA on the tip (I lose about 50% when I pick up with exactoor tweezers [“Shakes” the Modeller!]), but not enough to keep it from sticking permanently to the larger drop on the model. I can put it precisely where I want it without it flinging off of the knife or out from the tweezers. When I got a decent line up of bolts / rivets (still changable if one is out of line), I go lightly over them with Tenax-75 plastic welder and a 000 paint brush- not too much, don’t want to melt the detail. Let it dry over night, then I sand very lightly with fine sanding stick to achieve (hopefully) a uniformity.
For years I used an idea that origionated with Shep Paine - He shaved the bolt heads off of Monograms 1/32 M3 halftrack and applied them to the model he was building - of course the kit was readily available anywhere at the time and only cost about 3 bucks, I’ve still got pieces of a couple of them in my parts stash.
And as Gip has noted, the Grandt Line of nuts and bolts work great (and definately look much better than anything I’ve been able to scratch build). One thing I like about them is the fact you can drill a small hole (#77 bit) and insert the stem of the bolt into that - so things go exactly where you want them. Check out the model RR section of your LHS for them