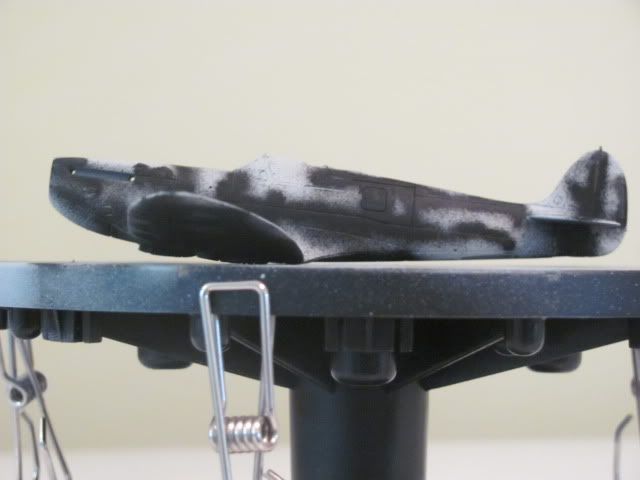
As this is really my first model since I was a kid and I’m also learning how to AB while I’m at it, your comments would be appreciated on my first pre-shading job. I know it’s not good but at least I tried. I’ve been intimidated by the idea of air-brushing enough to keep away from building but I’m determined to start.
I’ve been following others’ work on here and on Facebook (Doogs’ Models) and am inspired.
I did this with Tamiya paints, thinned about 3/1 paint/thinner (Tamiya X-20A). I use an Aztek A420 dual-action and this was around 8-10 psi. I think maybe I was too close to the model for a lot of it as the pressure seemed high. A lot of it is a lack of practice.
Try thinning your paint a little more. The amount of spatter is indicative of the paint not being thin enough (in combination with your air pressure at 8-10 PSI).
If you’re using X-20A, then try two parts of that to one part paint and use a lighter touch on the trigger.
Great to see you’ve had a go - don’t be scared of airbrushing, it just take some practice.
I find pre-shading quite difficult too - it’s nearly impossible for me to get any form of straight lines by hand.
Phil_H has provided some great tips, but i’m might add a few suggestions too.
I generally find thinning Tamiya 1:1 paint to thinner works best for me (though i use a gravity fed a/b). At that ratio, i normally have pressure around 10 psi and work close to the model.
I definitely think you need to thin the paint a lot more, close up the nozzle a bit and be sure to keep the a/b moving (ie, don’t stop then release the trigger, keep it moving as you release).
In any event, you’re on you’re way! Hope you post some pics of the completed build.
While it is on the heavy side, you have to start somewhere. An idea, which may seem wasteful, go pick up a few of the cheaper revell kits and build just the airplane itself, to give yourself practice mules. Save all the interior bits, undercarriage and all into a spares box.
The beauty of these paint mules is that you can practice all you want and just strip the paint off after a while. I’ve got a couple of revell P-40’s for this. Money well spent.
I will definitely think the paint a bit more (50/50 maybe). I think too that I have to back the AB back a bit. I was so worried about getting the paint in the right place I think I was too close (1-2 inches).
I was thinking about buying another cheapo airfix plane to do as another practice plane. Maybe something larger would be good as B-17 Guy suggested.
I’m glad I am doing it, it’s just intimidating.
I was using Vallejo paints but I tried with the Tamiya Flat Black I had on hand as I’ve been reading a lot of good things about the Tamiyas for ABing. I was happy with the way the paint sprayed (despite my shortcomings) and the job it did on the prop. I think I may use Tamiya for the AB and Vallejo for brush painting.
I don’t think that 1-2 inches is too close. Remember that it’s the distance from the subject to your airbrush which generally dictates how wide your lines are. I often work inside 2 inches without any problems. Also remember that the lower your air pressure is, generally speaking, you will need to thin the paint more for it to atomise cleanly without spattering.
Giffin: just remember that Vallejo produce a line of paints specifically for a/b - they’re already thinned in the bottle.
I’ve heard that the brush painting Vallejo line can be a pain to thin down, so if you still have a collection of these, you may need to take extra care in thinning, or simply reserve them for brush painting.
Not a bad start! I don’t share it around much, but in my past modeling life, I didn’t really get that thinner was for “thinning” paint. Wouldn’t spray through the airbrush? Kept clogging up the works? MORE PRESSURE! Yeah.
These days, complete 180. I’ve come to appreciate that thinner is better and that a light touch is absolutely crucial when airbrushing, especially any kind of shading (though post-shading still scares the pants offa me).
With that in mind, a few things to consider:
Thin your paint more. 3:1 paint to thinner isn’t going to get you very far. For pre-shading you want at least 1:1, but if you’re going after fine lines to follow the panels, 2:1 or even further is probably the better bet.
Try Tamiya’s lacquer thinner. Even if you’re totally against it, it’s not going to kill you if you’re spraying tiny lines at low pressure. I’ve found it gives me a significantly improved degree of control and much prefer the way the paint performs with it versus X-20A, especially for fine work like this.
1-2" is way too far for line-trace work. When I do mine, I get in so close I’m worried the needled might scrape the surface (one thing I love about the H&S Infinity is the ring guard thing that prevents that). Light touch on the tigger, too. I’m often balancing that tripping point between no paint/paint flow.
Someone mentioned motion. Always. A still airbrush is a pooling or spidering waiting to happen. Keep moving. In the case of panel lines, I go back and forth, up and down, sometimes run panels like Pac-Man. If your paint’s thinned enough, a slip-up isn’t going to kill you, since you’ll be at maybe 50% opacity, and need more than one pass to really darken the line.
Vallejo. Model Color can be made to airbrush extremely well with Future, Testors Acrylic Thinner, or Windex. I’ve never been able to get it or Model Air to do the ultra-thin lines Tamiya pulls off with ease, however.
The real key to preshading is what you do on top of it. I know modelers who “pre-shade” by painting the entire thing black. Heck, I do it with armor. And I’ve been experimenting with different streaking shading and such, busting out different colors to add depth and nuance. Saw over on Flory Models I think some brilliant pre-shading work on a sprayed hinomaru that involved white, yellow, orange and pink. Thin enough red on top, and those things peek through.
Thanks for all the comments! Doogs, it’s your models I am trying to emulate with my pre-shading. I follow your FB account.
I use a 2-gal. compressor but I think I may want a hobby one as the regulator on my compressor is pretty vague (ie. 4 marks between 10-30 psi.) and it goes up to 125 psi. I have a hard time down-regulating it to 8-10 psi.
Easy way around that - use a second regulator at the bench. In my old setup, I had a 15-gallon shop compressor at the other end of the garage. Ran an air line to the bench and into a TCP Global regulator. Much finer control…though honestly these days beyond ramping up the “throttle” when I’m flushing the brushes clean, I usually make any airflow adjustments on the G-MAC on the end of the hose.
Hey Doogs. Thanks for your write up. I’ve been postshading or using plain old Flory. Preshade, and flory would be a nice switch. Also, it’ll be good practice for free handing better camo Luftwaffe camo schemes. (I’ve been using the “cut-out”, handi-tac method.)
Try practicing making thin lines on a paper towel or styrene sheet, before painting the pre-shade lines on the model. Whenever I’m painting, if I have some paint left in the cup, I’ll pull out a paper towel and practice painting lines. As was mentioned, you can get as close as almost touching to make very thin lines. Practice on the paper and you’ll see how easy it is.