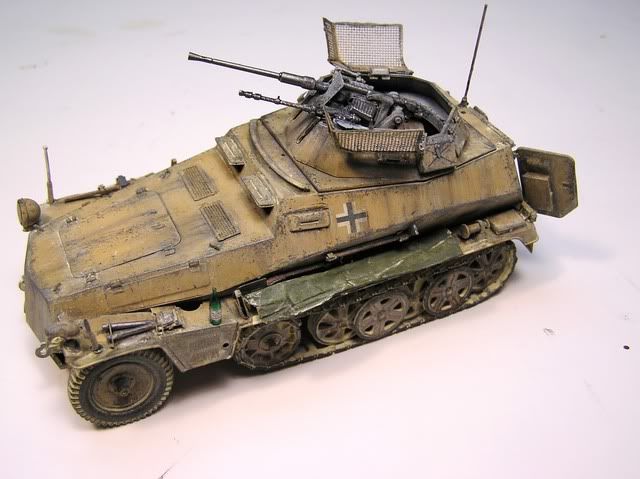
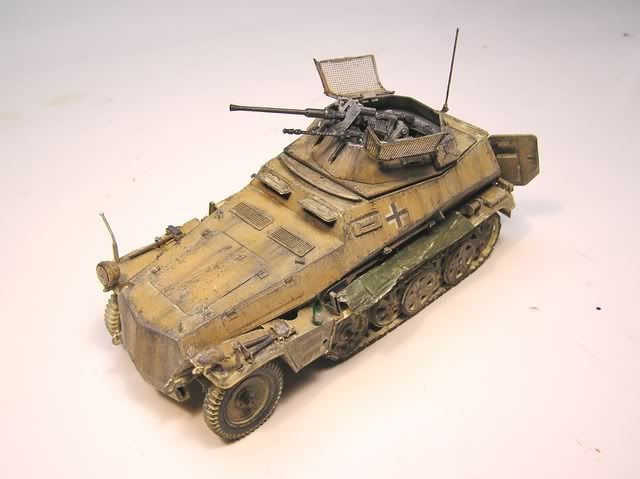
Finally finished this little guy. I used Eduard PE, and a metal barrel stolen from my Tamiya 222. I left the top hatch and gun unglued, for easier viewing of the interior. I didn’t mask the interior very well though, and ended up getting lots of yellow inside, plus I smeared a lot of the interior paint, but it doesn’t look too bad until you examine closely. Other than that, all I added was an antenna, the dark green tarp, and the wine bottle on the front left fender.
Awesome fella. Weathered to a tee. I had the same barrel and gun assembly on my Sdkfz 222. Very nice piece of kit. What did you use for weathering this beast?
WOW, Ian…absolutley SMOKIN! Looks tremendous! Great finish–you’re definitley on a tear with some awesome builds lately! This is a Tamiya kit? A new release? Wasn’t this a re-release of an old kit?
Doog–It is neither a re-release or a new kit as far as I am aware. Without the metal barrel from my 222 and the Eduard PE, it looks pretty rough IMO, especially the grenade screens, which Tamiya tries to replicate with some kind of nylon mesh.
Luftwoller-For weathering, I try for the most part to use the same techniques Biffa and The Doog do, but in a bit of a different order. I stick more or less to these steps, and use GW acrylics:
Sloppy airbrushing of brown, both as primer, and to make later coats seem more grungy sort of.
Basecoat
Lightened version of basecoat, focusing on centers of panels and stuff, to replicate fading.
Coat of Future
Decals
Coat of future
Winton Artist Oil color “dot method”
Chipping with a corner of a sponge
Black wash
Faded yellowish/pale dunkelgelb wash for further fading and blending
Pigments
*I’ve starting using only a very lgiht coat of future over the decals now. Other than that, I find it doesn’t really do much other than make it exremely shiny.
Very nice, I remember the conversation about the wine bottle, It looks like your bottle is nicely done. What did you use as your wine bottle technique?
Thanks Espins and ps1sw. The wine bottle is clear styrene and came with my Tamiya Churchill. I mixed green food coloring with future, and painted on a bunch of coats. The kit even provided little label decals.
It’s neat to see the progression you’ve been making in your builds recently and you’ve branched out again with this one, keep it up! [tup]. A couple of suggestions to throw out there as opinions/observations for what they’re worth and given in the spirit of constructive consideration. The first concerns the tarp, while it’s nicely done it seems out of place on the fender since it’s not tied down or secured to anything, the question arises in my mind as to why it’s there? Also, the rear blackout light lower plate appears to be skewed at a wierd angle in the 4th pic down…this was a hinged plate that flipped up over the 4 squares to display the regular lights or stayed down to display the 4 square blackout lights and shouldn’t be at the angle yours is. Not to seem nit-picky, but is the coax MG34 barrel drilled out? It’s hard to tell from the pics and if it is, my apologies, if it’s not may I suggest getting a pin vise and various small diameter drill bits (easily obtained from several online shops), they do wonders for adding this little bit of detail to older kits with solid muzzles on the MGs.
You’ve nailed the wine bottle, very impressive, and the weathering and color tone variation on the dark yellow are also very well done. [tup]
Thanks! To Wbill, thanks for the advice. For the tarp I agree it looks weird. Tamiya had a molded on piece of stowage that looked like a chewn up-piece of gum. So I cut it off, but of course underneath was hollow so I had a giant hole in my fender. I tried to fill it, but to no avail. In the end I just threw a tarp over it and called it good. I can’t give you an answer about the black out light though…my photobucket’s being weird and won’t let me see any pictures.
Well put, Bill. It makes you respect those car and aircraft modelers who don’t have the option of covering mistakes with ample amounts of stowage, grime n’ chipping.