Finished: 1/48 Tamiya P-47D Razorback

Well I have been away from this for way too long (moving, then other stuff), but I’ve managed to get some work in here and there, so I now have something to show (finally).

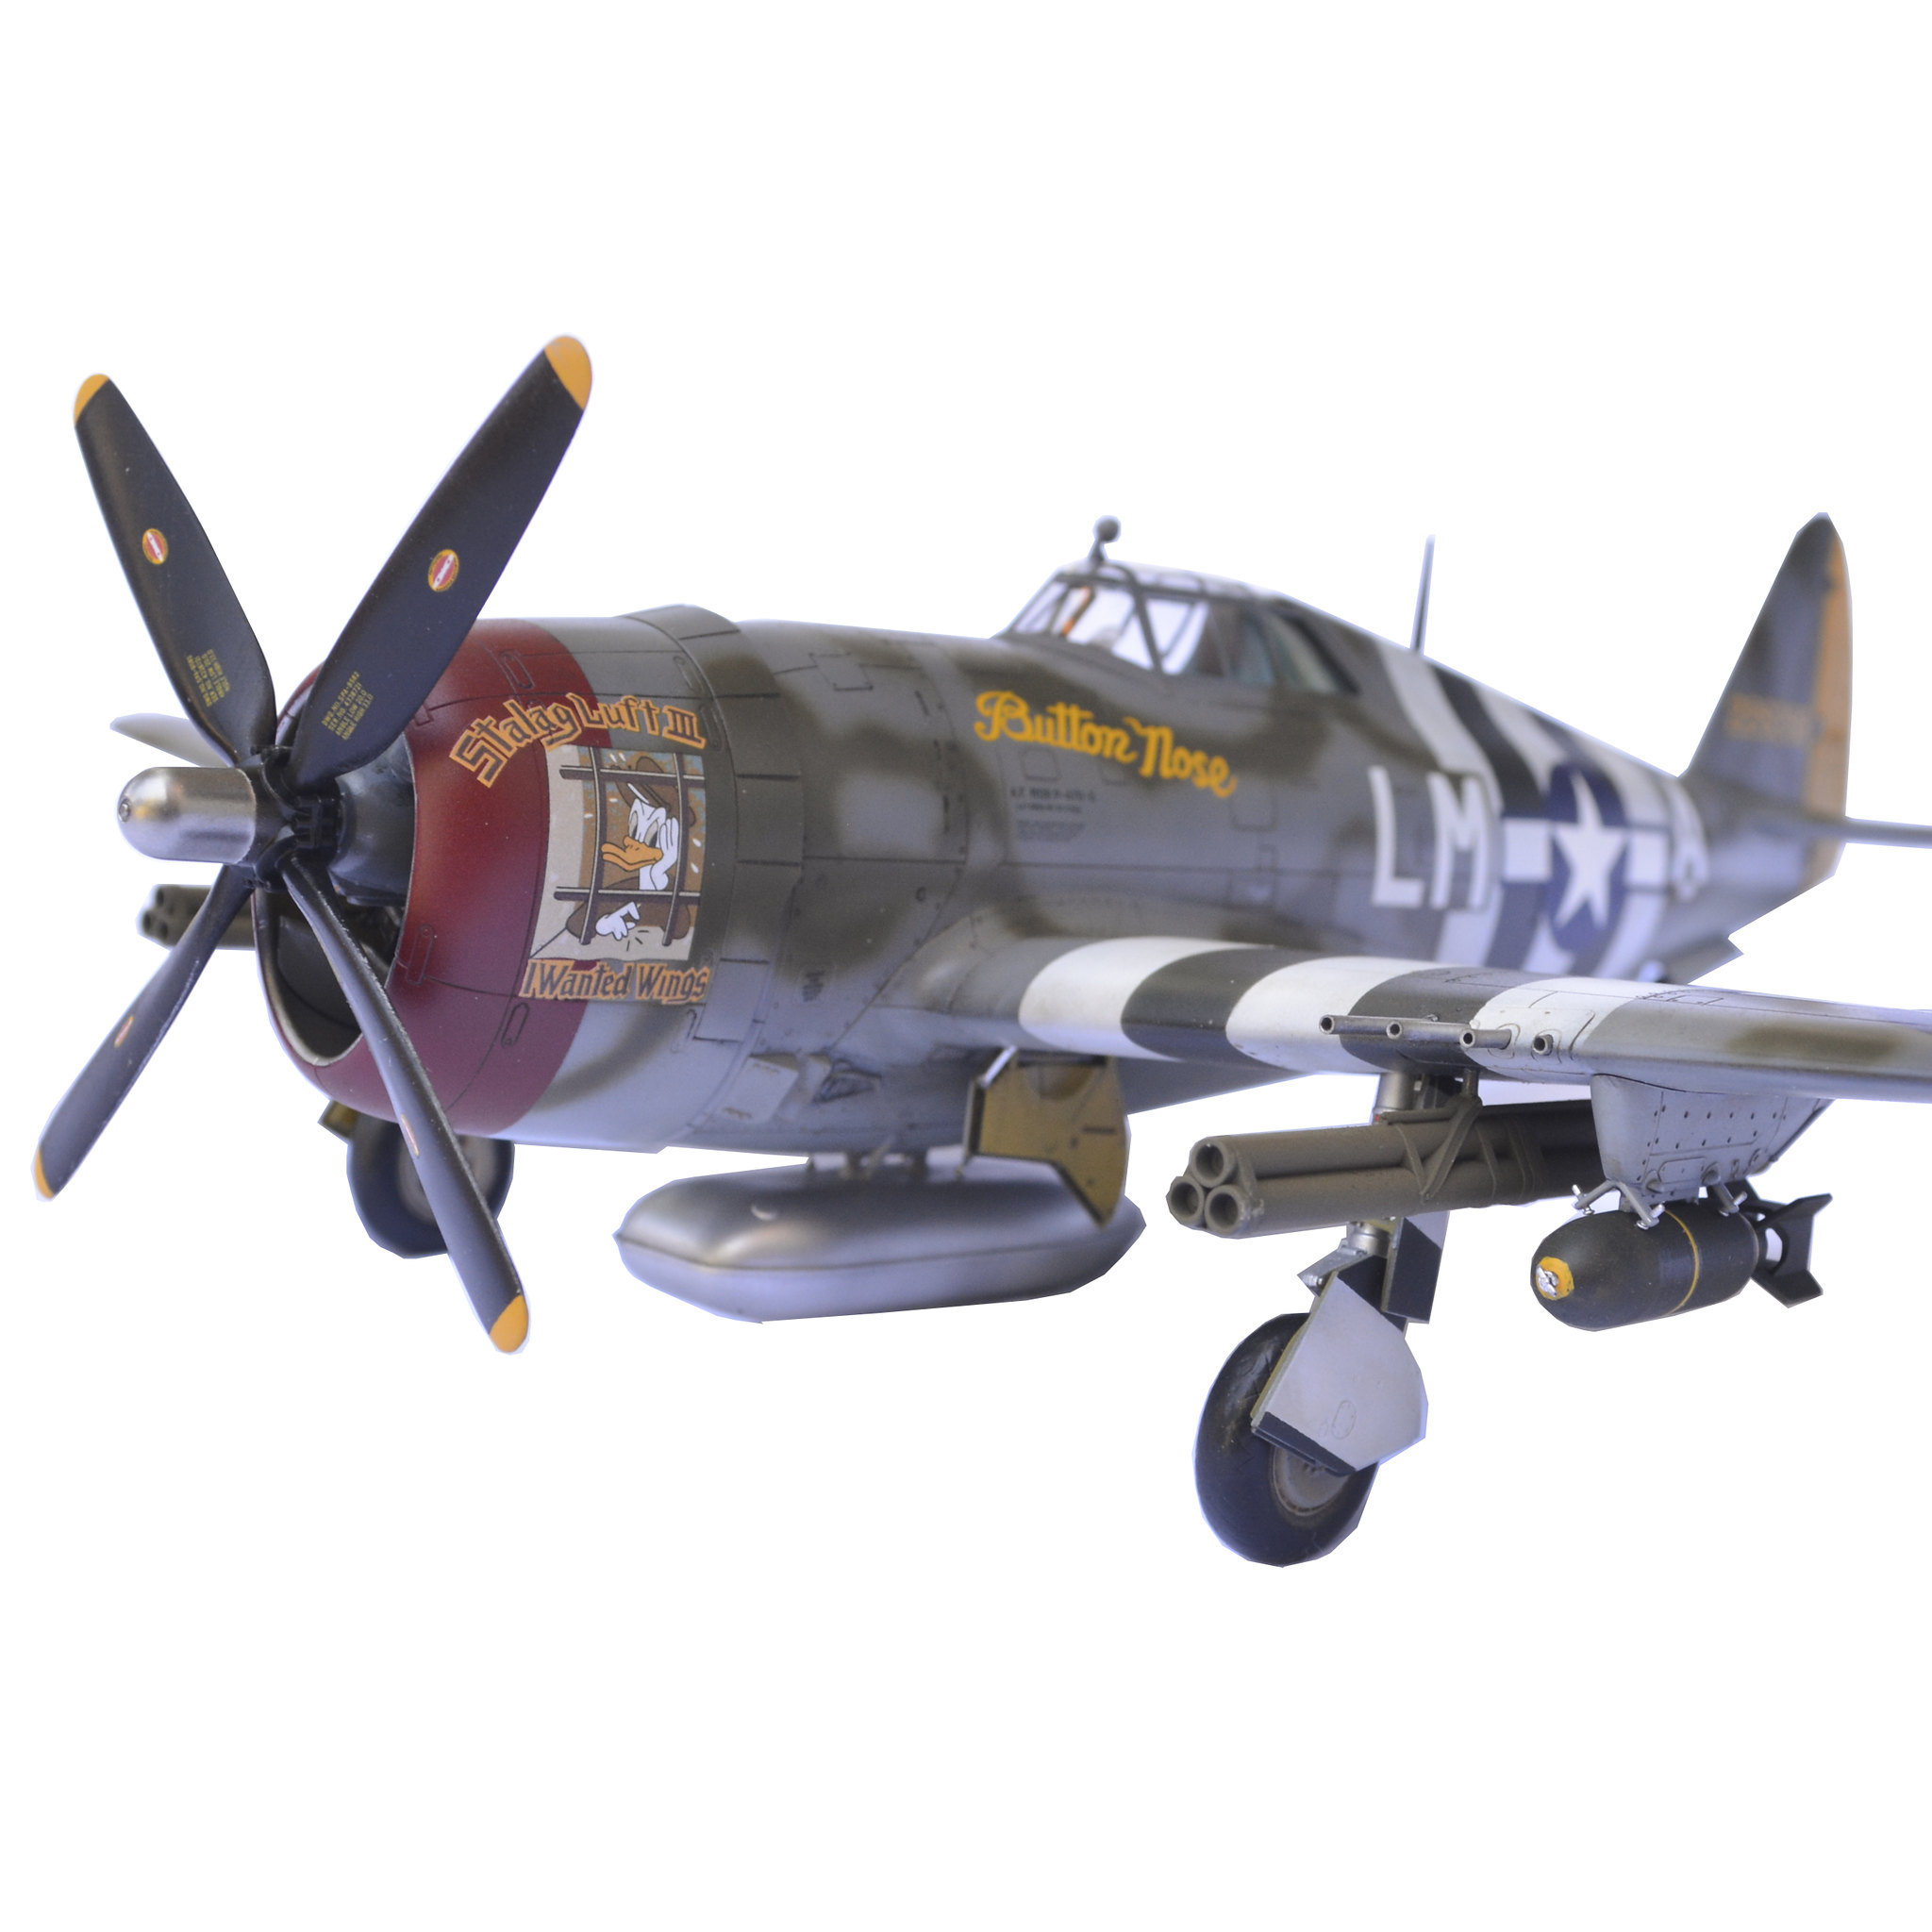
My kit is the 1/48 Tamiya Razorback, and I believe I posted pics of the cockpit before somewhere - maybe in the Thuderbolt Group Build (if not - too late. Dropped my phone in the river and it did not survive).

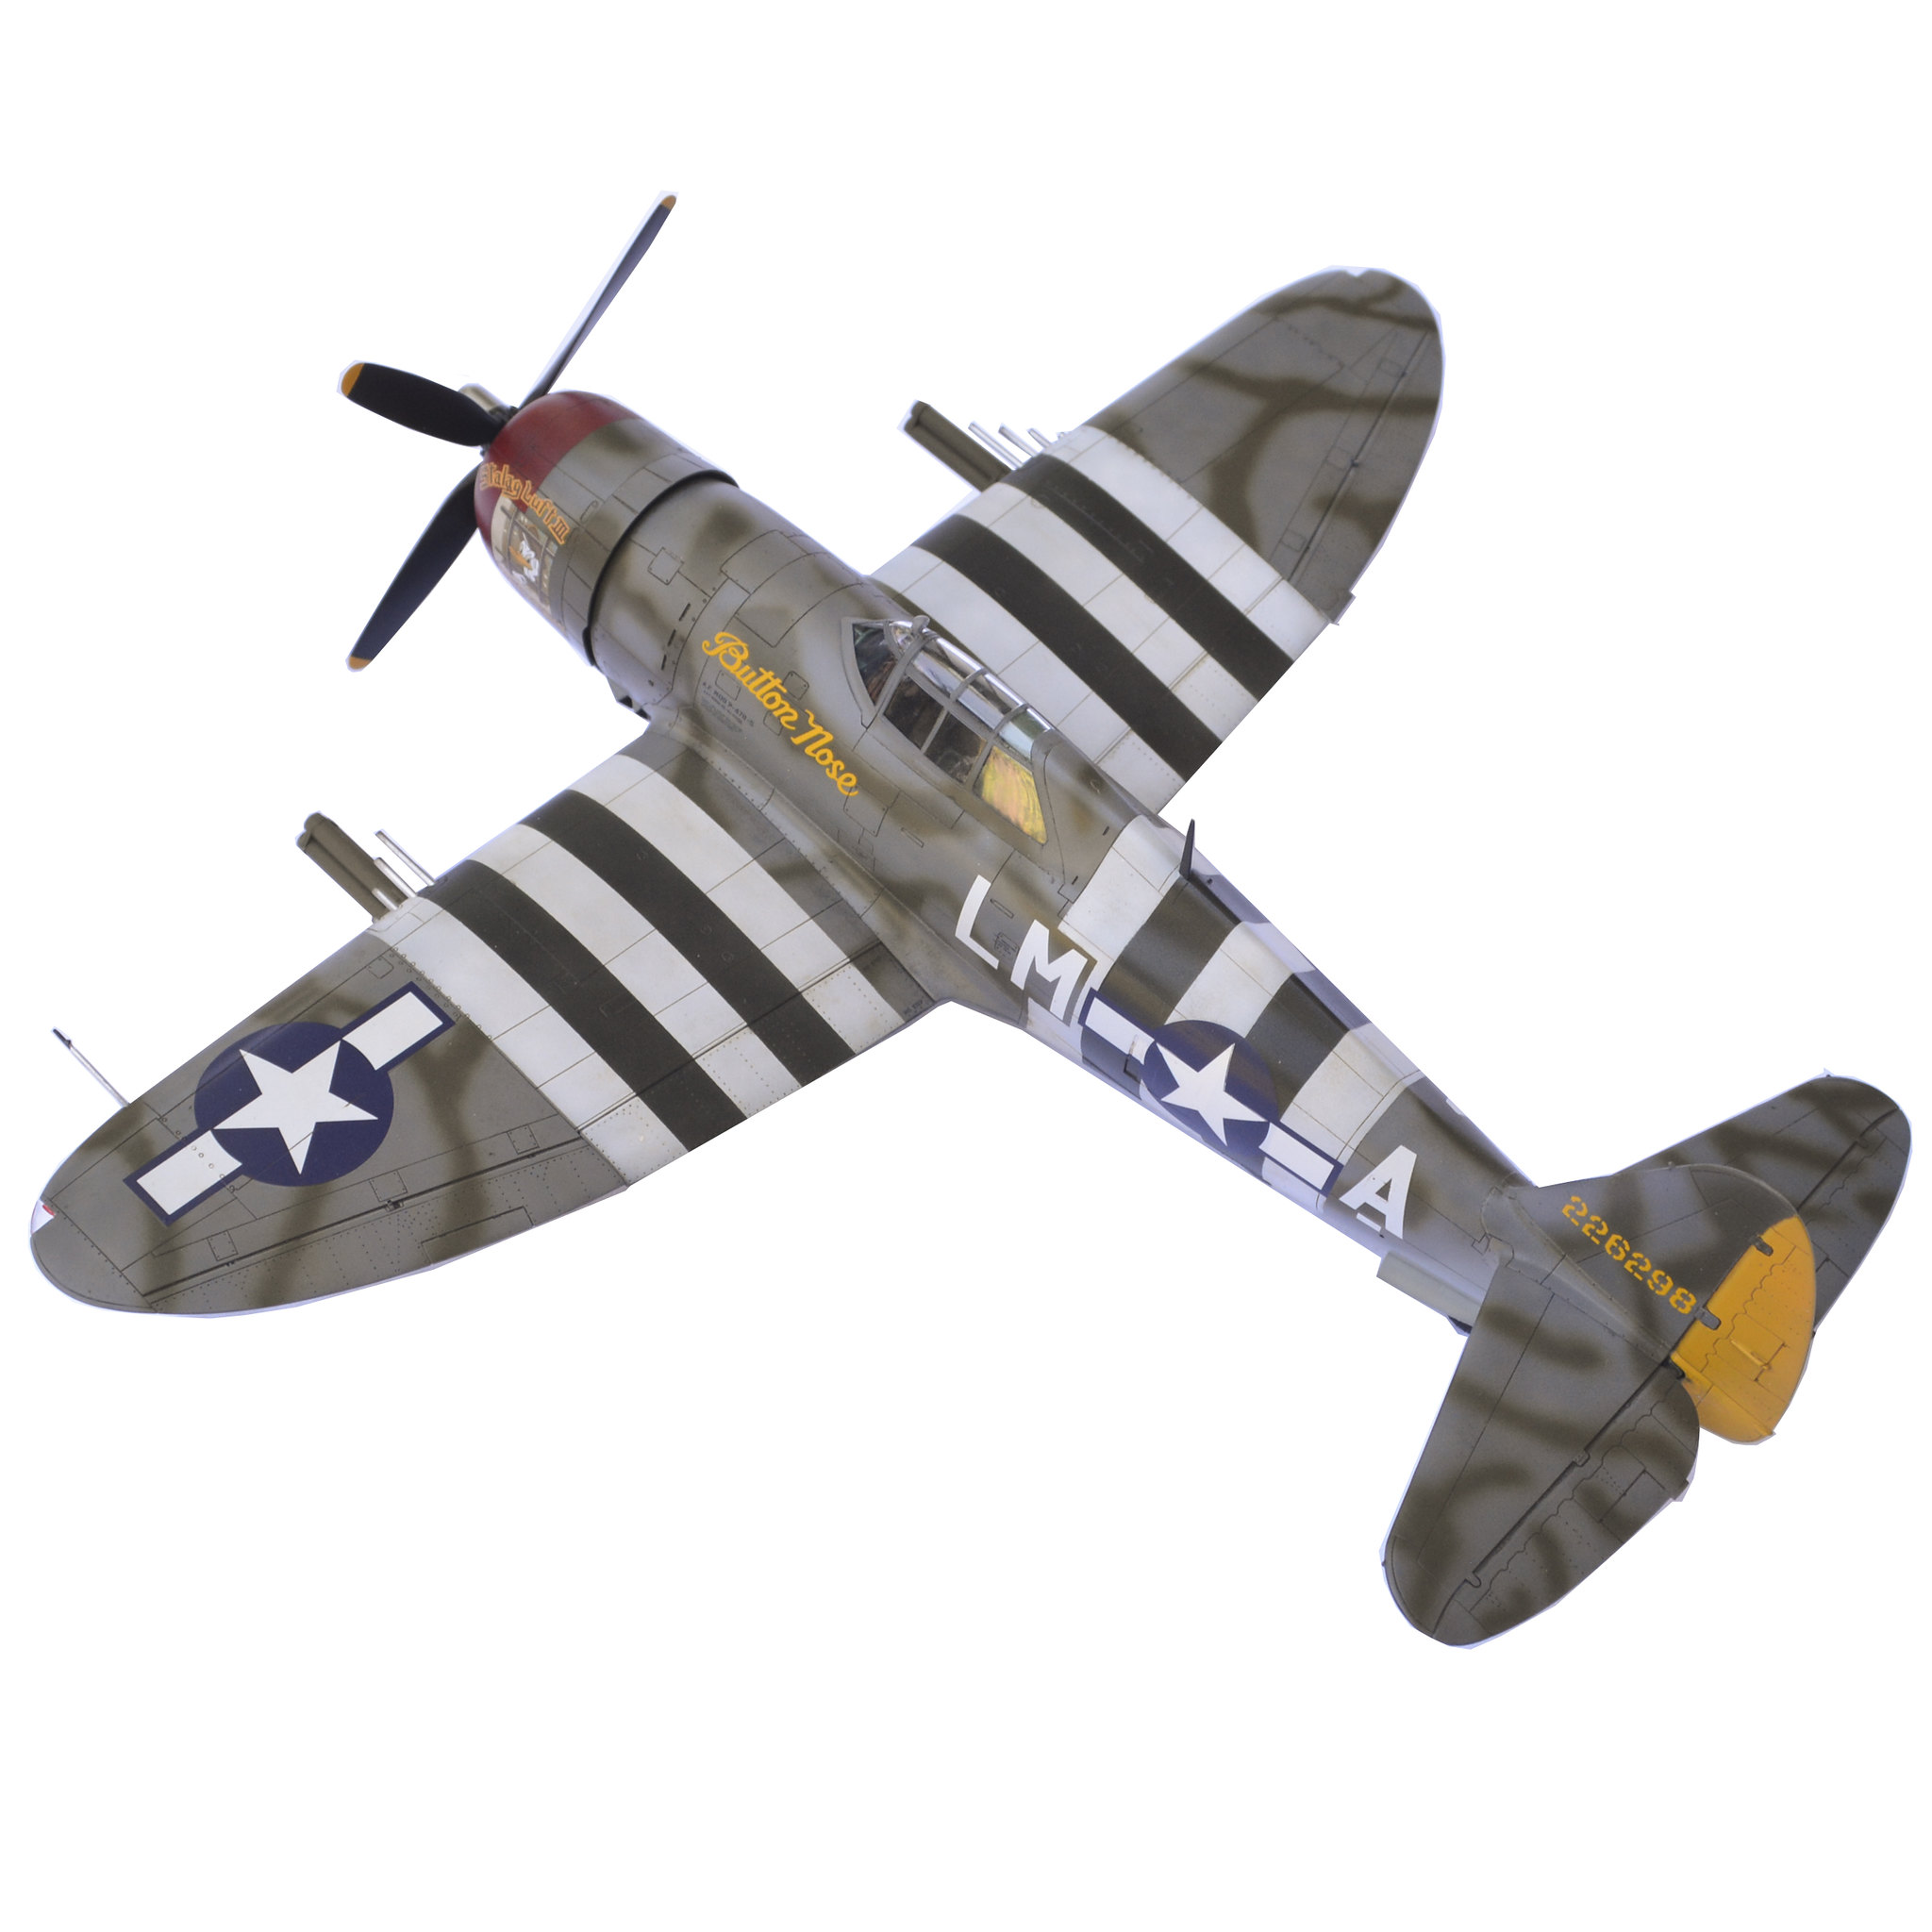
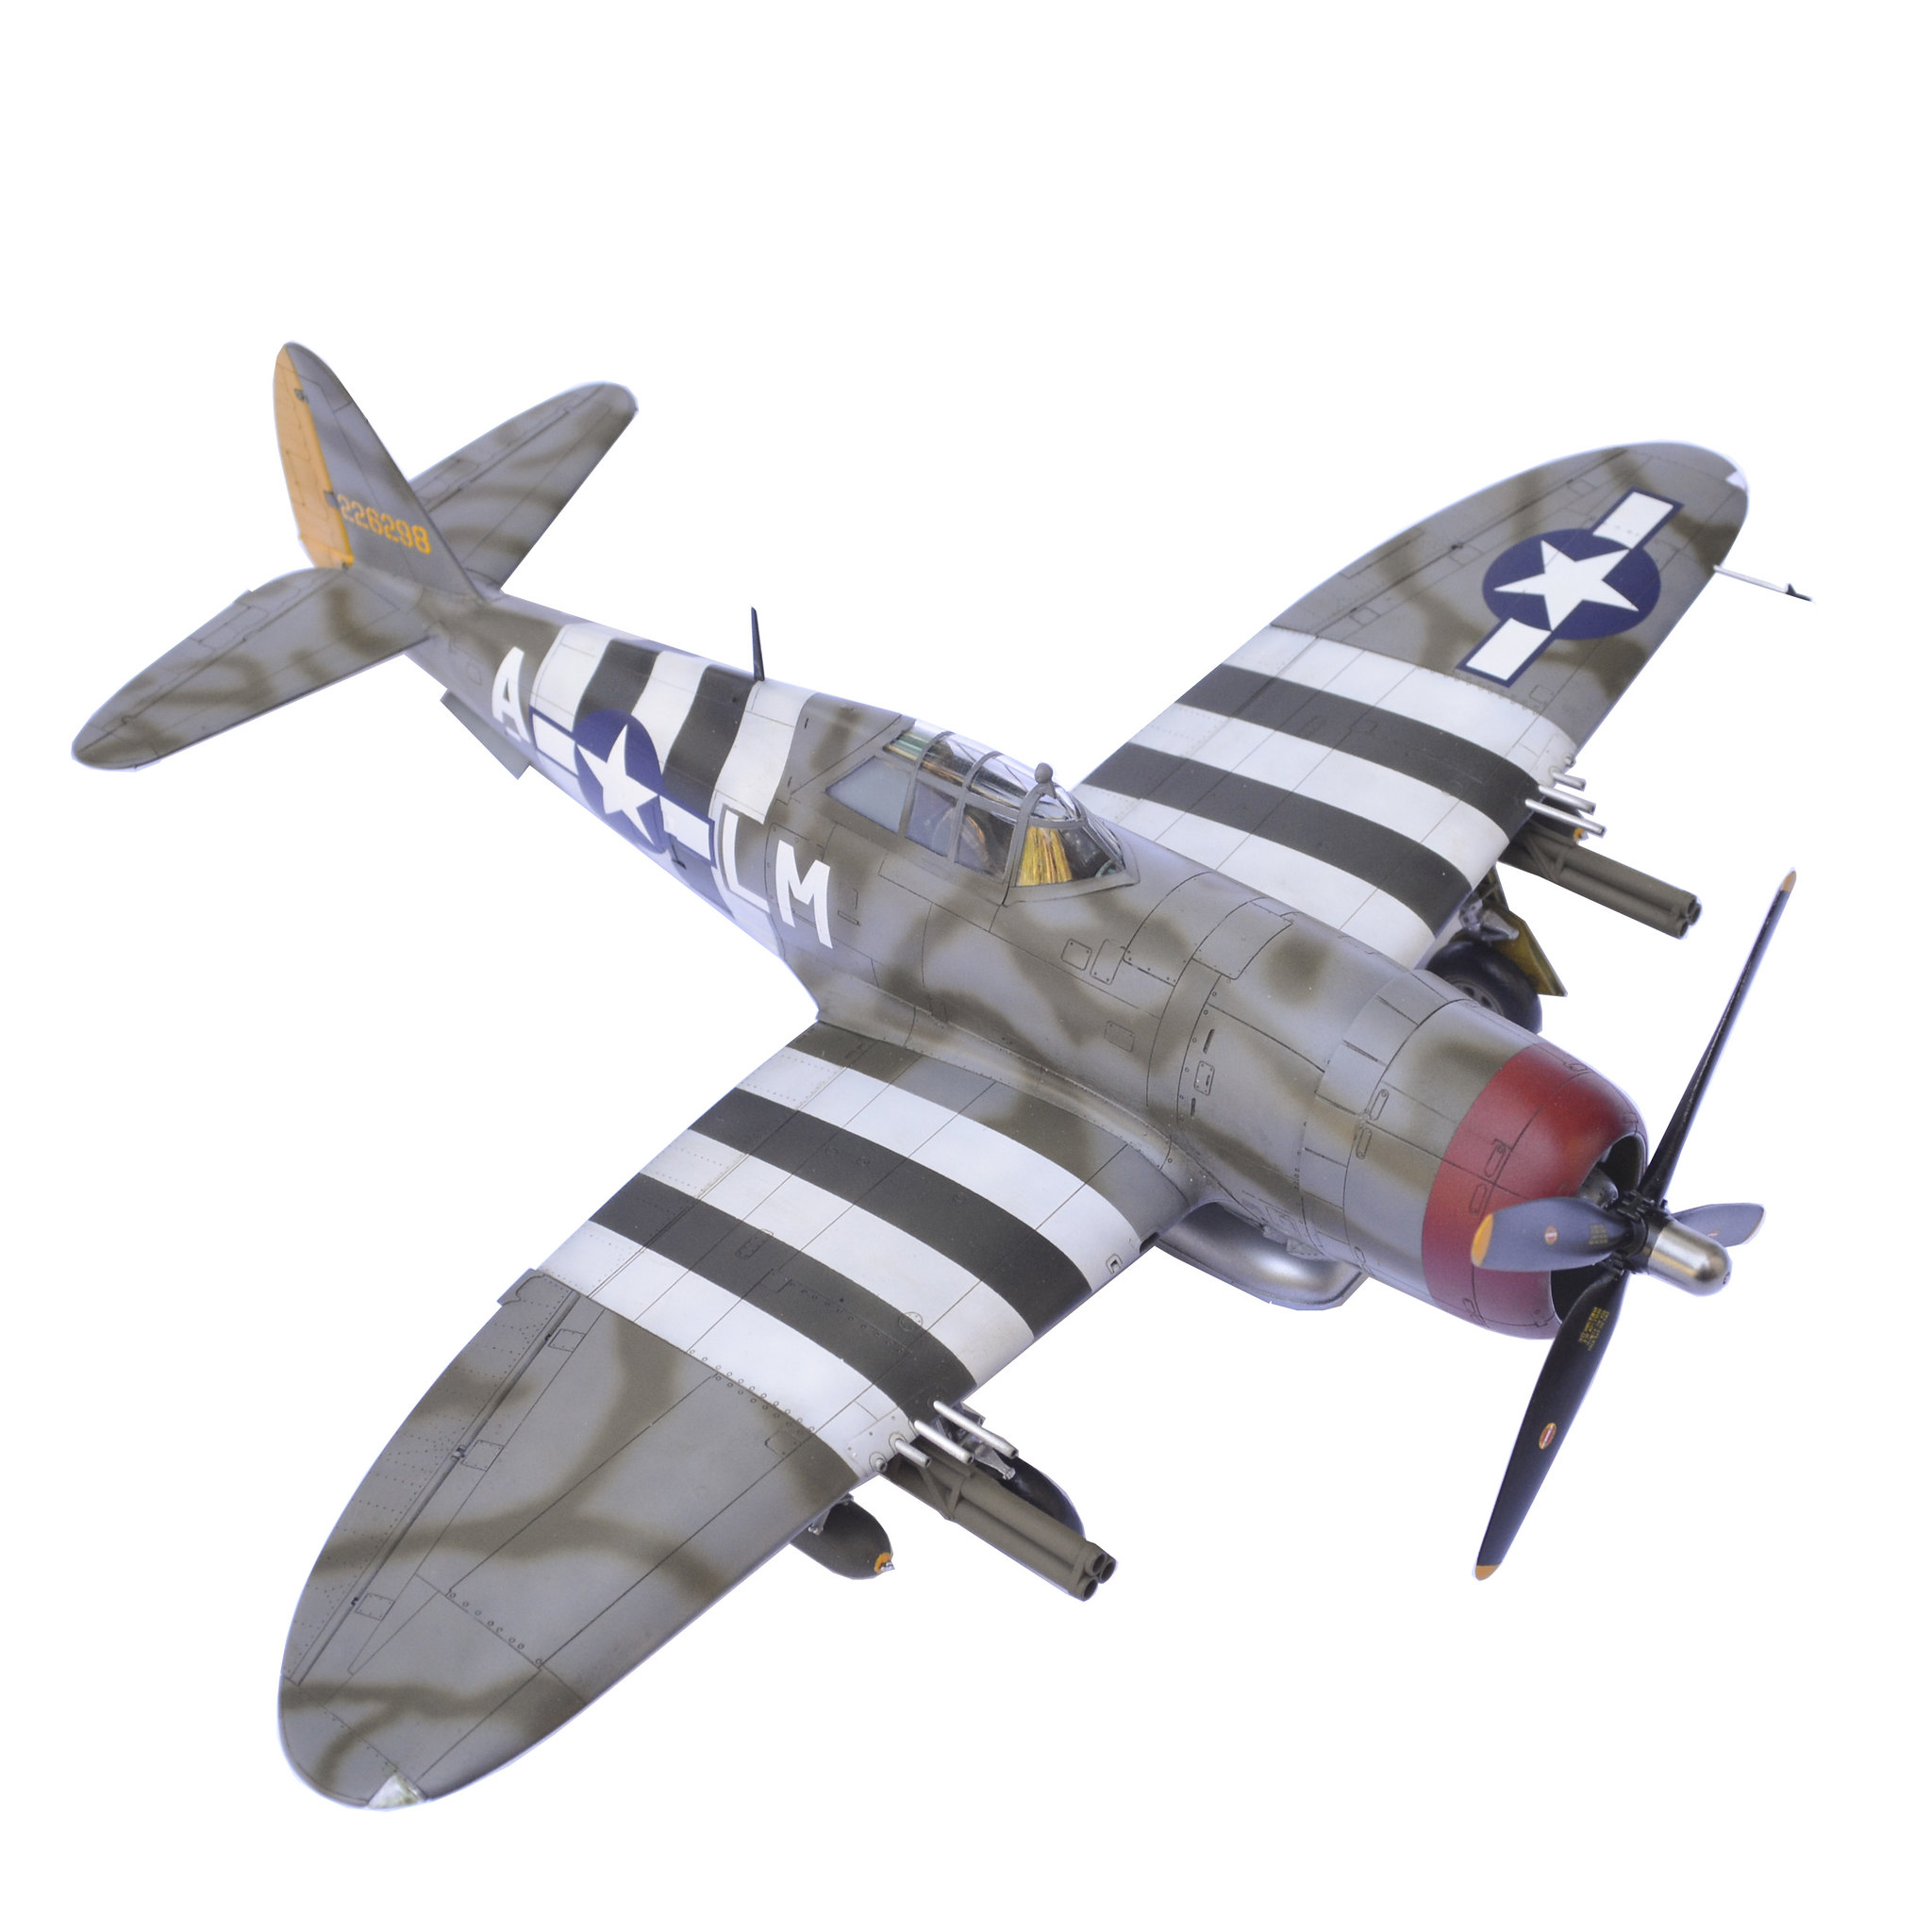
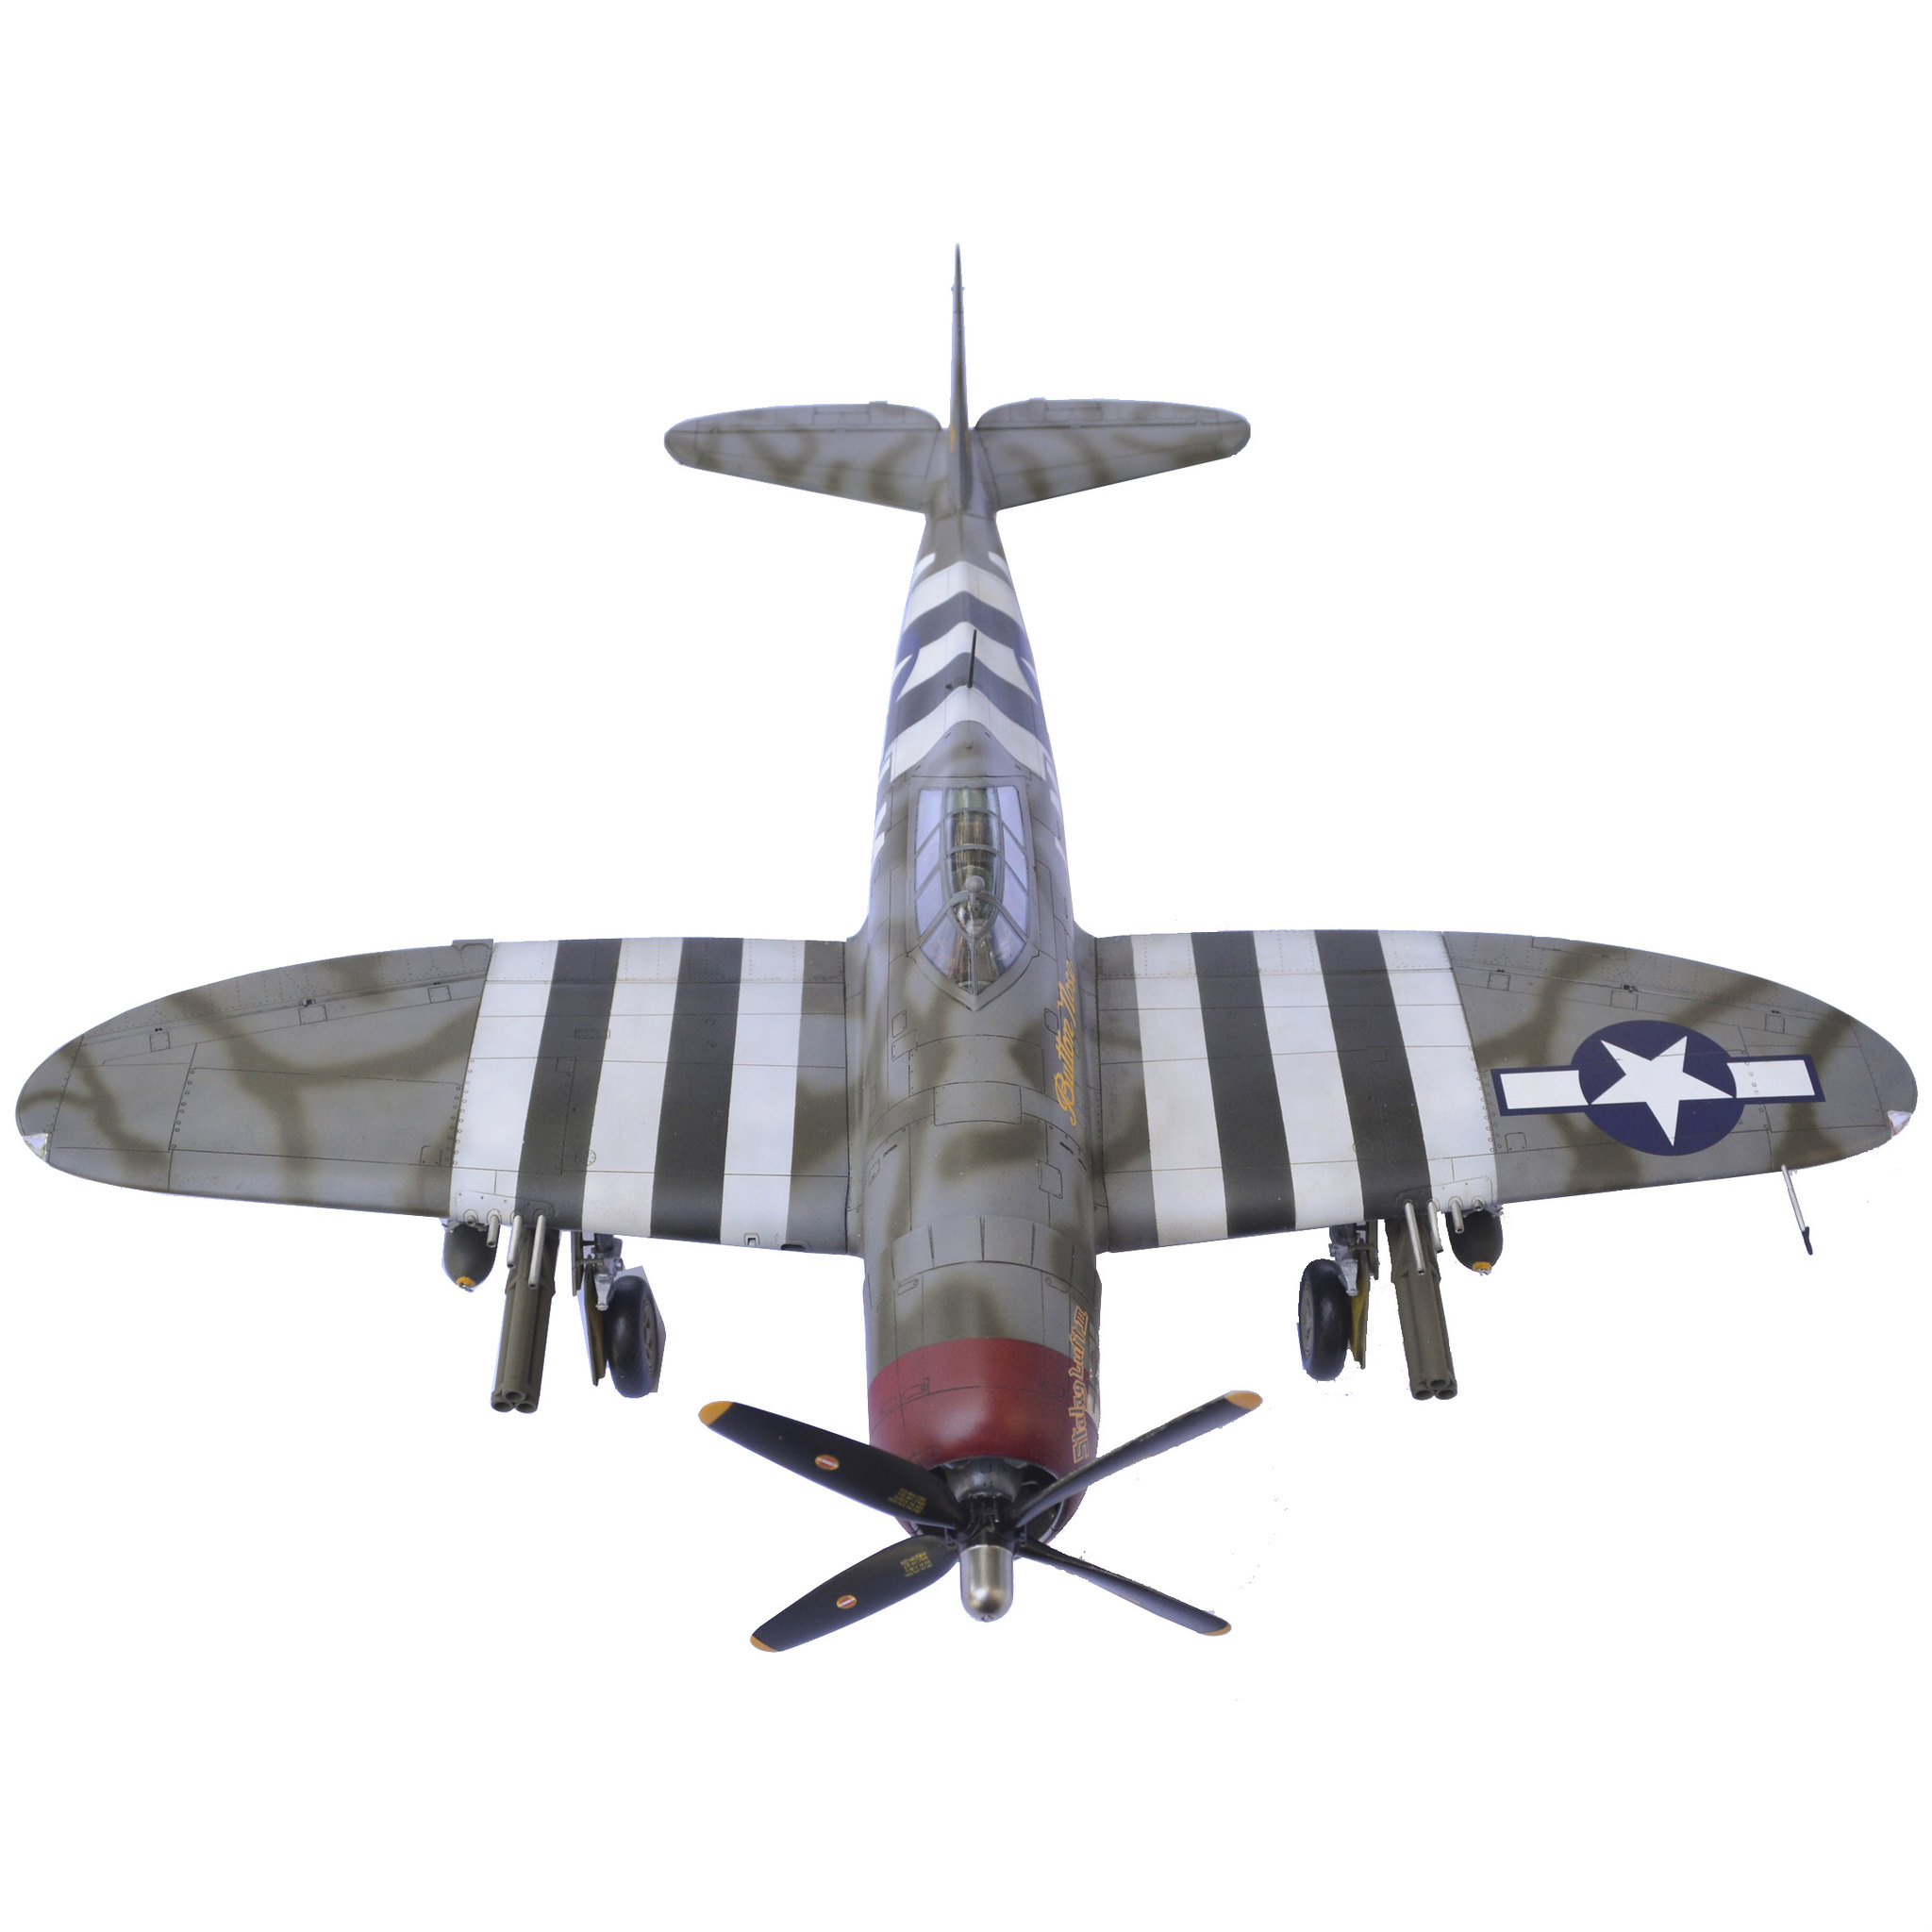
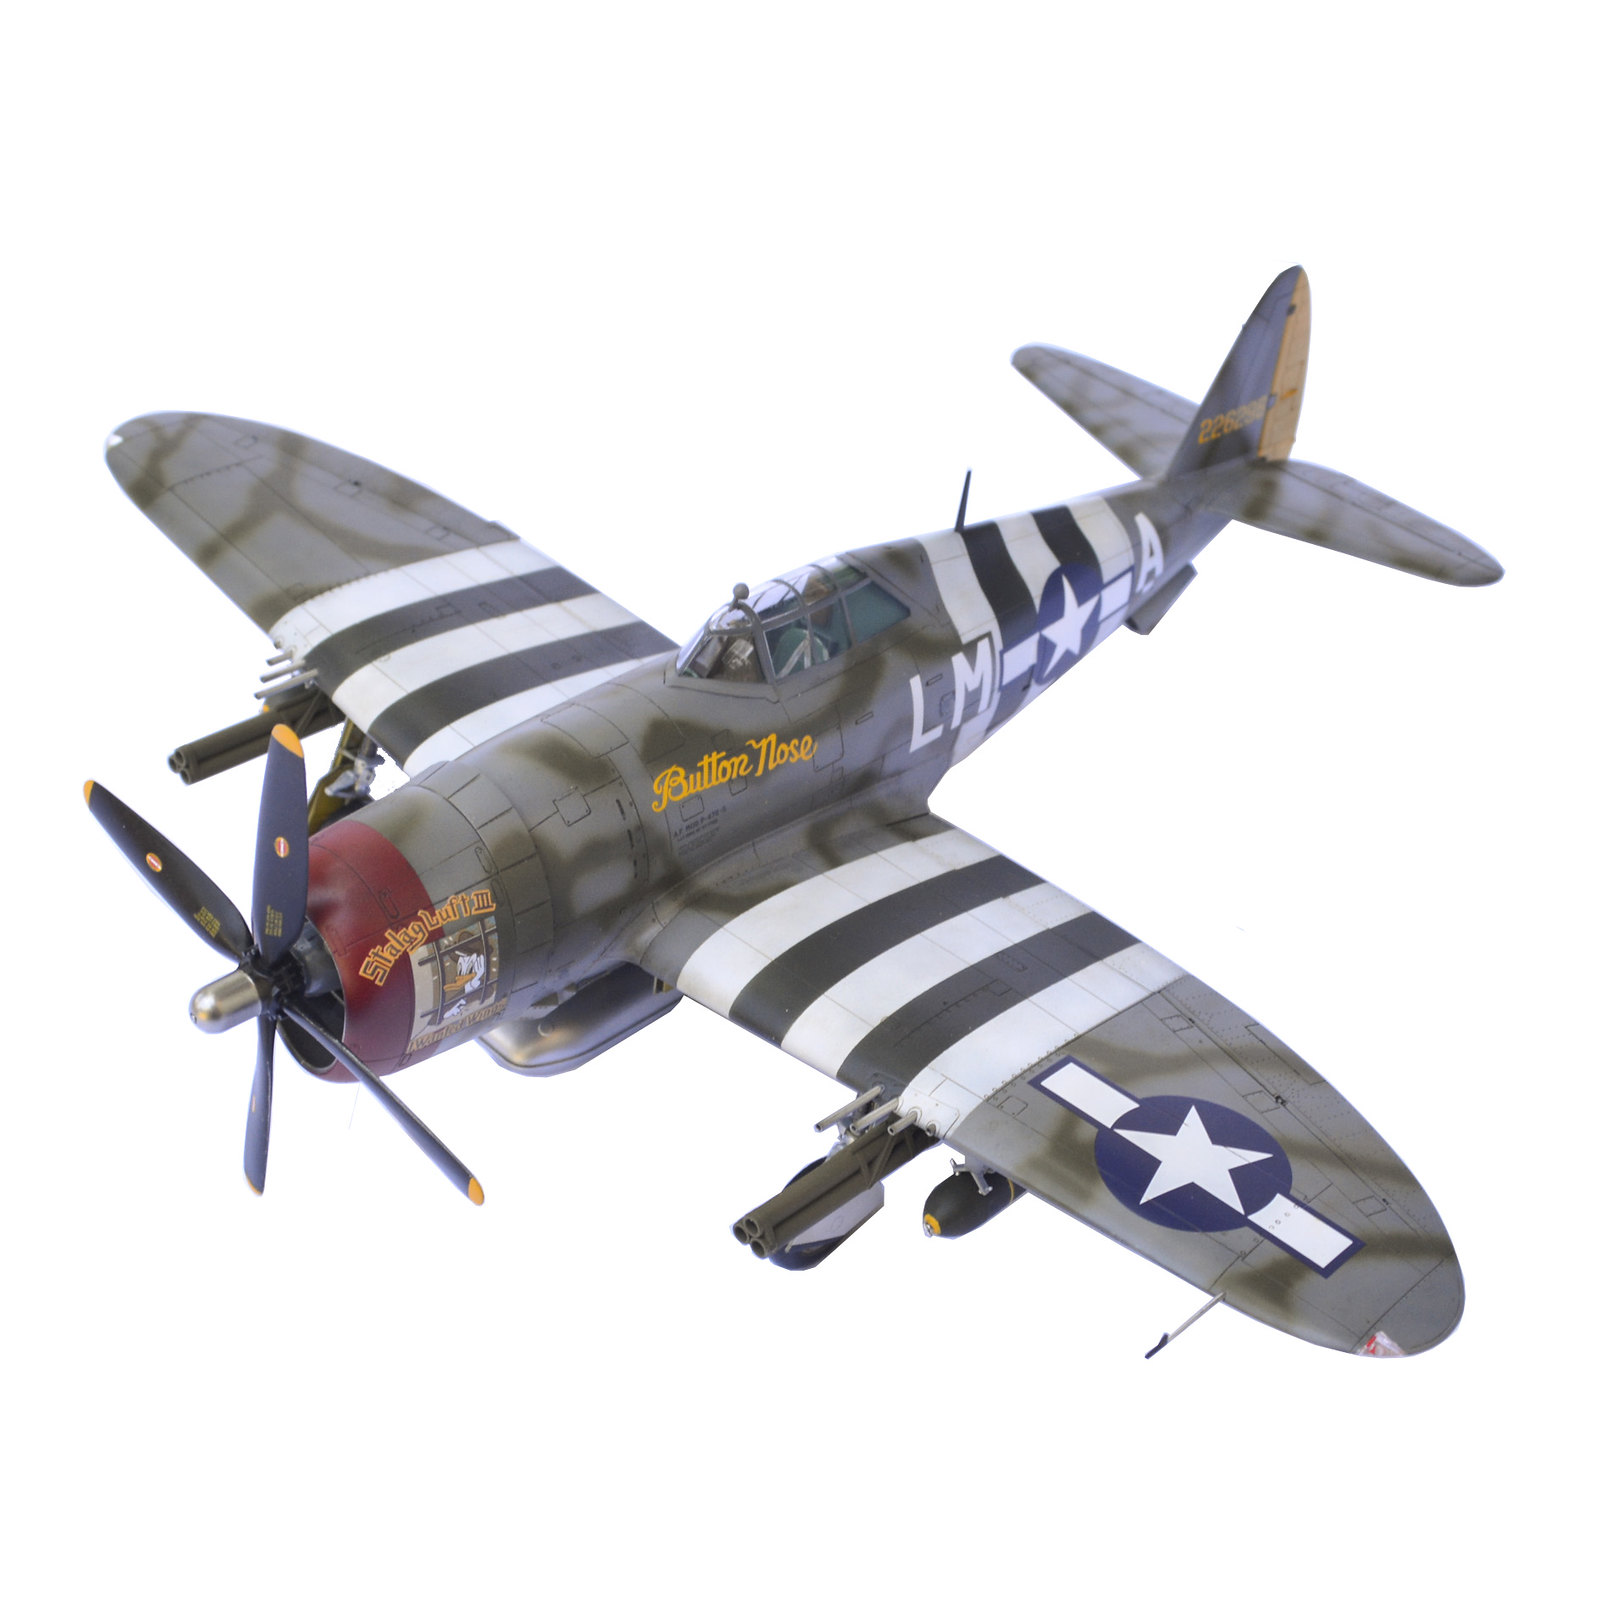
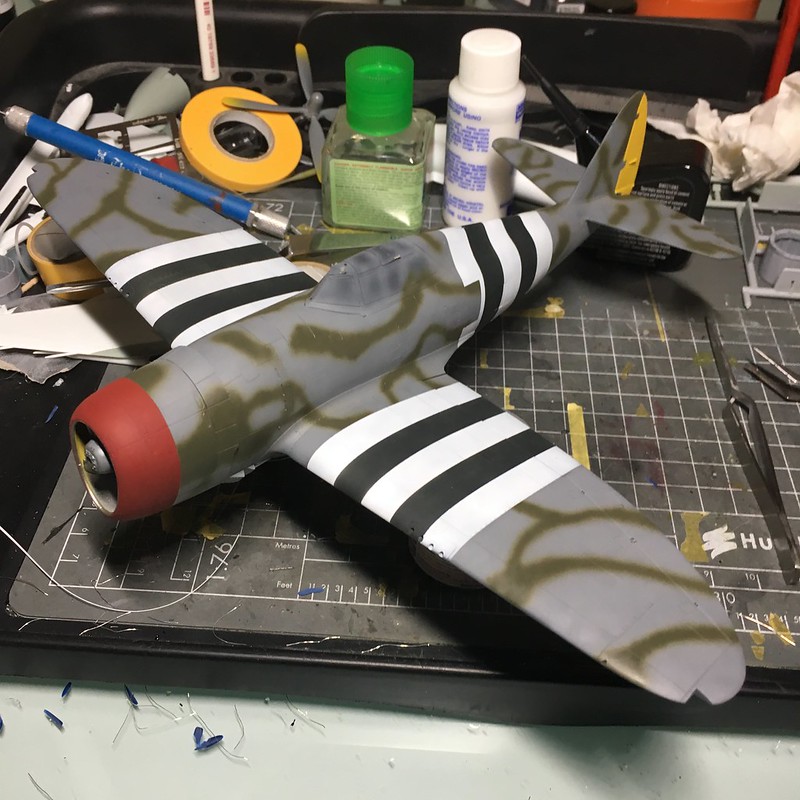
I have the Kitsworld decal set because I wanted to do something a little more fun than OD over Neutral Gray, and I went with a 56th FG bird. The scheme is supposed to have the top invasion stripes overpainted in OD, but I opted to leave it in the D-Day scheme before the overpaint.

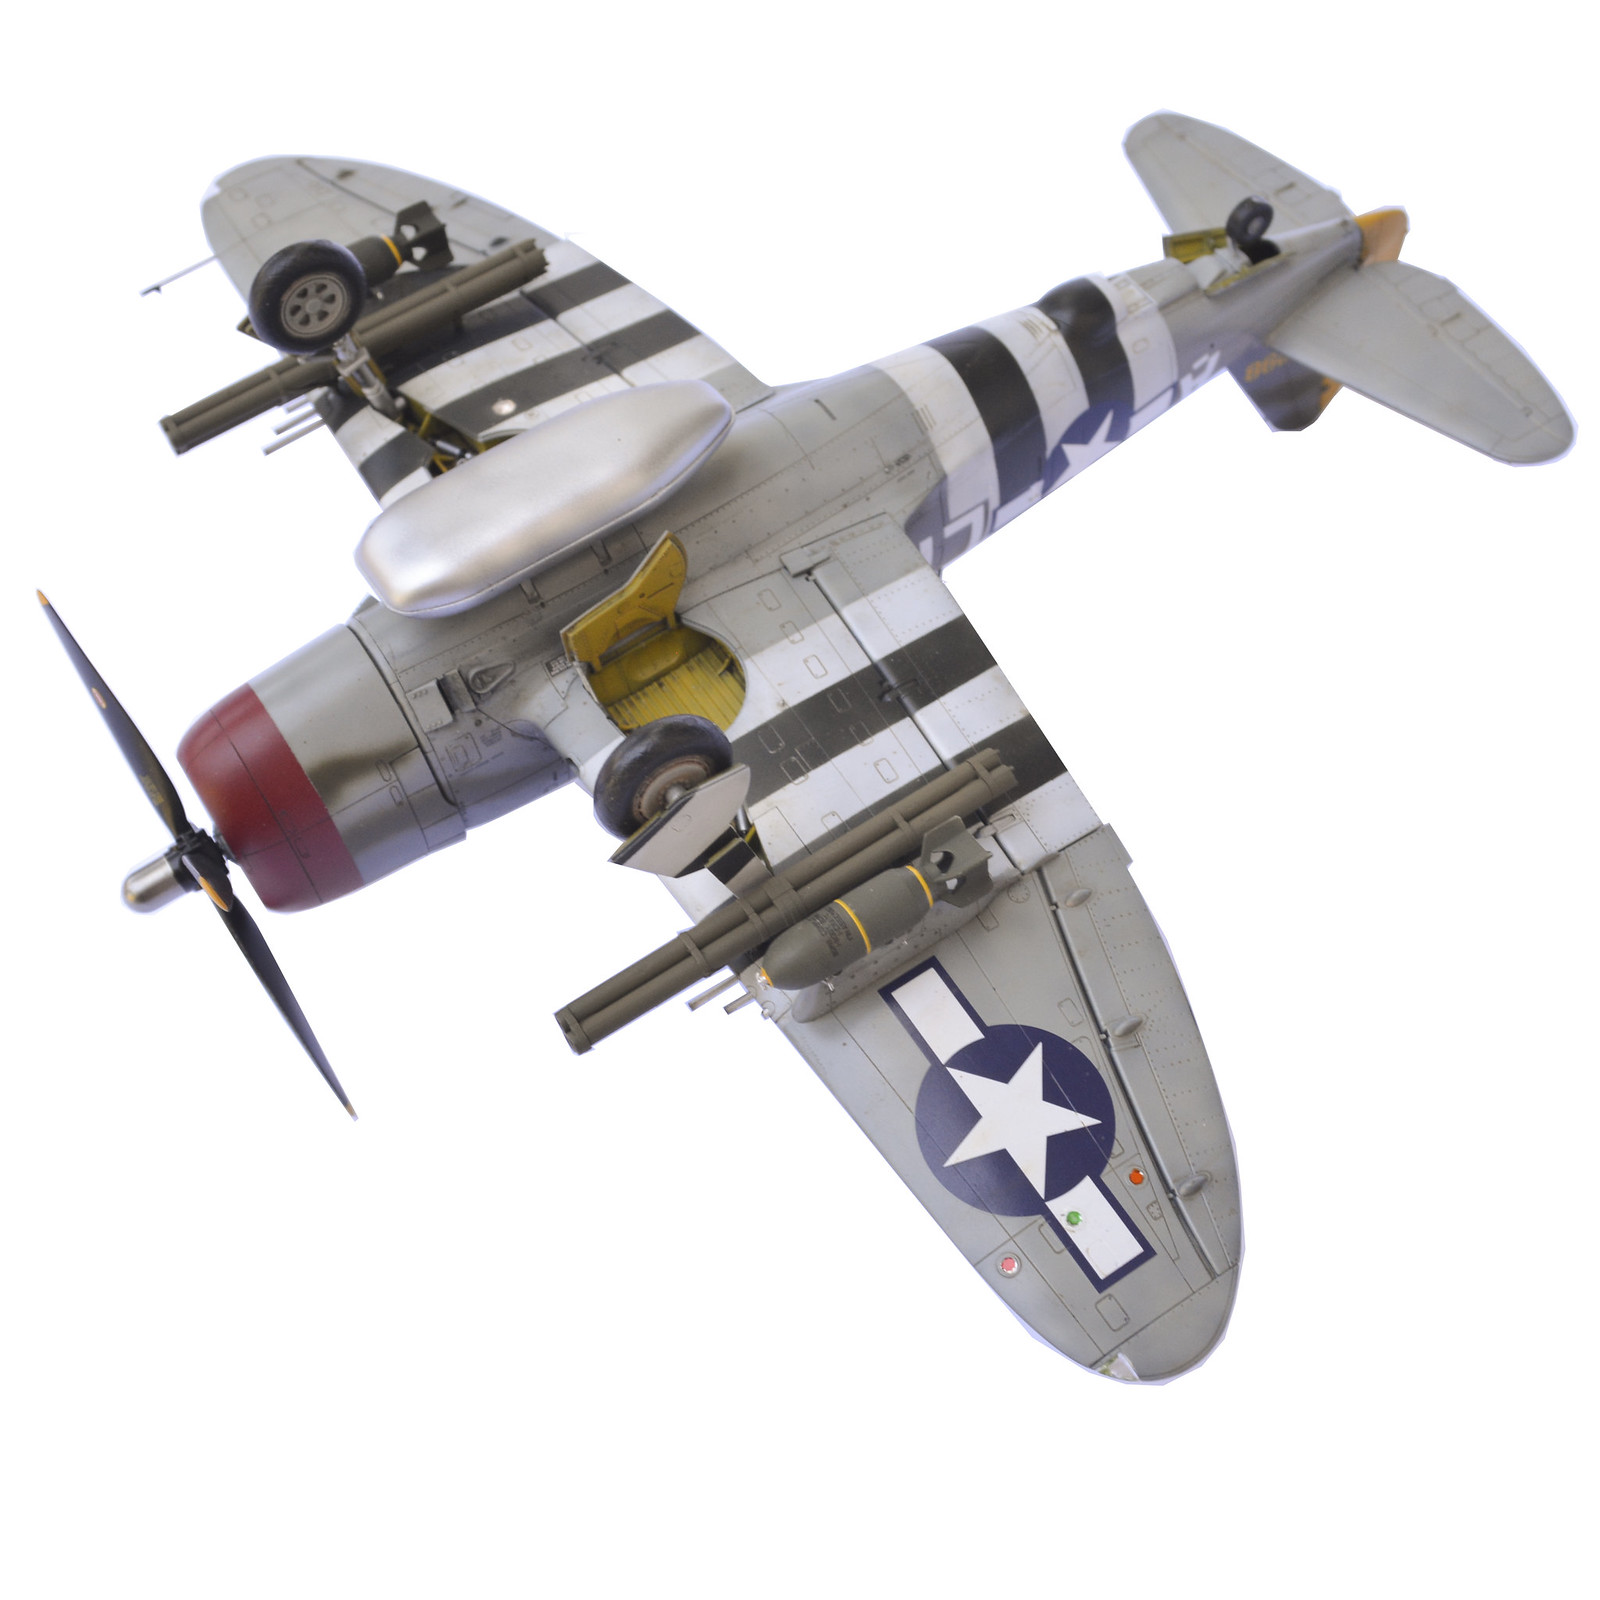
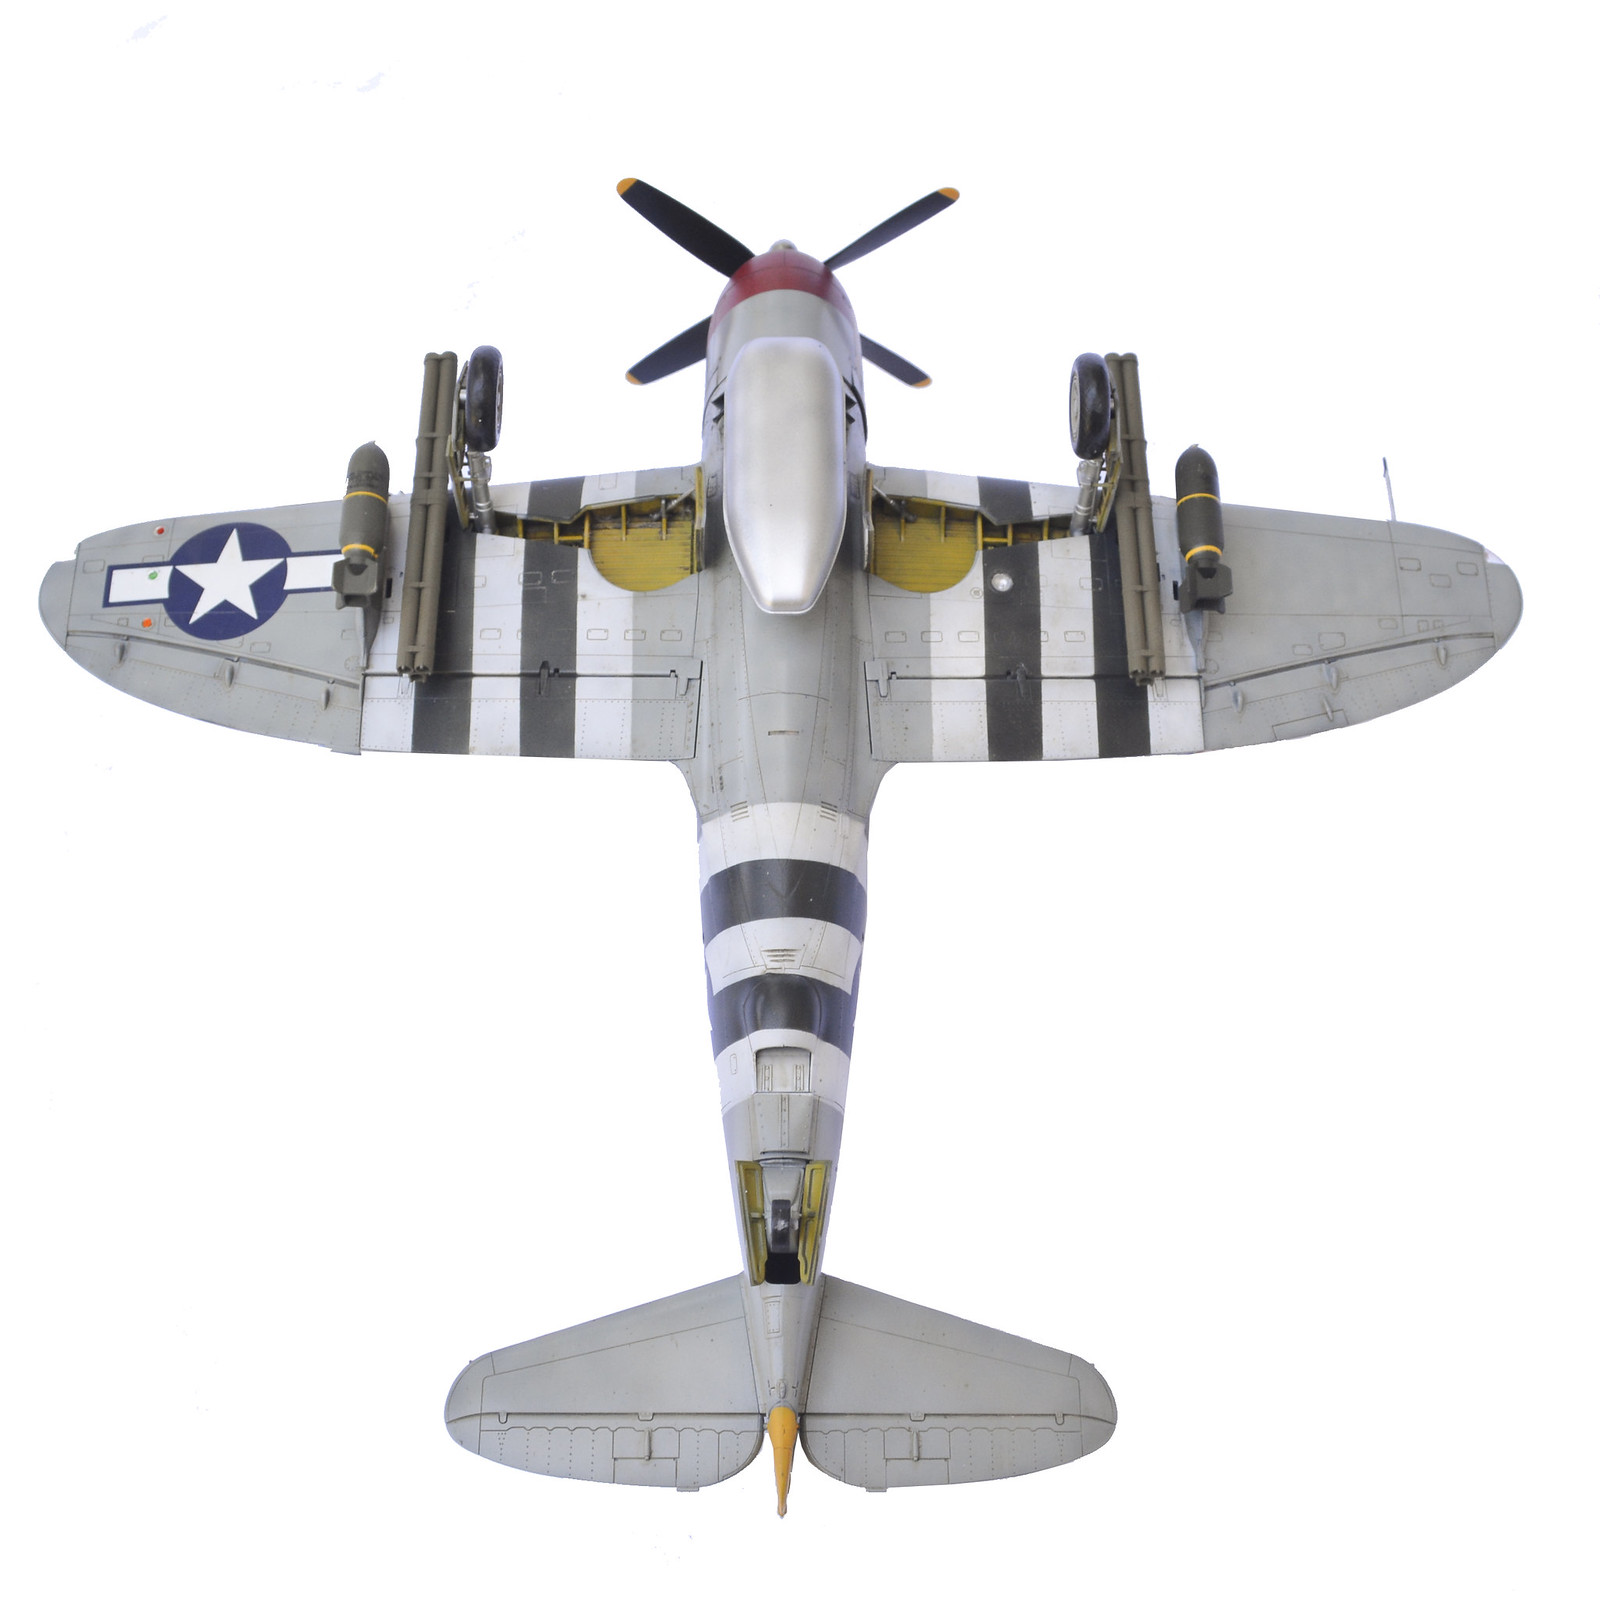
This is the first time I’ve done invasion stripes, and it took a fair amount of tweaking to get them where I wanted them.

Untitled

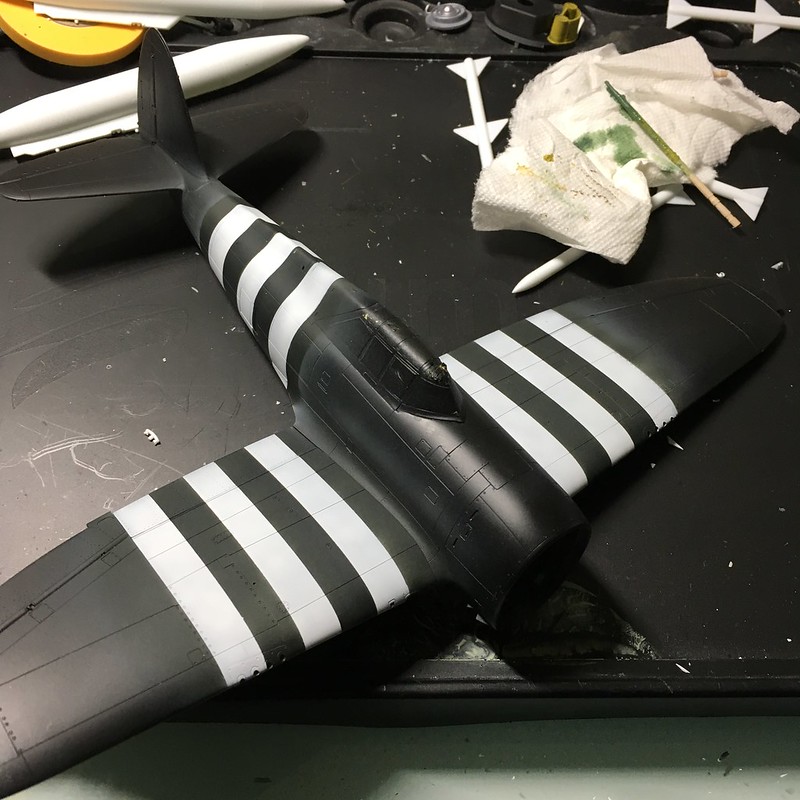
But once done, I was pretty happy with them. They are Tamiya White and NATO Black sprayed over gray.

Next up was the engine. I added some spark plug wires, as I’ve never done this before and wanted to give it a shot. Next time, I’ll use copper wire, as the steel wire I had was not great to work with (too stiff).

Untitled

Next up was the scheme. I freehanded the camo after masking the nose, rudder and invasion stripes. My reference pics of this bird show the edges pretty soft, and I tried to replicate the effect without getting the green too discolored over the gray. The colors are Tamiya Medium Sea Gray (bottom), Dark Sea Gray and RAF Dark Green 2, all without mixing. The red is Model Master Insignia Red, and the rudder is Model Master Insignia Yellow.

Untitled

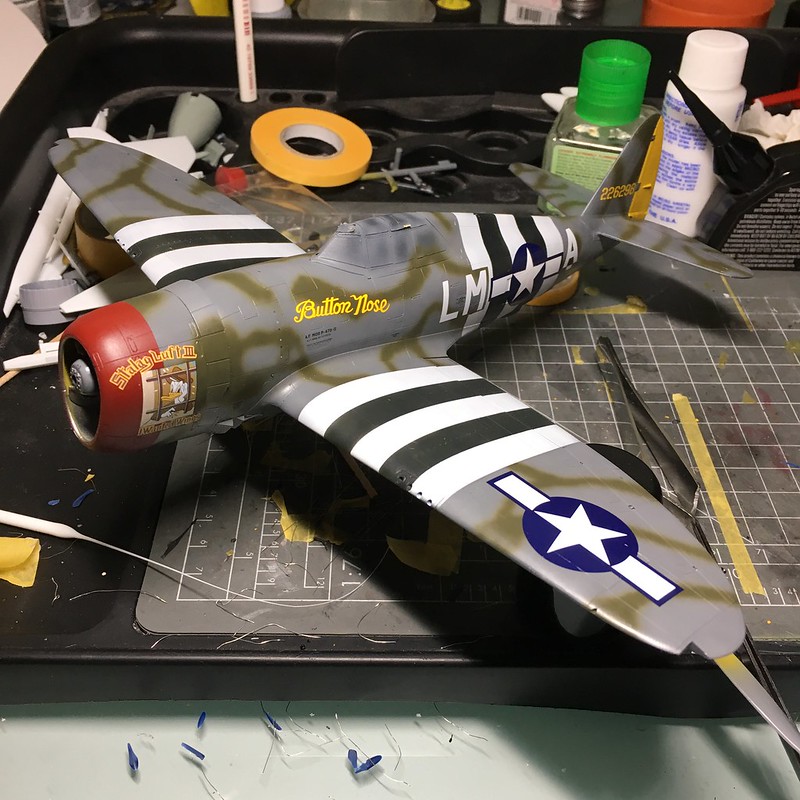
Next up were the decals. As I mentioned, they’re from Kits World. These went down excellently, and really sank into the detail nicely with the Micro Set/Sol combo on top of a layer of Tamiya X-22 gloss. I can’t say enough good things about the quality of the decals.

The instructions, however - were not good. At all. The main scheme decals are easy enough to see, but the stencil data had literally nothing to indicate placement. I referenced the Kits World stencils to the Tamiya ones and placed them with the callouts in the Tamiya instructions. It took way longer than it should have and should not be necessary. None of them are numbered, either.

Oh well, it’s ready for its next clear coat before going to washes.

Untitled

Thanks for looking, and hopefully I’m back in the saddle now after too much time away!

-BD-

Wow, looks great :smiley:

Oh man, your stripes came out much, much, cleaner and straight than mine. How did you get the stripes even and straight? I used Vallejo Off White and Model Master Grimy Black for my invasion stripes on my 1/48 Tamiya P-47 Thunderbolt ‘Bubbletop’. It took me forever to get them even and straight.

I am interested in how you did yours. I have the same P-47 Thunderbolt Razorback kit in my stash and would love to learn how you did your stripes.

Thanks, guys - I appreciate it!

For the stripes, the wings were pretty easy. I sprayed the whole area white, then used the 4mm Tamiya tape and marked each edge. Then I used dial calipers to measure the distance, divided by 5, and set the dial calipers to that (I think it was 0.365 inches). Then I worked from the outside in, making sure the spacing was the same throughout.

The fuselage was another matter. I tried the same thing, but started with the foremost white stripe, and measured back from there. I thought it looked great, but then I took off the masking, and it was a nightmare. I had to go back and fix it repeatedly.

Lesson learned: cut the tape very thin. The reason is that the wider the tape, the more it wants to wander on a tapered part like the fuselage. So I used a metal ruler on a piece of tape on my cutting mat to cut it about 0.5mm wide, then used that to make the initial lines, and filled in with wider strips of tape.

Honestly, the next time I do this, I am getting one of these guys and projecting perfet lines on the fuselage to follow: https://www.amazon.com/Qooltek-Multipurpose-measure-Adjusted-Standard/dp/B00PQ4PJYC/ref=pd_lpo_vtph_469_bs_img_1?_encoding=UTF8&psc=1&refRID=MEKVBP3ZEJ38Q53Y70KA

On the other hand, the way these were done was right before the invasion, and I have seen them look like they were done by a drunk guy holding the paintbrush with his mouth. So really, any amount of irregularity is conceivable, but I wanted this one to look clean, so of course I agonized over it. (They’re still not perfect, but close enough not to bother me).

-BD-

That looks really nice Brandon, I really like the look of your camo on top

Way to go, Brandon! Great job!

Well, I’m calling this one done.

Once again, this is the 1/48 Tamiya P-47 Razorback kit with Kitsworld decals. Paints are mostly Tamiya with Model Master for the nose, rudder and rocket tubes. Mr. Paint Dark Dull Green was the interior color. Alclad is most of the metal bits, with some Tamiya and Testors.

Anyway, we’re mostly just here for the pics, yeah?

P-47 05 copy

P-47 04

P-47 03

P-47 02 copy

P-47 01 copy

P-47 08

P-47 06_1

P-47 06 copyThis was a lovely kit that went together so well. Glad I have the P-47M to build in the future!

-BD-

just beautiful,that is a nice build and a fine kit. with my p-47’s cant decide which prop to use?

Way to cool. I like the full invasion stripes

Your agonizing paid off big time. That is a beautiful build. The invasion stripes look perfect to me. Glad you were able to sort things out and get back to this kit. Well worth the time and effort. Thanks for sharing.

D

Looks fantastic Brandon. The stripes are great and so is the camo pattern. That’s a difficult paint scheme all around, and you nailed it.

Cheers, Mark

Thanks, all! This was a fun paint job to tackle. My girlfriend actually took an interest in this one, and liked it until I hung all the ordnance off of it, at which point she said “It looks like it’s trying too hard now. Like, it’s saying ‘Look at me. Look how much I can lift.’”

Maybe she has a point, but then, that kind of was the point of a CAS loadout.

As for the prop, I was only able to find out which prop to use because I found a few pics of this specific aircraft. Tamiya gives callouts for their markings options, but I didn’t want to build one of those, and my decal sheet didn’t say which it was.

-BD-

Looks excellently done!

I also have the Tamiya P-47M in my stash so I’ll be referring to this thread when I get around to that kit.

Nice Jug BD! =]

Thanks, Bish and Mike!

Mike - This build was one of the best-fitting kits I’ve ever encountered. You’ll love the M (although that fuselage spine insert could bea pain, as I look at the sprues for mine).

For the interior, I used Mr. Paint Interior Dark Dull Green and thought it really captured the P-47 cockpit color well. Definitely worth checking it out, but I’ve seen lots of mixes thatcapture it well, too.

I can’t think of one complaint with this kit beyond my normal beef with Tamiya over thick decals and lack of a realistic seat harness.

-BD-

Excellent work. Not a huge fan of this particular paint scheme, but hey I’m sure it was effective. Those Tamiya kits are the best I’ve ever assembled in my career. I have this in my stash and I’ve assembled the M. You know the drill, no aftermarket parts really needed at all. Good build! This is making me itchy to start again.

BD, I am totally jelly over this kit. I love everything about it. I need to get another razorback and do invasion stripes. Well done.

BK

Nice work Brandon. The Tamiya Razorback is the best kit of all time in my humble opinion.

Sweet, Brandon!

That is one fantastic build. The invasion stripes really stands out!

Toshi