Hi all, I’m finishing up my 109 and wanted to add some exhaust stains on the sides of the fuselage. My question is , what is a good color to use? I’ve got flat black and grimy black on hand right now. I was just wondering what the general consensus was. Thanks.
Well, it depends on how well your engine is running! Seriously, exhaust stains on an engine whose mixture is correct tend more toward tans and greys, depending upon how far back from the exhaust the stain is. Sooty black stains indicate overly rich mixtures, or it’s a diesel! That’s why jets tend toward blacker exhaust staining, due to the kerosene fuel.
Not uncommon to see a little black ringing the opening of the exhaust stack, and on the area immediately by the stack, but as the stain works aft, it should become more tan. I do it either with flat enamel misted on with the airbrush or pastel powders, or both.
Hi Panzer88,
I agree with Ashley - his description of the how’s and why’s of exhaust staining is spot on. To replicate this I first take the scale of my project and its finished color(s) into consideration. For example, in 1/48 scale my staining would go like this for an RLM 74/75/76 finish:
Using your airbrush, spray a layer of very dilute buff (or reddish brown) from the exhaust stack aft. As you proceed aft, draw your airbrush away from the fuselage (or if you use a dual-action brush, move the trigger such that you draw less paint as you move aft). Once this is complete, spray a very dilute black inside the buff layer. This will effectively simulate the effect of various air/fuel mixtures and age on the fuselage. For a natural metal or silver finish, try using the diluted black only.
If you don’t yet feel comfortable doing all of this with your airbrush, color pastels can also be applied with a brush to effectively simulate the exhaust staining.
Give it a try and more importantly, have fun!
Very good advice thus far!
Another thing to consider on the 109’s is the period in the war portrayed (not sure which 109 you are building)
Towards the end of the war, the Luftwaffe was using coal-based fuels which had a distinct black/dark brown color.
Then again, this points up a delightful aspect of this hobby. It is, after all, YOUR 109, and maybe it IS running horribly. It’s way too rich, the mechanics haven’t been able to correct it, it’s a pig and lags behind the rest of the Staffel. And, you’re terrified that some well-tuned Mustang is going to run you down and wax yer fanny because it can’t get out of its own way.
I like to build little stories like that into some of my builds, I’ll cut a gear leg to simulate a flat oleo strut, sand one tire bald, drill a hole in a fuel tank and leave the cap off, or dangling from the chain. They’re little, subtle things that only I really know are there, but they personalize the build and I can weave a story into the model. Kind of a diorama without the base!
Excellent advice in the above posts. Exhaust staining is like many other aspects of full scale aircraft, ie, it is much different from one machine to the next. Color photos of WW-II aircraft, especially Luftwaffe, are rare, but even B&W can give you some ideas of contrast.
Darwin, O.F. [aln]
I would agree with the others. Assuming a properly tuned engine and a pilot who was experienced and diligent with the mixture controls, the stain should be mostly tan with just a little bit of black at the header outlets.
The reason I would go with a bit of black is that on the way home and the landing phase, the engine is not having to be revved as high.
Look at the exhaust on your auto to see how black it is from the RPM range normal street driving is limited to. Compare this to the exhaust of a race vehicle that spends the bulk of its time in the upper rev range.
Also, there are many color photos of American WWII aeroplanes that bear out the tan over black scheme.
Sounds to me as if you plan on using paint for staining rather than pastels… Dunno about painting them (too permanent" for me, and I just flat can’t control an airbrush well enough for that kinda work), as I use pastels almost exclusively, along with charcoal for the black… You can pick up a starter set of artists pastels (Not oil pastels, they’re more like crayons. No colored chalk. either. It’s too hard and won’t leave enough color behind) for about 12 bucks at Hobby Lobby or Michael’s, or whatever art supply store is near ya…
For German engines, I use a base of charcoal, followed up by progressively wider layers of browns and greys, but the predominant color is black, since the synthetic fuel (Coal-oil based, as was pointed out earlier) the Germans used burned pretty dirty… Dad has told me several times that you could really tell when a German fighter (especially the Me-109) was in a hurry because it’d leave an exhaust trail almost as easy to see as airshow smoke…
Pastels are better, IMHO, also because the effect is reversable if you blow it the first (dozen) times… The charcoal is rather semi-permanent though, so easy does it at first. Also, they work best applied over you final flat coat… Gloss finishes won’t leave anything for them to grab onto, and if you spray your final clear coat over them, they either be drastically altered or disappear althoghter…
Thank you very much guys. The 109 is a G-10, so I guess that means go for a tad on the dirtier side on the exhaust stains.Thanks again.
Sorry, a little late to the party…
I use chalk pastels, in the same way that Hammer describes. Generally speaking, I make the exhaust stain darkest at its center, and closest to the heat source, and then lighter as I move away from that center. And generally, I use black or dark brown at the center, and lighter browns at the outside.
Those are generalities. I check photo references, if I can find them. And of course, there will be variations based on the aerodynamics of the particular aircraft, fuel mix, how well or poorly the engine was tuned, etc, etc.
Color choice may change, too, based on the subject. But I’ve found chalks very easy to use. I scrape some powder from the colors I want to use, into the wells of my palette, and then apply them to the model with the brush. If it doesn’t look right, I can wipe the chalk away and start over.
One downside is that if you apply a sealer over the chalks, it may affect the way the colors work to the eye, but I’ve found that happens more for chalk used for fading, rather than the stronger colors used for exhaust staining.
Here are two pics of an Eduard P-39Q that I built, to help illustrate how the exhaust stains came out:
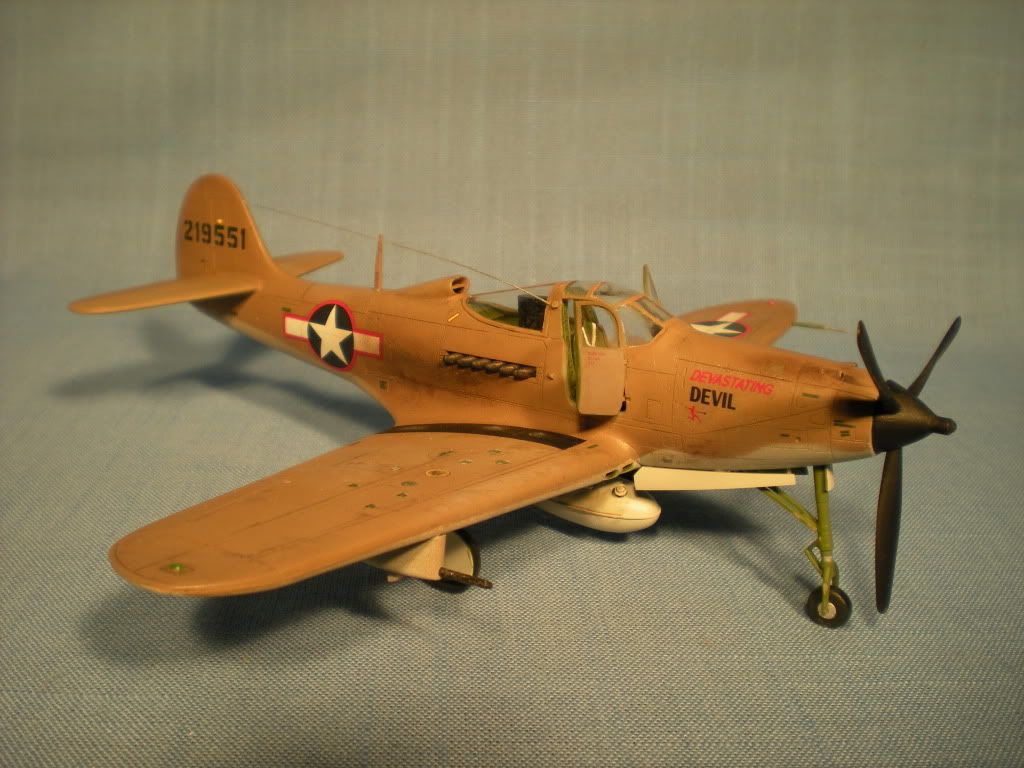
I used chalks to do the exhaust staining from the nose guns, too, but tried to keep it much lighter than the engine exhaust.
Another angle:

I recommend chalks highly, very easy to use!
Hope that helps!
Brad
That’s why this group is so good…you say “exhaust stains” and you get a world of feedback and insights you would never think about. Love it!!
Make sure you show us your final outcome!
Mark
Lots of good advice here. Being terminally lazy I just stick with my tried and true method of heavily thinned MM Burnt Umber acrylic. The thin consistency allows to make the staining darker near the point of exhaust and thin it out as it goes back.

Very nice job on your exhaust, Mike, but I also like your mottling job on the sides, too!
Thanks!
Another method you might want try is with gouache paint. They are water colors that come in tubes like oil paint. Mixed very thin, essentially water, they can be sprayed at very low pressure and built up slowly. They have a dead flat finish and you can mix whatever color you like. The best part is , if you don’t like how it turns out or you make a mistake they can be wiped off with a wet Q-tip as they reconstitute with water even after dry. Airbrushing exhaust stains gives me a more feathered edge that I didn’t always get with pastels. Available at any art supply store and inexpensive.