How do you eliminate dust or deal with it after it gets on your paint job?
It’s generally better to avoid the dust in the first place, beforehand! Regular cleaning of your painting area (but not immediately before you paint) goes a long way to helping. I’ve also heard of folks “misting” their painting area with water from a squirt bottle (like a Windex sprayer) just beforehand, to help eliminate dust in the air.
Also, have someplace “safe” to leave the model as the paint cures. I’ve actually had more problems with dust when using enamels, I suppose due to the longer dry times.
AFTERwards though, a light buffing with a lint-free cloth will get some dust specks etc off the surface if they aren’t cured in too bad. Or a light sanding if necessary. Another question I’d ask - WHAT are you painting. Obviously a high-gloss showroom fresh car model needs to be dust free. But if you’re building a military vehicle that is going to be getting a dose of weathering, dust is not much of an issue.
Since I use slow drying Testors enamels (at least the gloss versions are very slow drying) I built a paint “oven” for drying. A nice secondary effect is that it keeps dust off the parts/model. I have also learned to be more careful preparing the model for painting, making sure I wipe down the surface to get all the dust off.
This brings up the issue of a spray booth. Ordinarily spray booths pull IN the air, and run it through a filter. Of course, this also sucks in dust. I remember the laminar flow booths we used to have in some of our clean rooms at work. The air was drawn through a filter, then blown at the bench very softly, leaving through a slot just big enough to get our arms and hands in. Sort of like the reverse of a spray booth. I have tried to figure out a way to do both, but it seems almost impossible to have a flow like the latter and yet keep paint dust and fumes out of the shop!
-
I turn on my spray booth fan about 10 minutes before my painting session to remove the dust in the air.
-
Right before airbrushing, I use a Blaster Dust can on a model. This blasts away any dust on the model.
-
Immediately after a painting session, I place the painted model inside my home-made dry booth.
Even with this procedure, I occasionally find dust on a model. I lightly buff it with a piece of paper towel.
I find paper toweling makes a nice cheap very fine sandpaper! I use Krylon primer, which is a matt finish primer that drys quite rough. It is fine beneath flat paints but needs to be shined up for gloss finishes. But it is very full bodied and really clogs up very fine sandpaper, even when wet sanding. I find the paper toweling works fine and is so much cheaper than good fine wet-or-dry sandpaper ![]()
I read the use of paper towels in an FSM article some time ago. Probably the most useful modeling tip I ever got.
great tip Don.
I had discovered it by accident when trying to clean up an “oops” . Glad you thought to share it.

Of course the question remains as to which brand provides the best “buffing power”, some are “soooo soft” 
and others are very rough ,
,
while some are “just right” 
Don,could you elaborate on your paint oven?
I’ve been using Scott Shop Towels. Get a three pack roll at Home Depot for under $6. They are way tougher and are pretty much lint free.
I’m currently getting ready to make a booth to keep dust off but I think most bbn of my problem comes from the airbrush
I think in cleaning with paper towels I’m leaving residue in the cup
but in my both I plan on having the air intake on the roof. hopefully this will keep what is pulled in suspended above the model and I will have 2 lights
a u.v. light close to natural sun and a reptile heat lamp to aid in drying times
I’m new to this hobby and currently on my first build but on my next build I want to eliminate this and hope this works
Holy crap I was about to write about Scott’s paper towels. They simply the best for all my hobby needs up and including using it as sandpaper for my primer. The real stuff always catch my edges and then bring up the primer. Paper towel solved that issue.
I did a post on it after building it, but it was awhile ago. If I can find the image on Postimage- lets see-
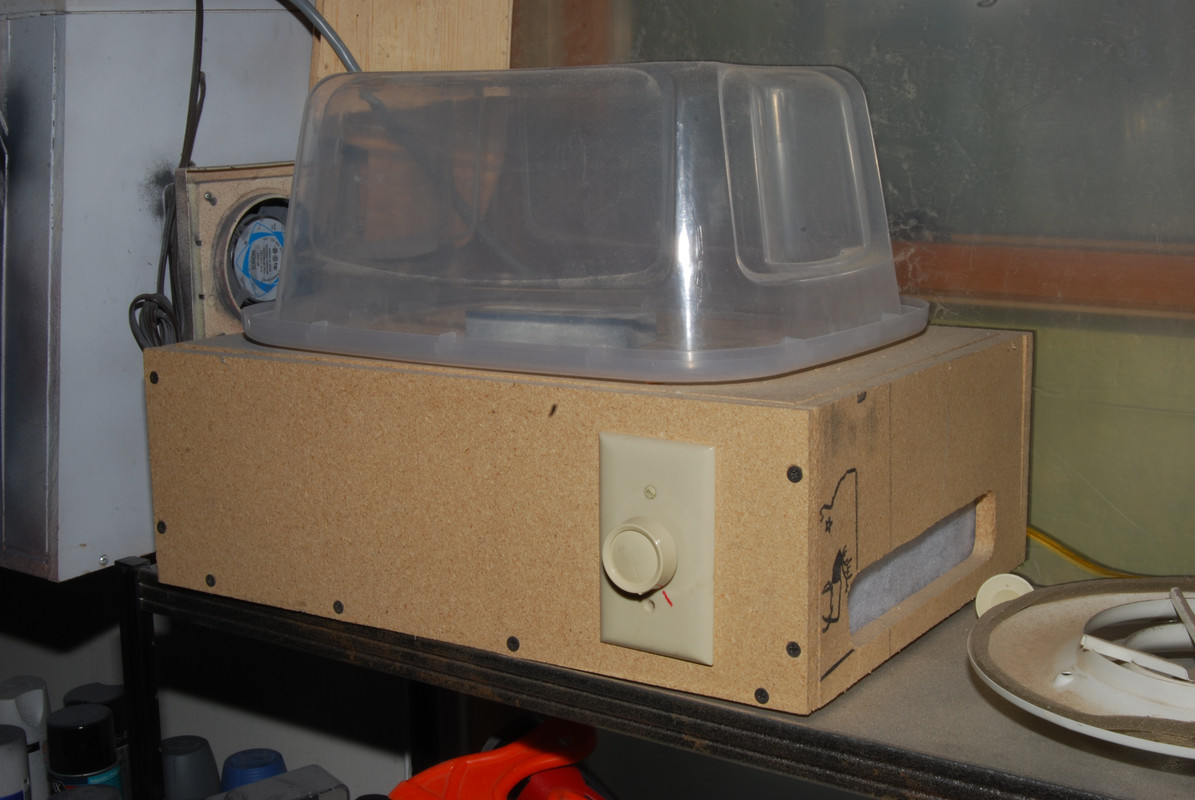
The base is a box of particle board. There is a slot near the bottom for an air inlet, covered with a cloth air filter to keep dust out. There are holes in the top to let the heated air enter the model/parts chamber (also filtered by filter).
There is a porcelin light socket screwed to the bottom, with a 60 watt incandescent bulb (get em while they last). I also wired the socket through a light dimmer so I could control the bulb for varying the temp. The top chamber is an old storage bin that I used to use to carry models to shows. It is mounted inverted with screws, with most of the to cut away to let the hot air in, with just a flange for the mounting screws. The bottom of the bin, then turned upside, will mount into the top securely.
There are holes in the bottom (now the top) to let air flow out. That also has a cloth filter to keep dust out when not in use. In the winter (it is next to an outside window) it runs just shy of 110 degrees, the temperature I like to use. I suppose I should have used a 75W bulb, but the temperature is close enough. In summer I have lots of heat, so I put a thermometer inside and control temp with dimmer dial,
In the background behind the drying cabinet you can see the muffin fan of my spray booth.