…and you still wouldn’t hve time to build them all!!![bnghead][proplr]
I had a small set back on one of my seats, my ProWeld tipped over and the lid wasn’t tight I guess. Resulted in one seat partially melted but salvageable. I’m continuing on with Mr. Cement. Not my favorite but it will work for a while I guess.
The Sea Venom build at LSP is a good one. It is a bit of an inspiration for me. There are a few items on the plane for which this build is still my reference.
As usual for me, progress is slow. Had drill this weekend and was issued some of my RFI junk so I spent my spare time playing with it and figuring out how to configure some of the junk to make it work for me. I’ve got to say that the MOLLE system is much more secure than ALICE, but it is a pain to swap things around.
Richie – not true, I plan to live forever… My stash went to 851 kits today, not counting the 90 I pulled out to resell, so I’d better…
Screaminhelo – argh! I hate it when plastic melts…
Cheers, M/TB379
LOL I hear ya Mate!!![t$t]
Gamera - I really like the looks of the Kikka. I’ve been wanting that kit but can’t seem to find it cheap enough for my taste. Looking forward to seeing it come together. [Y]
I finally received my small package from Squadron. True details resin cockpit and wheels for the P-59.

I wanted the resin wheels to replace those horrible, plastic melting rubber tires that come with the kit. As you all know, when searching for one little thing for a kit, you always end up with some more! [:D] I don’t know how much of the cockpit will be visible when the kit is finished but I’m glad that I bought the resin pit. Much more detailed!


I think I’ll be building her as ol’ Smokey Stover. Pretty cool! [H]


I just finished building a plane for my friend and I’m trying to get a little work done to my FW-190 now but hopefully I can get a move on this thing soon!
Jeremy those resin bits sure are a big improvement!!! Looking forward to more pics!!![t$t]
Simpilot and Jeremy: thanks guys!
Jeremy: looking forward to seeing your P-59 come together. Helo is building a P-80 over on the Korean War GB but this is the first time I think I’ve seen someone building the P-59. The Airacomet was a nice looking plane, too bad it was so underpowered.
I would love to get a P-80 Gamera. I have T-33s and Starfires coming out of my “you know what” but don’t have any P-80s to complete the family.
Progress is going slow on the office so I decided to assemble the power plant. I am not going to have it opened up back there but I am playing around with some things. I sprayed the engine overall panzer gray and I used Hawkeye’s steel powder and some pastels on the exhaust section to try and make it look a bit like burnt metal and here are the results:
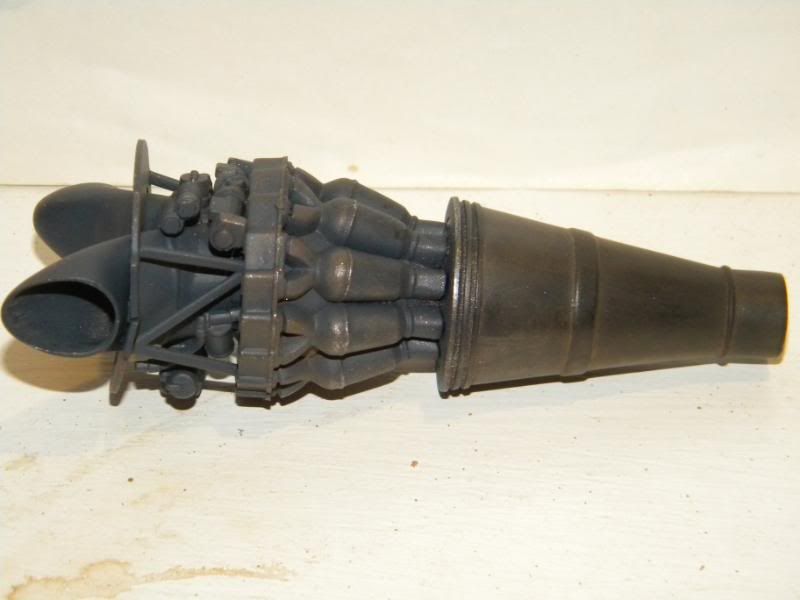
As you can see, it is a little dull and leaves much to be desired if you are going for absolute realism but I am happy with the results.
Right now I am trying to make cushions for the seats with Sculpey. A little trial and error going on here along with measurements made with the calibrated eyeball but The process is a good learning experience.
I am especially looking forward to seeing the Meteor and the P-59 come together. Two real pioneers in the jet age.
Mac, I think that looks quite nice actually!!! Looks like the burnt metal of a jet pipe!!![t$t]
Thanks for the vote of confidence! The engine is pretty nicely detailed from the box. It is a very good starting point if you want to open it up and display it. It is simply practice for me.
Wow Mac… that engine looks really cool!!! I like the subtle burnt look! [Y]
I managed to make a little progress on the P-59. The True Details interior looks really nice and I wish I could have done a better job with it. The instructions say it should be painted Bell green and gave a couple of FS callouts for the color. Both of them were at the opposite spectrum of greens! [8-)] I chose a color closer to the darker of the two suggested from something I aleady had on the shelf… Russian topside green! [:P] Maybe not accurate but I like the way it looks.


I didn’t do a wash on the interior because it was already a pretty dark color and I was afraid that a black wash might darken it more. I decided to try a heavy drybrush of light green and grey instead to try and make the details stand out more. I think it came out looking pretty good. What do you guys think? Any suggestions before I close it up?
I think that pit looks excellent, jmabx, you made the right call not going darker. It’s interesting that it wasn’t standard US interior green, but a Bell factory mix. There were variations in factory finish, some P-47s had a dark bronzy green interior IIRC.
She’s coming along a treat!
Cheers, Mike/TB379
Nice work Jeremy. The dry brushing did a nice job. If you still want to apply a wash, you could try darkening the base color just a bit. Maybe use a darker gray or brown to do it…
I left my engine at work. I still need to dull coat it. I’m curious what that will do to the pastels I put on there. I guess that I will turn to the pit again this weekend and maybe do some sub-assemblies.
Happy building y’all!
Thanks Mike and Mac! [Y]
Quick update…
There was a big void behind the IP that you could see with the wind screen on. I filled it by glueing styrene rod for instrument backs and adding wire. Looks better now. I tried to take pictures with the windscreen on but my camera wouldn’t focus.

Nice job behind the I P Jeremy. Do you have shots that show the back of the panel or is it the result of an informed imagination?
I’ll have to post some shots of the back of our panel and post them some time. I realize that all are not the same but it could help to further informed creativity.
Just my imagination trying to busy it up. [B]
Well done Jeremy!!! Looks fine to me!!! Fills that empty space just fine.[t$t]
Mac: really like the paint job. Looks burnt and worn like she’s seen some serious use.
The Kikka is slowly making her way to the finish line. I airbrushed the yellow leading edge stripes and put the natural metal on the engine intakes and exhausts. I need to do the wheel wells now and hopefully after masking them I can move on the underside, mask, and then the top, and be done with painting.