I’m on board Bill for the ride! Always great to learn from your WIP’s.
Thanks IB, glad to have you along!
Great subject Bill, I’m sure you know of the many different finishes that can be applied here, I’m not 100% on the exact configuration but I know that as you have stated in this thread yourself these vehicles were adapted to fill a lacking in A/t mobility, some were factory built but a kit was also issued where either a new gun or a gun in service could be used and mounted. I think that kit vehicles had the radio operators visor blocked over as this position was deemed redundant because of the difficulty of accessing the space. The mount is also so close to the one on the 234/4.
I think what I’m hinting at is that you have many choices for your finish with out having to perform any major surgery on the kit.
Best of luck to you on your new project and I hope to hop in more often to track your progress.
Regards.
Terry.
Hey Terry! Nice to see you drop by, hope things are well with you!
You’re 100% correct. Some of the /22s were factory built and others were /9s that were converted using field kits and existing Pak 40s to convert them over. Kit vehicles and factory vehicles both had the radio operator’s position eliminated because of the way the ammo was stored. I’ve been busy on this one today and will have an update posted tomorrow so if you pop back in about this same time tomorrow you can catch an update. [;)]
Lots of progress to report as the build continues. Step 5 begins work on the interior of the fighting compartment and deals mostly with the floor and driver’s area. The /22 did away with the radio operator’s position because of space/access constraints due to the Pak 40 ammo bins so I removed the “hump” that is the seat mount on that side. It’s molded hollow so some Lion Roar scale tread plate was used to patch the hole along with some thin sheet styrene for the side of the raised central part. The driver’s seat is dry-fit only and I also installed the later type wooden crew seat for the left side. The instructions don’t indicate it but two holes need to be opened up in the floor for the seat bottom to mount in the correct spot.

Step 6 assembles the driver’s instrument panel. I added all the various parts called for but left off the steering wheel and gas mask container so they could be detailed separately. After painting, the dash will get the instrument face decals provided by the kit.

Step 7 is a simple step, it adds the driver’s instrument panel to the floor and then adds the floor to the vehicle’s lower hull completed earlier. I held off doing that just yet because the floor and side hull panels need to line up properly with each other and it’s easier to achieve that by installing the three of them together vs. separately.

Speaking of the lower sides, those came next in Step 8. There are a lot of molded-on locater marks that aren’t needed for this variant, so those were removed with a micro chisel and sanded smooth. Ejector marks were filled with Squadron White putty and sanded down. I also added the large ammo bin and the seat back as well as the gunner’s wooden jump seat.
The instructions are wrong in the placement of the side ammo bin as they point to one of the molded on marks as the correct position when the right locater marks are provided on the upper hull top…so some care is needed for the bin to end up in the right spot as both the height of the box and the position along the side matter when it comes time to add in the Pak 40 mount base in Step 15. The placement of the wooden jump seat is also critical on the other side for the same reason…so I used the blue-prints in Panzer Tracts 15-3 to help ensure I got it in the right spot and height as well.

Step 9 calls for the lower hull sides to be installed but I wanted to do that along with the rear hull plate and doors so I assembled them first as called for in Step 10. The doors were left in the closed position and putty used to fill the unused 2nd fire extinguisher slot.

Over in Step 12 the front portion of the Pak 40 mount makes an appearance but I went ahead and installed it, the floor, and the lower hull sides together in a single step to make sure everything was going to play nice and line up correctly.
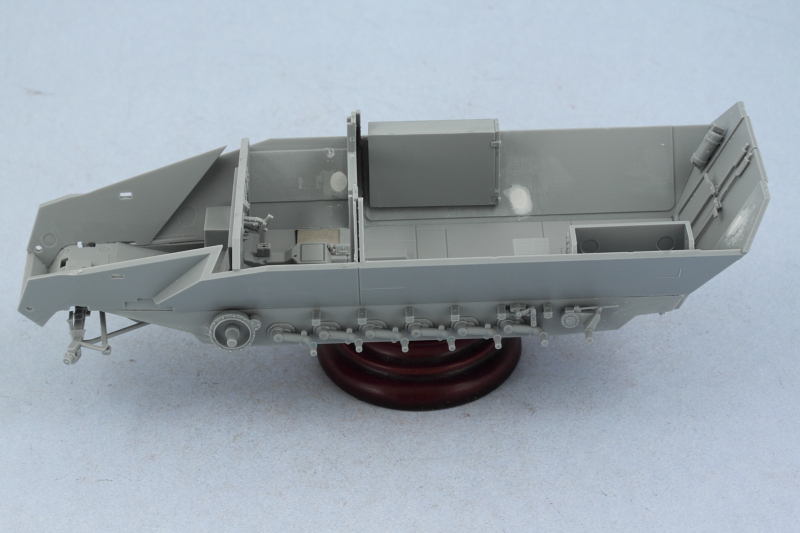
Speaking of playing nice, I also decided to check the fit and alignment of the platform mount for the Pak 40. This is assembled out of multiple parts in Step 15 so that was taken care of and the mount tested along with the front bulkhead to make sure everything would fit correctly. As you can see, the fit/alignment with the other lower hull elements is tight so everything needs to be in just the right spot. I also added the smaller 5-round ammo box once the mount was glued in place so it could go in the right spot. The instructions are somewhat vague on its placement but the PT photos include a nice shot of the interior of a /22 showing how it should go. That photo also showed that DML got the placement of the hinges backward on the bin’s lid so I made sure to mount it with the hinges oriented correctly.

I returned to Step 10 to assemble the front plate for the driver’s visors. The kit provides the external visors as the earlier style with the ridged outer surface but the final version of the 251s had simplified these to be flat plates. That meant some careful trimming and sanding to flatten the plates down and the radio operator’s plate was just a simple blank plate, so it received some putty attention to fill the back side mount point for the vision block and on the front side to fill the vision slit.

Last but not least, Step 11 deals with the upper hull and I went with the late version options featuring the single piece engine access hatch and side opening radiator access hatch. The front plate was added in and the edges blended in using a combination of liquid glue and light sanding. The top plate over the driver’s area was also added but I left off the nose plate until the upper and lower hulls are joined together. Finally, I filled and sanded smooth the small mount marks for the crew jump-rail that were fitted on standard 251s but not a feature on this variant.

Next up will be assembling the Pak 40, a kit in itself!
Looking great as always bill.Got to love PT, i have become rather addicted to them. Their 251 series is excellent.
Terry, i know i ask this every time i see you one here. But how is the UHU coming along.
[:)] Hi Bill
Nice big update as promised!.. What could be better than reading a great technician’s build log while watching a recap of the fantastic 2012 world Olympics ? … Looks like a lot of little, but important things to be aware of with this kit, but you are always thinking many steps ahead.
tread[H]
Wow…big week…looks like great progress, looks like the putty monster was needed. The dashboard looks like it could use some detail help.
Rounds Complete!!
Coming along nicely Bill, looks like your moving flying along with the progress on this one!
Top notch Bill !
Bish have to agree with you there, PT is a great go-to reference set and I have several of their publications on different vehicles that I’m interested in. Thanks for the comments!
Tread always pays to study the instructions when building a DML kit! Thanks for the kind words as always. [B]
Mike DML gets a lot of mileage out of their 251 molds so that always means some putty and sanding is going to be needed here and there depending as those large ejector marks are “usually” covered up by other elements but not this time! As for the dash, it will get some detail help in the form of decals and such for what little will be visible on the final vehicle. Once the Pak 40 is in place, you’d need a dental mirror to see much of what’s there…otherwise it would definitely need some PE help for better detail!
Corvette it felt good to get in some quality bench time for sure! That doesn’t happen as much as it used to so when the opportunity presents I try to take full advantage. thanks! [B]
Carl thanks as well! [B] [B]
Due to the fact that my wife has to attend an open house at her school, I have the chance to get in a mid-week session at the bench! That means the Pak 40 got some attention. It truly is a kit-within-a-kit as the sprues are taken directly from DML’s Pak 40 kit with the only swap-outs being the special cut-down gun-shield used on the 251/22s and the extra rail guard on the loader’s side.
I started in on Step 16 and selected the b46-b56 style muzzle brake since this is the type featured on the photos included in my Panzer Tracts reference and is the late-but-not-final type of brake commonly seen on Pak 40s in 1944. The tuned aluminum barrel was fitted using CA gel and the breech assembled per the instructions with only a small amount of putty needed at the joins to create a seamless look. I left off the breech lever so it can be detail painted separately and also left the block movable for the same reason.

Step 17 adds the recoil tray and other bits…and has a little pitfall that I didn’t catch until it was too late. The instructions show the orientation of the D-shaped pins on parts b26/b27 pointing backwards…I wasn’t paying close enough attention to the part numbers and thus installed them on the wrong sides. Of course I used a liberal amount of liquid glue to get a good bond and rather than risk damaging the parts trying to remove them, I ended up carefully snipping off the D pins, reversing them, and re-gluing in the correct position. The pic below is before the surgery.

Step 18 adds the side mounts and their respective details. I left off the elevation and traverse wheels and the gun sight to allow for separate detailing. I used 0.5mm solder and CA gel to add the missing bowden cable to the firing mechanism for a little extra detail. On the right side, the mount pins and holder for the small hatchet were filled in/removed and sanded down since that wasn’t a feature on these guns.


Step 19 adds the gun shields and I opted for the PE shutters for the gun sight aperture. The PT reference pics show that the usual Pak 40 storage cylinders weren’t mounted (and the instructions indicate those are optional as well) so I filled their mount holes on the inner shield with putty to eliminate them.

A small test fit with the lower hull and upper hull to make sure everything is playing nice before painting. Definitely shows how cramped the interior was on these vehicles.

Next up will be painting and detailing the interior and the gun!
Lovely work again. I take it this kit came with the metal barrel.
Thanks Bish! Yes, the kit included the aluminum barrel.
Nice middle of the week surprise, Bill[Y]… this guy is coming together fast… What paint scheme ? ( if you already said, I must have missed it)… Darn wives… leaving us high and dry with nothin’ to do [whstl] !
tread[H]
Thanks tread! Paint scheme will be three tone for the exterior, I’m leaning towards the box art scheme at the moment but not set yet on whether it will be hard edged or soft.
Yup , same for me . My wife went a played cards with her friends so i had to stay home alone with the dogs and work on my Zil …[;)]
Bill , really good looking already [Y]
I wonder what kind of “kick” that had on the vehicle and crew? Looks great so far!
Rolling along nicely.
Thanks Carl!
IB that’s a good question…the gun overladed the chassis to begin with so the recoil must’ve been an added stress on top of that. I suppose having the wider base with the half track suspension would help but still!
Marc thanks for dropping in and commenting as well! [B]