DML Pz IV F2 Afrika *Complete PICS p.8 01-19-09*

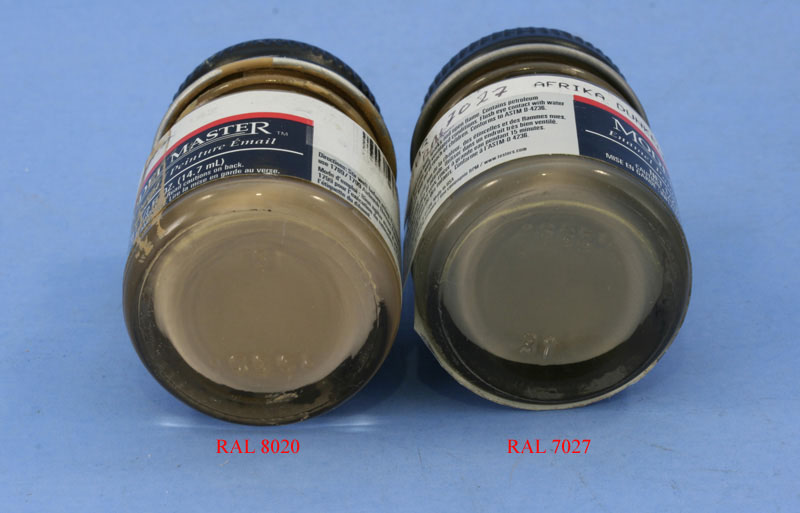
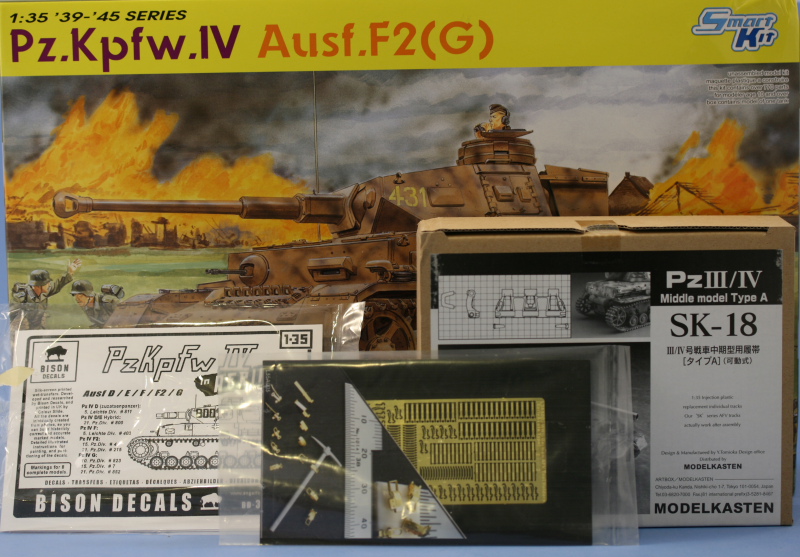
This particular project is one that’s been sitting in the back of my mind for a while now and I recently got the “spark” to bring it to the front burner (how’s that for mixing cliches!) after browsing through some recent reference material and reading about the “Tropen” schemes used in N. Afrika. This got me to thinking…the orders are well established and clear (see here for the full description: http://www.afrikakorps.org/ralcolors.htm) regarding the schemes to be used in N. Afrika but I’d always just gone with the flow of one-color ‘desert yellow’ schemes. The Pz IV F2 presented just the right opportunity for me…I’ve had the Bison “Pz IV in Afrika” set on hand for a while but never got around to using it and it includes markings for an F2 in service with the 8th Regiment, 15th Panzer Division in 1942. There were 2 “Tropen” schemes ordered, one (RAL 8000/RAL 7008) that ran from March '41 until March '42 and one (RAL 8020/RAL 7027) that ran from March '42 until May '43 when the N. Afrika campaign concluded (this of course overlaps with the introduction of Dunkelgelb in Feb. 1943 but that’s another story!). The F2 timing is perfect once again since they started production in March '42, so the Testors has the correct RAL 8020 (Afrika Braun) and RAL 7028 (Afrika Dunkelgrau) available even if the Testors names aren’t right, they include the RAL # in the product description and the shades are a close match to online color chips, so I’m set! That will be the scheme I will be using, the RAL 8020 as a base coat and the RAL 7027 in a 1/3 pattern over that when it comes time to painting.

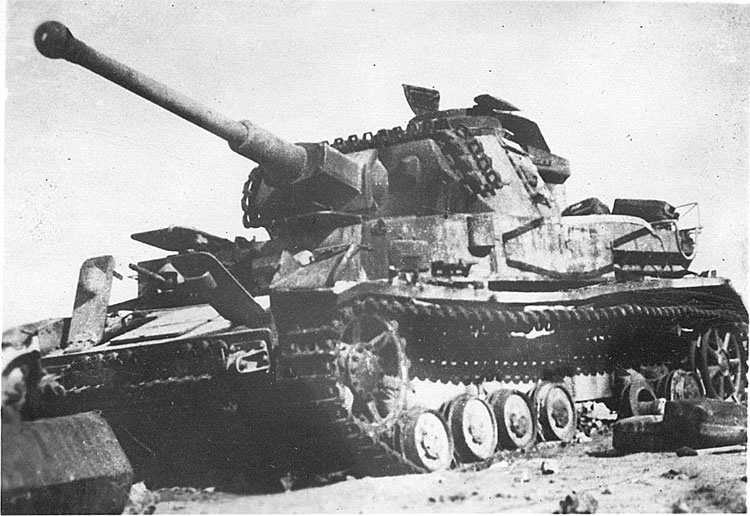
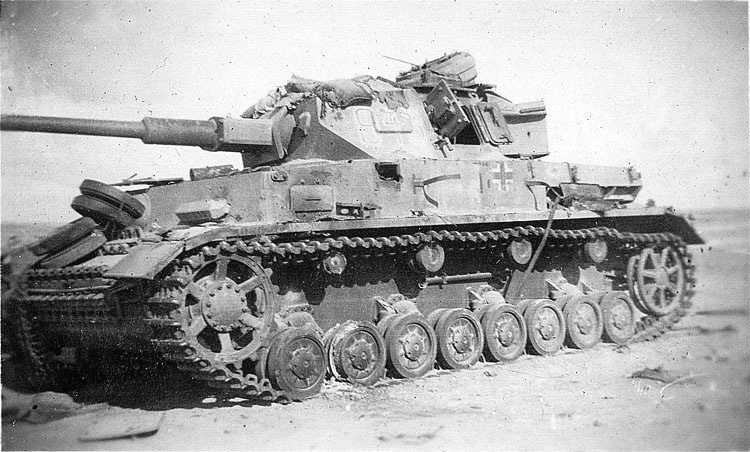
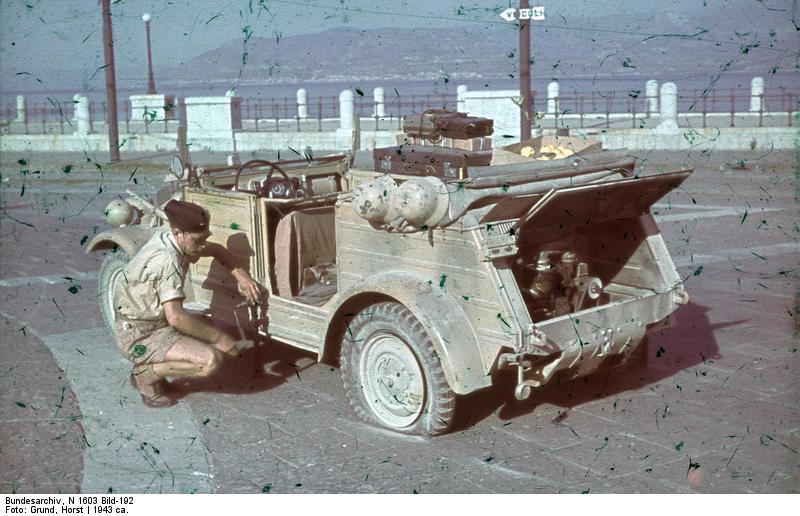
In addition, I will be making some modifications to the kit as I go along based on the inspiration of these two photos of F2s in Afrika found using Google Image search along with the configurations provided in the Bison markings sheet.

And, just to make things interesting…my wife asked me the other day how much time it takes me to do a build project…and I could only guess, so this one will be more “precisely” documented as part of the build log process to include total time per update/session as well as “time to date” in the posts. To be honest, I’m a little curious myself! I won’t include time spent “waiting” for things like paint to dry or cure, etc. only actual time building or actively working on this project.

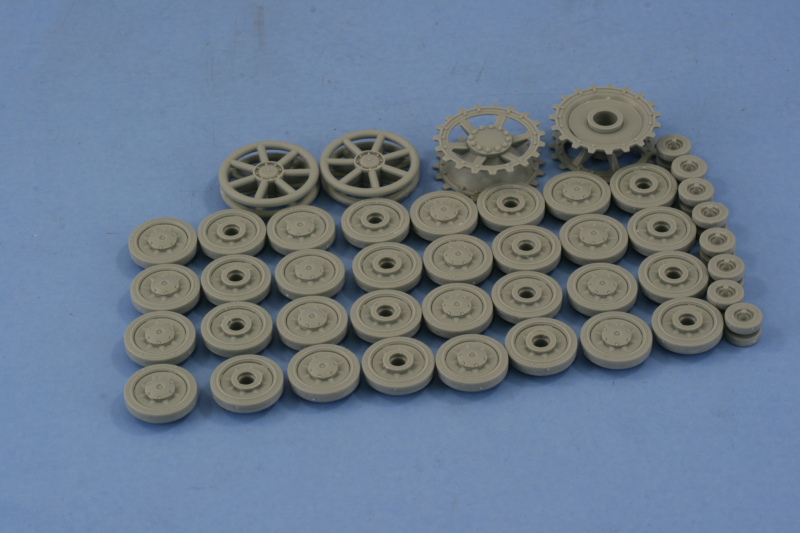
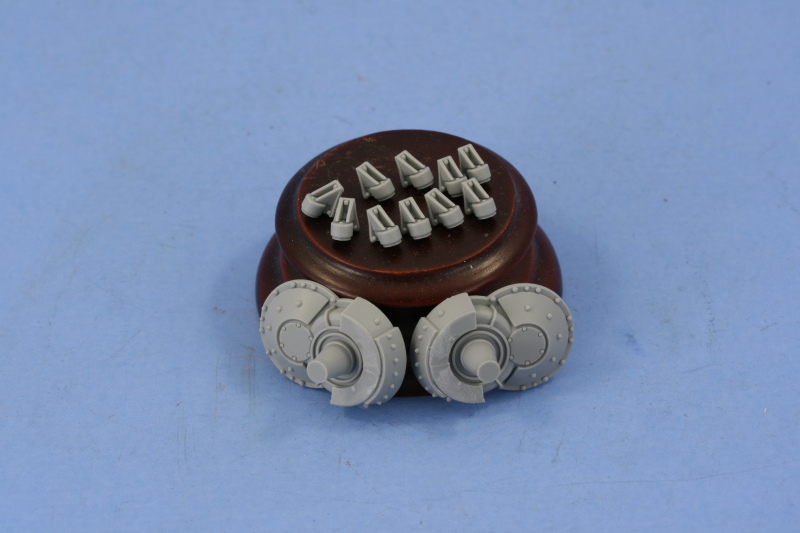
So, with that lengthy introduction…here’s the first installment. I began with Step 1 which deals with the road wheels, sprockets and idlers. The sprockets were assembled with their 4 parts x 2 (two halves, hub, and back insert) as were the idlers (2 x 2 parts). The return rollers (8 x 2) first had their mold seams sanded down and then were assembled, and the road wheel halves (32) also had their seams sanded down and their hubs (16) added but left separate to facilitate painting later on. That makes for a total of 76 parts for this first step…and it’s as far as I got today.

Total time: 3.25 hours

Total time to date: 3.25 hours

I just got this kit! It’ll be interesting to see how our individual products turn out! I’m gonna do a little scratch work, and make wheel racks for the two extra road wheels the kit includes, not sure what camo scheme yet, only time will tell.

TacoBuff,

I’ve built the IV G and these are supposed to be virtually the same kit just with the features swapped around of course between the different Ausf. The G built up like a dream…so I’m expecting smooth sailing with this one. The kit actually provides enough parts to create 4 spare wheels, so there’s lots of opportunity there to mix/match depending on the vehicle you go with. There are photos of the ones with LAH in France for example that have 3 road wheels mounted along the left side below the turret in a “special” field-mod mount, so you can really get creative with this depending on the version (even though the DML instructions don’t point this out). Look forward to seeing what you do with yours. [;)]

I will be following this closely as I have a PzIV waiting in the stash and this is my favorite time period to model!!

I wish references were clearer because the orders are specific, but photos don’t really show the camoflage clearly IMHO.

Go man go!

Well, I’m all strapped in.

!http://www.thelastsuperman.com/disastermaster/%23t1-4.jpg

This is going to be fun to keep up with. I just signed up for Dupes’s 1000 Road wheel GB Panzer IV and Variants and this looks like the kit I am going to order. Looks like the DML 6063 Panzer IV f2 G.

Jeff

Definitely following this build. Afrika Korps topics always spark my interest.

Oh goody! Gonna settle in the easy chair grab a few cold ones and some pretzels and I’ll be set.

I have to agree with you aboutthe DML kits. I’ve done the F1 and the G and they were a real treat to build. Can’t wait to see what detail oyu pick out of the photos. I like the spare track draped over the turret. Also, is that a pioneer tool clasped to the side of the hull? Would that have been a field mod?

Do you a scan of the scheme you can throw up here?

Ya got my attention. Let’s see where this goes.

[:P]

DM, Jeff, SgtBrown, MR, Swanny appreciate the interest…since I’ve got the full week of vacation still, this one will probably go quicker than most, at least for the building phase! [;)]

AgentG, Marc the two-tone schemes are incredibly difficult to pick out in b/w photos because they are so similar to each other to begin with. Add in a good coating of dust and you’ve got what looks like a single overall scheme. I was able to find 1 good color photo in the Bundesarchiv of a Kubelwagen in the Tropen scheme (caption says Sicily 1943 but that was also considered a “Tropen” area)…here it is:

Even in color you can see that it’s hard to make out the two different tones, but they are there and the darker color is most certainly not Panzer Gray.

Marc,

Yep, it’s the tensioning wrench for the idler…and strapped to the lower hull since it had to go somewhere to make way for the jerry-can rack on the fender side! That’s one of the things that immediately sparked my interest with these photos…both have the jerry can rack but only one has the spare wheel holders on the back of the air intakes. The spare track draped over the turret is also something I’d planned to add…a common DAK practice to help add protection the thin top armor against strafing aircraft and shell splinters.

Looks like another winner-to-be, Bill. INteresting stuff about the paint schemes.

Do you ever use standard kit indy link tracks?

Doing a DAK paint scheme of my own, so watching w/ keen interest. [8D]

You sneaked this one in on me Karl! Increasingly I’ve been moving away from using kit-supplied indy links as I’ve started to enjoy the flexibility that workable tracks provide especially with the pigment weathering process, but I haven’t abandoned them entirely…it really depends on the kit. The DML magic tracks have pin marks on each link that have to be cleaned up but I still keep them around as they come in very handy for things like adding additional runs or spares, so the assembly time with the MKs is roughly comparable to the clean-up I would have to do on the magic set anyway.

Though everyone’s work speed is different and projects vary in complexity, I find it intriguing that you’re documenting actual contruction time. I’ve often wondered myself when building. I see the FSM reviewers saying they spent this or that, but that usually doesn’t include much weathering. Compared to me, they seem to slam them together.

Afrika Korps topics and North Africa in general are interesting and under-modeled IMO. Curious to see the RML base on your model. I’ve been wondering what would be a cood match for I’ve got a few in the stash that ear-marked for Rommel. LOL

CosmicJ, appreciate the interest and hope you enjoy the ride. [;)]

Eric,

Way back many many moons ago I did something similar when I built the DML Leopold because someone asked “how much time do you think it will take to finish?” and I honestly didn’t know but I don’t do this as a normal practice. I’m very curious to find out since I normally think of things in terms of chronological time (i.e. 4-6 weeks) vs. actual man-hours of effort.

I agree with you that Afrika subjects don’t get the attention they deserve…which is kind of odd IMHO since they provide a convenient escape for those looking to model vehicles in the 1941-43 timespan that don’t feature Panzer Gray or Whitewash but still provide some variety. When I asked on Armorama about available “Tropen” RAL colors, Testors has both the '41 and '42 schemes in enamels but not acrylics and some of the other acrylic suppliers like Lifecolor had some but not all, so that’s probably a big factor as to why two-tone schemes don’t get done as much as they should?

Hey Bill, a coincidence. I just recently picked up a set of those Bison decals and really liked the Tropen schemes. So much so that I entered a second build into Dupes’ 1000 Road Wheels Group Build; the PIV F1 (DML 6315), to be modeled as tank 403, Pz.Reg. 5, 5th Leichte Div in Tobruk, March 1941 (in the RAL8000/7008 scheme). So I’ll certainly be following this.

[tup]

Don

Wow Bill the dust on your stug hasn’t even settled and you’ve got another one going already. Looking forward to watching this one[^].

Now when are we going to see that first figgie of yours?

Don I’ve got the F1 in the stash as well and I’ve heard great things about all three in the IV Smart Kit family, look forward to seeing what you do with the '41 scheme!

As soon as one finishes, I start another…and only work on one build at a time as a rule. Normally there’s an intervening week before I start on a new project but with my holiday vacation still having 1 more week to go, I couldn’t let it go to waste!

As for my first figgie…well only time will tell on that one. [;)]

Moving right along, work continued today with Step 2. This step has 2 sub-assemblies which deal with the bow and rear hull plates. The bow plate received the tow bracket mounts and hooks while the rear plate was assembled from 3 parts.

These were then installed along with the front halves of the final drive mount plates to the lower hull.

Step 3 addresses more elements of the suspension and also has 2 sub-assemblies, one for the final drive housings and one for the two-part assembles for the 10 bump stops. The armored housing for the front of the final drive is actually 3 parts that assemble smoothly, just a little bit of sanding required where the top and bottom halves meet on the outer surface.

The rest of the step installs the previous sub-assemblies along with the mounts for the suspension elements and the rear tow hooks. The side fuel filler caps are also installed.

Step 4 addresses the details for the rear hull plate and, you guessed it!, has two sub-assembly steps which deal with the multi-part muffler/exhaust and the idler mounts. The muffler consists of 7 parts and goes together well, the only modification I made was to widen the hollow opening for the exhaust pipe a bit with a drill bit and round needle file.

I also assembled the two-part turret traverse motor exhaust and drilled out it’s molded solid exhaust pipe with a #80 micro-drill bit.

One thing I should’ve paid a bit more attention to was the “handed” nature of the idler mounts…they are designed to only fit one side or the other and when I installed the small angled pieces I didn’t check that first and so installed them upside down in the previous photo. That was fixed before installation and the hollow lower hole re-drilled out a bit to repair some of the slight glue damage that resulted.

I installed the main and auxiliary exhausts along with the cooling filler pipe and cap and chose the middle version of the tow pintle as a compromise between the three versions offered.

Step 5 is a fairly simple step, it assembles the glacis plate out of two parts and the option is presented to open up the holes for the spare track run. Photos of F2s show some had it, some didn’t…and the two reference photos I’m using split the difference between have/have not so I decided to go ahead and fit it. The track run itself will be fitted later after painting. The brake access hatches had their armored covers added and the hatches installed to complete the step.

Step 6 is a busy step…it essentially installs all of the suspension and running gear. I only installed the suspension elements but left off the road wheels, sprockets, and idlers for later. Since the sprue here is a common one with this kit and the G, make sure you choose the right circular caps by following the call-out in the instructions as the two types are side-by-side and it’s easy to clip off the wrong ones if you aren’t paying attention.

The glacis plate was also installed in this step to round things out.

Next up will be fitting the fenders and then on to the upper hull!

Total session time: 5.25 hours

Total time to date: 8.50 hours