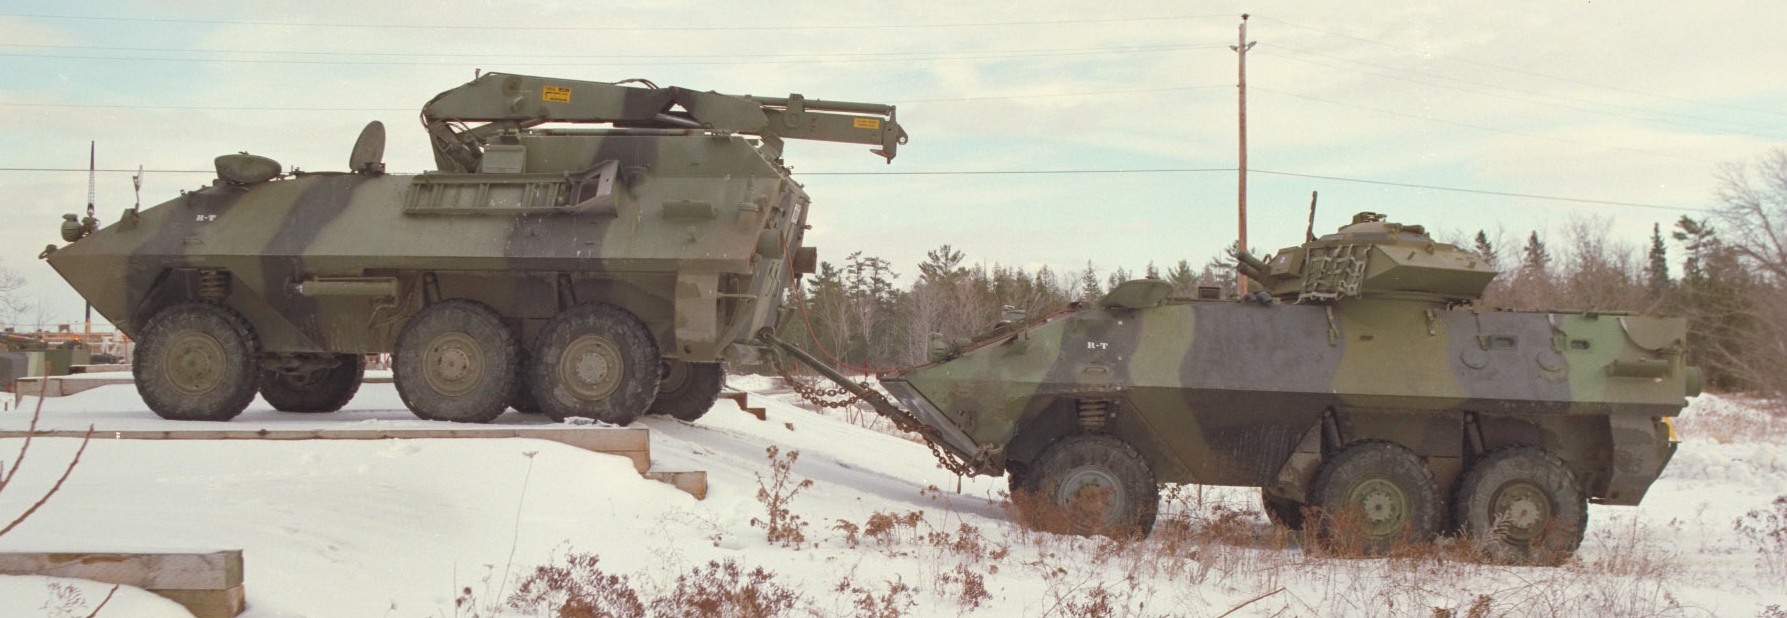
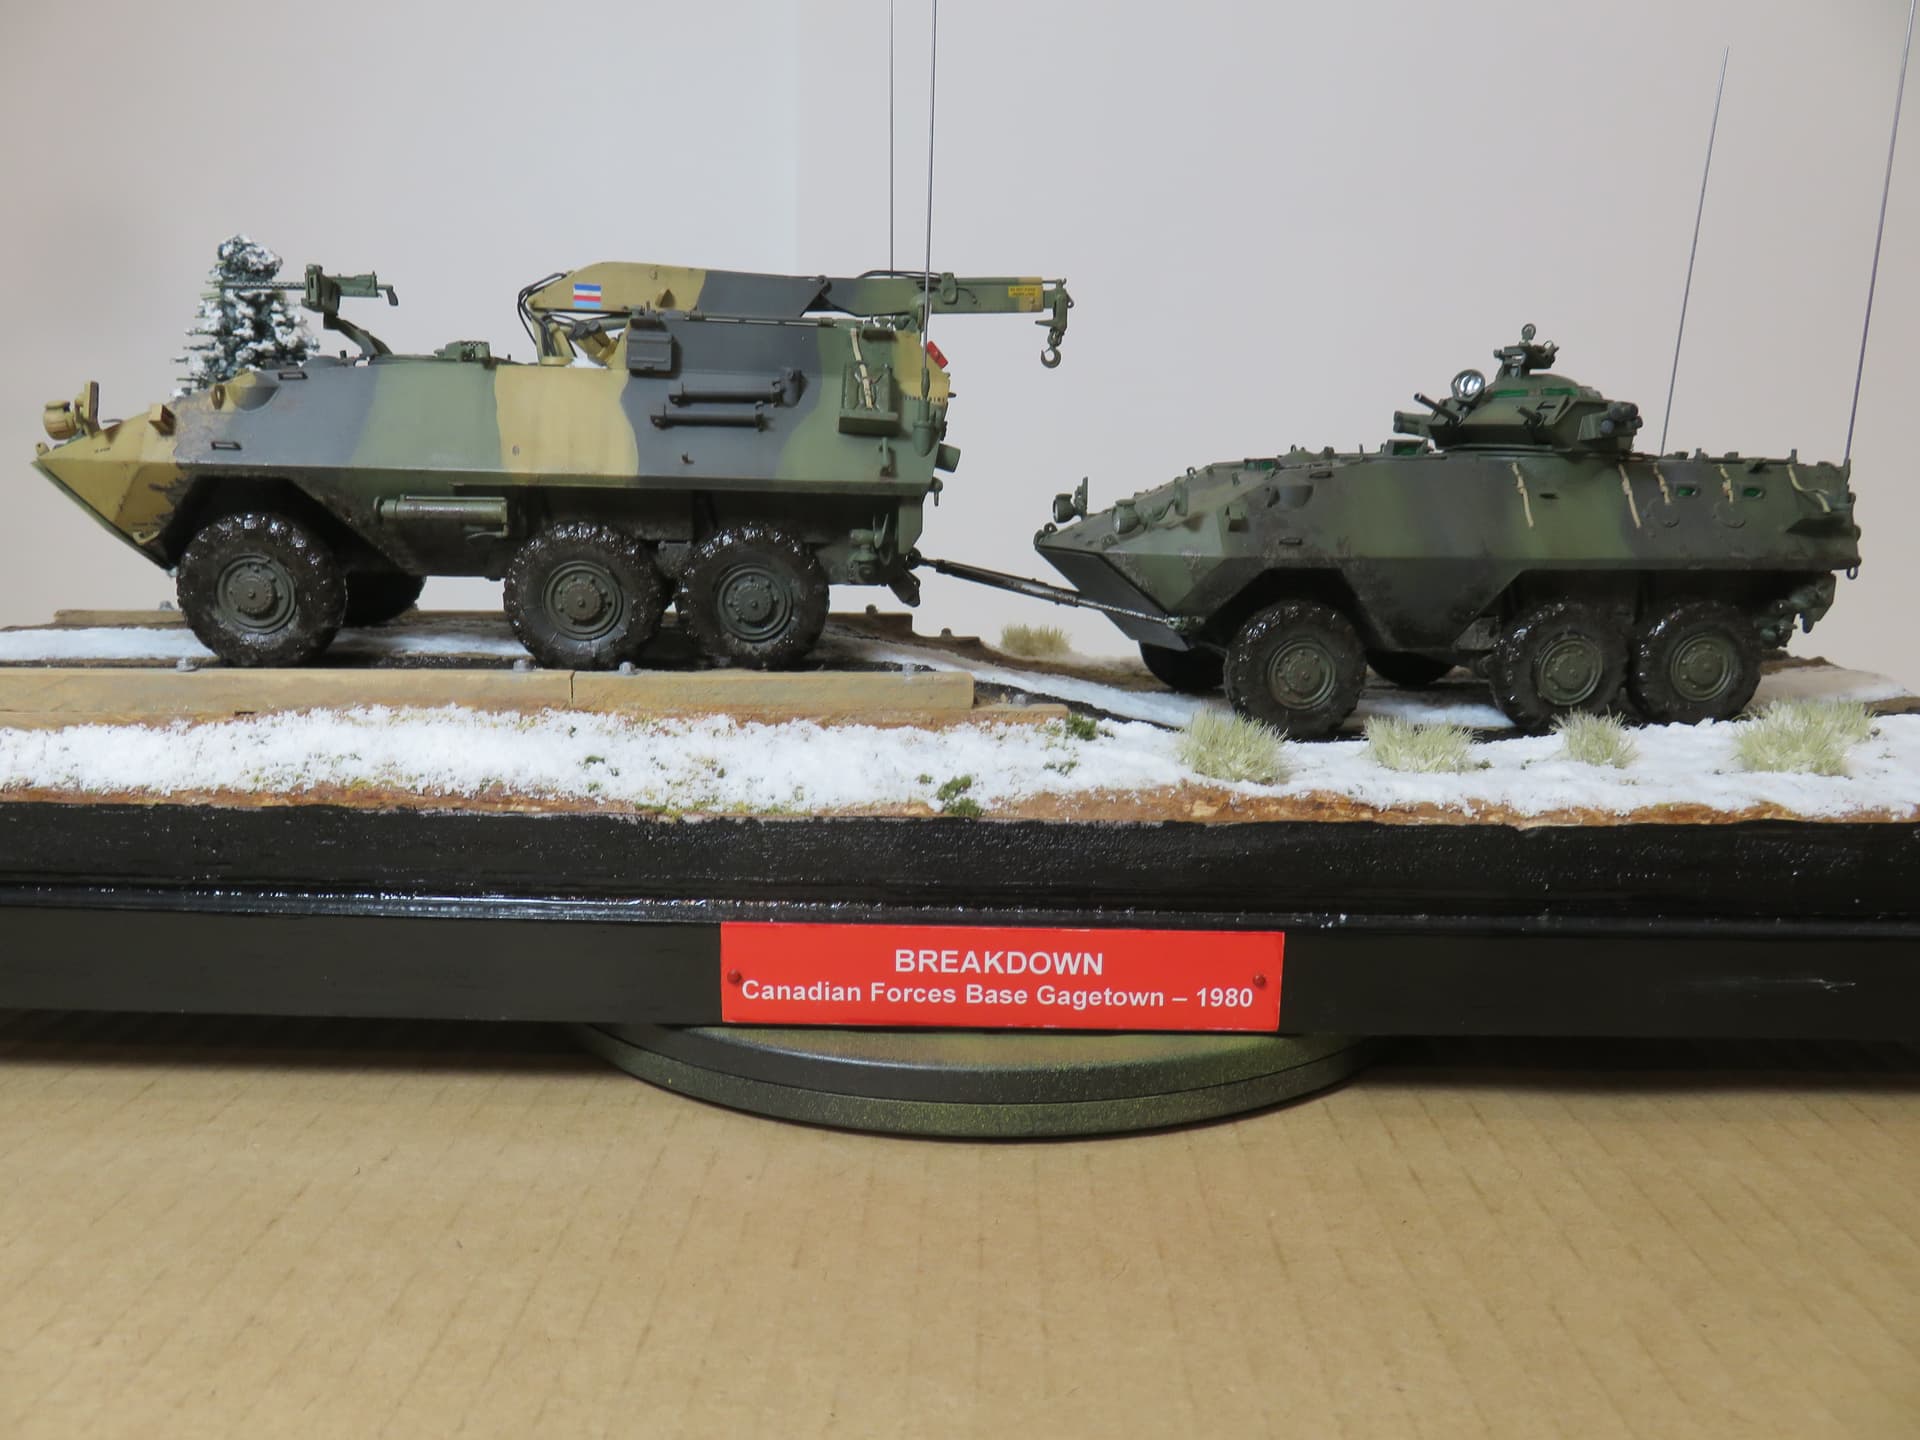
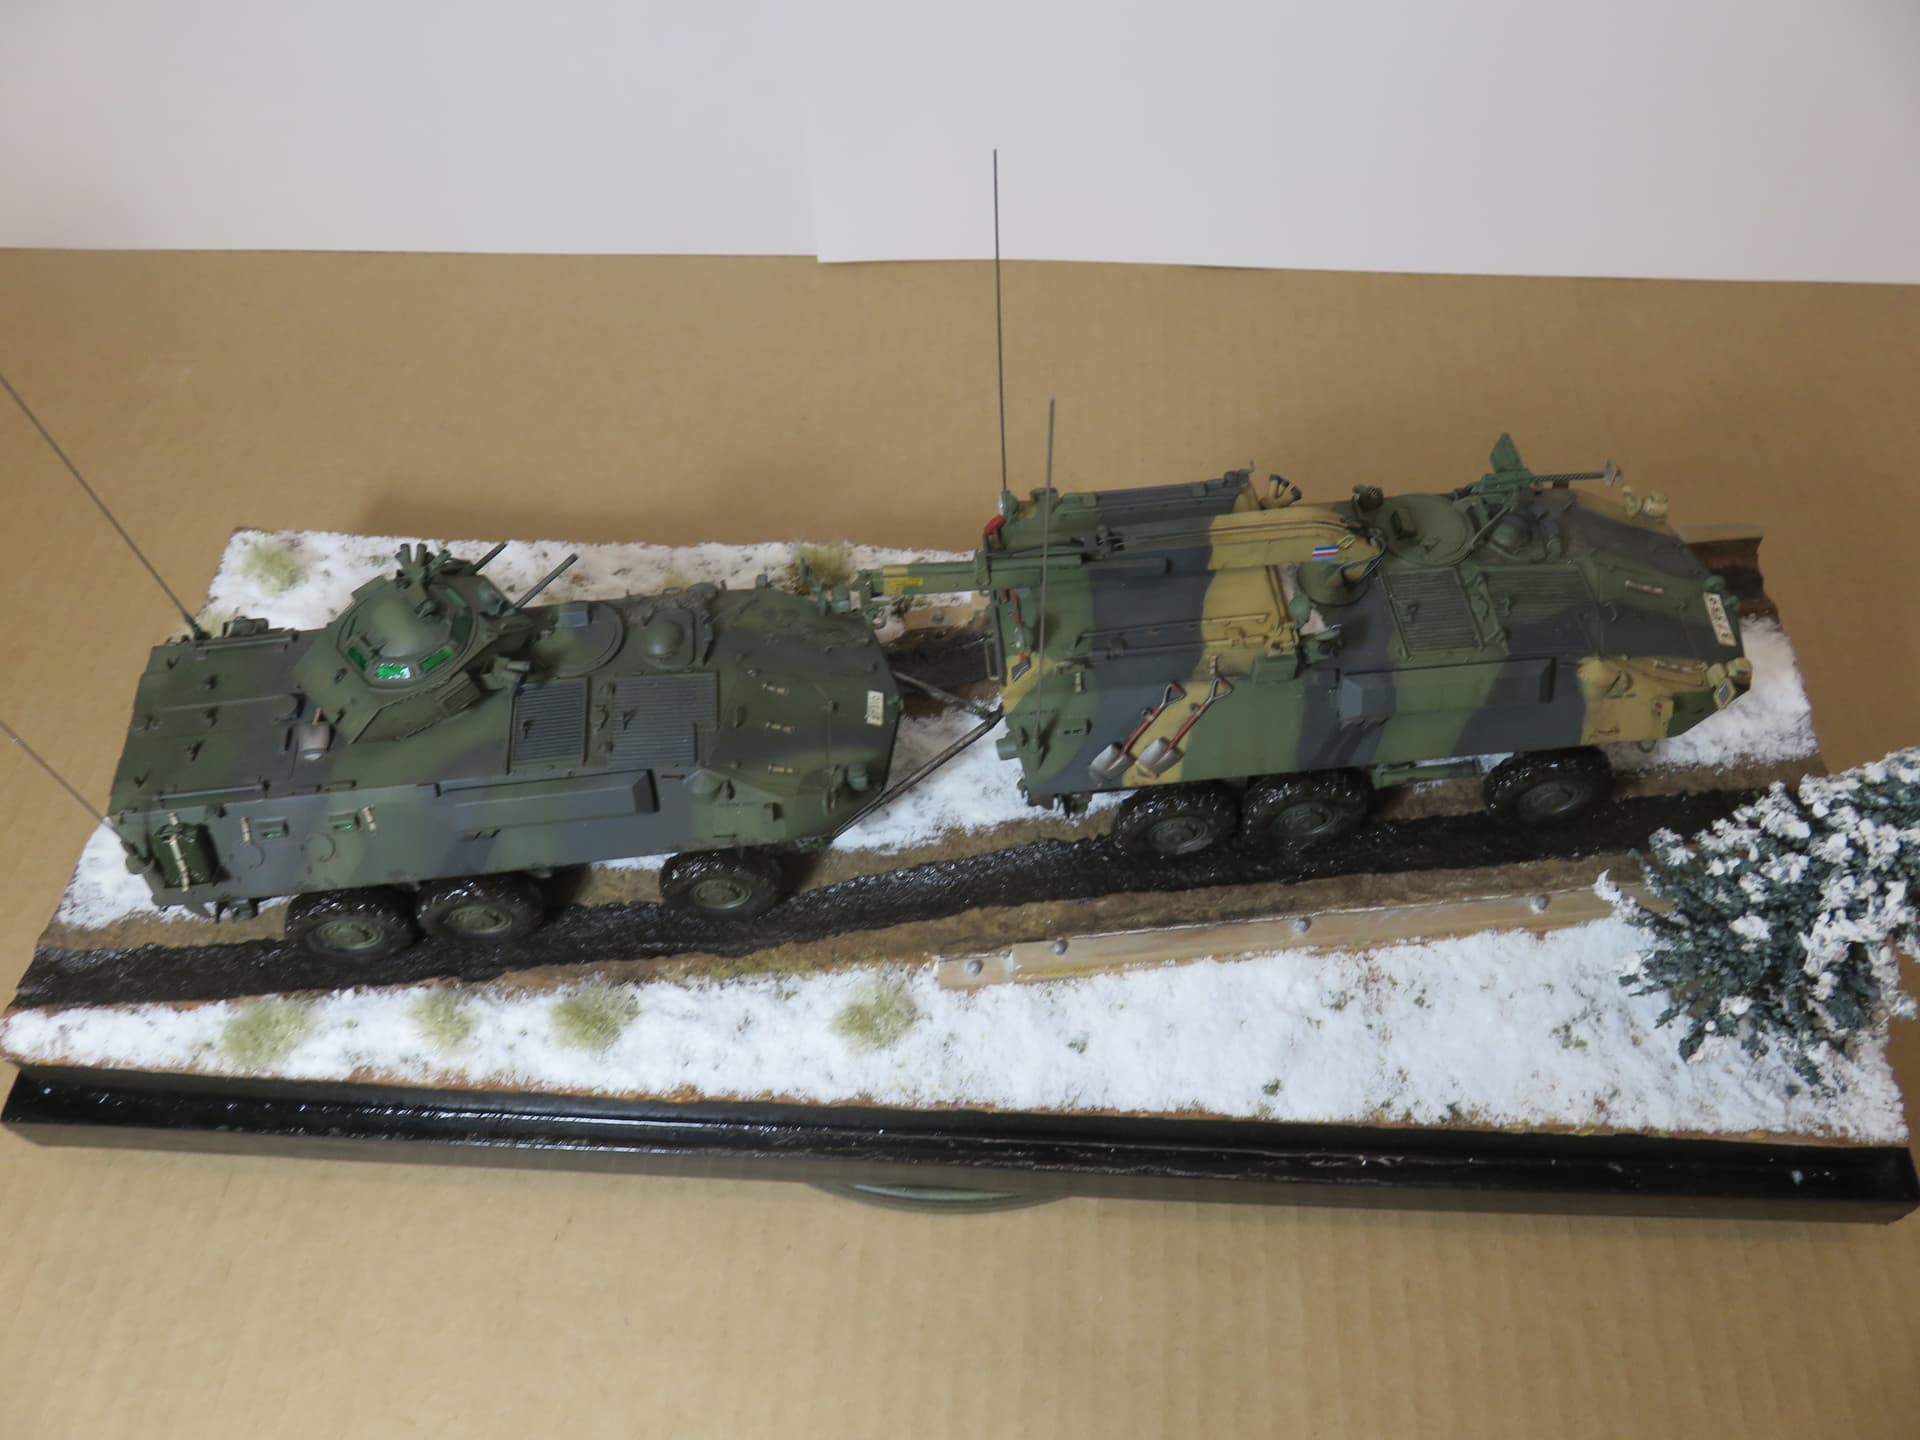
In this diorama, an Amoured Vehicle General Purpose (AVGP) Husky Armoured Recovery Vehicle (Early Version) tows an AGVP Grizzly Infantry Section Carrier (Early Version) that has suffered a mechanical failure during training at Canadian Forces Base Gagetown in Oromocto, New Brunswick during the winter of 1980.
Having both the Trumpeter AVGP Husky (Early) (Kit No. 01503) and the Trumpeter AVGP Grizzly (Early) (Kit No. 01502) in my stash inspired me to build this diorama after finding a picture of a Husky Armoured Recovery Vehicle towing a Grizzly Infantry Section Carrier. But this was not going to be an out-of-the-box build. Both kits have accuracy issues. Armed with a couple sets of Eduard Canadian AVGP Grizzly Photoetch Detail Set (Kit No. 36232) for the Trumpeter kit and with research from Anthony Seward’s Canadian Wheeled Project AVGP DVD (#AS008), which includes suggested tweaks to both kits, and from on-line kit reviews, I set out to correct as much as I dared to bring the kits closer to the Early versions they purport to be.
There were a number of changes common to both the Husky and the Grizzly that I made during the build consistent with the Early versions of each:
• Omitted the propeller or rudder guards as early production vehicles did not have these.
• Deleted Part A5 x 4 so that there was only a single front shock on each side.
• Added Eduard steering stops that are missing on the kit hull.
• Ensured that the tire treads faced forward (i.e. the chevron pattern should be angled downwards to the front of the vehicle) as the kit instructions show the chevron pattern facing in both directions.
• Used Meng Nuts & Bolts – Set C to add a hex nut for a check plug at the centre of each wheel.
• Added recessed valve stems to each wheel.
• Opened the bottoms and backs of brake and vent line covers for the four rear wheels (Parts A26, A27, A38, A39, A40 and A41) in order to resemble thin metal covers.
• Tie downs were replaced with Eduard photoetched items.
• Wire cutter was omitted from the hull.
• Added a scratchbuilt power hook up for the windshield electrical connection just left of the driver’s hatch/left of the left periscope.
• The kits provide water type jerry cans. These were replaced with fuel type jerry cans.
• Added Eduard photoetch covers over each of the driver’s three periscopes in place of Kit Part B10 which is used only for the AVGP Cougar.
• The raised lip around the engine grills was sand down to be more in scale as it is too high.
• Lifting eyes were added to the engine grills using copper wire bent to shape and superglued in place.
• Out of scale and too short antennas were replaced with 0.015” music wire cut to 93 mm to achieve the correct length.
• Missing weld beads around the vision blocks were added using Archer Surface Details – Arc Weld Beads.
• There is a molded block on the upper left rear hull that is not present on the early Husky or Grizzly. It was sanded off and replaced with two small pieces of stretched sprue aligned side-by-side.
• The rear door lock was omitted as locks were not fitted on early-version Huskies and Grizzlies.
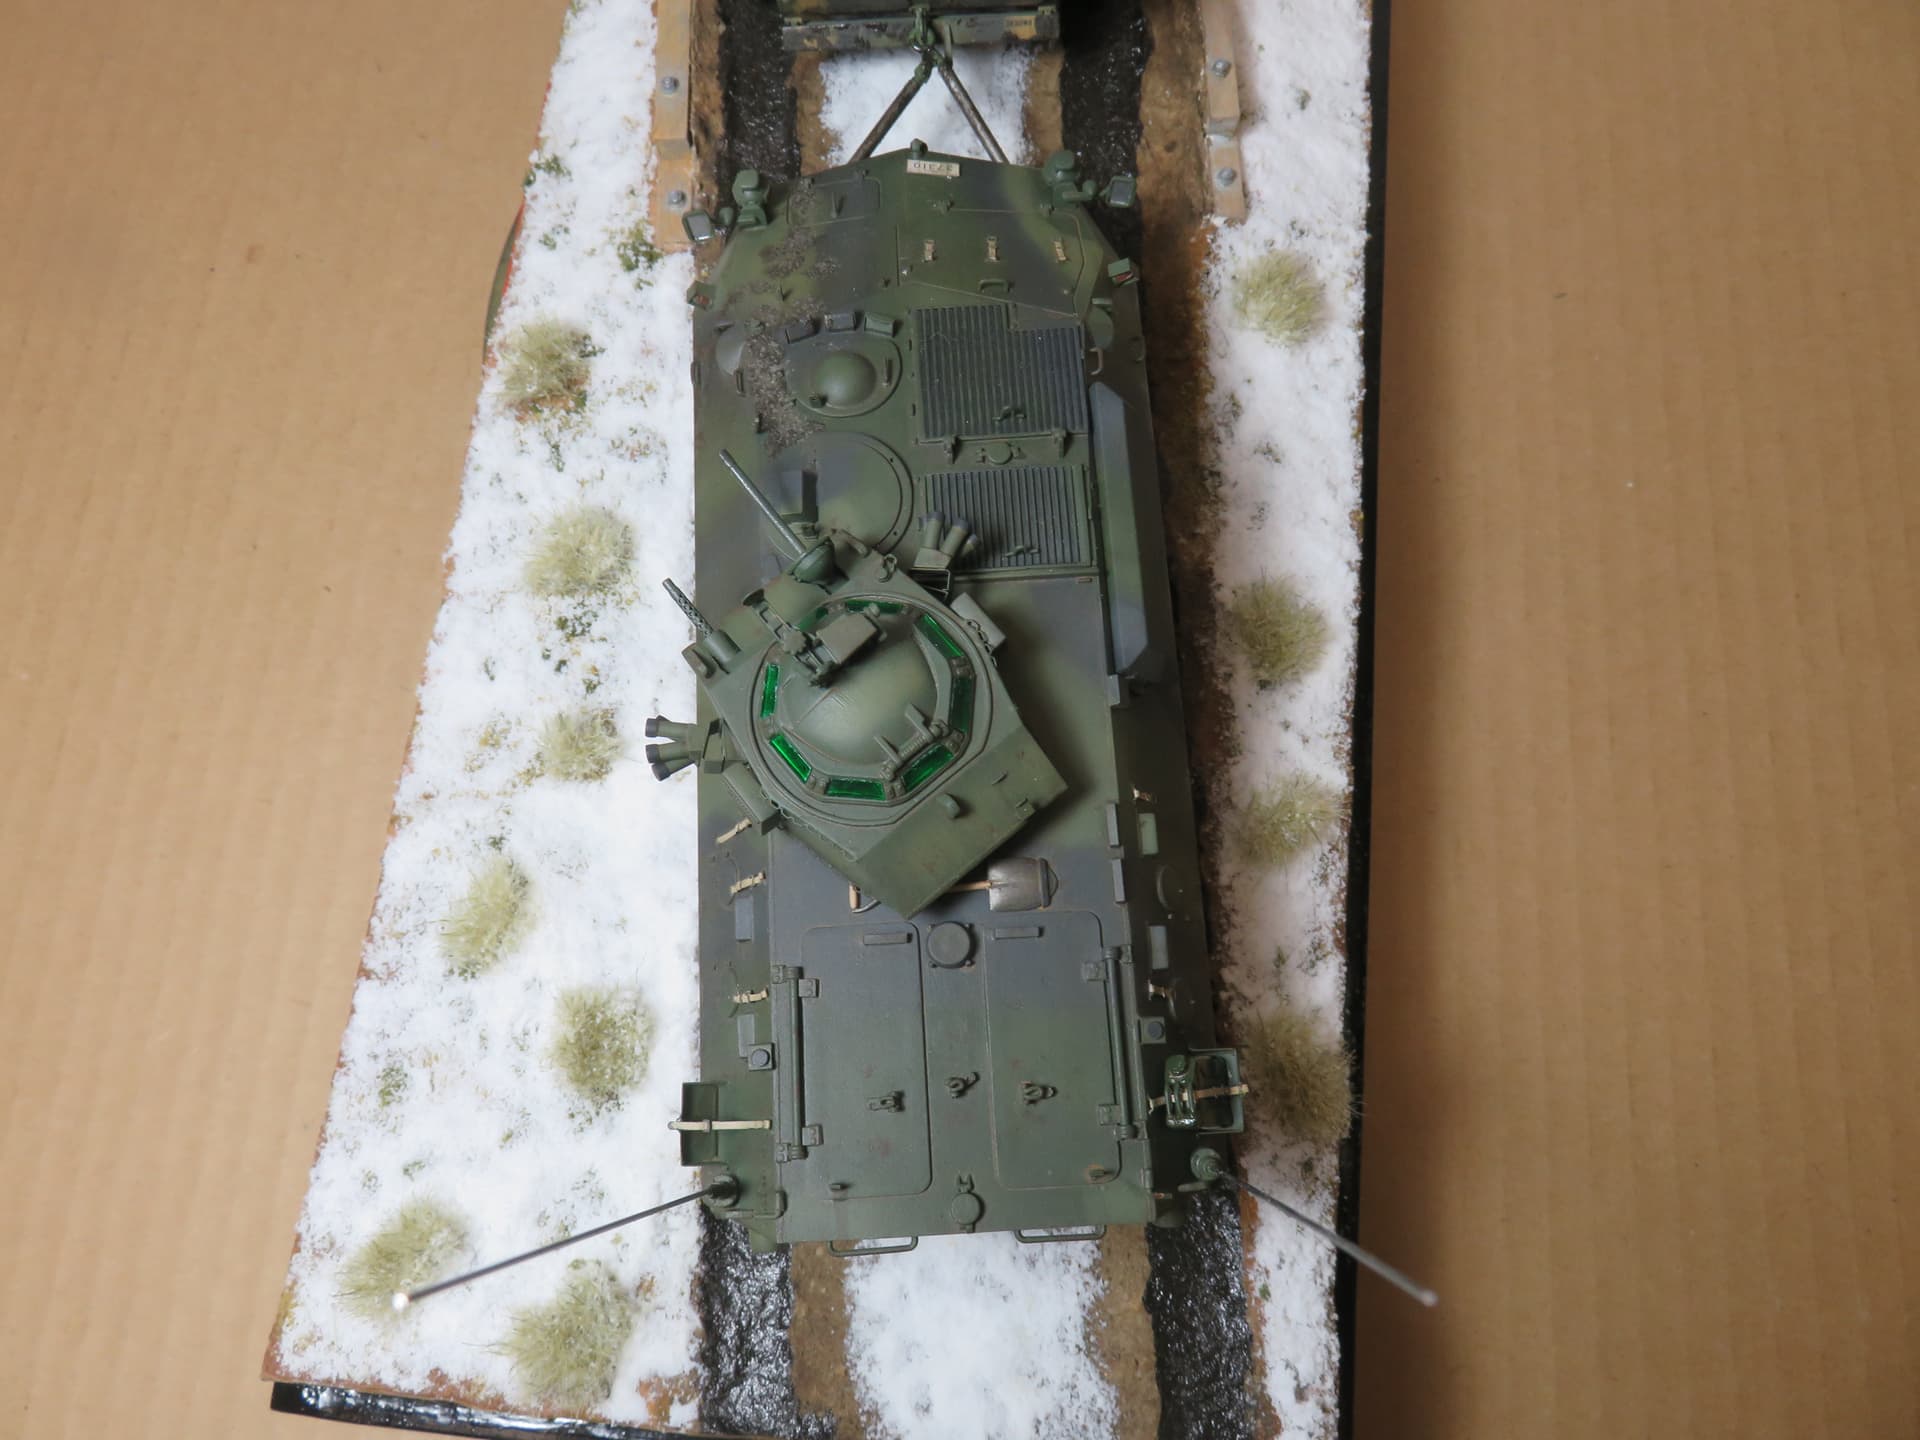
• Vision blocks and periscopes were painted Tamiya X-11 Chrome Silver and then overpainted with Tamiya XF-25 Transparent Green.
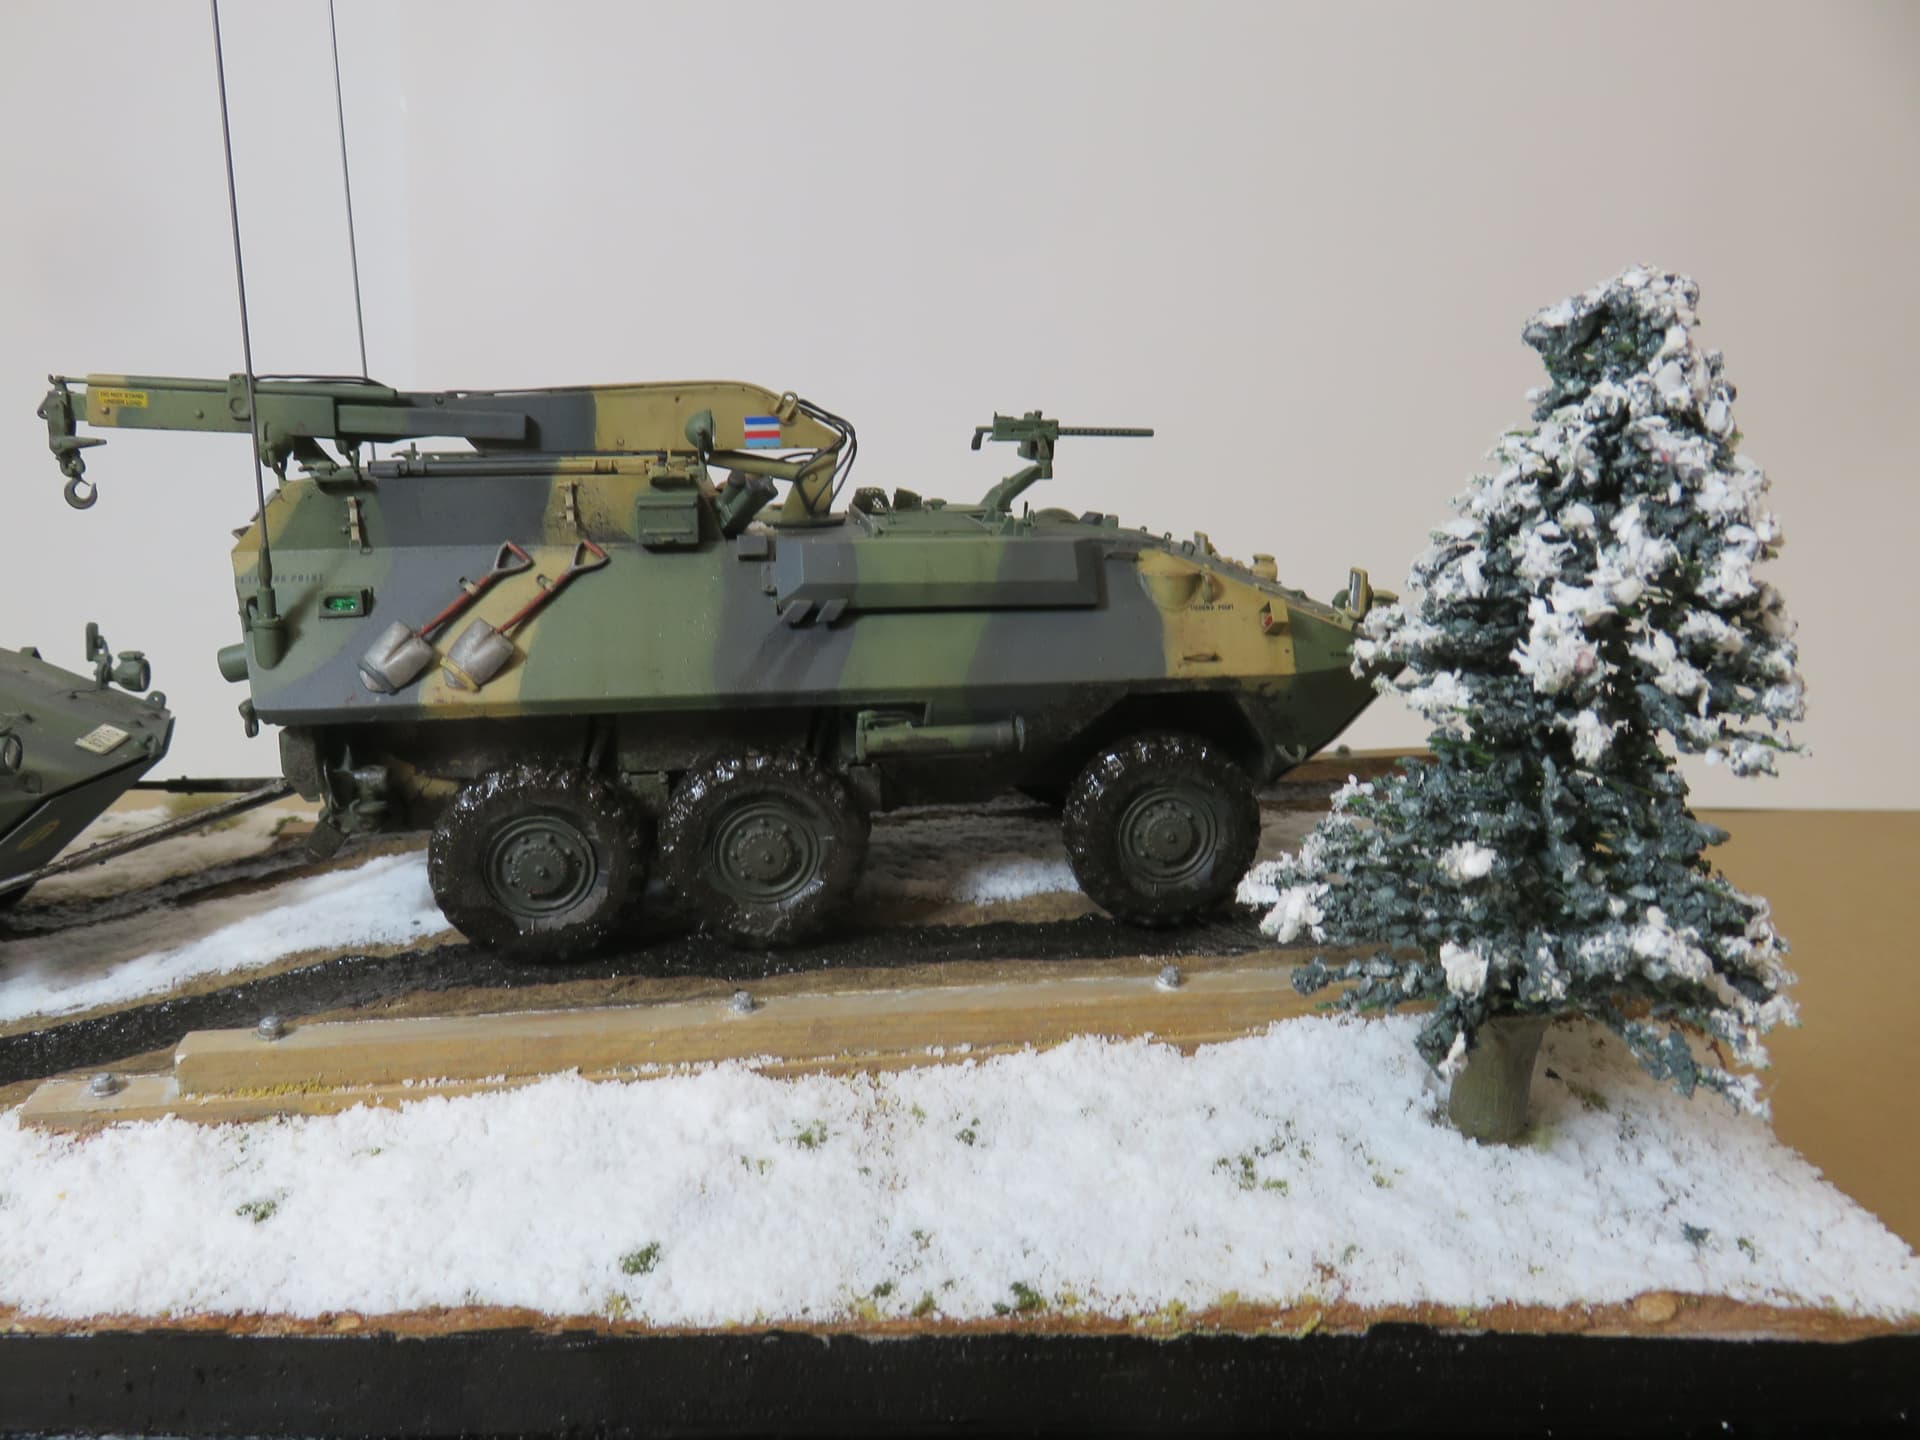
I made a few modifications specific to the AVGP Husky only:
• Replaced the kit-supplied 0.50 caliber machine gun and mount with an Asuka Browning M1919A4/C5 General Purpose Machine Gun (Kit #: 35-L26) and pintle.
• Tie downs molded on the left side of the hull were sanded off as they were not present on the vehicle.
• The rifle ports on the rear doors were reworked. Stop blocks were added - one at 9 o’clock and touching the closed rifle port and the other at 7 o’clock and about 2mm from the rifle port.
• Scratchbuilt electrical connection added above the left tail light.
• The early-version Husky was painted in a three-tone camouflage scheme as a two-tone scheme is more typical for a mid-version Husky. The model was painted with Tamiya XF-67 NATO Green, Tamiya XF-59 Desert Yellow and Tamiya XF-69 NATO Black using a Paasche H airbrush. Panel centres were faded with lighter shades of the base colours.
• I typically take a light-handed approach to weathering. My reason is to avoid covering up details and to allow the build and the paint scheme to show through rather than weathering effects. In the case of this diorama, given that the vehicles portrayed would have been in service for no more than a year (they came into service in 1979 and the diorama is placed in 1980) and given that they are being used for peace-time training, my thought is that the paint and overall condition of the vehicles would be well maintained (notwithstanding “Breakdown” is the title of the diorama).
• Weathering started with a wash of Abteilung 502 ABT006 Burnt Umber which was applied over a gloss coat of Pledge Floor Revive. This was followed by a pinwash of Abteilung 502 ABT006 Burnt Umber and a wash of Abteilung 502 ABT130 Dark Mud applied to the underside of the hull and to the wheels. A coat of Tamiya XF-86 Flat Clear sealed this work. AK Interactive AK012 Streaking Grime, AK014 Winter Streaking Grime and AK024 Dark Streaking Grime were then applied randomly around the vehicle with streaks blended using a damp chisel brush and White Spirit. Chipping was added using AK Interactive Weathering Pencil W19 Chipping Color. AK Interactive Pigment AK2038 Smoke was brush on to add staining to the exhaust. The mud on the bottom of the hull and on the wheels was created using AK Interactive AK617 Weathering Plaster Base mixed with AK Interactive Splatter Effects AK8026 Wet Mud. This was built up with several applications. The plaster causes the Wet Mud to dry without the wet effect gloss. Stipple AK Interactive Splatter Effects AK8035 Dirt and AK Interactive Splatter Effects AK8027 Dry Mud on to the lower hull. The lower hull and wheels then received a light brushing of straight AK Interactive AK8026 to restore the glossy wet look to the mud.
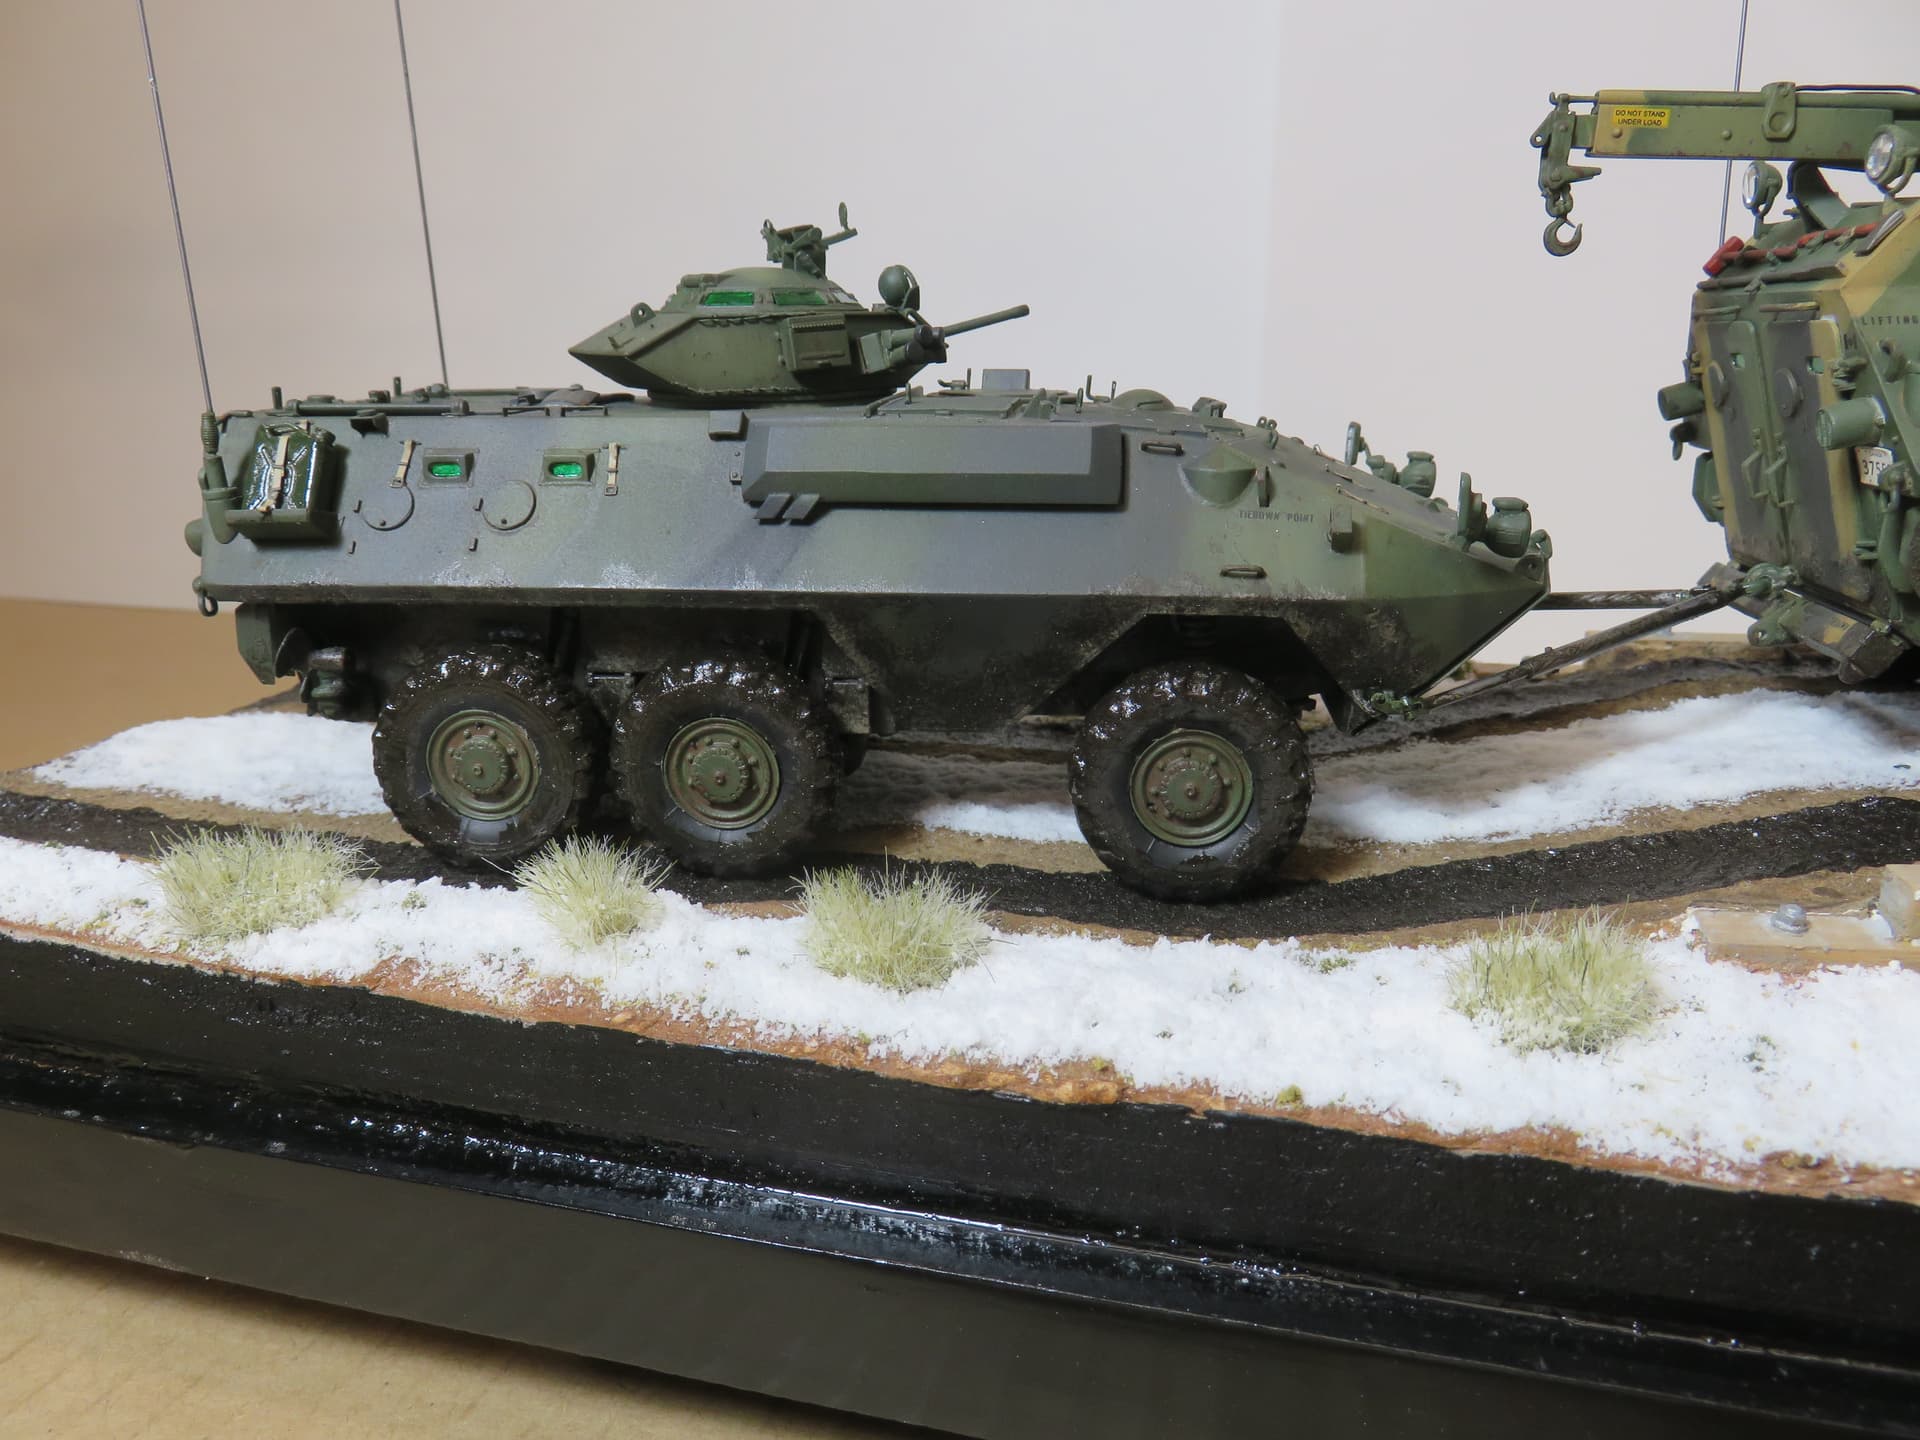
Similarly, a few modifications specific to the Grizzly were also completed:
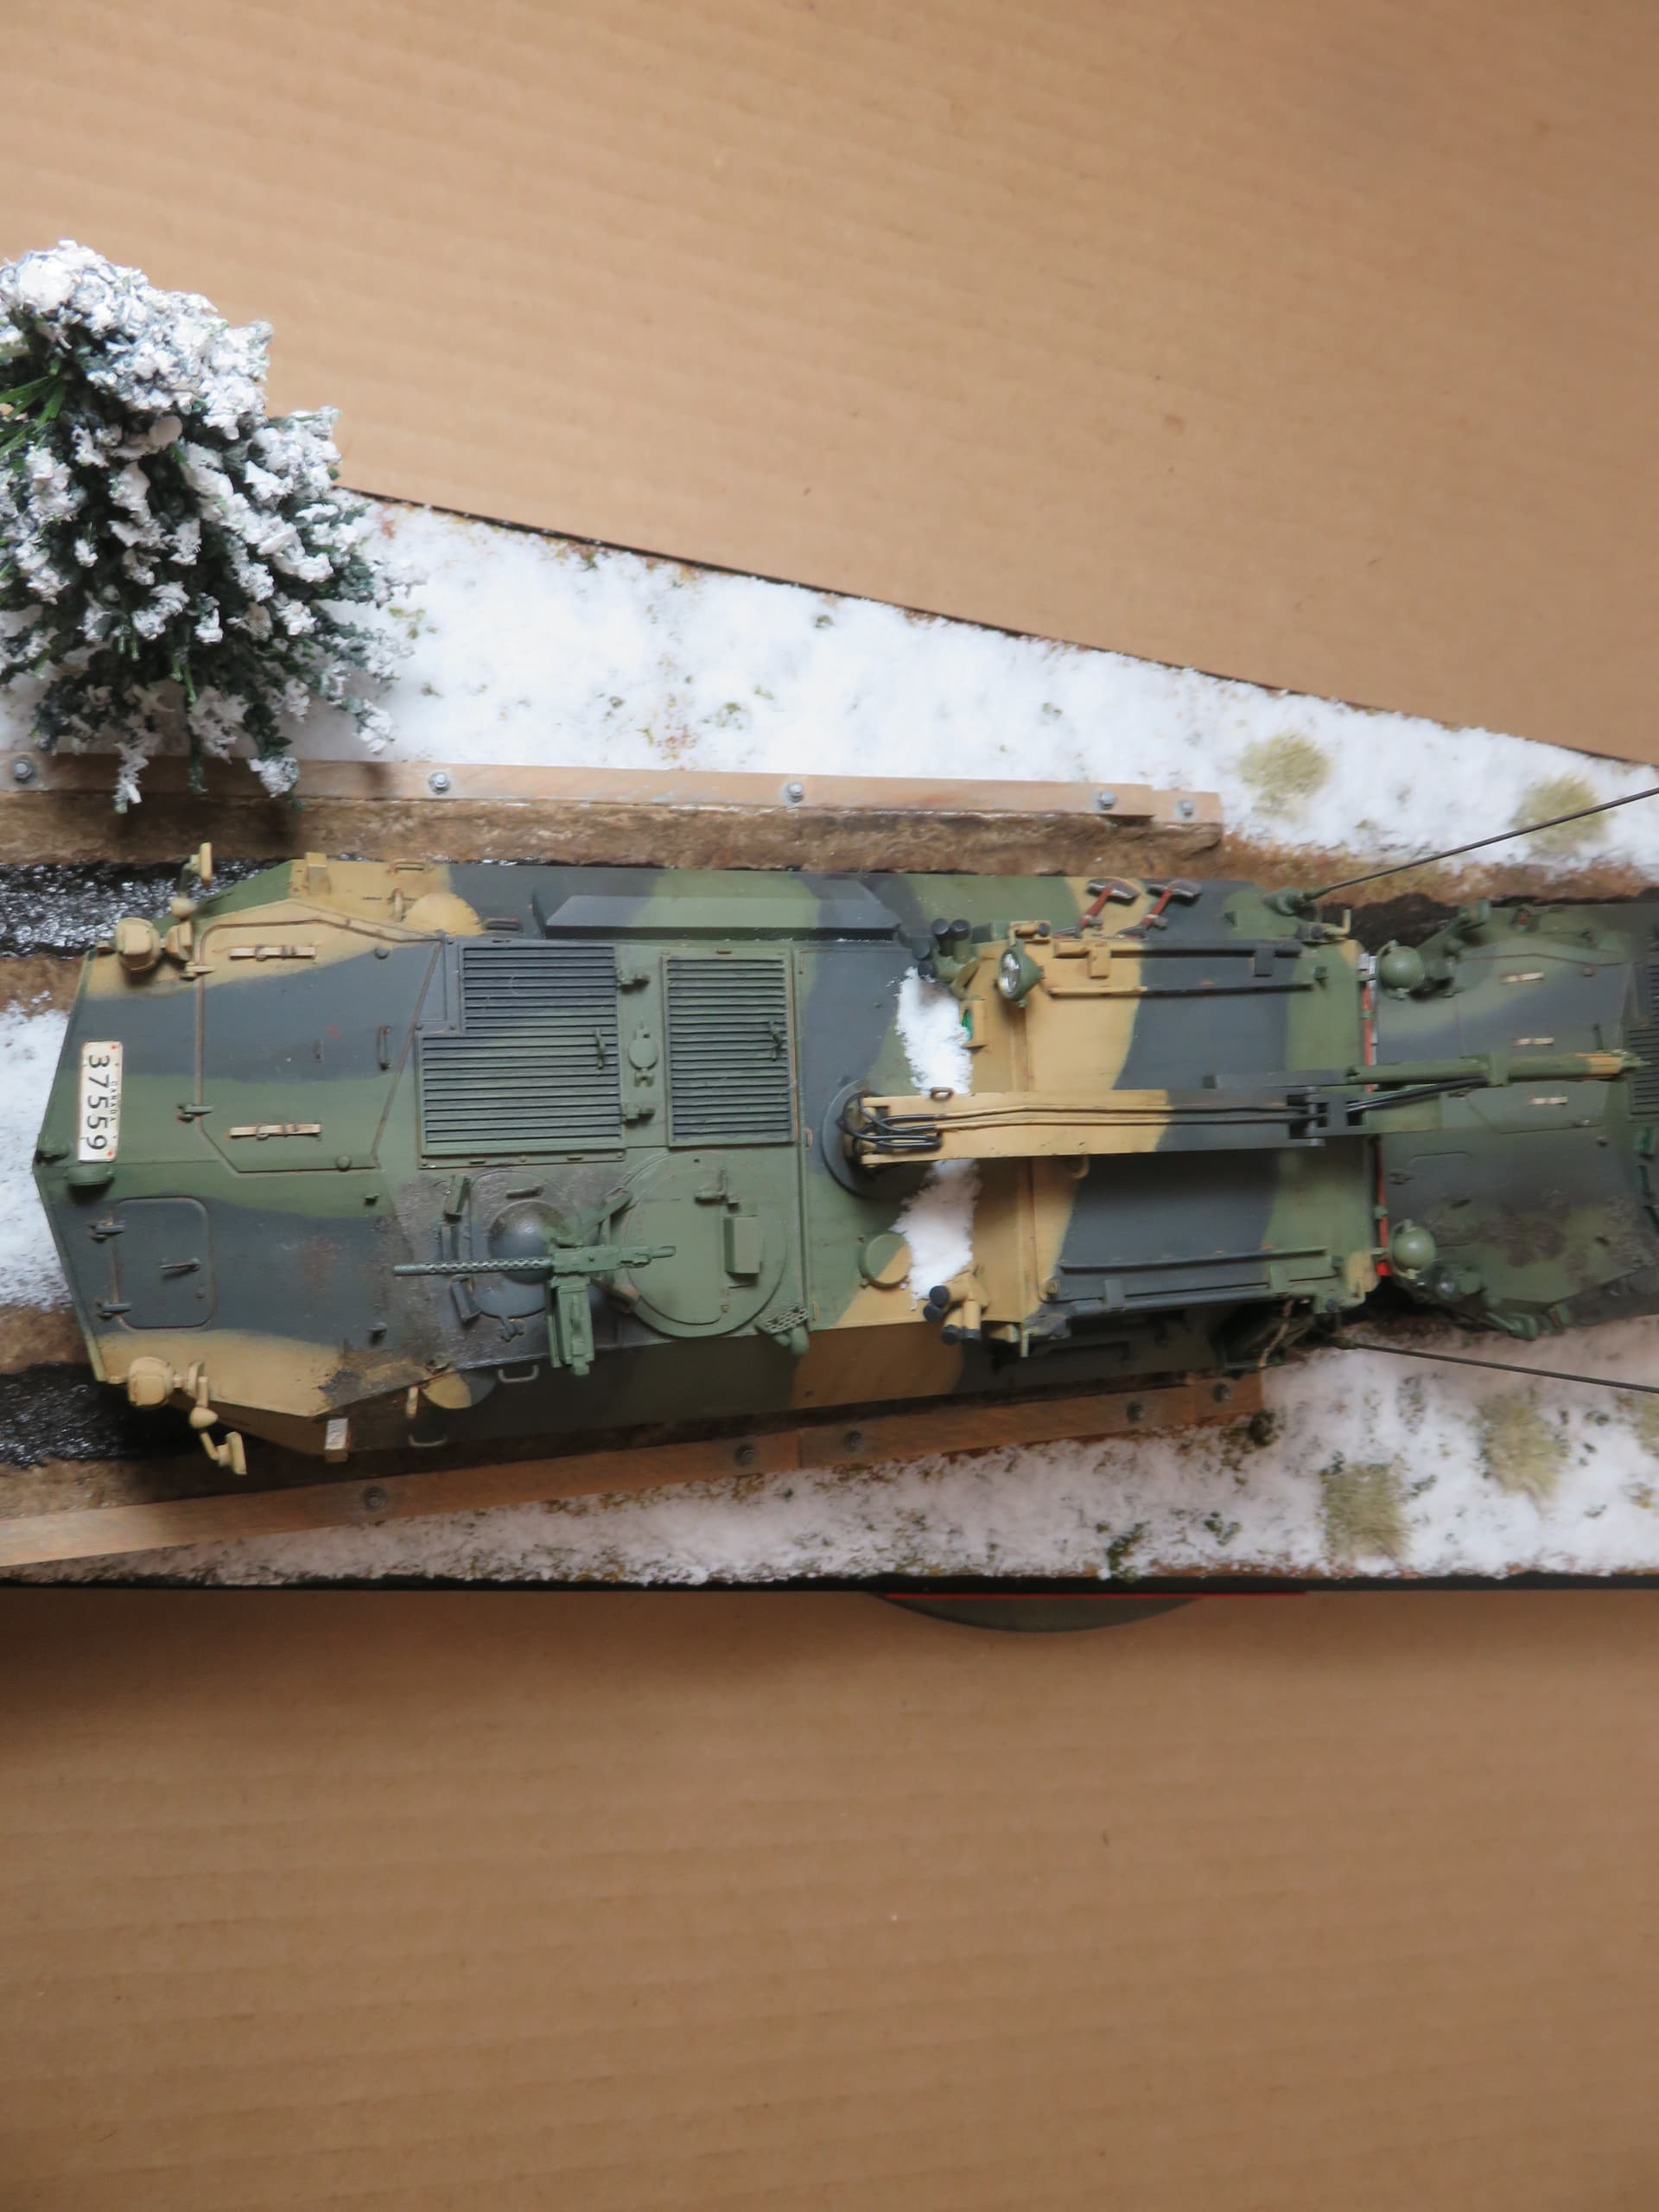
• The hole for Part H13, which is the land line connector for field phones and the two holes just to the left for Parts H24 and H25, which are the late version communications boxes, were filled as this equipment was not present on early-version Grizzlies.
• The jerry can racks were replaced with Eduard photoetch items and were raised slightly to be level with the bottom of the angled portion of the antenna mount.
• Hatch locks were added to the driver’s hatch and the two upper rear hatches.
• The side circular rifle ports were sanded off and relocated closer to the vision blocks.
• Each rifle port had revised stop blocks added as per the Husky and the small raised pin on each rifle port was relocated to 6 o’clock and not the 9 o’clock position as on the kit.
• The shovel was relocated from the back door and positioned between the upper rear hatches and the turret.
• The ventilator cover was moved to the front of the Air Observation hatches and not at the mid-point as on the kit.
• Note that the Grizzly instructions fail to include directions for assembling the turret, but instructions can be found on-line.
• Scratchbuilt monocular M28C turret sight as used on early-version Grizzlies. It took 39 parts, an Opti-Visor and a large dose of patience to achieve a reasonably facsimile of the real thing.
• The barrels for the turret mounted 0.50 calibre machine gun and 7.62 mm C5 General Purpose Machine Gun (GPMG) were replaced with more accurate parts. The former was from the Husky kit while the C5 barrel came from Master Model Browning M1919 .30 Calibre Barrels One Piece Muzzle (Kit #: 35005).
• The wire cutter was omitted from the turret.
• Continuous footman’s loops were added to the turret using Eduard photoetch items.
• Attachment points were added on the top rear hull for tripods used when the turret guns are dismounted. These were fabricated from fine solder.
• A scratchbuilt electrical connection for the turret spotlight was added to the right of the turret sight. This is where the electrical cord for the spotlight attaches.
• The external handle was removed from the outside of the gunner’s hatch and the hatch sanded to have a distinct flat rectangular spot in the middle for the internal locking mechanism.
• The early-version Grizzly was painted with a base of Tamiya XF-67 NATO Green with camouflage of Tamiya XF-58 Olive Green and Tamiya XF-69 NATO Black using a Paasche H airbrush. Panel centres were faded with lighter shades of the base colours.
• Weathering was completed per the process/techniques used for the Husky.
• There were a number of other opportunities to add or to improve details that I chose not to pursue as I believe the effort involved was either not worth the reword or was likely beyond my skills:
The front A-frames have what looks like a small bullet/narrow arrow-like shapes. These represent a bumper for the A-frame from hitting the ground hard and should be bigger and conical-shaped like nose cone (Parts A13 and A14).
The differentials are missing the shift cylinders for taking the vehicle from 4x4 to 6x6 drive mode.
The towing points on the bottom of the rear hull (Part A20 x 2) appear to be undersized and should be more like parts B20.
The lower hull sponson on the right-side 3rd wheel needs to be extended about 2mm.
The engine grills look to be in the wrong spot and both should be inset further from the right edge of the hull.
Antenna mounting units do not look correct.
The rear doors should fit flush with the rear hull, not raised as in the kit.
The side vision blocks should be sanded down as they stick out too much.
On the Grizzly, the vision blocks on both sides of hull are too far aft and should be moved 2 mm further toward the front of the vehicle so that the back edge of the rear vision block is in line with the front edge of the upper hatch bumper.
The Grizzly’s turret angles appear to be reversed/backwards. The front and back angled portions of the turret should be sawed off and their respective positions reversed. I studied this issue in some detail and have to say that to my eye the turret angles as molded look consistent with all of the many photos and drawings I studied, so I decided not to pursue what would be major surgery.
Summary
The diorama took about 151 hours to complete, including 57 hours to build and paint the Husky, 76 hours for the Grizzly and 18 hours to construct the diorama itself. The addition of the photoetch details to both vehicles added considerable time to the build of each vehicle (particularly for the Grizzly) but was worth the effort for the scale fidelity and extra details the photoetch adds. The weathering may be a bit too restrained, but I learned a lot with this build and I am sure my weathering techniques will evolve for projects still to come.