How do you add cast texture with mr. surfacer (500). Photo step-by-steps would be excellent, but a written tutorial is always accepted. TIA!
i stipple it on with a old stiff paintbrush and build up coats to the required effect , it dries quickly aswell, see my results on my jumbo sherman post, cheers , Andy
Funny you should mention your jumbo. thats what inspired me to ask!
As an alternative, I have done the same thing using squadrin white puddy thinned with laquer thinner.
Cast texture w/mr. surfacer eh? Check out bufflehead’s recent build: /forums/1/1140724/ShowPost.aspx#1140724 I’d bet that he probably could help you out.[:)]
Funny that this was posted! I was contemplating adding some texture to the turret of the JS-2 I’m working on now! Give me a little bit and I’ll post some photos and text to show ya how I do it.
I use Testor’s Liquid Cement and stab/stipple with a fairly stiff brush dipped in it…
Hans, I use that method also and quite successfully. However I use Tamiya Extra Thin or Tenax 7R…depends on how much texture I want. I’ll have to try the Testors and see how it works.
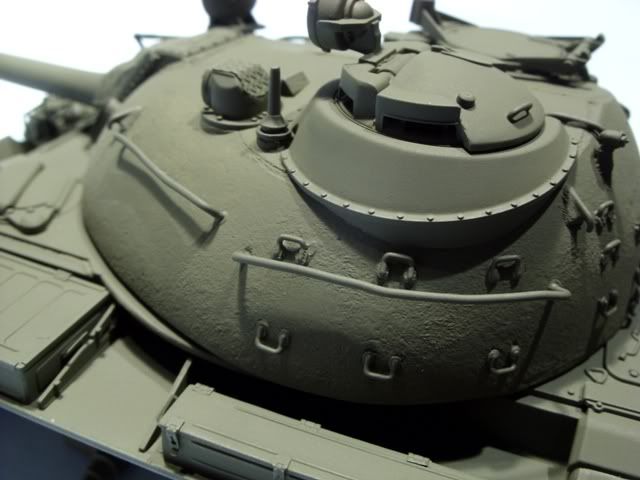
OK, here’s a little tutorial with pics on how to apply Mr. Surfacer to create texture on a kit. Be advised that I do not claim to be an expert in these methods! This is just a compilation of things I’ve learned over the last couple of years. If anyone wants to add to this or present better methods please feel free!
For this I’m going to use a leftover gun manlet from a Tamiya M4A3 kit. I left it on the sprue to make it easier to take photos. In this pic I’ve already masked off the screw heads with some blue tac and one of the larger holes is plugged with a piece of stretched sprue. The mantlet is molded with a little texture, but it leaves something to be desired.

I use Mr. Surfacer 500 for texturing as it goes on thicker than 1000 or 1200. Also shown are some of the stiff bristle brushes I use. The natural bristles on the top two were cut down to make them shorter/stiffer.

Just dip the brush into the Surfacer making sure all the tips are saturated, but you don’t want it dripping with Surfacer. BTW, make sure the Surfacer isn’t too thick, which can happen with an older bottle. If its too thick just add some laquer thinner to thin it down. A brand new bottle has the right consistency.

In this photo you can see the beginning of the texturing process. I stippled the surfacer about 10-12 times to get this far. I just dab and stab the brush with the Surfacer onto the mantlet surface, just straight up & down, with no lateral motion, no brushing back and forth. This is called “stippling”. Don’t worry if you don’t cover the entire surface at first. I repeat this process 2-3 times depending on how much texture and coverage I want.

Here’s the mantlet after 2 full applications. The Surfacer dries pretty quickly, but subsequent applications cause it to become somewhat tacky and this tackiness helps create the texture. I made this texture pretty coarse so that it can be seen in the photos. If the texture becomes too coarse don’t worry. You can smooth out the texture after its fully dried with some extra fine sandpaper or even some fine steel wool. In fact, this smoothing of the texture can create a more realistic representation of certain cast surfaces! I left the texture unsanded for the photos.

I applied one more light coat with the smallest brush and then removed the blue tac and sprue plug.

Lastly I quick coat of lightened Tamiya O. D. with the AB. You can see some roughness in the texture. Again, you can knock down these rough spots with some sandpaper or steel wool if necessary.

That’s it! The whole process took about 10 minutes (not counting the quick paint job).
I hope it helps!
I used Squadron green putty thinned with lacquer. Stippled on and just before it was completely set I lightly burnished it with the side of a brush hanlde with different pressure in spots. Then I gave it a light brushing of clean lacquer thinner to clean it up.
Cool… Neve tried Tenax… Had a bottle around somewhere’s years ago, but lost it in one of my many moves during that period and never replaced it. Testor’s is way cheaper, IIRC though.
Your texturing turned out pretty damn good though… As did Wing-Nut’s…
WARNING The method described above is NOT for the feint of heart, or if your prone to panic attacks!
Hans’ method works well…I have used this method too, but I highly recommend an old kit as a giunea pig. Experiment in small sections, say 1" square…and time the drying of the glue, try different brushes (ones you are willing to trash when done), and different stipling patterns. Last tip: if the glue gets stringy you fussed with it too long!
I’ve used CA glue and Zip kicker effectively too! check this out:

wing_nut, Squadron putty thinned with lacquer thinner…never tried that! I’ll have to though as it looks like another effective method! Here’s how one of my Shermans looked with the Tenax and a stiff brush. Different cast look, but as SMJ says, practice first!

After some primer
 \
\
Lots of different methods…all with slightly different results and all relatively easy and effective! Give one a try someday!
Wow[tup] hows that for freaky,im getting my hands on an M4 kit and want to do it some justice and here we have some great examples dropping straight into my lap! thanks heaps for the tutorial Bufflehead,and thanks to the OP for asking! this forum rocks
M.
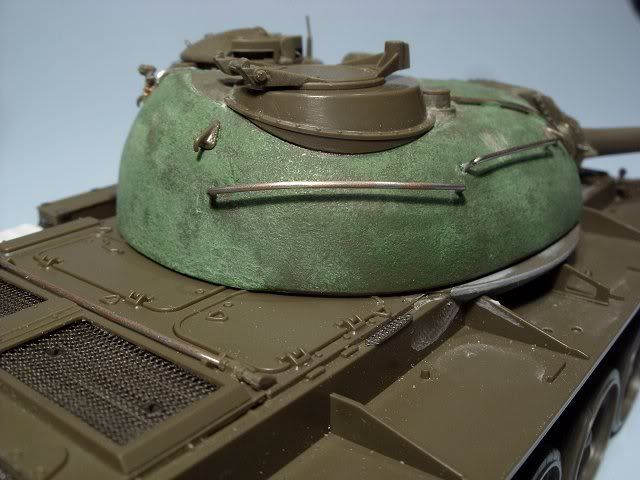
How do you guys think my attempt at this worked out? Did it before I read this, used laquer thinned squardon white
before

During

After

Looks great smeagol. You’d never know it was a 1st attempt, like you’ve benn doing it ofr years
Ernest, that looks great too. I like the way it alternates betwen a smoothish to pitted surface.
when i was building models in the 80s i just brush painted a section and used a cheap (20 for a dollar) brush and “stabbed and jabbed” when the paint got tacky. no putty, no other material.