Coming pon nicely. I can certainly understand why you would want to paint it in sections. I did that on both my 72nd B-24’s, so i can only imagine trying to handle that in 48th.
Yes, the first B-24D I built, I sprayed the entire Liberator on newspaper in the living room. Mrs. Toshi was on vacation that week. LOL! She didn’t scold me at all. As long as I didn’t mess anything up.
It was FSM forum members that told me that doing this, will mess my living room up and not to mention how the chemicals can affect my health. Back then I didn’t use acrylics as I never heard of them. I was assembling and painting my model kits with Testors Rattle Cans and hand brushing with Testors paint in those little square bottles.
Thanks to you all, I have now a spray booth and 90% of my paint inventory is Vallejo and MM acrylics. Vallejo being the majority of my inventory. Today I’ll be spraying MM clear gloss acrylic to seal the paint in and apply the decals and then some weathering with a final coat of MM flat acrylic clear spray. Hopefully this works out on this build.
Then it’s off to my next build. I have in my stash, a Kitty Hawk 1:32 Bronco and a Monogram 1:48 PBY Catalina. Thanks for the visit Bish!
Toshi
Yep, I’ve got that all documented. I have the Monogram PBY, and I’m going to make a mold of the cowling and engine mounts, and cast them in resin.
That’s why it’s still sitting in my stash, too [:D]
Big congradulations on your FSM forum anniversary Toshi!! [D]
Looks good so far, here’s to your B-24 being your biggest and best yet!!!
Richs …Baron
I did the casting of the cowling and engines. .also I did the nesels too I too plan on doing the British navel version [proplr]
5-high
This was perfect timing for me. It took me a couple of days to get things into this point of the assembly process, but it was well worth it. Not only am I pleased with the direction this B-24D is progressing, on the day to take photos of which is today, the sun is out bright and shiny. The last couple of days were warm yet overcast.
I’m glad I waited to take the photos today as if the sun did not shine, I would have to rely on indoor photos lighted artificially. The weather was so great that I even sprayed the Liberator in it’s entirety outdoors. In my humble opinion, I think it turned out decent and acceptable.
The continued agenda for the Liberator will be to clean a few things up and paint the canopy glass as well as all other windows by hand. I don’t know what to expect. I hope it turns out ok. Here is what was done on this beautiful Monday afternoon. Thank you forum members for the read and replies.
Toshi


Thank you so much, especially the kind remarks and support given to me by such a great modeler as yourself. I am most honored. Thank you!
Toshi
To Mr. the Baron,
I took your trivia to the next level and without any cement, I just popped the wings in and that was that. The wings are so difficult to pop in, it would take a great amount of jiggling in order to take the wings off again! But that’s a good thing. Again, thank you for the trivia!
Toshi
Amazing how fast you tossed that one together. Very nice, it looks great!!
BK
Looking really nice Toshi, and good choice of markings as well. I always enjoy seing Norfolk based aircraft.
Thanks Brandon, I had fun building the Liberator!
Toshi
Thank you sir, I figured you’d enjoy this Norfolk based Liberator build.
Toshi
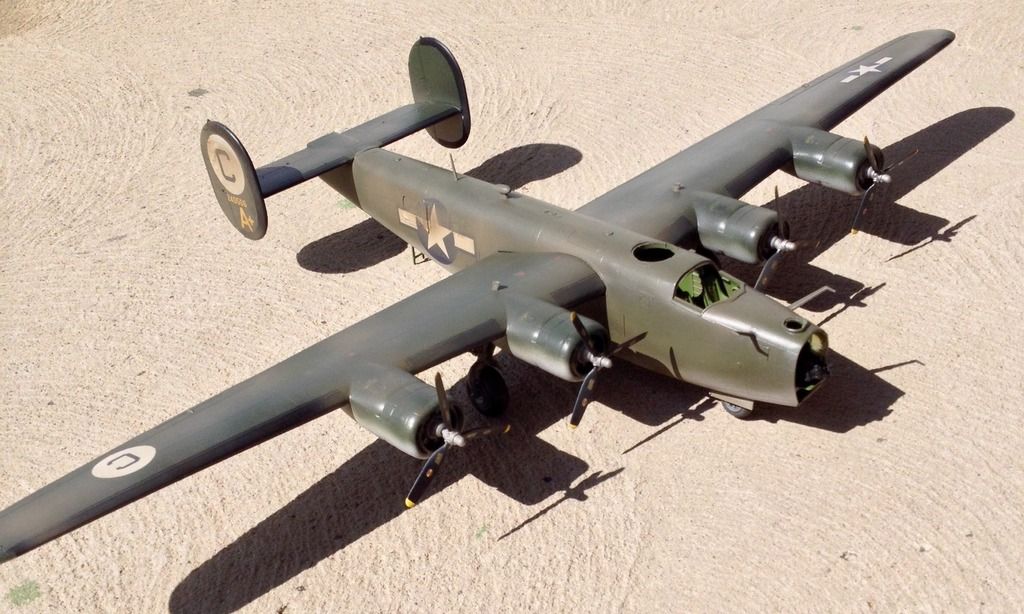
Here is the completed Revell 1:48 Consolidated B-24D Liberator. This build was based on the Fightn’ Sam, B-24D-65-CO, 389th Bomb Group, 566th Bomb Squadron, Hethel, Norfolk, England, 1943-1944. Thank you forum members for your support, I could not have completed this without everyone’s read and replies.
Toshi


Well done, Toshi! That’s a great build.
You should have placed her back on the first pavement (concrete) I assume to take some pictures. That stuff looks just like sand.
To GAF,
Placing the B-24D on concrete would have been my first choice but this is NE Ohio. LOL! We had a thunderstorm with several inches of rain. This started a couple of hours after the outdoor photo shoot. Now we are in for more rain and plummeting temps down to the 40’s.
In 24hrs. I’ve seen it sunshine with temps in the 70’s only to change into a thunder storm, hail, flurries, wet snow, and snow, all in one day. LOL! This is no joke. I’m serious.
Thank you sir for your support in my projects! I am most humbly honored.
Toshi
She looks fantastic Toshi! Wonderful job on a classic kit. I wanted to mention in early April there’ll be a IPMS show in Dayton next to Wright Patterson AFB. If you get a chance to make down to it let me know.
She turned out great Toshi! You even put the tail fins on right side up! (The 1/72nd Minicraft kit I built years ago show the tail fins upside down and I didn’t check references assuming the instructions were right - and put mine on upside down…[:(])
Thank you my friend. For such a classic kit, everything went well. Fit and finish was not bad at all. I just encountered one or two areas that needed TLC.
I’d love to go! I just don’t know yet if I can make it that far. I’ll have to see Mrs. Toshi’s schedule As well. Thank you for the visit!
Toshi
Oh, well. Sometimes the instructions can be incorrect at times. For the majority of the time, the instructions are accurate. Like you, I found out the hard way. LOL! Thank you for the visit sir!
Toshi
Once again Tosh the bar has been raised.