Clear coat step damaged the paint, how can I fix my model?

[TL:DR: I messed up badly my gloss coat before the decals ; based on the included pictures, how could I fix this mess ?]


Hey people!

So, I think I’m getting pretty decent at building, priming, and painting my kits, but if there are steps that really terrify me, well, it’s the clear coats. Extra points when it’s matte.
And lo and behold, I indeed messed up my model BAD, sigh… With the gloss. Congrats to me.

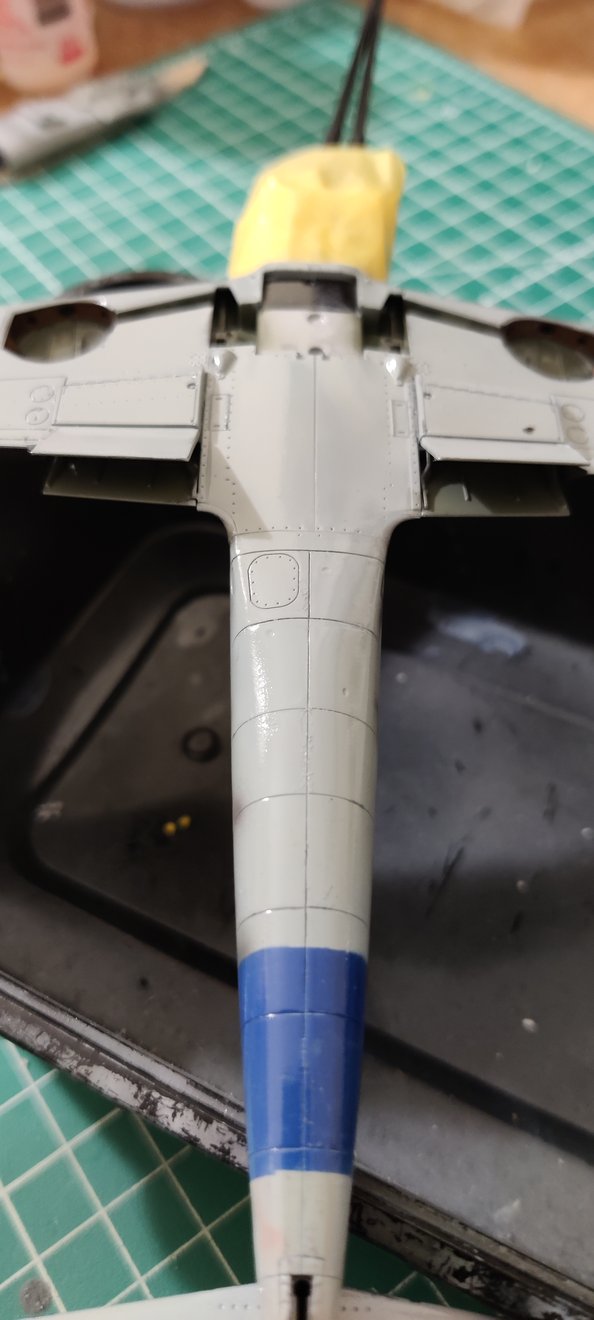
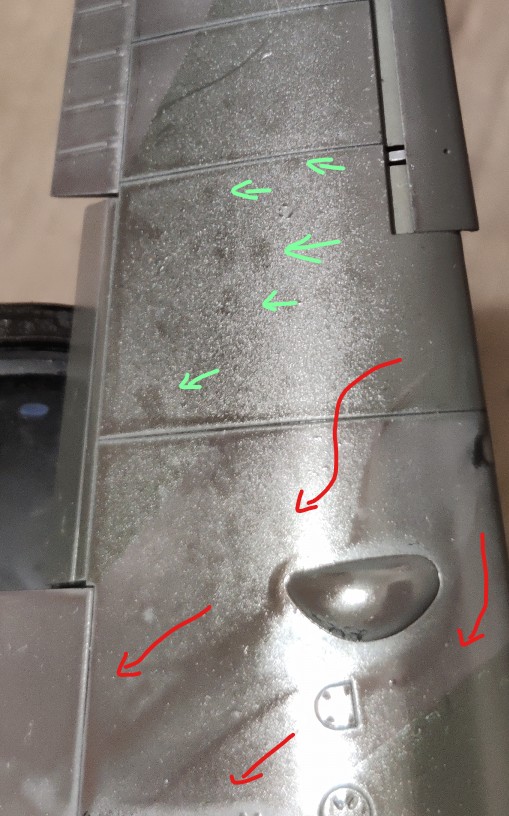
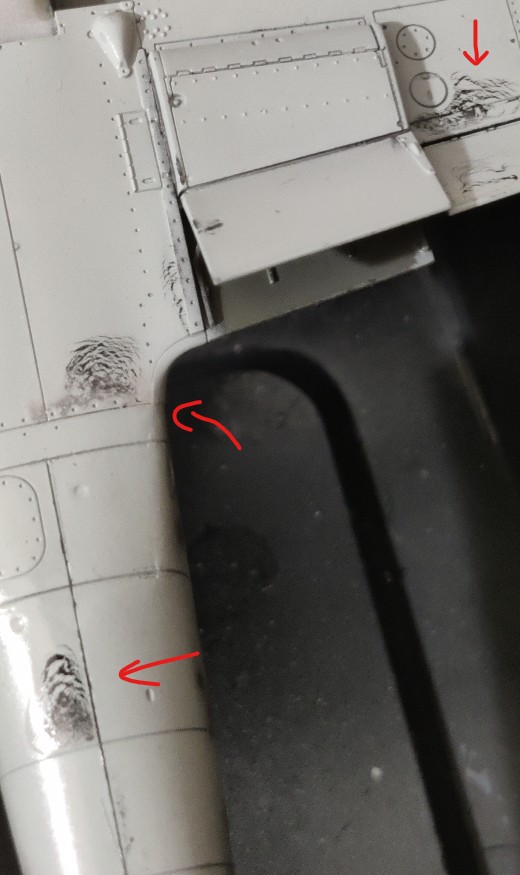
What happened, actually, is that while I was wet coating over my initial mist coats, a sudden, big sputter from the airbrush send droplets flying all over the model, immediately followed by the release of a heavy flow of Tamiya x22+Mr Hobby Leveling Thinner, resulting in durable spots on the wing as well as a very visible trace of fluid that damaged the paint on the wing root. Additionally, and probably the cause of the sputter, the coat had become a bit contaminated and tinted in red !
As a result of all this, the left wing became very tacky, despite an attempt to smooth it by spraying pure MLT. It did help get rid of some pooling and removed a few red spots, but I could never get my left wing glossy coat to look smooth or remove the very visible droplet marks.

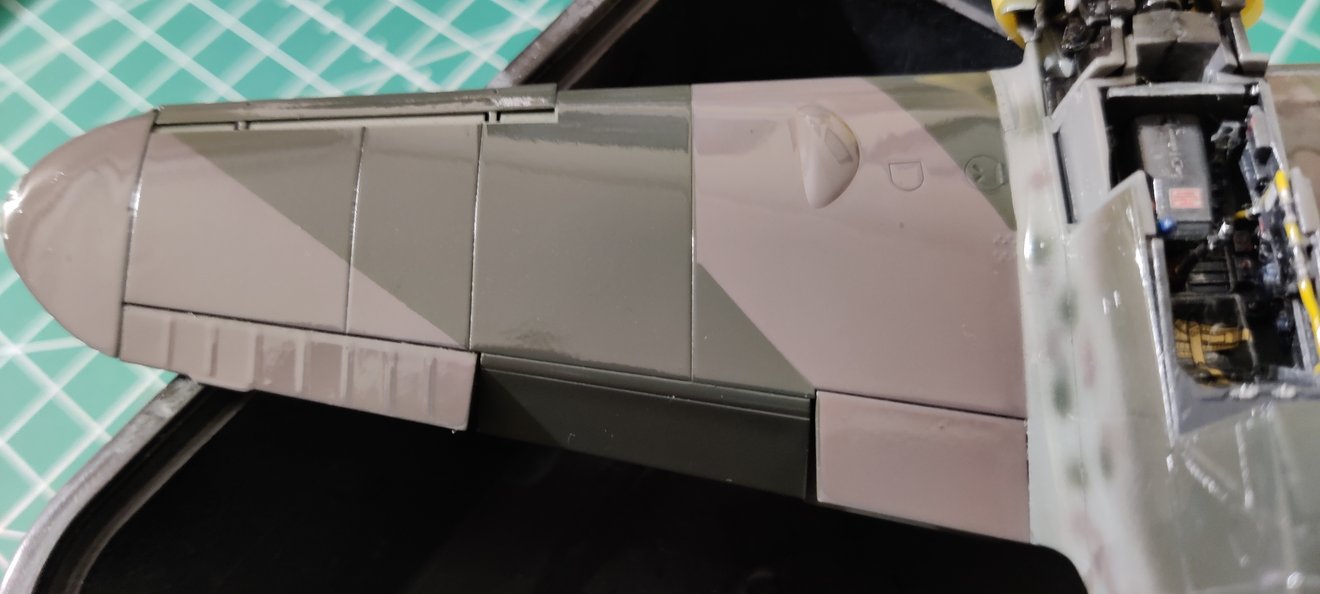
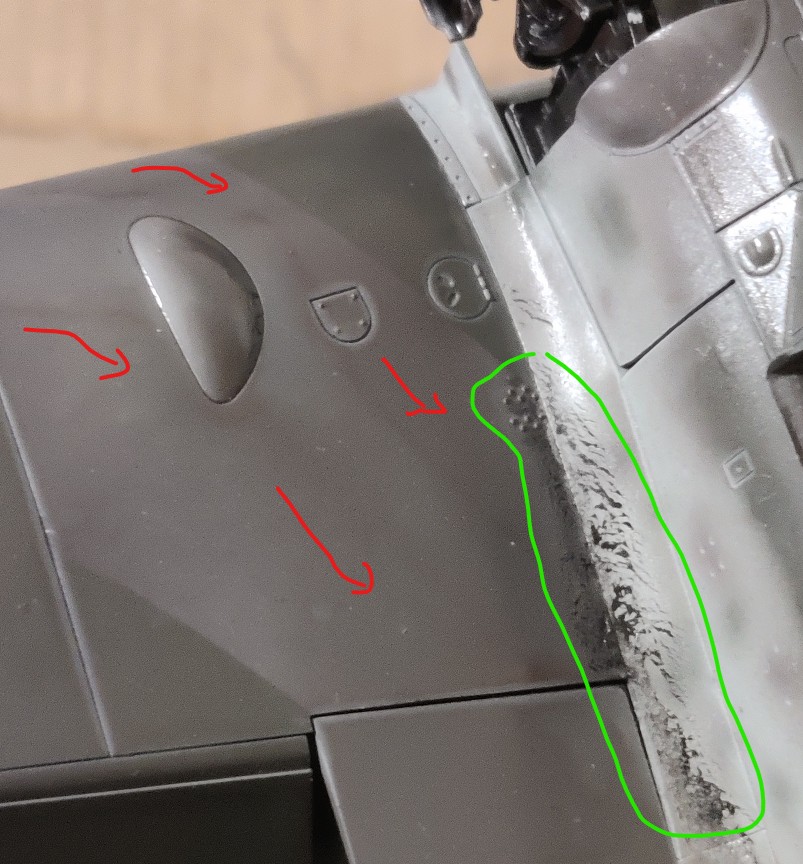
Also, due to the surprise, I didn’t notice immediately that some big drops of what I think was almost pure MLT had been sprayed all the way to the right wing tip, really burning the paint and probably the plastic, as it looks like crazing here ( miraculously, the flanks were spared ).

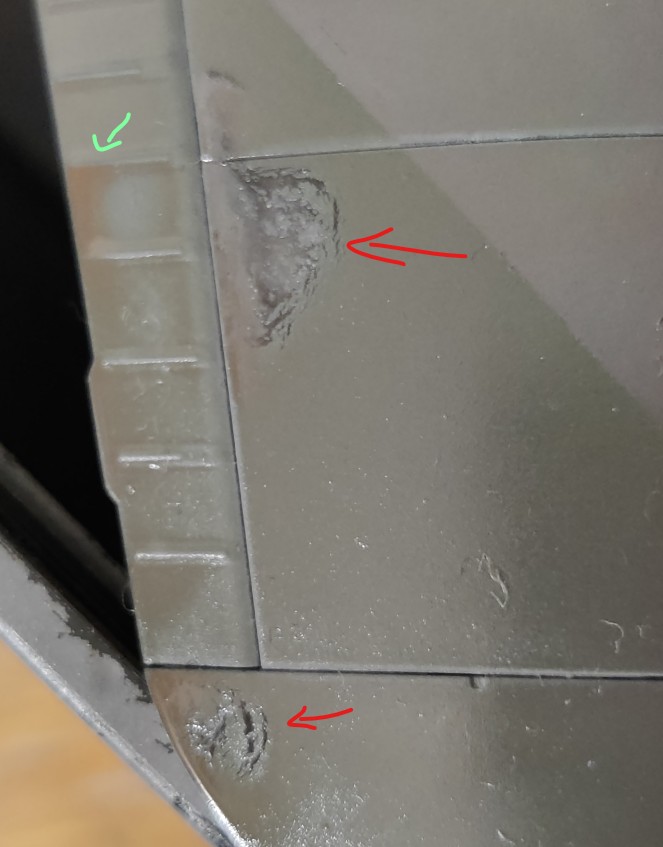
Finally, the underbelly got damaged too, mostly because in my panic I may have put it down on the base I use, maybe to grab something to suck the flood, disturbing the already done but not yet dry coat.

Well, I thought I had good airbrush cleaning ethics and techniques : apparently, I don’t.
I will need to remember to regularly spray using high pressure to help get rid of any clogs in the unreachable channel…

So my question : is there a way to fix this mess ?
Am I doomed to strip the paint ? Should I sand and repaint and recoat, which I suspect may take quite some time and sounds hazardous ? Is there a trick someone knows and would be willing to share ?
Or should I just shrug, sh!t happens, go on ?

I must say I was super happy with the way things were going, and this was kinda demoralizing. I was fortunate, at least, to get this on the coat before the decals, not after !

Thanks for any advice or help with this matter !


Additionnal info:

  • Using a CREOS gsi Procon boy PS289, with air control and a 0.3needle
  • Primer was Mr Color Surface Finisher 1500, black, thinned with Tamiya Lacquer Thinner ; paints were various Tamiya Acrylics, thinned first with Tamiya x20a, then MLT when I got my batch.
  • Tamiya x22 thinned loosely 2:1 with Mr Leveling Thinner
  • Two tack coat, 15psi ( 20 on the compressor, air control on the airbrush tuned down to lower pressure ). Medium paint flow. 10-12 cm distance.
  • Wet coat 1, 20psi, slightly higher paint flow, 8-10cm.
  • Sputter, panic.
  • Second wet coat, hoping it would get rid of the tacky coat on the wing, droplet marks, red marks, and pooling that occured after the accident. It mostly worked.
  • A lighter wet coat of pure MLT to smooth out the last coat. Worked well where it worked.
  • Has been drying for 24h, it’s very hot here these days.
1 Like

How unfortunate that this happened. I can totally relate as I’ve had some major issues at various stages of building, as have we all.

I’ll hit a couple parts of this, but it only suggestions (insert disclaimer here). Most of these will also depend on thickness of the clear, which may vary on different areas.

First, isopropyl alcohol (IPA) (90% or higher) is generally recommended to remove Tamiya paints. You didn’t mention what paints are underneath the clear so I have no idea if you could safely remove the clear this way without more paint damage.

Second, you could perhaps lightly sand and then touch up affected areas with paint before over coating again. Think body shop repair, feathering paint etc.

Third, regarding the red - it doesn’t appear to be really noticeable in the pictures and may be less or more visible in person as pictures tend to highlight nearly imperceptible flaws. If it’s less noticeable I might be inclined to leave it as is.

Perhaps someone else who has deal with this issue directly will chime in with their recovery approach.
Fourth, would you be satisfied by finishing the kit with the blemishes that you now have? If you can overlook the issues, finish the kit, be happy with it, then move on to the next having learned on this build - then why not. We all mostly build for ourselves, most models don’t ever see the light of day. If it weren’t for the internet I’m sure 95% of all models finished would only ever be seen by the builder.

Fixing issues is part of the hobby, as is making the mistakes. A lot of work and effort has already been done, it would be a shame to give up on it. No judgement either way - I have too many in various unfinished states to ever judge anyone else who completes a model.

1 Like

Woops you’re right. I forgot to mention I’m using Tamiya acrylic paints. I’ll add this to my post.

I have some IPA 99%, as well as acetone-free nail polish remover which worked wonder when I stripped a previous kit. Just needed to shoulder the horrible smell, urgh.

I’m thinking of sanding, yes… It’s probably the most sensible option. Well at least for the smaller spots. Also, hopefully, sanding the super tacky left wing will be enough to get it back to a smooth state. Letting it in this state will just generate more problems down the line.
You may be right about the red. It’s both a cause and a consequence of the sudden unclogging, but it’s not the worst issue. It comes with the other problems, though, so, if I find a way to fix the rest, the red may indirectly be fixed too !

But to answer that important question :

To be honest, not entirely! :smiley: I’ve thought about it. I could live with the damaged paint on the wingroot because it could be disguised as weathering. The underbelly spots are a bit annoying, I think easy to manage, or even dismissable since we won’t quite see the bottom anyway. The bigger issue is the crazing on the right wing, imho.
And I want to learn! As you said yourself, fixing issues is part of the hobby, and I’m very eager to experiment and grow !

I’ll wait another 24h just to be sure it’s cured, collect other advice if any, and attempt… something, I guess.

1 Like

I’m no expert at fixing your issues. For me stripping and repainting the visible defects would be the way to go. I have an airbrush I paint with, but when it came to shooting the clear gloss/matte I chickened out, and believe it or not, got excellent results using Rustoleum rattle cans for the clear and the matte finishes. Worked great! I just made sure that all the underlying paint and the clears between coats had ample time to cure. Best of luck on your repairs. I look forward to seeing how you go about resolving things.

I tried this once because I ran out and my wife had some laying around and it worked great! I almost went out and bought my own, but I didn’t because me buying nail polish remover, well, it’s just not a guy thing to buy lol

Heh, I won’t blame you ! It’s so unnerving and easy to mess up. Matte in particular is a nightmare.
I can’t really use cans though, I’m stuck in a smallish flat with poor ventilation… :confused: Spraying through an airbrush is already pretty hazardous ! But if I could, I would use cans, no doubt. Just to feel safer :smiley:

I felt weird buying some, but even weirder when I casually mentioned the smell during a conversation :wink: Got awkward looks, haha

And yet MEK and Acetone etc. are so lightly fragranced :rofl:

I don’t know what you mean, some relax by burning incense ; me, I just drop a reed in my bottle of acetone and enjoy the scent :smiley:

1 Like

DrKoin

From the photos, the flaws might best be fixed by stripping the paint and starting over. I use Mr Hobby’s Mr Paint Remover; this easily strips the paint down to bare plastic.

Before deciding whether to strip, do consider if it is feasible. What I mean is, if there are areas like the cockpit (and believe you have the engine as well) that you don’t want to strip (since repainting these may no longer be easily possible), then this option might not really work. There is some risk of the paint stripper getting to these areas, even if you are careful.

Do figure out what went wrong with your airbrush. Best to avoid the problem happening again. I assume you use a compressor; do you have a moisture trap between compressor and airbrush?

Hey Edwin, appreciate the answer !

For now, I selectively stripped down areas where the most damage occured with IPA, and sanded the medium damage sections to remove the gloss. Everywhere else I sanded to obtain a smooth, gloss aspect, something like a plastic toy.

Then I re-masked, re-painted, with very light coats. I realized another mistake I made, which was that during the initial coats I adjusted my RLM mixes on the fly ( one drop of white here… One drop of dark green there… ), a clear overconfidence / noob error that shouldn’t cost me too much but could have been avoided with better preparation.

Anyway, it’s currently curing and I think I’ll wait 36h before re-attempting to gloss uniformly ( sunday then ). I’ll just have to be a little cautious, even before the clog ejection, I went too heavy, which, with the current heatwave, cascaded into my issues.
I have two options for my varnishes by the way : the Tamiya line ( gloss x22 satin x35 and matte xf86 with x20a or MLT ) or the AK line ( gloss ak192, satin ak191, matte ak11237 and ultra matte ak183, but only distilled water for thinning )

For the compressor, I have a typical low entry airgoo/fenghua/noname compressor with tank and a little moisture trap. I’ll do a little check-up and maintenance pass in the morning, draining both tank and trap.
My guess with what went wrong is that I generally spray at a low pressure, like, 16psi but with the air control valve of the airbrush turned down to 60, 50%. Lack of atomization, paint unable to spray, drying a bit fast because of the heat, etc, resulted in a clog. When people recommend using 16psi they obviously don’t mean 16psi with a half opened air valve :face_exhaling: So when I actually cranked it up to actual 20psi with fully opened valve, it reacted accordingly.

DrKoin

The PS289 is one of the airbrushes I use. I leave the micro air control (MAC) valve fully open and rely on the regulator to adjust pressure. The MAC is usually used on the fly; while spraying, if you feel you want to fine tune the pressure, that’s where this valve comes in.

I have 2 moisture traps with my setup. 1 is at the compressor and the other is attached to the desk where the spray booth sits. I drain the tank after every session and leave the drain plug off. No moisture issues. I am not certain if moisture may be one of your issues and am just guessing it, based on your mention of “a sudden, big sputter from the airbrush send droplets flying all over the model, immediately followed by the release of a heavy flow of Tamiya x22+Mr Hobby Leveling Thinner, resulting in durable spots on the wing as well as a very visible trace of fluid that damaged the paint on the wing root”.

Patience is key in this hobby. Let paints, glues, fillers dry/cure fully. Avoid rushing and risking the previous work.