Don’t feel bad, SPrue–I put the suspension bogeys on backward for my DML Ferdinand. Coulda kicked myself right in the head…THAT was a HUGE pita to undo and correct!
M. Brindos, cool
Doog, ouch, that must have been harsh
All WIP and finished pictures for this BLOG is here: https://imgur.com/a/T9zbg
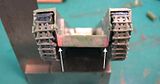
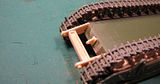
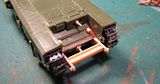
Ballast weight needs to be added to the interior rear area so the completed model, with the bridge attached, does not unrealistically ‘endo’ .
The i-Sheet suggests 20 grams of weight that is not included in the box.
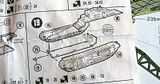
I find a 25 gram, automobile wheel balance weight, in the recycle bin at work. Perfect shape to fit into this little guy.
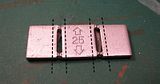
Each section was a little wide so I ground away some of the material (dotted lines). This brought down the weight to an exact 20g.
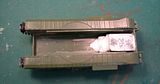
These were glued in using white glue (PVA).
All WIP and finished pictures for this BLOG is here: https://imgur.com/a/T9zbg
Thanks for looking…
All WIP and finished pictures for this BLOG is here: https://imgur.com/a/T9zbg
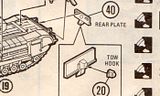
The i-sheet is not clear on the exact position of the ‘rear plate’. It could fit on the model in two different ways based on the parts angles. I web searched and found several 1/35 build pictures. This helped with final placement.
This is too low but fits perfectly.
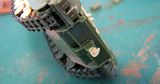
This will be final position.
All WIP and finished pictures for this BLOG is here: https://imgur.com/a/T9zbg
thanks for looking …
Yeah that was a good catch there. That’s a tough one to figure out. There was no internet when this was released, right? lol
Hah, true that! If one of your buddies didn’t know, then you had to go to the library. What library, what’s that? [:D]
Yep, the library, and if you were lucky you could find a book with good pictures in it for reference. Most of the history books I had available were not really concentrated on the details of such things. lol
There doesn’t seem to be an edit option. I guess double posting must be allowed?
I was just thinking… that is an unusual place for a tow hook. It looks far too high to me. Kit? or were they really up that high?
Yeah, it looks high.
You can edit your own posts by clicking on the little icon of a pencil at the bottom in the gray area.
AH HA! I thought that was editing tags. I’m used to it being on the bottom right side because of Genessis lol. They’re in England, so it must be backwards, right? lol
[;)] yup, those nutty islands [proplr]
All WIP and finished pictures for this BLOG is here: https://imgur.com/a/T9zbg
The cement has cured and the rear plate is in final position.
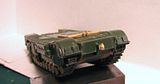
I used the two positioning tabs molded into the rear plate [part 40] pictured in the i-sheet,several posts above.
All WIP and finished pictures for this BLOG is here: https://imgur.com/a/T9zbg
I miss those old matchbox kits. This brings back memories lol.
Coming along nicely. Makes me want to break out one of the kits from the Matchbox stash.
Puttin’ a shine on this old brick, eh?
!http://img198.imageshack.us/img198/2084/bafflebrick2.gif
It’s coming along quite nicely.
Looking like she should…!
M. Brindos, RX7850, DM, Doog, Thanks for looking in.
All WIP and finished pictures for this BLOG is here: https://imgur.com/a/T9zbg
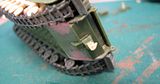
I filled in and sanded smooth the two gaps on the front of the lower hull (arrows). That was a mistake for this variant kit.
^ Those are the mounting points for the Bridge Carrier [parts 3 and 4].
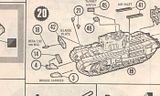
^ See the little tabs that stick out and insert into those gaps, that I filled? [blkeye]
v So I dug the putty back out with the tip of my knife and glued in the Bridge Carrier parts.
All WIP and finished pictures for this BLOG is here: https://imgur.com/a/T9zbg
[H]
Good recovery lol. Been there, done that. lol
Wow, 1/76, that’s an unusual scale…too small for comfort.
Nice build and skills for such small size.
Thanks fellas!
GarzonH, it’s not my usual scale to build