Charles' Revell 1:196 USS Constitution (Finished)

I’ve actually completed this kit, but thought it might be interesting to post some representative pics from the build process.

A more complete photo album is here: https://www.flickr.com/photos/46419281@N03/sets/72157645549105073/

My organizing goals and principles when I started this build were:

  • I viewed this as a simple test of my skill and will, as a way to figure out if this is simply a passing interest of mine, or something that I want to spend more time with
  • I wanted to enjoy the process and the journey, and not to get in a hurry to finish. I mentally broke each macro-step out as its own thing, and stayed focused on getting things right at every stage
  • In slowing down, I was able to focus on the “little things” that I could to add detail and make the ship more visually interesting
  • I wanted to use this as an opportunity to really begin the process of understanding just how these sailing ships fit together, and how everything worked
  • I wanted to be realistic, based on my current skill and experience set (as well as the relatively small scale), as to what level of detail and customization I could pull off
    As an example, I decided early on that, at this scale, I’m not actually rigging the ship . . . I’m creating the illusion of a rigged ship. The kit doesn’t come with any tackle/blocks of any kind, and trying to figure out aftermarket options would have been bewildering (and expensive) to me.

Anyway, I’ll stop rambling, let this post serve as the kickoff, and then start adding some pics.

Charles

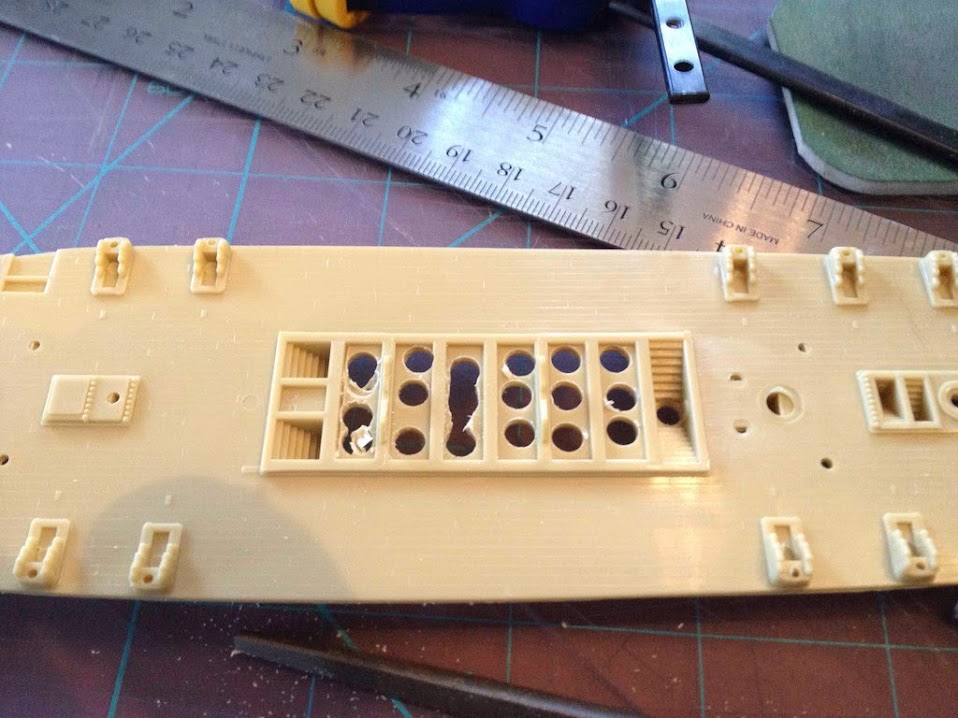
One of the first decisions I made was to drill out the waist area. The deck included with the kit had a solid surface in between each timber, which I just didn’t like. So, I drilled it out, prior to filing:

Up next . . . painting the deck. And the gun carriages. And the deck. And the carriages again . . .

Well, that’s interesting . . . the photos looked good in preview, but didn’t post. Hang on while I try that again.

Drilled:

Filed:

The next step on getting the spar deck ready was to paint everything appropriately. For the planking, I went with the tried and tested method of laying down a basic coat of wood/beige, and then washing/smearing with varying tones of darker and lighter, until it looked right to my eye.

Part of my learning process was to try to figure out the best method to get a relatively clean coat of red paint on all the gun carriages without having to do a lot of back and forth touchup.

So . . . um, after a LOT of back and forth touchup, i concluded that my skills require masking, and lots of it:

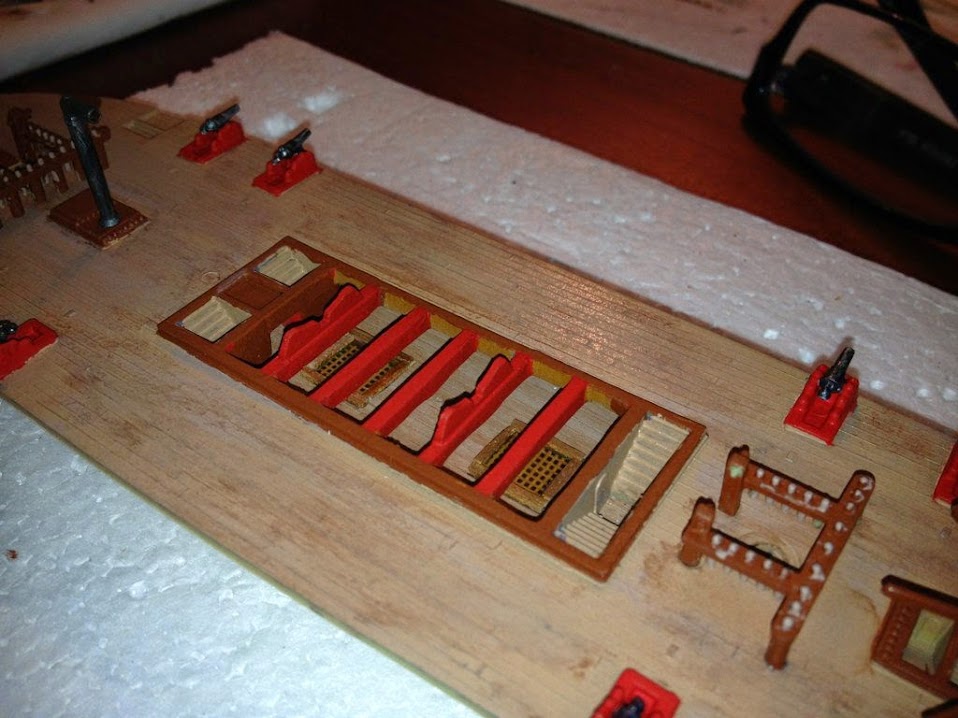
You’ll note that I opted to paint the timbers in the waist red as well. I ended up really liking the look once I unmasked everything:

So, once you clear out the waist, it means you need to come up with some sort of “false” gun deck. My solution was to use a piece of wood from a cigar box, and just use a number 11 blade to scribe planks in.

In retrospect, I could have probably cut the planks a little “thinner,” but I’m happy with how it turned out. For the hatches, I used tiny little pieces of cedar veneer from the cigar box, and for the gratings, I found an image I liked, color-corrected it till it looked right, and then printed on matte plastic labels.

Also, prior to final assembly, I took one more pass with the paint thinner to get the right “wash” look on the gun deck, so it was more in alignment with the spar deck.

When I put everything in place, it looked like this:

Really inventive and nice mod by adding a (false) gun deck. It will, I am sure add some nice dimension that you normally would not have at this scale. Looking forward to your next post.

Thanks for the comment, Arnie . . . you’re very kind. I guess I’ve read through your 1:96 Conny build log a few dozen times now, so it’s a real pleasure to hear from you.

I thought I would focus on a handful of things I did with this build that I’m particularly pleased with, and that moved me along the spectrum towards adding layers of detail and dimension. In no particular order . . .

The carronades for the spar deck are molded all on one sprue tree, and are mounted individually into the pre-molded carriages. They’re molded in black plastic, and I painted them flat black, and then experimented with simply dry-brushing them in silver. To my eye, it added a bit of a metallic sheen that I really like. They still “read” as black, but also as metallic.

Also, I really hated the way these were mounted on the sprue. Basically, you have to cut the pieces off right at the end of the carronade barrel, and I couldn’t figure out a way to do it that didn’t leave a “crimp,” meaning I had to lightly sand till everything looked round and proper.

And I would have loved to bore these out as I did the cannon on the gun deck (next picture), but there just wasn’t enough material left for a comfortable margin of error.

Yep, I bored these little guys out:

My method was to carefully find the center point with the tip of a No. 11 blade, and give it a quick turn around once I was comfortable I had the right spot.

Then, I’d use the pin vise to carefully bore out to a sufficient depth. I’m sure it goes without saying that I muffed up a few before I got it right. I used those for stern and bow chasers and painted tompkins on them. :slight_smile:

Couple more details I was pleased with.

This is the galley vent, which is just a solid piece of plastic, so I used the pin vise to bore it out. I started with a relatively small bit, and stepped up a couple times to get to this look.

Then I used a tiny tiny brush and dry-brushed the inside with copper paint, just to provide a little visual contrast. I also painted black, and then dry-brushed with silver, just like I did with the carronades.

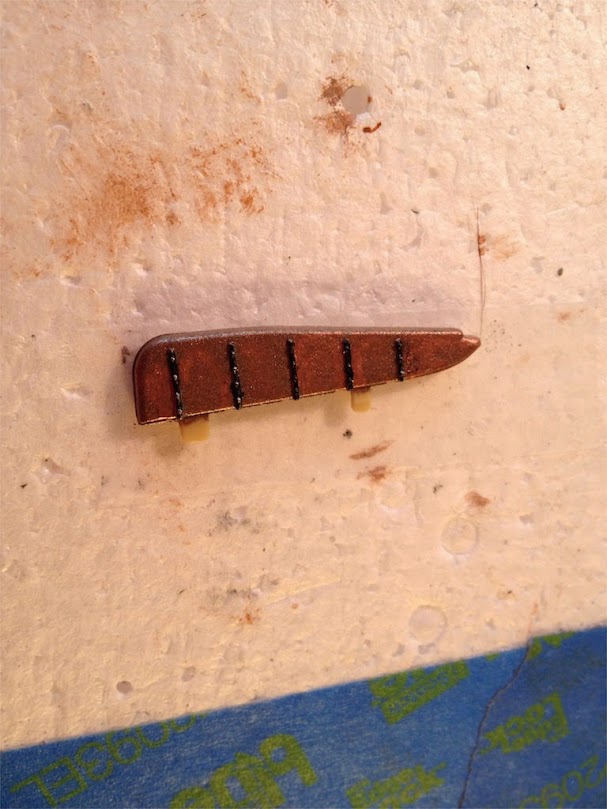
I’ve seen a lot of different treatments for the rudder on the Conny, but ended up just painting it to match the copper hull. What I got a real kick out of was the way some of the detail turned out. Remember, I’m still picking up some basic skills here, so figuring out a way to dry-brush the bolts to get them to pop was kind of a big deal for me [:D]

As you can from the shot of the deck above, there are a handful of bits and bobs that have to be painted and secured.

Here’s a shot with a few of them, including the fiferails, capstan, and anchors. You can also spot the stern, which is only partially painted here:

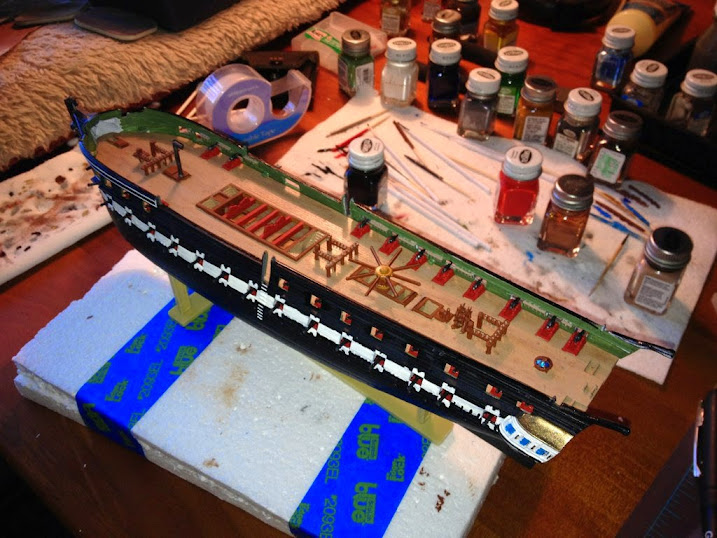
Once all these were done and dried, I test fit everything into the hulls pieces. Here’s what that looked like:

A few comments here:

  • I tried something I haven’t seen elsewhere, which was to paint the windows, both in the stern gallery and the skylight, a bluish color. I thought I’d try this to mimic glass, and ended up liking it enough to keep it. On the skylight, I actually first painted the panes silver, then overpainted with clear acrylic blue. YMMV, of course, but I’m OK with it. I don’t think it work at all on a larger scale.
  • By this time, I had primed and painted the hull halves, black overall, with white stripe across the gun ports. I painted the half lids white, but sort of wish I’d painted them a contrasting color now. Maybe red, with a dark-ish wash.
  • I’d also painted and mounted the bored-out cannons for the gun deck.
  • The way the pieces fit together, you have to glue up the hull AND the spar deck simultaneously, since there are a few pins that sit on top of the deck to hold it in place. I found this to be a little nerve-wracking, but it came out all right.
  • Prior to final glue-up, I had of course glued the false gun deck in place.
  • I used a white paint pen for the detail work on the hull.

Neat! I misread your title, thought it was the 1/96. Then I saw the deck…

I used to build that model pretty often when I was a kid. Not really rigged of course. I did white stripe, Nelson beelines, red stripes.

Its a fun kit for sure.

In truth, the rudder would be copper as well, so for accuracy’s sake, you picked correctly. Some will argue about the gudgeons, which also would have been copper or bronze, and as such would not have been black.

Personally, I believe it is up to the builders discretion. I have said somewhere, that sometimes giving way on accuracy for aesthetics is less than a criminal act. I like things to “pop” as well, whenever possible.

I am curious about any treatment you may have given the copper, as it looks weathered like an old penny rather than shiny. Nicely done.

Thanks Arnie.

As to the copper look, I actually used, believe it or not, a hammered finish copper spray paint, and then lightly brushed on some copper paint as a highlight. I’ll be honest with you–I used the hammered finish paint mostly because I had some in the garage, and I thought it might be interesting.

As with quite a few of the things I tried here, I ended up liking it enough to keep it. [H]

This is shaping up into a nice model. If this is your first serious effort, I’m sure we’ll all look forward to seeing the next one.

I don’t know how interested you may be in the history of the kit, but it’s a real classic. It was originally released in 1956, as one of Revell’s first two sailing ship kits. (The other was H.M.S.Bounty.) It represented the state of the art at the time, and it still holds up remarkably well.

One big problem confronting all modelers of the Constitution is the fact that the ship has been modified so many times over the years. The 1/196 (or 1/192; different sources list it differently) version apparently was based on the set of plans the Navy published at the time of her major restoration in the 1920s. The Navy researchers weren’t trying to backdate her to a particular period. She still looked about like that in 1956. Since those days the philosophy has changed; for the past thirty years or so they’ve been trying, as they get the money, to bring her back to her War of 1812 configuration. There are quite a few differences between the kit and the way she looks now.

The one thing Revell changed from her 1956 configuration, I believe, was the figurehead. From the late nineteenth century onward she had a relatively simple “billet head,” as she has today. She had a similar decoration on her bow for much of the War of 1812. In the 1830s she was fitted with the Andrew Jackson figurehead that’s reproduced in the Revell kit.

That Jackson figurehead has an interesting history of its own. In case you haven’t heard it, here’s a summary from a Forum post I wrote in 2008:

"Regarding the sad story of the Constitution and her Andrew Jackson figureheads - the most thorough account of the incident I’ve encountered is in one of the books I assign in my freshman-level U.S. history survey course: Andrew Jackson: Symbol for an Age, by John William Ward. He analyzes the ‘Jackson image’ and where it fit into the typical American’s perception of what his country was about.

"The Constitution went into the Boston Navy Yard for an overhaul in 1833. The commandant of the yard was Captain Jesse Elliot, one of the Navy’s more controversial characters. (He was, among other things, the officer who, in command of the Niagara, had so irritated Oliver Hazard Perry during the Battle of Lake Erie that Perry had transferred his flag to her in order to bring her into the fight. That, at least, is how Elliot’s numerous critics told the story.) Her figurehead was in bad shape, and Elliot, a Jacksonian Democrat, thought it would be appropriate to install a portrait of Jackson as a replacement.

"While the figurehead was being carved, Jackson pulled one of his more memorable and controversial stunts: he got into a titanic war with the Bank of the United States and pulled the federal government’s funds out of it, thereby precipitating a national financial panic. At that point, as Professor Ward puts it, ‘even those who had been able to find kind words for the President because of his Nullification Proclamation [against John C. Calhoun and the South Carolina Legislature] relapsed into the customary New England habit of vituperating the tyrant in the White House.’ Boston newspapers launched attacks on the idea of putting Jackson on the bow of the city’s favorite frigate, and Elliot was threatened with tar and feathers.

"The figurehead was completed and installed. Then, on the night of July 2, 1834, somebody, in the middle of a noisy rainstorm, sawed the head off it. The culprit was never caught; the Constitution sailed for New York, where she was fitted with a new figure of Jackson. (Until the new one was ready, Elliot had a flag with five stripes on it draped over the mutilated one - symbolizing the five New England states that had threatened to secede from the Union during the War of 1812.)

"The story of what happened afterward gets pretty amusing - and, as Ward puts it, the severed head gets ‘ubiquitous.’ Several accounts of dubious reliability identify the perpetrator as a Cape Cod sea captain named Dewey. One source says he walked into the White House and presented the head to Jackson, who glared at him for a minute and then said, ‘close the door, Captain Dewey, and then sit down and tell me how you did it.’ Another says Dewey gave the head to the Secretary of the Navy, who passed it on to Jackson, who reacted by saying: ‘Make that man a postmaster.’ Yet another says that somebody or other arrested Captain Dewey and locked him in a local insane asylum for two and a half months. Dewey supposedly had somebody make him a box of business cards, each bearing a picture of a saw and the words ‘I came, I saw, I conquered.’ Unfortunately the existence of Captain Dewey isn’t confirmed by any reliable contemporary source.

My favorite version of the aftermath comes from the pen of somebody named Russell Jarvis, who published a short biography of Captain Elliot. Jarvis (quoted by Professor Ward) says that Nicholas Biddle, the president of the Bank of the United States, paid a visit to Boston shortly after the beheading. ‘While he [Biddle] was there…some of the most leading, the most active “Whig” [i.e., anti-Jackson] politicians, particularly those connected with the monied institution, to the number of forty-four, invited him to an evening entertainment at one of the Boston coffee-houses. After the cloth was removed [i.e., after dinner, when it was time for the serious drinking to start], the servants were sent from the room, the doors locked, and, – Bostonians! blush while the revolting story is told! THE HEAD OF THE IMAGE WAS BROUGHT IN, LAID UPON THE TABLE AND BACCHANALIAN ORGIES WERE HELD OVER IT!!!’

“It sticks in my head that one of the two Jackson figureheads is (or used to be ) in the Naval Academy Museum and the other in the Museum of the City of New York. That’s my notoriously unreliable memory talking, though. I couldn’t find any mention of them on either museum’s website.”

The bigger, 1/96-scale Revell kit first appeared in 1965. (My source for the dates is Thomas Graham’s fascinating book, Remembering Revell Model Kits.) This one is based on a set of plans that were commissioned shortly before that by the Smithsonian, to represent the ship as she appeared in 1814. There are questions about some of the details on it, but generally it represents that configuration pretty accurately. (At least two Forum threads about it are running right now.) The two kits make an interesting comparison.

We’ll all be interested in seeing how this fine model develops. Welcome aboard! You’ll find that the “Ships” Forum is inhabited by some pretty strange people, but most of us are relatively harmless.
Thanks Professor Tilley! I was not aware of the history/legends around the Jackson figurehead. The rich legacies of so many of these sailing ships is part of what makes this hobby so darned fascinating.

I spent quite a bit of time noodling over the differences between the 1:196 and the 1:96 version. In addition to following Arnie’s and Evan’s build logs, I downloaded the assembly instructions and rigging plans for the 1:96 kit from Revell’s website. The rigging plans in particular came in very handy as I was trying to figure out the right mix of (simulated) rigging detail to build into the ship.

I actually now have the 1:96 Conny kit on my workbench. I haven’t done much more than take it out of the box and stare at it for now, but I’m planning to get rolling on it pretty soon. Thanks again to Evan and Arnie, I certainly have plenty of guidance . . . I’ll just have to sort thru all of the available options and find the path that matches my current experience. I’m sure that lies somewhere between ambitious and pragmatic [;)]

So . . . shrouds and ratlines. This kit comes with pre-molded plastic versions, which are just not that visually satisfying, at least to my eyes. I decided early on that crafting the shrouds and ratlines from scratch would be something I would tackle head-on, no matter how long it took.

Some quick thoughts before the pictures:

  • I know a LOT more now about how shrouds are actually rigged than I did at the time, thanks to Lennarth Peterson’s book, Rigging Period Ship Models.
  • I would do this MUCH differently if I did it again.
  • Having said that, I’m actually very pleased with the finished result

The first task was to paint the deadeye/channel assembly. I was worried that if I left the rope detail too dark, it would blend too much into the overall black of the assembly, so I started with a coat of white paint, and then splashed on some tan:

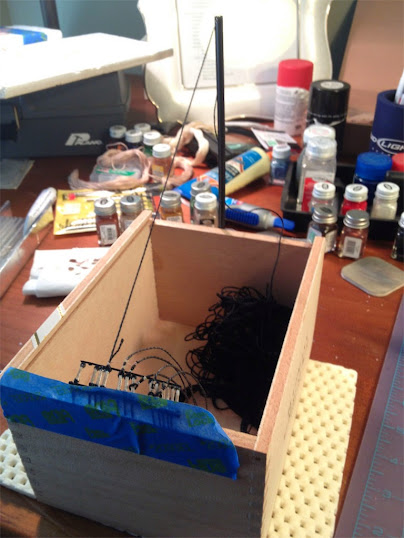
The next thing I decided was to place and seize the shrouds before mounting the deadeyes to the hull. So I made a rig . . . basically Cigar Box + Sprue + Tape = Rig. I used a micro-saw to cut a channel in the very top of the sprue piece:

To actually seize the shrouds, I would first loop the shroud thru and behind the deadeye, then seize with tan thread, by tying an overhand knot to start . . . looping behind and tying another overhand . . . then tying off with two overhand knots on the inboard side. I’d brush with watered down yellow glue, and when dry snip the ends of the thread:

I waxed all of the threads by dragging multiple times across a beeswax cake and working with my fingers to melt the wax into the thread.

You are doing a terrific job!

I am most interested in the gun-port lid configurations of various models of this ship. For example, the Isaac Hull model in Boston depicts her with no gun-port lids at all. The Revell 1/96 model includes square lids, whereas the Revell 1/196 model has the half-lids.

The same holds true for various paintings. The Michel Corne paintings, which depict the ship at various stages while fighting HMS Guerierre, show no lids and a yellow-ochre gun-port band. Other paintings of the same battle show a white band with square lids. However, many historians consider the Corne paintings to be the most accurate. Different paintings by different artists confuse the issue. She probably carried differing configurations throughout her career, even being painted white with square lids with a red band for her mid-19th century world cruise.

Keep up your excellent work. I am looking forward to see your model develop!

Bill Morrison

Thanks Bill!

And yes, it seems there’s a LOT to know about the whole gun-port lid matter. Honestly, when I first saw the half-lids on the 1:196 (prior to doing ANY research at all on the Conny) I just thought it was something Revell made up out of thin air, maybe to save plastic or something. But then I saw pictures of her in her current configuration and there they are!

Also, I painted mine white, but I sort of wish now I’d painted them a different color, or even a slightly different shade of white, just for contrast.

Why not repaint the lids?

Bill