i am trying to reference the color of the C-1 Ariete. from what i have found the whole thing is green. none of the pioneer tools or anything is any other color than green. even the steel tow cables are green. other than the decals i’m limited on my colors. anyone attest to this?
Hi Roo…I checked three different sources and you’re correct about this; totally green, A slightly-greenish olive drab, with everything monochromatic–BOOOORING ! ! ! Boy if there was ever a case for "artistic liscence…anyhoo, the rub here is that, as soon as you’re done painting it, you’ll come across a photo of the new camo, and it’ll undoubtedly be some way-cool version that’ll have you losing sleep!!–happens to me every time !!![sigh]
yeah all of my research of actual real vehicles were boring green, i happened to come across this site. its in italian, go figure. but it looks nice, its still the same all green camo, but some of the tools are painted and stuff. let me know what you think. http://guide.dada.net/modellismo_statico/interventi/2006/01/242179.shtml
rooster
Nice dio ! Yup, that,s how I’d do it…paint the tools and tow ropes, etc…even though it might not be technically correct from the photos, how long would those tools and ropes wear that paint anyway, ya know? Beside, you’d look like “newbie” painting the tow ropes and having pristine tools!
hey easy on the newbie jokes. [:I] your talking to one. hehe. it looks fun for me to try and make mine look like that one. i have it all green now, and i’m thinking about my next step. is it normal for tamiya acrylic paint to feel rough? its not orange peeled, but has a rough texture to it. kinda like really fine sandpaper. and i was thinking about how to get the great wash effects he has around the bolt heads and gear. he made a great dio aout of it.
Roo, thats normal for Tamiya flats; let it dry a while before you start washing. BTW, see your other post on your Sherman for picking out details. If you want to really go full-out, you can do one of two things: One, for a super-cool “dusty wash”, get some oil paints–whit, yellow and burnt umber. From these three colors you can mix a perfect dust-colored wash. Only use a “PINCH” of yellow!!! (for some reason, yellow oil is super-dense!) mix to taste, and then with a wide, soft brush, dilute it with thinner to a thin-soup consistency and brush it all over the model. Wait about only 2 minutes and then with a couple of soft facial tissues bunched up,LIGHTLY dab off the whole wash concentrating on all the flat planes–leaving the oil in the seams and crevices like collected dust–it looks way cool!!! OR–use the burnt umber as a wash and do exactly the same, for a more dirty look. You can also just use black for a newer look, or for a tank that hasn’t spent a lot of time offroad. If you get nervous about the drying time, use a hair dryer to “fan” the model and speed dry time. With all these washes you can then go and redo certain details to emphasize them more, with a finetip brush. Then drybrush to pick out the details with a tan color–if you don’t do this final, vital step your tank will look very drab and lifeless! Good luck, and one last thing–don’t put your decals over that rough finish or they’ll “silver”–make sure you give the places where the decals are gonna be a light coat of gloss(don’t go too heavy on this coat!) And if you can get it, use a good decal setting solution like MicroSol. And sorry about the “newbie” comment! [%-)] [oops] I just figure that all the guys on this site are old Vets with the wealth of knowledge I find here! [bow]
just busting your chops about the newbie comment. that’s why i am here, to learn. and i do have polly scale decal softner and setter. i think what i will do is just go over everything in the OD and start over. the red dust on the turret can be easily covered up by just going over with another coat of OD, while i can probably fix the lower hull without too much removal. so, in conclusion, i’ll just start over with OD over everything, then work on the mud i already have on with a earthy color. i’ll try the thick oil wash you explained in the other post, then i’ll work on drybrushing it. i’ll see how that goes before i decide to do the dusty thing. if i have any more questions or pics to share with youm i’ll just PM you, and milk you of your knowledge [}:)] thanks again doog. i’ll be in contact with updates.
Here you have one more:
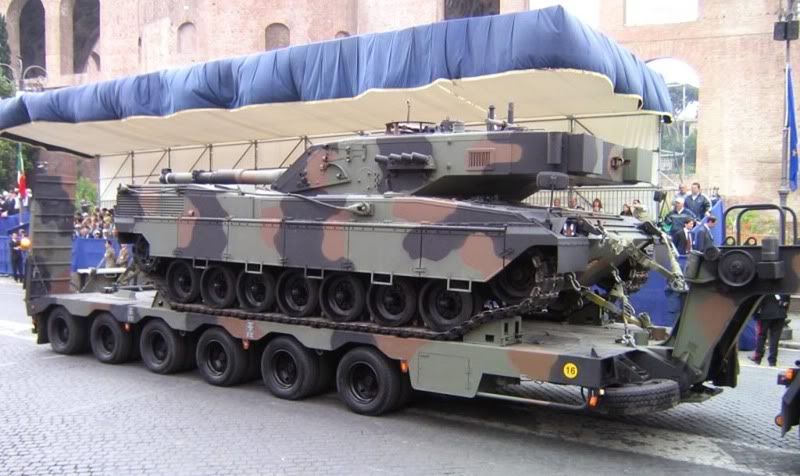
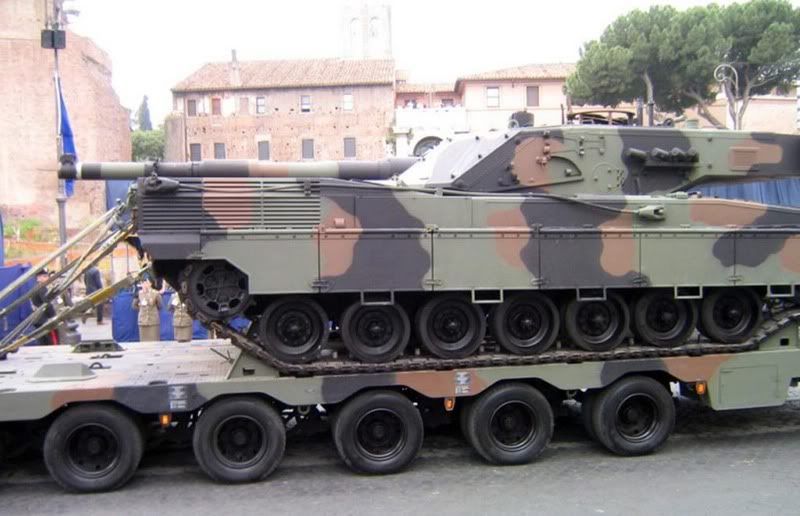
Beware: This Ariete C1 is unique… a test for the camo scheme… Sorry… These are the only pics that I could find… Hope this helps. Most regards.
José
[censored][banghead]
always after you paint it do you find another damo scheme. thanks jose. i love the camo. kinda looks like the modern german camo. unfortunatly i’ll probably have to stick to the original i already started on. but lets just say that this is stored in the photo album for the next ariete. [:D] thanks again
rooster
Whoa there Roo!! The more coats of paint you put on that Sherman–I think we’re cross-rutted on posts here–you WERE talking about that OD Sherman in your “any ideas or feedback for me?” thread were’nt you?!–the more detail you’re going to obscure. By the way, see that post for some decal options…I wouldn’t go repainting the whole thing! IT’s not necessary–just hang on til you get some decals, then re-weather. And don’t worry–you’ll go thru this again. I’ve been panzer modeling for 20-odd years and I still have to do these touch-ups from time to time ! BTW, I’ll be leaving for Europe on Tuesday for 35 days, so I’ll be outta touch for a bit…
The IPMS Italy website has a link to the official website of the Italian army. I saw a color camo shot there.
i appreciate all the help guys, but i already painted it the standard green color. i read and speak italian, and from what i have read, it is true that the camo scheme isn’t out in production yet. they have some prototypes, and testing vechicles, but nothing is official yet. so when they do make it, i will be sure to tackle the new camo scheme, i really like the way it turned out. thanks again guys.
cheers,
roo
another question i might have is: after extensive research, i have found some great builds of the C-1, but trying to find real world pics of the C-1 in training, or in action, is limited. would there be a little bit or rust on it in real life? i know its a failrly new vehicle, but would there be a little bit of rust around some bolt heads and the like? maybe an armor expert could clarify this. after all, armor is armor right? it all boils down to being a beautiful heap of steel with an ass-whooping of a gun that strike fear in the enemy. any help would be greatly appreciated.
Rather than start a new thread, I just bumped this older one. I can’t seem to determine the darkest color. Is it a dark grey/green?
well being that its still a prototype, i’m not sure of the exact color, but i would guess that its more close to the NATO black. its a little bit more grayish than flat black.
Looks like standard NATO 3-tone camo to me too.
What is a standard NATO 3 tne scheme? What are the colors?
Factory colors are Forest Green, FS34127, Military Brown, FS30117, and Flat Black, FS37038. However, the green and brown fade very quickly on the actual vehicle and I find Medium Green, FS34102, and Field Drab, FS30118, give a more realistic look. All the above colors are available in the Testors Model Masters lines. Here is a website that cross-references them to other model paint lines.
Mille Grazie Gino[:D]