I am doing my best to resist buying Accurate Armour’s resin kit of the Ward-LaFrance M1A1 heavy wrecker. It looks absolutely awesome, and I think I’m losing the battle. But it’s also pricey! I’ve never worked with a resin kit before. How does working with resin differ from working with typical polystyrene? Does it require a different glue, special paints, unique sanding technique, etc? Thanks for any input. Maybe you’ll scare me out of it. ![]()
I have not yet built a large resin kit, only use AM sets and a Probe Droid. First thing with resin is that you need to use CA glue, your normal glue or plastic weld will not work. Resin is also rather brittle, so thin parts need to be handled with care. It also produces a lot of dust when sanding which I have heard some say is not very good for you if you breath in.
As for paints, you just use what you normally use. In the past, I have just put the paint straight on, but recently I have started priming and I would advise doing that if you don’t already. Washing the parts is also a good idea.
I have been toying for some time in getting some of their WW2 German conversion sets, they do a nice range of proposed panther turrets amongst other things.
Thanks, Bish. So far, it’s looking good for Accurate Armour’s bottom line and my modeling enjoyment! ![]()
Yes, that is one thing about resin, it is a bit pricey. It is also well detailed.
Like plastic kits, resin can vary depending on the company. Recently, Aires/Quickboost have gone from the normal yellow resin to a grey one which is less brittle and does not have the same feel. I will guess that AA is the older yellow resin, and resin kits do tend to be limited runs so you have all the fun of that.
If its something you really want, go for it. But I would suggest trying you hand at some smaller resin pieces, AM sets etc, before you actually tackle an expensive kit.
Barrett
As Bish says take care with the particles of resin, wear a mask and ventilate. You will still get covered in something like white chalk and it can be a pain to get out of clothing. I’m working on a resin piece at the moment and I’m using epoxy for glue as its a little less problematic than CA but takes its own sweet time to dry.
You will need to prime but it needs to be a good primer. I’ve used automotive in the past but for resin I use Alclads primer as its a lot finer than just about any primer I’ve seen so far.
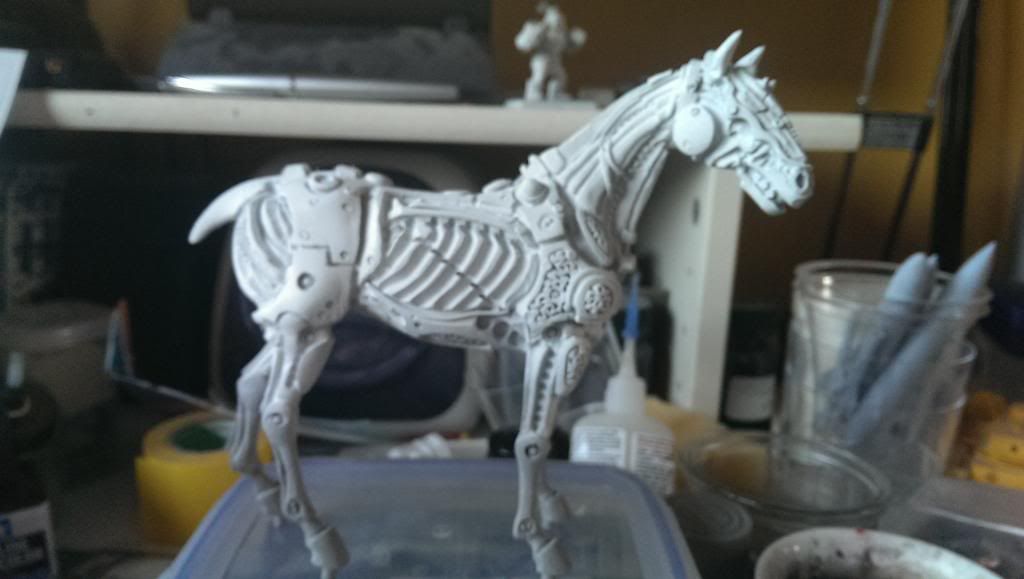
Picture to give you an idea, its along way from even finished primer but the primer brings so much together and covers all the filler you’ll end up using.
Phil
P mitch, thanks for this. Why filler? Is more needed than with a typical newer Tamiya model, for example? Do the parts not fit together as well as typical plastic? Do they tend to not come out of the molds with smooth surfaces?
Thanks, Bish. Sound advice, I’m sure. But can I resist? I don’t know. From the pics, I think you’re right that AA uses the yellowish resin. It’s an excellent suggestion to try something less expensive and less complex to get started. I’ll look around and see if something else catches my fancy while I continue to ponder this.
Limited run kits tend not to fit as well as your more high end models, that’s the case with injection and I would imagine the same with resin kits. Also, these kits tend to have the insertion tabs you get on longer run kits, that goes for injection as well, but I think more so with resin. The aircraft kits I have don’t have the insertion tabs for the wings, for example, just flat matting surfaces. So you wil need to take your time and make sure everything is lined up.
For amour kits, theres not the range of resin AM sets that there are for aircraft. Its usually interior sets, and engines. You could try a few resin figures just to get the feel for it.
Locator pins really matter, especially for things that simply MUST be symmetrical–like headlights and tail lights. Hmmm. And if I have to use CA for glue that limits the working time to get things just right, too.
Barret
Yes you will need filler. As Bish says they are limited run kits and the fit isn’t always the best as they tend to be a little smaller in some areas then others. That’s a result of the casting process, the resin shrinks a little as it sets and can warp a little so expect to have to use a hairdrier or warm water to allow the resin to be pushed into shape. At joins expect to use filler just to get things smooth if nothing else.
Phil
Thanks, Phil. Sounds like a love/hate relationship–love the subject/hate the medium. I really want to build this truck, too. RATS! Seems like I definitely will need to take my foray into resin slowly.
Don’t worry BD, a challenge is always good and you will surprised what it brings out of you.
I agree with Bish, go for it. If nothing else buy it and stash it till you feel up to it, that way you’ll have something to work too
Phil
Bish and Phil, Thanks for the opportunity to have this extended conversation with you. You both helped me tremendously. It’s hard to justify a nearly $200 model in the stash to be made some time in the future if I decide that I want to put up with the extra demands of working with a complex model consisting entirely of resin parts. I’ll need to give this more thought. In the meantime, I’ll get a small resin model of some sort that requires some assembly and see how that goes first. This is exactly what I needed to work through. Thanks, again.
WOW, I just looked at the price of those, I can see what you mean. Well, glad we have given you something to think about it, but it all boils down to how much you want it. And I know the feeling.
Have you considered Mirror Models, not the same vehicle but is cheaper:
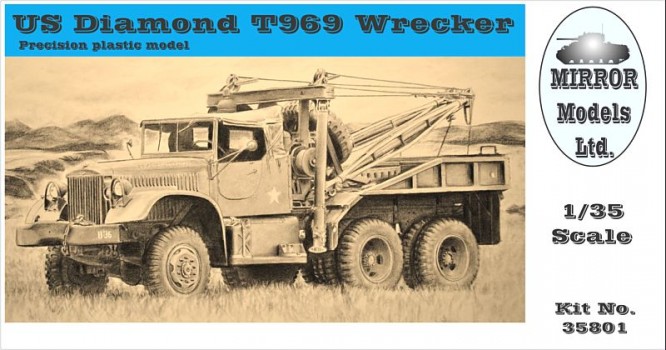
It’s on sale here in Canada at only $78.00
regards,
Jack
I’LL NEVER BUILD ANOTHER RESIN KIT .
The one that I did buy was of the ship my on which my father served and only available in resin in 1/350 scale. it was from Iron Shipwrights and it was incredibly poorly cast with bubbles and excesive flash in almost every one of the hundreds of parts. I had to send for replacements twice because they where as bad or worse than the almost unrecognizable parts supplied with the kit. The instructions where very vague and in no particular order of assembly. After a year and a half, I’m still “fixing” parts prior to assembly. I wanted to build a museum piece in honor of my father , but for $245 USD, all I got was a nightmare.
Bish, It’s tough all right. But I did the math, and the cost in US dollars is more like $260, so that’s making the decision a little easier. One thing I feel confident to say–This isn’t the model I should try to learn on.
Jack, Thanks for pointing this one out. It has popped up a few times as I’ve sought reviews of the Ward-Lafrance kit. It looks like a very fine alternative. Seems to have good attention to detail and lots of opportunity for close work. I may very well go with it instead. Hopefully, it will scratch my itch to do this subject and get the Ward out of my system at the same time. At a third of the cost, that’s already providing some strong incentive. ![]()
Jay, YIKES! That’s all I can say. I’m sorry you had that experience. I’m a bit of a perfectionist, and I am definitely concerned that I might end up feeling the same way about this kit I’m looking at. Just failing to get the headlights symmetrical from all angles would be enough to make me cringe every time I looked at the finished model. I really don’t even understand the nearly obsessive nature of my attraction to this kit. It’s constant and doesn’t make any sense. I wonder if others at FSM get kits in their heads like this.