I asked my buddy about his ideas for spraying out my airbrush without having to just spray it off into the air and he sent me this:
Mike,
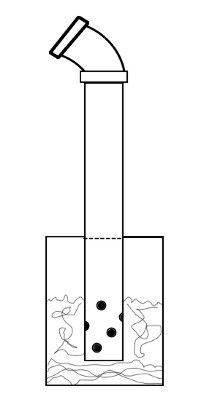
For the spray out, try this. Buy a new empty gallon paint can from your local supplier, and also get a 30 inch length of 2 inch ID PVC pipe and a 30 degree elbow. Cut a circular hole in the lid of the can that the pipe will fit tightly through. Drill 6 to 8 1/2 inch diameter holes around the side of one end ot the pipe (put them at random locations within 4 inches of one end). Attach the elbow to the end that has no holes. Slide the end with the holes through the can lid so the holes are on the can side. Place a layer of furnace filter material about 2 oinches thick on the bottom of the can. Insert the pipe into the can, and place filter material around it loosely. Close the lid with a mallet. Now you can spray into the elbow end of the pipe, and the fumes will go into the can and the insulation. I have one of these that I have used for 9 years now, and surprisingly, there is very little paint build-up in it, and I have never replaced the filter material. I do open it occasionally to check though. It looks like this:
I think this would work great and thought that maybe you guys might find it helpful also. [:D] [;)]
mike, thanks for that tid bit!! i’ve been brain storming for something similar. heck, i practically have most of that stuff lying around my jobsites!!LOL. later.
why would you need to clean out a rattle can? this contraption allows you to clean out your airbrush by spraying your cleaner through your airbrush into the pipe and the fumes are trapped in the can instead of floating around in the air we breathe. later.
Mike,
I built mine out of a 8"x 6"x4" plastic container (Tupperware like freezer container purchased @ a Dollar General Store), cut a hole in the top that was large enough to accept the inlet filter from a 3M respirator. The filter was glued to the top with the inlet on the outside using silicone seal. A small hole was made in one end of the lid to accept the nozzle of the airbrush. I stick some paper towels in to absorb excess liquids and put the top in place. It’s small enough to store easily and works great.
Maybe I’m overthinking this, but I’m not entirely convinced it’ll work.
Depending on how tight the pipe/lid joint is, I don’t see how air will get out of the system; it would seem that you would need a couple of small holes in the lid to allow air to be expelled, thus preventing overpressurization of the system which would cause the spray to come out of the pipe and back at you… but adding those holes will also allow fumes out, thus partially defeating the point of the whole apparatus.
Maybe the system is large enough where it never gets sufficiently overpressurized, or the lid/pipe gaps are big enough that air is indeed allowed to escape… could someone who’s actually built and used one of these things tell us if it really works as advertised?
You,re absolutely correct. When I posted that I had a senior moment (seems I’m having more and more of them lately) and couldn’t remember where I saw the idea. I didn’t use the butter tub because it was too small for the filter I had. I had a bunch of the Tupperware type bowls around to put nuts, bolts and small parts in when I’m disassemblying something.
Swanny, my most humble appoligies - and for you guys who don’t know what we are talking about, check out Swanny,s web site - lot of good ideas there.
I decided to build one of these Saturday, but I did mine slightly different.
I used a coffee can for the bucket part (actually a plastic Folgers can since the one I was using was metal and is really rusting badly).
Instead of drilling a bunch of holes in the bottom of the tube I used a “Tee” connector. The T is mounted upside down in the can, with the top of the T glued to the inside bottom of the can. When paint comes down the tube it blows out both ends of the tee connector.
I used 3/4" PVC pipe instead of 2"
I drilled several 1/2" holes in the can just below the lid, and covered them on the inside with coffee filter material. That lets positive pressure inside the can vent out and prevents the fumes from blowing back through the tube. The volume of a piece of 2" pipe would probably be enough to prevent that from happening but I used 3/4"
I put a 45 degree elbow on the top, and then a 3/4" to 1/2" reducer. I cut the flange off the 1/2" end of the reducer and it is just about the same size as the tip of my airbrushes.
I can blow out 2 full paint cups from my Omni without any significant blowback through the tube. I used way too much filter material and really reduced the air volume in my can. I folded a 20x20 air conditioner filter and stuffed it in there, and there are four layers of material. I need to reduce that to two layers to get some more air space for fumes.
The paint and thinner go down the tube into the can. Then what? The solvent will slowly diffuse out of the can. It might keep you from being overcome at the time of the cleaning, but in the end you will still be releasing the solvent into the environment - albeit at a slower rate (which is admittedly better).
Actually, this method seems OK if you put the can outside after cleaning to let the fumes waft away, and if you don’t mind releasing solvent fumes into the outdoor environment.
The IPMS Stockholm method is interesting because it recycles solvent to clean the airbrush. However, according to the drawing you still have a larger volume going into the can (spray air plus solvent) than you have coming out of the can (solvent only) - the extra air has to get out somehow, and when it does it will carry solvent. (Mass balances are a way of life to me).
Hey, I don’t have a better mousetrap, or even one that is as good, but if I were going to build and use one of the contraptions above, I would still do it in a well ventilated area and afterward I would put the can outside where the solvent doesn’t slowly evaporate into the house air.
It’s all about concentration over time. A few parts per million dispersed in a matter of a minute make me cough. A few parts per trillion dispersed over a few weeks doesn’t.
Probably 99% of what I spray is acrylic, and for cleaning my airbrush I use commonly available household cleaners (specifically Windex, Simple Green, and distilled water). The timed concentration of vapor being released from the can into the atmosphere of the house is going to be far, FAR less than if I used Windex to clean the inside of my windows.
That is interesting, however the solvent being recycled into the airbrush will also carry a high concentration of paint particles that were in the thinner and airbrush, and then absorbed into the atmosphere of the container, so you are basically recycling contaminated solvent through your airbrush.
Actually there is a better moustrap. Check out this one: http://www.swannysmodels.com/FumeCan.html
Swanny uses an organic vapor cartridge from a respsirator to absorb the fumes and vapors.
Edit … I just had another idea, and this is really on the order of a question. I wonder how activated charcoal would work as a filter medium. I know it will remove chemical contaminants from water (I use it in my fish tanks for that purpose) but I don’t know whether it would 1) Remove contaminants from air and / or 2) Remove those types of contaminants.
As my environmental chemistry professor said, “The solution to pollution is dilution.”
Actually, I did see Swanny’s device, and it probably works well - until the cartridge is saturated with solvent. If you spray very often into the tub, I’d suspect the activated carbon becomes saturated rather quickly. Then you either trash of the solvent soaked cartridge or you bake it out, which also releases the solvent, again at a slower rate.
The trouble with all these systems is that if X amount of solvent is used then X amount will eventually be released. None of the systems is truly closed, and the solvent doesn’t deteriorate.
Nonetheless, I’m not one who is afraid of small doses of chemicals, particularly if the dose is intermittent. I just wanted to point out that it’s probably better to keep these devices in an airy location when not in use so the solvent can slowly waft away.
It’s been so long since I took college chemistry classes that I don’t think our textbooks even contained the phrase “Environmental Impact”. [:D]
I can’t remember the life of the ones I use but it isn’t long. I keep my respirator cartridges in ZipLock bags to try and preserve them.
I may give the charcoal idea a try. I’ve got a container of it for my fish tanks. The stuff is cheap and when it quits working (if it works at all!) the old nose will let you know. In water it’s good for 30 days, but the concentration will be much higher in this situation. On the other side of the coin though, there won’t be contaminants circulating around it 24/7 like there would be in a fish tank.
You are absolutely right, and if I came on a bit too strong forgive me. It’s been one of those days and I probably vented a little at your expense.
Actually, most manufacturers say you should clean a your paint cans nozzle after use by by inverting and spraying until the paint stops. To be fair, this usually this takes about 5 seconds, so I’ve never been concerned in the past about it.
As far as the spray out chamber, another alternative is the Testors Cleaning Station that comes in some Aztek airbrush package kits. It does a good job, filters the air, and collects the spent thinner in a nice jar for handy recycling. Mine came with my Aztek airbrush, but you can get one separtly for under twent-five bucks.
why not simply put cloth filters there, crush up some bbq charcoal, put it on top of the cloth filter, put another cloth filter there, repeat until it’s almost at the top, drill a small hole in the lid, and vent it outside?
Cloth is too dense. Air wouldn’t flow through it quickly enough and pressure would build up in the can blowing the spray back out the tube.
I don’t think BBQ charcoal is the same, but I don’t know that for a fact. I’ve always got “Activated Charcoal” (whatever that means) around because I use it in my fish tanks.
If you have a hose running outside, especially long thin one, the hose will build up back pressure. The pressure in the can from your blowing the thinner in is going to take the route of least resistance (actually it was take every path up to a point) so most of it is going to blow back up the tube. The resistance on the exhaust side has to be lower than the resistance on the inlet side. That’s also why you can’t use dense cloth, it blocks the exhaust too much. It’s also why I need to remove a couple of layers of filter from mine [:)]
I noticed Swanny’s device mentioned a couple of times…
If I remember correctly, those 3M mask filters have something like an 8 hour life (i.e. you’re supposed to change them every day if you’re working in areas with high concentrations of whatever you’re trying to filter out).
I think the lifespan of the filters can be improved by getting two identical containers. Keep an unmodified lid over the solvents/rags between paint jobs, and keep the lid with the filter glued to it on the second continer. Takes up a little more space, but makes stacking easier. Otherwise you could just dispose of rags/thinner after each session… it’s not like you’re going to reuse it.