I screwed up and I’m not sure how to correct this, or even if I should. ![]()
First let me start by saying that I am building a fictional futuristic carrier. Why the lower blue hull? Why not? Red is just getting to be a bit too boring for me. Besides, I’ve seen pics of Canadian warships with blue antifoul painted lower hulls. ![]()
The black boot stripe has been fully painted black, and the hull portion under the black boot stripe fully painted blue except for the following:
The only part left is the tip of the bulbous bow. I really thought I had the waterline marked correctly with TAMIYA yellow masking tape. But due to my poor eyesight, I guess I didn’t. As you can see in the second picture below, the height of the two red lines do not match. The left red line which denotes the top of the black waterline stripe, does not connect to the center yellow line. I’m guessing the gap is probably about 1/16" inch (or a tiny bit more) or so.
I’m not sure how to correct this discrepency or even if it should be corrected. And then I also need to figure how I’m going to “curve” the black boot stripe around the front of the bulbous bow. And Yes, the paint did bleed under the tape in some places. I will correct those spots in the next few days.


Perhaps adding a very slight but lengthy diagonal on the starboard side will allow them to meet effectively without having to do copious amount of remasking and painting? Might also be enough to make it so it isn’t as visually apparent.
One of the reasons to not rely solely on tape for a waterline. The correct way to draw a waterline is to set/tape a pencil on top of a block (wood, legos, whatever you have) at the height of the waterline. Make sure the hull is perfectly level side to side. Then simply trace around the hull. Your lines from either side should be perfectly even then.
Bob
Ingenious. I love simple solutions like thisl
To my eyes, the black on the actual ship looks a bit wider than on your kit. If you masked both sides again to just bring the black a tad higher on one side and a tad lower on the opposite side, you would only have to spray black to fix it, and not have to worry about blue or grey.
As for the bulb, I would try to find a round sticker the proper size for the front edge, mask around it to get the curve. Remove round sticker then use straight tape to join to the black on the hull. Not sure if that is as easy to read as it sounded in my mind.
Having seen you past work, I’m sure however you fix it, it will look pretty sharp when done.
Here’s something I’m looking at….
All of a sudden I’m looking at it too. Me thinks that will come in handy when I do my Titanic waterline. A task I’m thinking will be difficult. Anything to make it easier is definitely on my radar. Thanks for the link.
Cheers,
Mark
Always a pleasure! As we are from Canada, research your suppliers and online vendors as the price is ALL over the place; from $20.00 - hundreds for this jig.
I did find a supplier, from Gatineau QC, where I bought my plane jig from $30.00 plus taxes. That included delivery. Let me look to see if I can find it….
Here’s the supplier in Gatineau Qc for the plane jig I bought
She has no waterline jigs listed on her site. Sorry.
With respect to the plane jig, I went to Home Depot and bought 6-32 x 1 inch bolts and smaller wing nuts as the ones that were included were too long. Not a big deal.
The jig also comes with boat hull arms so it’s multipurpose. I’ve added small strips of foam to the tops of the arms as to not scratch or scar anything resting on the arms.
See, and I fine this absolutely ridiculously priced…
Right now, folks, I’m on a break from working on my carrier and correcting the waterline on the bulbous bow. I had to order a new table/desk lamp which should give me more light to work on the model. So I won’t have any new progress to show till maybe late next week sometime.
@Nomads Thanks for looking. As I’m sure you know, shipping costs from the US are outrageous. Likely way more than the jig itself. I’m perusing the Hobbyworld site for some other items (without going crazy) to justify the shipping.
Thanks again and cheers,
Mark
I just ordered one from BNA in Australia, along with some 1/48 WWII figures and 1/700 PE/Aftermarket parts for my BB-63 and a Hornet in my stash. 25.00$ shipping from Australia is pretty inexpensive for tracking and 7 day delivery (usually here in3-5) considering 25 day shipping is $16.00.
@Nomads Order placed. The Waterline Marker, Wax Picking Pencils, and a Scriber. $17.02CAD for shipping. From Australia. Yup, that’s crazy inexpensive from 1/2 way round the world. Thanks again for the intel.
Cheers,
Mark
My pleasure. Glad to help
Well, I think I’ve gone as far as I can go on finishing painting the bulbous bow on my carrier. If I continue any further trying to fix/straighten the black waterline mark by masking, painting, masking, painting, etc., then I’m just going to screw things up even more. Don’t judge things by the pictures only as I have bad photography skills. To get a real sense of how the bulbous bow looks, you’d have to be here.
Do I really want to go any further with painting this area? Not likely. Better to say it’s done and just cut my losses. Painting the bulbous bow was a real P.I.T.A.! This thing fought me every step of the way. ![]()
![]()
![]()


Too true. Even when the manufacturer has marked the waterline with a raised or recessed line, it’s best to check – they don’t always get it right, or even from side to side!
That turned out pretty decent considering where you started on the first pictures. Good recovery. Once you get the grey done again, it will probably not be noticeable at all.
Nice job.
Here is a photo of a home-made waterline scriber for those so inclined to make one. A bit fancy, but the principle is the same. Uses virtually any standard size pencil, from the old #2 to the newer refillable plastic ones.

Ok, and now for my next trick…er, question that is. For those who have built aircraft carrier models in the past or are currently doing so, what advice, tips, tricks, etc. can you offer for painting the flight deck? Especially the larger white and yellow flight deck lines as shown in a pic further below?
A few things on what I will and won’t be using:
- I will not be using Tamiya paints. I stopped using them a few years ago.
- I already have plenty of yellow TAMIYA masking tape in 6, 10, and 18 mm sizes. I also have 2 mm tape too.
- I don’t own an airbrush and can’t use one for various reasons which would take too long to explain. So either spray can or hand brushing are my only options.
- I was planning to use the Vallejo spray paint you see pictured below for the flight deck.
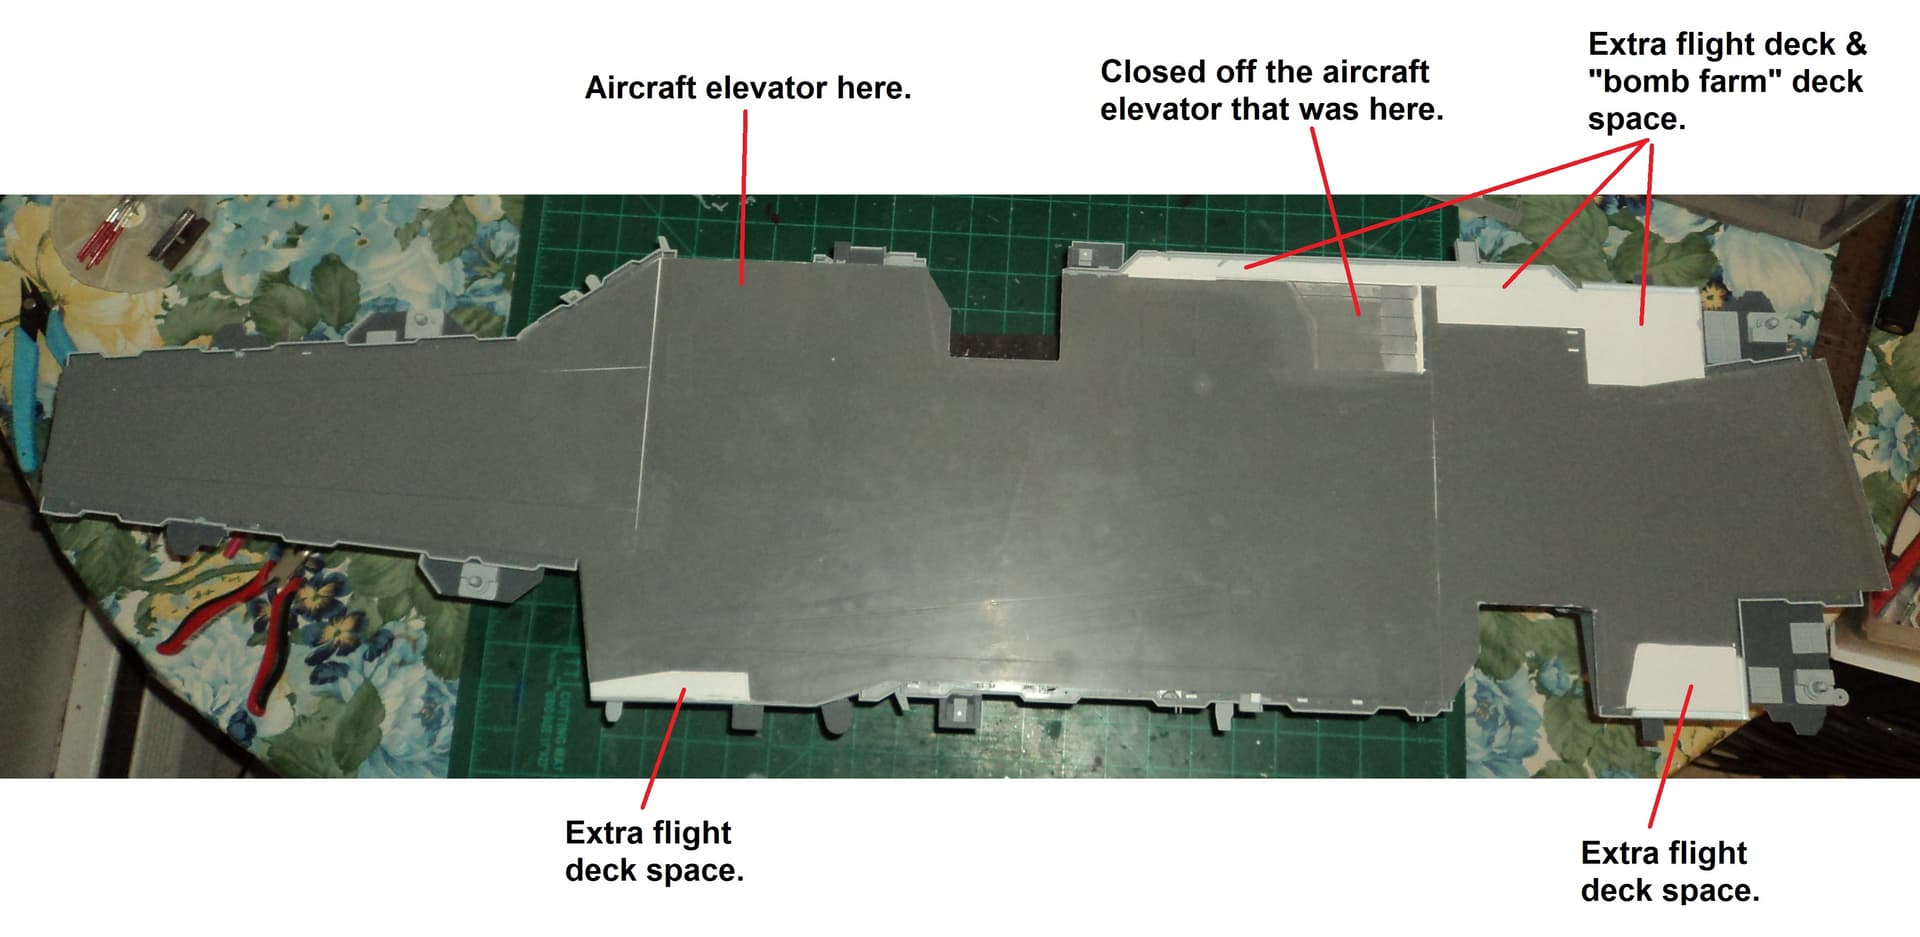
- Some people may be wondering why my carrier looks different in the below picture. I wrote a few notes to explain some changes on how I converted a 1/350 TAMIYA Enterprise carrier into a new future carrier.