Build Log: 1/72 Hasegawa Su-33 Yellow 13...

I saw this kit and had to have it because I have already built two from-scratch RC versions of this aircraft/scheme. This is my fist plastic kit build in 32 years so who knows what will happen. Your comments, suggestions and criticism are welcome and would be greatly appreciated.

First off…here’s my RC Flanker (26" Wingspan):

…and the video.

http://www.youtube.com/watch?v=RZIaSKlbv6k

Skip to the pictures of the completed model here.

Now for the plastic kit build. This will be an out-of-the-box build. I live in northern Alabama, and we’ve been “snowed-in” for two days now and I’ve made some decent progress while trying not to go stir-crazy.

Here’s the box:

COCKPIT: The main instrument panel decal was off on the right when I placed it. I guess I need an optivisor because I didn’t notice it. I used Micro Set and Micro Sol.

Once installed, you don’t even notice the decal being off**.**

GENERAL ASSEMBLY:

Nosecone doesn’t fit very well…lots of sanding to do.

Engine Intakes don’t fit very well…lots of sanding to do.

Whew…that was a lot of sanding…

I don’t know if this is just how kits are made these days, but this kit doesn’t want yo to do a gear-up configuration. The doors fit horribly in general and aren’t even molded for closed assembly…

There was no way to get the nose gear door glued in there…so I stuffed a rolled-up paper towel in there to support it from the inside while I assembled it.

There…

Next problem: there is no rear nose gear door. What little assembly you can get from cutting up the would-be rear support, is completely the wrong size:

So…I made the part from some left over kit plastic…

Back to the doors…lots of cutting and sanding to do. I had to cut a section out of each main gear door in order to mount them closed.

Much better…

Putty and sand, putty and sand…almost ready to prime.

…but I had to do so much putty and sanding, I’ve got some re-scribing to do. I used a sewing needle in my pin vise. My Dymo tape is a work and I can’t get there, so I decide to use pinstriping tape and it worked pretty well. I’ve never done any scribing before. I must say, it’s a pain in the rear and somewhat stressful.

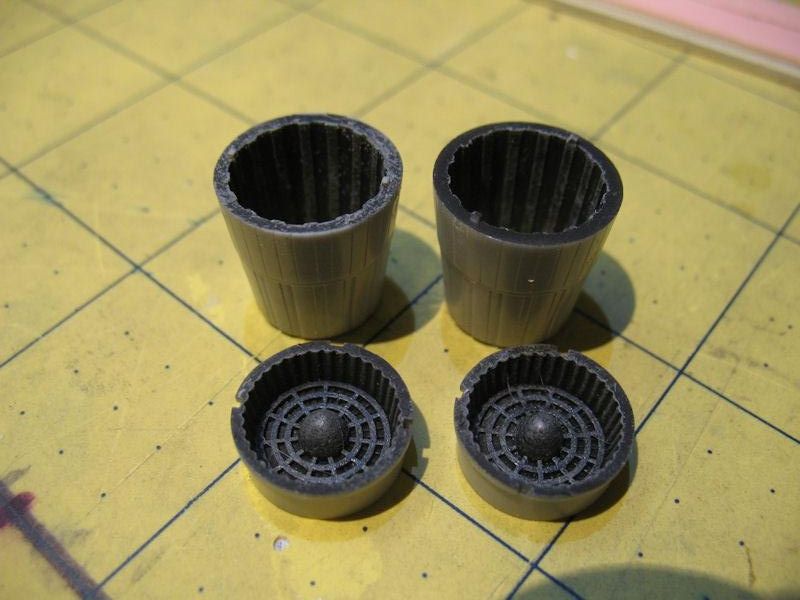
Now I’m about ready to prime. Here are the cans. Black inside with some light gray dry brushing to get that charred look.

I hope you enjoy the pics. I will update as more progress is made.

Looking good so far[Y]

Looks good so far what kit is that and looks like 72nd scale

Sorry forgot how to read for a minute

Vertical Stabs. There was a hefty gap left, so I got to putty some more.

I’m not one to be really concerned too much with real-world accuracy, but the big vent/intake on the right side stab is really bugging me…so I tried my hand at a little modification:

Much better I think. Now on to finish rescribing and priming/painting.

Great work! She’s looking great!

Eagle90

This is literally my favourite aircraft but considering the price of the kit I am surprised at how much putty is needed considering the price of this kit, the air intakes are a usual issue with Flanker/Fulcrum kits they’re always a pain, but other wise it looks great, I look forward to seeing more.

Did a little dry brushing on the cockpit before masking it up.

All primed and ready for the base coats tomorrow. I used Tamiya White Fine Surface Primer for the first time and I must say I really like it.

I’ve never done pre-shading, post-shading or washes of any kind. I’ve done my research and watched probably ten or more tutorial videos, so my hopes are high!

[:D]

I started with the engine area. I was shooting Tamiya flat Aluminum…it was so grainy I could have used the finish for sandpaper. I tried thinning it more, thinning it less but no improvement. It got worse as it dried. How demoralizing.

I stripped the entire engine area to bare plastic and got some Model Masters Metalizer. Great stuff! WAY better than the experience I had with the Tamiya.

I almost ruined the model…again! This time, I was shooting the base coat grey and it came out all grainy, bumpy and fuzzy. After some research, I learned that it was all my fault for how I was airbrushing (too far away). I’ve since hit the entire model with some 4000 grit micromesh pads and some fine steel wool and I should be ready to try again tonight. Fingers crossed! This model has been a one heck of a learning experience.

That RC unit looks stunning- I assume that you’re going to paint the 1/72 kit to match?

Can’t wait to see the finished model- the Flanker is a gorgeous aircraft.

Thank you…and yes, it will be painted in the same scheme as my RC Flanker. When I’m done, I’ll take a picture of both of them together, but the RC one has it’s nose all smashed at the moment.

This evening’s progress: Disaster averted…again! I used a Scotch-Brite scouring pad on it after I got home from work to finish removing last night’s mistake. I dropped my pressure to 15psi, thinned the paint more and never got further away than three inches. It’s smooth as could be now!

Tomorrow: Masking begins. Luckily, I only have to mask once to paint both the darker colors at the same time.

It looks great, is it a good kit as far as kits go?

I’m just thinking I recognise the yellow/grey is it inspired from the Ace Combat series?

Yeah…sort of says “ACE COMBAT” and Yellow 13 all over the box. [:D]

I’m not really sure how to judge this kit because it’s my first one in 32 years. As you can see there’s been quite a bit of putty and sanding, but that could be my inexperience. I think she’ll turn-out fine, but assembly and prep have been a lot of work. I’ve got a Trumpeter 1:72 Su-27 on the way, so I’ll be able to compare.

Dean- I think that this kit may just be a rebox of the Su-27B/K molds from Hasegawa as it looks just like the 1/72 kit I built a few years back, with the exact same putty issues and gear door misfits. They’ve gotten a lot of mileage out of that mold set…

T3chDad- if you want some fun (and have the shelf space to use) try one of Trumpeter’s big 1/32 Flanker kits. They’re pretty simple to build, there’s a host of aftermarket goodies to use on them and they’re freakin’ awesome when finished. But they’re not cheap by any means.

I think you’re right Dre. Just a different set of decals and instructions in a new box. I’ve seen the 1/32 kit and some build logs and it looks awesome. I’ll have to do that some day. It seems the kits go for about $150.00 USD…not too bad considering what you get.

If you dive into one of those big birds, I highly recommend the Eduard PE sets for it as they dress up some obvious weak spots in the kit. The intake FOD screens are a bit wonky to set in place but they look the part as opposed to the big slabs of plastic that Trumpeter gives you. The launch rail PE makes a huge difference in the look of those parts, which are very plain plastic otherwise.

Aires and Wolfpack make some fantastic resin bits to dress up the cockpit space(s), which are pretty visible under that giant canopy. At the very least, a set of resin seats make a huge difference in the appearance of the cockpit.

Dean made a 1/32 K conversion some time back that is simply stunning.

Good progress and more lessons-learned this weekend.

Yellow accents done and ready to mask for the camouflage .

I started masking the old fashioned way…looking at the scheme and eyeballing little tiny pieces of tape.

It was difficult, slow, confusing and I wasn’t happy with the process. See, I’m lazy…so I had an idea! I took some extra transfer film I use with my vinyl cutter and overlaid a print I made by scanning and enlarging the scheme from the instructions and started cutting-out the masks but it was still tedious. I had another idea! I took the enlarged image and used my vinyl cutter to cut all the masking at once on the transfer film. That was awesome! I only had to fudge a few bits due to the turtle deck. Everything that was flat was easy as pie and I was happy. I did fill in some some small areas with conventional masking tape.

After spraying…

Now for the moment of truth!

Wow! I couldn’t be happier with the result. There were only two tiny little spots to touch-up.

Next up: Future and experimentation with washes.