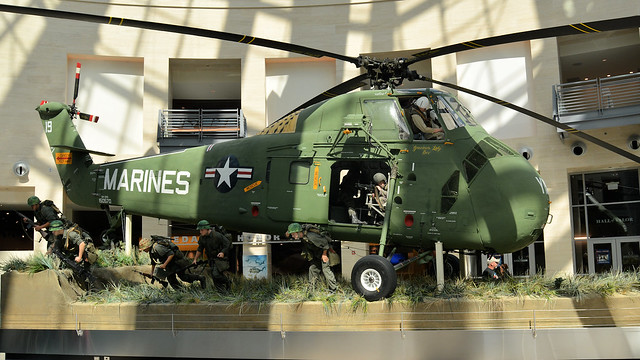
I am about to start on something I have wanted to do for a long time; a large scale (1/32) UH-34D conversion.
The finished product will be a USMC UH-34D from Vietnam which is currently at the National Museum of the Marine Corps in Quantico, VA; YN-19. This helicopter has very long and storied history, which can be found here: https://www.freedomsflyingmemorial.org/index.html
I will be starting with the Fly Models Westland Wessex HC.2 kit, which is of a later British version with turbine engines. The kit is interesting that it is a true multi-media affair with injected plastic, resin, PE, and paper parts.
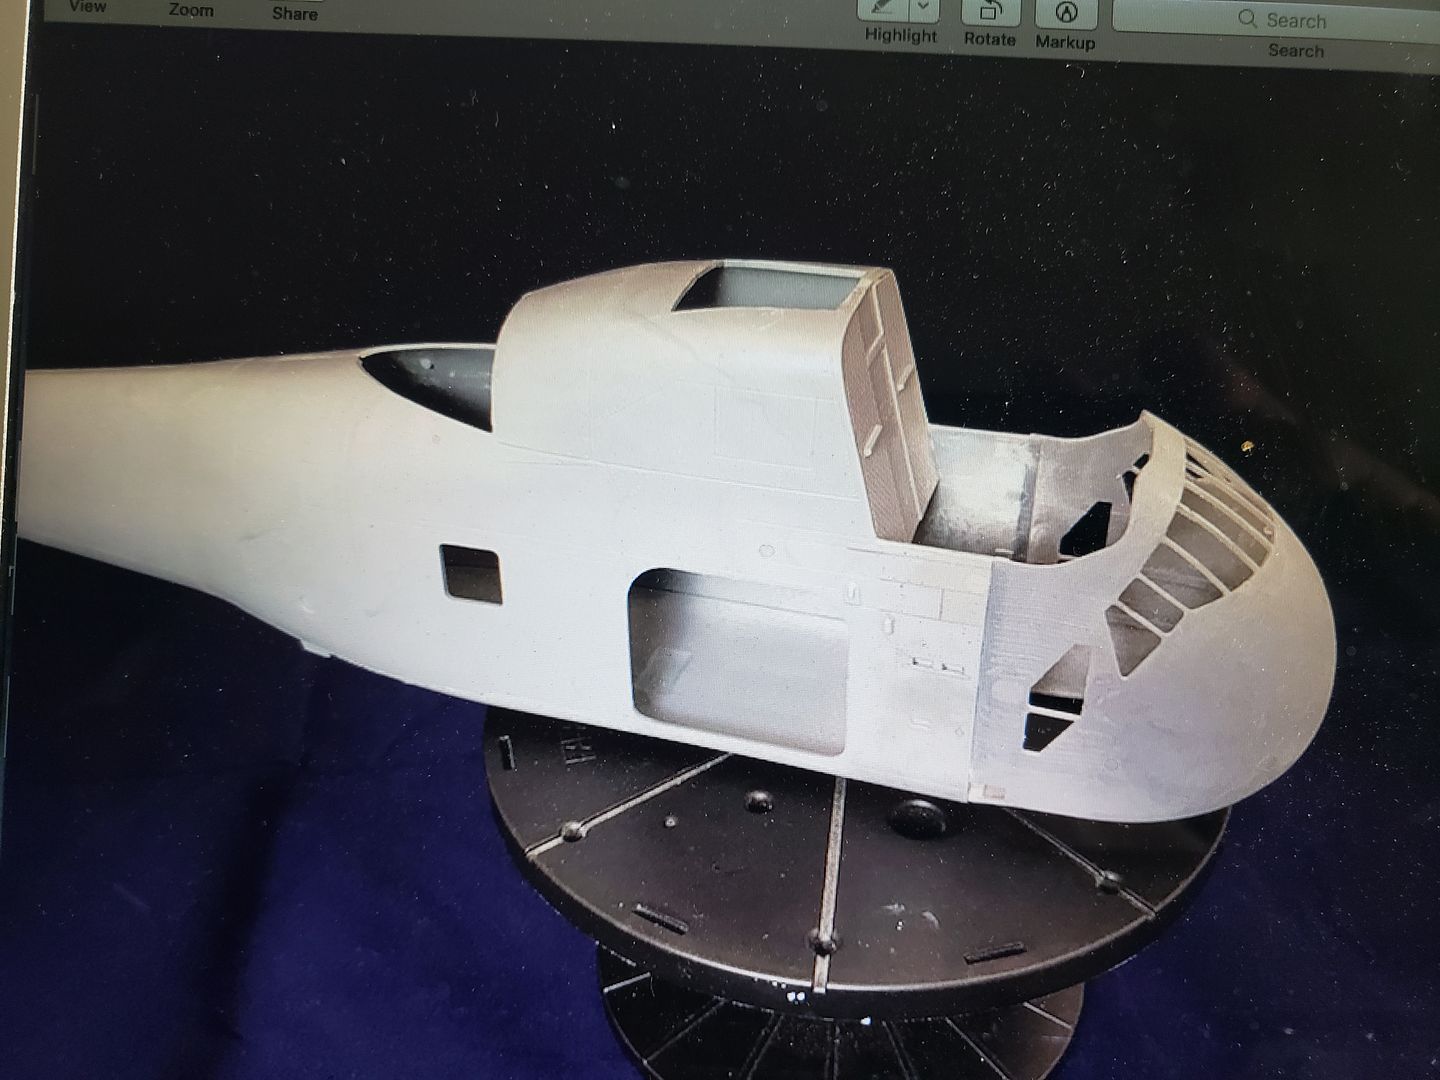
I will be using a new product that will be available soon to backdate it to a USMC UH-34D with piston engine. It is a 3D printed H-34 nose conversion designed by Oliver “Rotorman” at ARC and printed by Norbert from Reedoak Rubber Composites ( http://reedoak.com/ ) out of France, who do excellent 3D printed figures and accessories in multiple scales. It is beautifully printed and extremely detailed. A great piece.
I have made a bit of progress. It doesn’t look like much, but it was time consuming. The Fly Models kit is very detailed. You start by adding all internal stringers and longerons in the rear cabin. The vertical stringers weren’t too bad as each was a separate part that you glue onto thin lines on the inner wall. The longerons and parts around the windows are each individually cut to fit between the stringers.
Here is one side done, one to go.
They took some time, but it does look great when done.
Progress is moving along slowly. I have completed all the stringers and longerons on both sides of the cabin. After finishing them, you glue a bunch of triangular and diamond shaped PE bolt plates where they come together.
There was a minor issue with these PE plates. The instructions indicate a total of 33 of the diamond shaped plates. However, there are only 24 on the PE sheet. To rectify this, I left them off behind where the seats will be. You won’t see that area to tell they are missing.
Work continues, slowly. Life and Hockey on TV (Go Bolts!) keep getting in the way of bench time.
I have continued with the cabin and cockpit area. First off, the kit is inaccurate in the area where the lower front cabin wall and the cockpit rear wall meet.
This is how the kit has you build it. It has a couple issues.
To start, the cockpit rear wall comes down too far. The kit has it even with the cockpit floor. There is actually a step there. I cut 5mm off the bottom of the cockpit rear wall.
Next, there should be a tunnel going from the cabin front wall through the cut out area to the ceiling that the prop shaft goes through from the engine to the transmission above. You can see it in the below pic.
Here is how I replicated it. I cut off the bottom of the rear IP at an angle, then boxed in the tunnel with sheet styrene and added an access panel on the rear side.
Also, here is how the mesh will look on the nose section. I’m not sure how much details I will add behind the screens. I am using a PE mesh from Royal Model (no. 469). It is relatively fine and I don’t think you will really see much through it. We’ll see.
I have a small update tonight. Not a lot done as I have been pretty busy w/life lately. My younger daughter graduated from college last weekend and was commissioned into the US Army as an ADA officer. She gets married next week, so I have been and will continue to be busy.
A very proud papa.
4453497×623 102 KB
4455509×672 86 KB
On to the H-34…
I have pretty much finished building and detailing the cabin and cockpit. I found that the cockpit floor was too long for the H-34 nose. The angled front firewall that separated the cockpit from the air intake grills area was falling across the middle of the grills. I cut the angled part off and glued it into the H-34 nose in the correct place.
IMG_1772480×640 52.3 KB
I then cut 1cm from the cockpit floor and angled the front of the center console to match the angle of the firewall. I will need to add about 3mm of styrene to the bottom of the firewall as the new position (further aft) raised it up as well.
IMG_1773480×640 55.3 KB
The H-34 IP is also included in the kit listed as “For Other Versions”.
Lastly, I added details to the cabin side of the cockpit rear wall and the cabin front wall.
Let me give you congratulations for your Daughter. Being in the service and a wife can be a strain. I know for sure. All three of mine got the " Military Flu" So I got one A.F., one Navy, and one U.S.M.C. All flyers. Husbands came later and the oldest is now single. May she have BOTH a long Happymarriage and a long safe, career in the service.
Now to the Chopper. That looks as fascinating as my French Helicopter. Lotsa of parts right? The Super Frelon is a big Model too. and I stopped on it till dry summer months get here. I want to paint it outside! The rotor blades are darned near as big a circle as the top of my A/C condenser fan opening!
Are you NOT going to have the doors over the engine opening, or removeable, to show the power plant? I have never seen anyone do an exposed power plant on one of these types. How-come?
Thanks and I’ll pass on your words to my daughter. I am very confident she will do well at anything she puts her mind to. She is just that way; wonder where she got that from?
Glad you like the build so far. It has been fun and will be quite big when done. I built the Heller Frelon many years ago. It is huge, but well detailed. It should come out nice.
No engine in this one; for a couple reasons. One, the kit doesn’t come with anything for the engine compartment and I don’t feel like sourcing an appropriate radial engine, scratching everything that goes with it, and cutting apart the 3-D printed nose to make it all work. The 3-D nose is pretty brittle and I don’t think it would cut well either. There is word though that Reedoak may have an open nose and engine compart in the works. Also, I plan on making this an in-action bird, with a crew and disgourging Marines, so no open engine compartment.
That sounds like a Plan to me! Note: Tell your daughter to take No Crap off of any man. She’s going to have an uphill fight in the Man’s world she chose. I definite Wish her Luck and Good Fortune. She looks Determined so there !
I have made a little bit of progress. I completed the basic interior and haver painted it. Waiting for paint to dry to proceed on that.
In the meantime, I have been working on the 3D printed nose. It is very detailed, but missing the intake screens and internal parts that can be seen behind them.
I added the firewalls and a basic engine fan and drive shaft inside. The engine fan is a little small, but for what you can see, it will do. The firewalls are 0.020 styrene, and the engine fan is a couple left-over fans from a couple Tamiya M26 Dragon Wagon kits.
For the intake screens, I ordered PE screen from Royal Model; Medium Hexagonal Mesh (#469). I made a template for the screens by enlarging a 1/48 UH-34 PE fret to 1/32. I then used the paper templates to cut the Royal Model mesh. It was pretty close and only required a bit of finessing to get them to match the openings on the 3D nose.
I also made a recessed “bucket” to place the exhaust pipes into. I used a kit part for the wheel hubcap used on the British version that is excess to the UH-34.
I’m slowly making progress on this one. I have been working on the cabin recently. I installed wiring and the troop seats so far. I made the seats out of the kit provided frames and fabric made from red card stock paper with the seat pattern printed on it.
I also have some of the detail pieces started. These are the pilots’ seats and fire extinguishers that will be in the cabin and cockpit. There will also be various bags, ammo cans, and a couple M14s in the back.