Well Guys…it’s been a while since I’ve posted anything…so I thought I’d share…
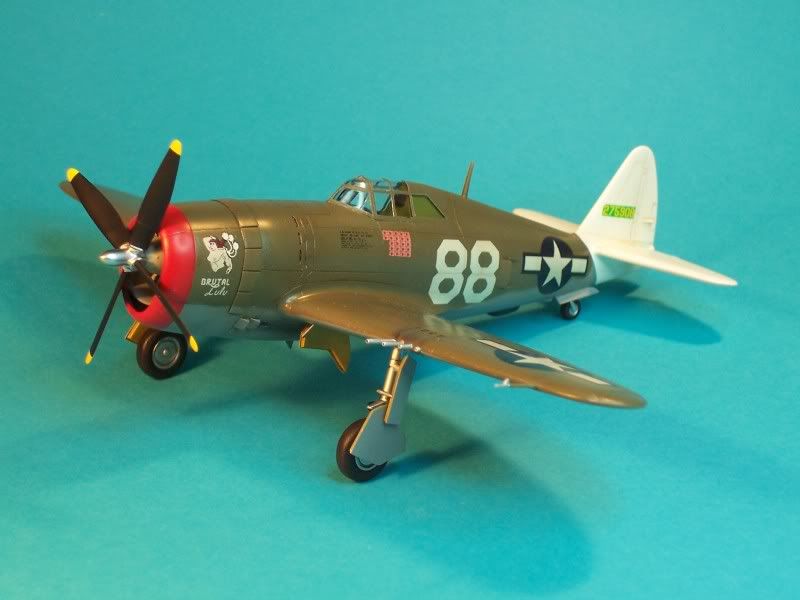
This is a Hasegawa 1/72 P-47D Razorback I started about 10 years ago…she’s languished for far too long in a state of semi-completion…so I decided to suck it up and have a go.
And before any rivet counters cry “FOUL”…yes, I know that the decals don’t match the airframe…I had “issues” with the ancient decals…a few self destructed AFTER most had already been applied (did I say rude words? Most definitely)…so not being terribly worried about the historical accuracy of that particular airframe, I cobbled together what I thought looked good…I think the overall scheme is a mix-and-match from 3 different operational aircraft…lol…who cares, anyway?
The delay was mainly from the upper wing halves…both were bent like a banana (the only defects I found) - when I tried to carefully straighten them, the inevitable happened…a crack 1/2 the chord length on both wings outboard of the guns! Again, I said LOTS of rude words…but that was long ago…oh well…the only other problem I had was the horizontal stabilizers were smaller than the mounts the were glued to…lots of sanding and re-scribing and they came up a treat. Other than that, the fit was perfect. No filler was used anywhere. This was one lovely little model - I’d build another in a heartbeat.
She’s about 99.9% done - still need to Future the prop and apply the Curtis Electric prop stencil data, then a mattcote and weathering…but the paint on the hub was still wet when I took the pics…also, the Humbrol Matt Cote gave a lovely satin sheen…argh!!! Oh well - I guess I can live with it.
She’s OOB, except for a scratched seat, seat mount, harness, and inner gear door actuating rods - oh, and brake lines. The only other thing I did was to sand off the outer portion of the gear doors and replace it with 0.006" alloy sheet - the outer skins on the real thing were probably 0.030" alclad with a return flange - the kit flange would have scaled up to about 4" thick - it really improves the look of the doors. The guns were drilled, too - thank God for Opti-Visors!
The paint is Model Master Acryl - in the little pouches…excellent paint!!! Lulu has a burnt umber oil wash, Tamiya Smoke post-shading on the panel lines, and all other weathering is via my Iwata HP-BC (a sweet little toy!!!). I might, sometime in the future, throw some pastels on her, but I’m not sure if I can be bothered…Lulu looks ok…I’m not displeased. So - here she is…


Now, it’s time to head back to the Classic Airframes Lodestar I started a while ago…she’s in TAA colors…and she looks darned good, if I do say so myself…only got the engines, cowls, landing gear and props left to do, then she’s off to her new owner, a Qantas pilot…he’s going to love her!
Cheers, guys!