Okay, are there any methods for fixing the tiny parts of landing gear that got broken because you weren’t paying attention to what you were doing. I admit it. I sometimes have a somewhat of a heavy handed approach when I’m working on my builds.
Currently, I’m trying to fix one of the main landing gear on my P-38. I am trying epoxy on it. I have it jacked up and I am goling to let it sit for no less than 3 hours. I think by jacking it up the gear will hang down straight.
Any other ideas, or even the tried and true methods are more than welcome
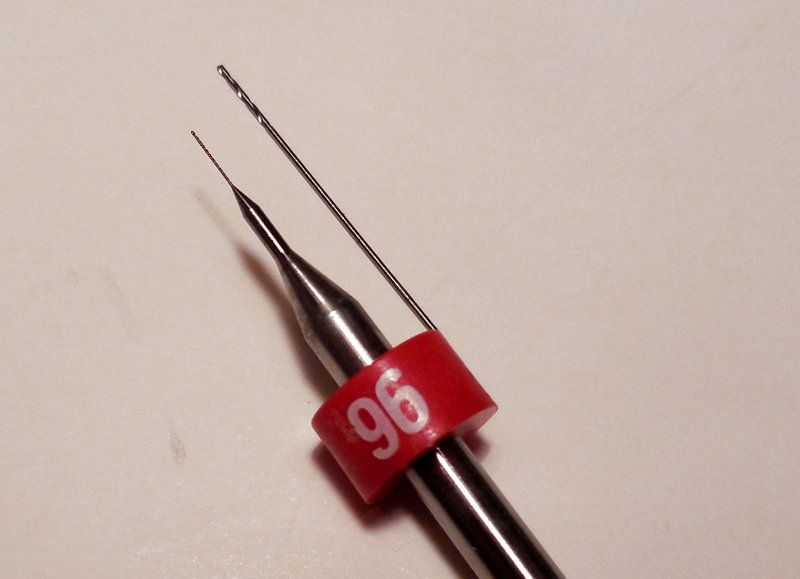
I understand, but this is leading me back to the pin vise amd those pesky little ( VEEERRRYYYY little) drill bits. My experiance with them is “if you look at them crossways” they break. The ones I’ve bought usually break with in the first hour after comig in the front door.
With all due respect, I disagree. If you take a tiny styrene rod and drill inside, you have a good chance to create a weak spot, that can break again. My solution would be to just use the right styrene glue, and just glue the parts together along the broken spot. We’re talking here about welding the parts together, using acetone, MEK, or mixture of those and similar substances. If the surfaces are clean, the joint should be every bit as strong, as the original part. Unfortunately messing with epoxy, CA or other stuff contaminates the surfaces and afterwards it’s hard to restore them so that the glued part is straight and right length. And I’m talking here about a tried method - thet’s the way I do it.
Thanks Pawel. I am using Epoxy on it right now. I’m being pretty gentle with it. so, we’ll see how that works. I may touch it up when i get paid and get super glue.
What scale is your P-38? If it’s 1/48 or larger, you may be able to use a small “normal” drill bit in an x-acto handle or your pin vise. This would almost hollow out the strut so I would recommend using something like a section of a metal clothes hanger and some CA or another stiff piece of metal (maybe a heavy gauge wire). The smallest normal drill bit should be small enough still to do the job, but they are thicker and stronger than pin vise bits. Does anyone know, are pin vise bits galvanized? I wouldn’t imagine they would be.
But since it only takes about a minute to drill out both parts, that is sixty uses of that drill. And, it is usually not critical to have the drilled hole fit precisely the pin or wire you use to reinforce the joint, it really is not that much of a problem. Yeah, they break. But #11 X-actos go dull, but does that prevent you from using them?
Maybe you could get another landing gear strut from the manufacturer, or maybe another modeler could send you one he/she isn’t using, and replace the entire thing? No drilling required!
I just did the pin repair to a 109’s landing gear. Tried glue then jb weld. The pin worked and is now the strongest strut on any model I’ver made. I may do that from the get-go on any future stuff. What with all the kids, cats and clumsiness.
I gave up on the pin vise with those little bits long ago. If you have a dremel, use it. The thing that kills those bits is the sideways wobble and inconsistent pressure of trying to drill by hand. If you keep them strait and drill slow (with quick rpm) they’ll last a lot longer.
I personally find it easier to hold a small pin vise straight with no side force than my much heavier Dremel tools. Both my corded and cordless dremels are many times heavier than my pinvise. Also, I do avoid using the 75 through 80 drills. I can usually find a wire to fit something in the 70 to 74 range, and those drills are surprisingly stronger. I find one should keep drill size about two steps above the nominal size of wire/pin, so you don’t need to clean up burrs from cutting. Thick CA fills any gap between wire and hole.
I have the landing gear to a 1:48 Revell P-38J I would ship to you. I make ‘flying’ models for my son, so I have a bunch of landing gear, drop tanks, bombs, rocket tubes, etc.
I had a similar experience when building the 1:48 Revell F/A-18E. I had one of the main gear wheels break off. I ended up cutting off the other wheel and used a small drill bit and drilled out the main strut as well as the wheel and inserted a very stiff piece of wire stud and used CA to secure the pieces back together. The wheels are now very secure, probably stronger than any other model I’ve built. I’m considering doing this from now on with other kits.
I have to admit…the guys advising teensy drills to make way for a steel pin works a treat - I’ve done it dozens of times and always obtained great results.
Any other type of glue application will still create a strut that’s sensitive to “shear” forces. Any sideways stresses (even merely setting the model down) subjects the gear to those blasted shear forces…and I’ve found that if I DON’T drill and pin the gear leg, I’ll end up repairing it many, many times before the model is done.