dragon BRDM-2/ATGM kit. base coat is light grey with black suspension. that was masked with silly putty. it looked like it was attacked by giant leeches. applied the blue. it was tamiya acrylic so i didn’t thin it enough and had to unclog the airbrush. 3 coats later it was done and i started removing the leeches and scrapping some raised edges. black was freehand. it’s hard to not have a pattern when doing this. long range vision was toast for 30 minutes after i was done. next was looking up arab words and making signs. glued them to superthin styrene and white glued to vehicle. since they are not painted on, the crew can remove the signs and join the other side easily. weathered with pastels. didn’t want to overdo it, just knock down the sheen and blend the signs a bit.
Is that scheme for real? Lord, that is a hideous camo scheme, and I dont mean your work. No wonder your eyesight was damaged… But you did a good job on that… thing. no disrespect meant to you at all Wayne. It takes a heck of a modeler to make something look that intentionally ugly… you pulled it off
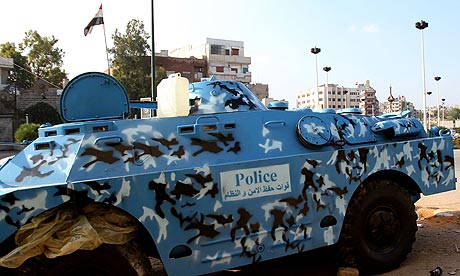
thank you. i was going to do it in syrian sand and green in keeping with my '73 war theme so i searched for some syrian BRDMs and came across half a dozen or so pictures. since i was in THE THIN BLUE LINE GB and had done an M-706 and wanted sone color on the shelf i figured what the hell. it wasn’t difficult except for unclogging the air brush but it was tedious. i’m a technical illustrator so i tend to think and draw symmetrically and the challenge was getting a random pattern with the sizes being the same throughout. the actual pattern is more spidery, especially the black. the police signs really say police, the rear fender signs are DAMASCUS on the left and BARRACKS on the right and the front signs were made by inserting arabic characters that looked close. will make a cobblestone street base and put it in NATIONALS
i couldn’t drive or watch tv for an hour after i was finished putting the silly putty on and later painting the black. and, with that in mind, i am building a 1/350 ww2 DD for a friend and the PE is insane. it’s my first little scale boat (1/700 doesn’t even count) and it will be cased so folks aren’t going to get contest close.
I hear ya about ship PE. I have done one 1/350 U-boat (only a few PE items on there thankfully) and have another ship build w/PE sidelined after my last couple moves. Very fiddly intricate stuff! No wonder I am back to my roots in armor… LOL! That one sure will stand out in a crowd! good luck to you at Nationals.
WAyne, I think it looks WICKED-COOL I think it needs some definition though—that shocking blue kinda obscures the lines of the vehicle and
If I might suggest, however, an oil wash of gray would tone down the blue a bit, and then a heavy, carefully-applied pinwash of light tan on the horizontal surfaces to simulate dust all over would really bring it more into a pleasing spec for that blue. You could also use pigments for that. Seal the model after the gray wash to protect it, and then draw the tan down over the sides to show rain marks and streaks of the sand,. Then, use a really fine brush to add a dark pinwash around the hatches and where shadows would fall to more or less “outline” the hatches and projections, etc. Honestly, it’s a cool scheme, but the vehicle itself needs to be defined better.
My thinking is that, with a scheme as bizarre and bright as this, the suggestion of it is more important than the actual depiction of it in clear, bright blue?
intersting the pattern works so well it doesn’t display well. ergo the pattern works in real life but not in the model world. that’s funny
always looking to improve. given it isn’t’ a flat finish, it didn’t stick well anyway. signs are easy enough to replace; i printed out 6 sets. what the hell i need to try one one day monday is as good as any.
i presume we are talking enamels or artist oils for the pin washes. should i wash the pastel off first? thanks
I would probably not wash off the pastels first; you should know that pastels are generally applied over a flat finish for best effect,. Don’t worry about them being there now–the more dust and grime you have, the better for the overall look, especially if it’s subtle. By the way, some nice chipping in aluminum or steel on the front of the vehicle—it IS a police vehicle after all; think "ramming car barriers, etc–would look good on the front, especially, before you start weathering. I’d chip the hell out of that splash shield and lower front hull.
Enamel washes finish semi-glossy; oils dry flat. I would flat the finish first with an airbrush and some acrylic flat—don’t worry about squashing the gloss with a big heavy coat of Dullcoat, just bring the shine own a bit. It will help the wash grab a bit more on the model. Give it an oil wash of gray. Let it dry and seal it again with acrylic flat. Then use those dust-colored pastels on the model (that would work better than the next tan wash I suggested at first --apply them more heavily on the top, and seal it by using thinner dripped on it. While it’s still wet, draw some of it down the sides to show streaks and rain marks.
Let all that dry and then take a look at it. You may then want to carefully paint in shadows with a darker wash of black-blue under the hatches and projections using a thicker wash mixture of say, Prussian Blue + Black. Or you might want to just leave the dust under there. Have to kinda judge it as you go, you know? But I think that’s where I would start.
sounds like a plan. finished a fire jeep lasst week (see auto forum) and the finish was gloss so the powders didn’t stick either. i jnew this think i was in brain flat mode, even when it looked shiny. the fire jeep i wanted clean so no real problems.
i agree powder makes better, well powder, than liquid. i can also moisten it for some streaking. sounds like i am actually looking for something w/ my hobby lobby and michaels coupons. thanks.
this is new. the dulcoat made the tamiya acrylic bleed like crazy. cool effect, not was i was planning. to paraphrase EMS “this is no longer a rescue operation. now it is a recovery operation.”
so the signs neeed to be replaced. already made and they were held on with white glue. top font and back look ok, just the upper hull really. as soon as it dires throughly i shall evaluate. may have to repaint some of the gray, really don’t want to redo any blue. this may end up being a tad motr “USED” than previously planned, amybe some of the runs can becomessmall arms splatter and rust. it is in a civil war and some of the picsshow one with flat tires and burned out in the front.
probably the most important thing is my reaction. i saw it, said some bad words and started thinking about how to fix it as i went to get my camera.
will still do the oil washes and i think some of run areas around the hatches will become wear areas. this is actually an opportunity. i sound like Zig Zigler.
cleaned up the blue that bled onto some of the gray with a fine alcohol dipped q-tip. repainted some of the black and the gray where the blue bled on it. since the base coat was that same gray it now looks like the gray splotches bled onto what would have been the vehicle blue base coat blue. like winter washes that run in the rain.
got thinking. the blue was tamiyas acrylic and the gray and black were MMA and they didn’t run. and i don’t think i have dullcoated any armor this year that has been basecoated with tamiya acrylic so maybe the alcohol in the dullcoat reacted with the tamiya. maybe this is reverse hairsprayish technique. at least i have time to recover before NATIONALS
Are you saying that that Testors acrylic dullcoat attacked the Tamiya acrylic blue, Wayne? Did you thin the dullcoat with anything?
I was planning to move to Tamiya acryls for exterior work, and I use Testors dullcoat, so I’d like to make sure I have this straight. Sounds like I’d better change my plan. Sorry about your setback.
That’s a cool and wierd camo pattern, and a very nice job. Enjoyed the prototype pics. I wonder what the camo pattern is meant to blend in with?
Sorry to hear about that misstep. That sucks. [:'(]
Testor’s Dullcoat is lacquer-based; there’s no alcohol in it. Tamiya “acrylics” are actually a lacquer-acrylic blend. Dullcoat comes out of the can too heavy for my taste; it’s why I almost never use it, and why I said not to use a heavy coat of Dullcoat. [whstl] I really prefer any of the available acrylic flats.
I guess what probably happened is that the lacquer solvent probably softened the Tamiya coat, causing it to run. Whoever;s reading this, know that you should ALWAYS apply Dullcoat in layers—THIN layers. The lacquer in it will soften some paints, and frost others if applied too heavily.
However, Wayne, this may be a “happy disaster”. Like when I applied a white flat over a hi-gloss coat on my Impala rustbucket and used a hair dryer to help it dry—it dried so fast and shrunk as it was drying–and wound up perfectly fracturing and cracking like old paint. All that paint-run could very well work for you in the end. Continue with the weathering, and see how it fares!
I think that post cleared up the issue for me. Product name error at my end. Testors Dullcoat is indeed lacquer based (I have mine on my “do not use” shelf since I switched to acryls), and the product I meant to confirm crazed the Tamiya acrylic is Testors Model Master Acrylic clear flat.
Testors Model Master Acrylic clear flat “crazed” your Tamiya acrylics? You sure about that? I can honestly say that that is both the paint AND the acrylic flat that I regularly use and I’ve never encountered that problem. Chemincally, it doesn’t figure. I wonder if there was some other fasctor involved? Did you use Future gloss beforehand?