Greetings everyone from Australia[:)] this may seem a basic question but is there an easy way to paint the boot stripe on a ship hull,?are there different methods and which seems to work best? any help/ advice would be greatly appreciated!!!
My method is to airbrush the waterline black boot first, (preferred color is MM Aircraft Interior Black). I then strike the waterline level around the hull using a waterline tool.
Next I apply band(s) of 3M vinyl pinstripe tape at the waterline. Tape is available at auto paint supply stores - in variable widths. The tape is flexible and conforms to compound curves well.
Next I airbrush the under hull. Use your favorite hull red. WEM Colorcoats is good, but my favorite is Lowes American Painter brand red primer. I’ve decanted the contents of a rattlecan into glass bottles for use in an airbrush.
Let the hull red dry then mask it off. Do not remove the boot top mask. Overlap the hull masking slightly over the boot masking.
Spray the deck color vertically on the deck.
When that is dry, mask off the deck leaving the larger deck fittings exposed. Also run tape along the edges of the superstructure/deck intesection. The smaller deck fittings will be hand painted.
Spray your hull/superstructure color. Hold the model so you are spraying from below deck level, allowing the deck edge to mask overspray onto the deck. With practice you can get 2/3 to 3/4 the height of the superstructure bulkhead painted in this manner. Use low pressure/low volume paint with your airbrush. Add paint slowly rather than applying it in one pass. Carefully spray the large masked deck fittings.
Allow everything to dry. Hand touchup hull gray at the bottoms of the bulkheads.
Remove the masking. Hand paint the small deck fittings. Mask & touch up paint flaws (oversprays & underflows).
Overspray with a clear coat to help level paint/masking tape ridges. You may want to lightly sand large ridges with 1000+ sandpaper. You may want to gloss spots for decalling & weathering.
Others may have other ideas. This has worked for me. Perhaps you blend several techniques to what works best yor you.
sorry for the dumb question but what is a waterline tool
thanks for the info EdGrune!
i would also like to know what a waterline tool is!?
also if anyone else can add anything to EdGrunes info or other methods that would be great!
A waterline tool is a pencil/marker/scribe which holds the pencil at a level distance above the baseline. It is adjustable in height.
To use, on a flat table/building board, level the deck fore/aft & P/S to the desired attitude. Adjust the waterline tool to the desired height. Run the waterline tool around the hull.
Purpose-made waterline tools are sold by Model-Expo and Micro-Mark.
 Model Expo Picture
You can build one by taping a pencil to a block of wood of the desired thickness. Shim or add plastic stock of variable thikness to the desired final height.
There are several ways to mark waterlines (assuming you aren’t working on a kit that has the waterline molded in). The pencil method works fine, provided the hull is kept absolutely level and absolutely rigid. (Sometimes it’s easier to mark the waterline with the hull upside down.)
Another system involves a laser level - a piece of modern carpenter’s technology that’s recently become reasonably affordable. Sears, for instance, sells one for about $35.00. It’s a battery-powered gadget that emits a bright red disk of light, which forms an absolutely straight line on any object it intersects. Set the hull on a good, solid support, being sure it’s abolutely level. Set the laser level to the right height (it’s got built-in bubble levels and adjusting screws for the purpose, and a threaded hole for mounting on a camera tripod if you like), and turn it on. A bright red line appears on the hull, right at the waterline. Mark it with a pencil or fiber-tipped marker, and you’re in business.
That method isn’t necessarily any easier or more accurate than the pencil trick. But the gadget comes in handy for other purposes. I mainly build sailing ships; it’s great for lining up masts and yards. (Set the laser so the line is projected vertically. If the entire length of a mast is lit up, the mast is vertical - and straight. You can also adjust masts for rake angle, by adjusting the angle of the laser.) It also comes in handy for plenty of more mundane household tasks - such as leveling pictures on the wall.
In any case, the big challenges in striking a waterline lie first in getting the line straight and horizontal, and second, if it’s a black or white “boot topping” stripe, in getting the width right. The stripe, in virtually all cases, needs to be a consistent width when viewed from the side. Unless the ship is very sharply pointed at both bow and stern, the stripe is not actually the same width throughout its length.
That fact is due to the changing cross-sections of the ship. In the hull of an aircraft carrier, for instance, the hull at the waterline is almost vertical at the bow and amidships, but slopes at a steep angle at the stern. The width of the waterline stripe, measured with a pair of dividers, may be as much as twice as wide at the stern as it is at the bow - but when the model is viewed from the side the stripe seems to be the same width throughout its length. Marking an accurate waterline stripe on a hull like that isn’t easy. (Some folks try to represent waterline stripes with black tape. They’re surprised when it doesn’t look right. That’s why.)
Let us give thanks to those kit manufacturers who mold waterline markings - very faintly - into the plastic.
thanks for the info on the tool
thanks again this is all a big help!!!, i have noticed that some of my unbuilt models do have a faint waterline mark on the hull, but others do not.
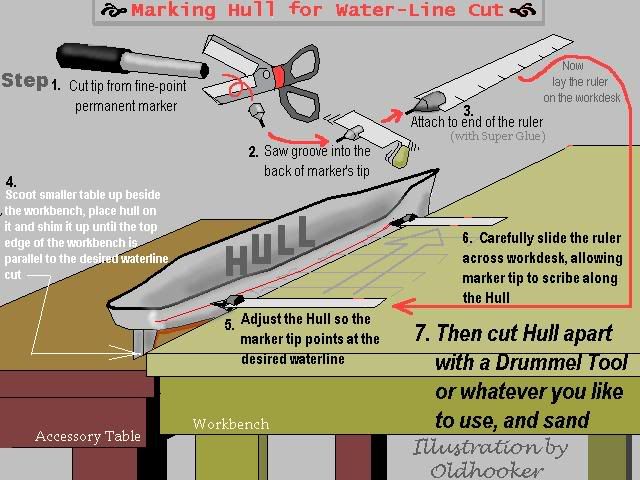
Here is another way of marking the waterline.
Yeowwww … I think for my next project, a 1/700 Oliver Hazard Perry class frigate, I’m just going to, ummm … pretend it doesn’t have a bootstripe!
mfsob - I do believe you’ve just uncovered one of the reasons for the popularity of waterline-style ship models.
Of course, I assume that nobody manufactures waterline decals - not the decals that also have the numbers and other symbols used on a specific ship, but only straight lines…
I figure that those decals would be fairly easy to manufacture, however, so I don’t really understand why nobody came with this idea!
I have to waterline three kits, one of them almost completed, and have to say I’m not exactly thrilled at the idea of spending several hours on the process… But thanks for the useful techniques you guys shares!
I usually paint my stripes using the same method that Ed uses, but once in awhile I’ll get lazy and use model railroad black decal stripes…they come in varying widths, and of course, are straight. I typically apply them in smaller sections to make ensure alignment.
Jeff
The problem with using decals or tape for waterlilne stripes is the one I mentioned in my earlier post. There’s considerable variation from ship to ship, but usually the width of the strip isn’t consistent.
For an example, take a look at the outboard profile of the Essex-class carrier in the Internet Hobbies ad at the top of this page. On the level of the waterline the cross-section of this ship’s bow is almost perfectly vertical. Under the stern, the cross-section at the waterline is a graceful curve that approaches the horizontal. In order for the waterline stripe to be a consistent width when viewed from the side (in other words, for the stripe to stretch from, say, three feet below the waterline to three feet above it), the actual width of the stripe has to be considerably greater at the stern than at the bow. (My guess is that it must be at least twice as wide at the stern.) Plotting out the shape of a decal to form that stripe would be quite a trick - and tape just won’t do it.
The severity of the problem varies from ship to ship. The waterline stripe on a *Fletcher-*class destroyer, with its gradually-varying cross-sections and squared-off stern, probably doesn’t change much in width. You probably could get away with using tape for the stripe on a ship like that. But on any ship with a stern that rakes sharply at the level of the waterline, painting that stripe is going to be a challeng.
That’s why I use short sections…I can tailor it to fit the contours of the stern.
Jeff
 SteelNavy Photo
L’Arsenal of France makes a set of black boot top decals for 1:350 or 1:400 scale applications.
Thx Ed - unfortunately I need white stripes! [:(] My kits are three Russian subs, painted in very dark grey, so black stripes won’t work. Good thing is that the width of the stripes shouldn’t vary a lot.
I will probably try to find model railroad white decal stripes, as you say Jeff, but I already feel I’m gonna have to build myself a waterline tool…
At least I’m glad I’m not building an aircraft carrier or a battleship, having to ajust the width to the curves of the stern/bow!
Thanks for your help everyone
Good day!
Just bought some railroad white decal stripes (used for road paintings), it sux! It’s way too thick and is also 2mm wide, which, at 1/400, would give a 80cm (31in) wide waterline on the real ship. The result would of course be extremely uggly.
So I finally asked Revell if it was possible to buy the decals of the 1/400 SSBN Typhoon class separately, as those decals include white waterlines, but in case of a negative answer (which I expect), I’ll use one of the methods described here above (most likely the method described by Ed).
I use selotape , stick it on a metal or plastic surface, paint it the colour required, let it dry , cut it to the right width and apply it
No matter what method you choose, it’s easier than touching up boot topping on the prototype…that had to be some of the nastiest paint I ever had to apply to anything!