Cheers guys!
I would like to take part in the group build. It’s my first car and I think I could learn a lot this way.
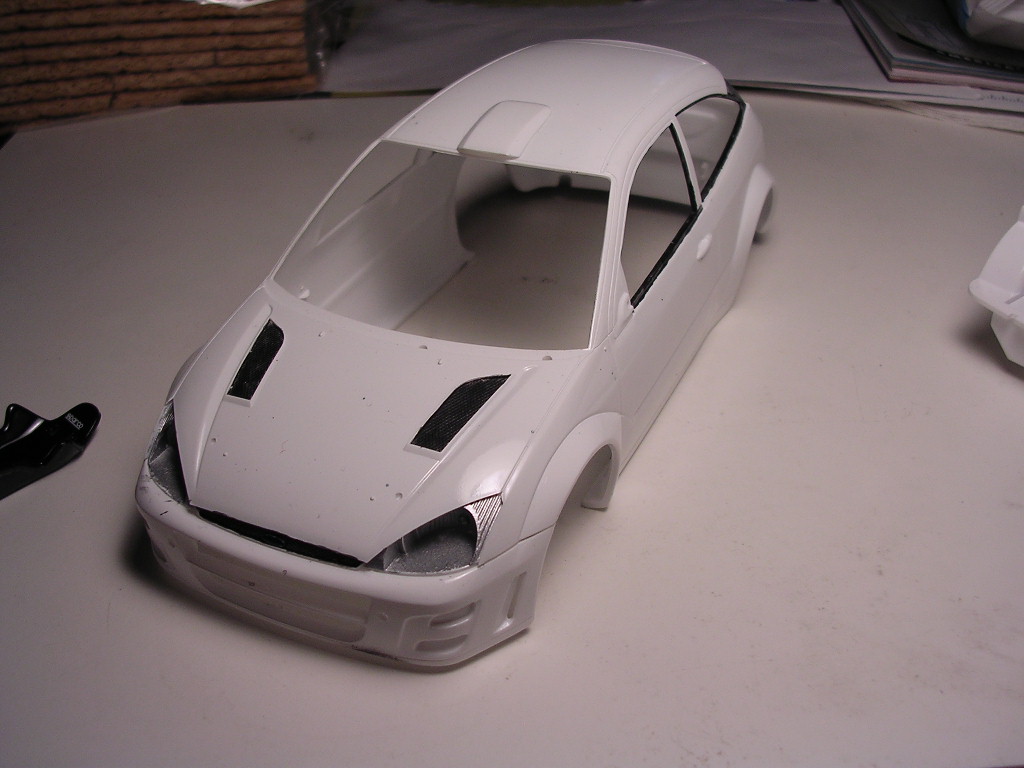
My car will be the Panizzi brothers Clarion Peugeot 206 WRC as it rallied in Turqey 2003. It’s based upon the Tamiya 2003 Pug and I will use Renaissance decals and parts (aerial, wheels and perhaps the dash) and probably a Studio 27 PE set.
NB:// Seeing this post has tipped over into 2 pages (on my screen settings anyway), and most likely will continue to grow in size, I will keep the Rules, People Joined, and the weblink to Scale Auto on the First Post on Page 1. Please refer back to that if necessary, but for all major announcements, just make them as we go! Thankyou!
I know that i’v put my name up to say i’ii take part in this CGB the stupid[banghead] think is i can’t recall if i have stated what kit i’m going to build?
nicholma i did know that scale auto mem did make same shells
Aaaah, nomination-time… I think I will stick to what I initially planned to do: a very much out-the-box Open Astra DTM. (Hey, this is my first group build - give me time to settle!) [:D]
Dumb Q: How do you post pics here - for when I have pics to post…?
ok - posting pics.
unless you have a webpage to yourself, you need to go to www.photobucket.com and register for an account as they do picture hosting. It’s like yahoo mail or hotmail - a free gig. Anyway, once there, upload your pics to photobucket (very easy) and then your ready to post them here.
place this symbol at the start of the picture’s URL [ img ]
place this symbol at the end of the picture’s URL [ /img ]
ps - you have to remove the spaces between the brackets!
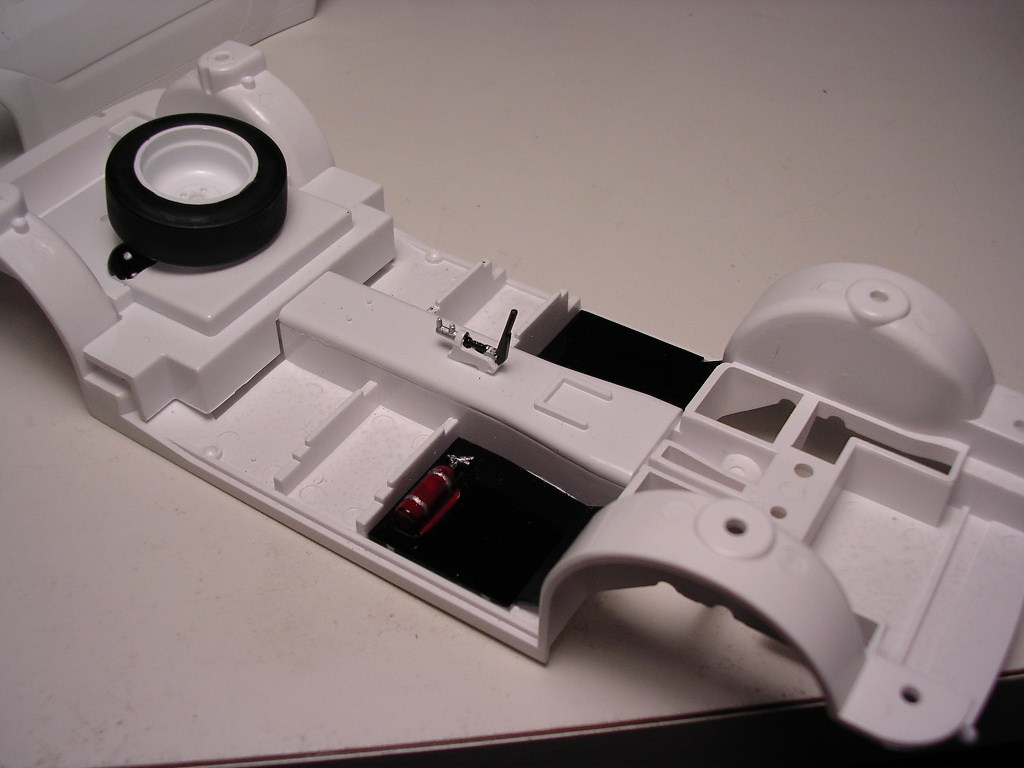
I read a lot of stuff about people using stretched sprue for antennas and rivets. My attempts last night ended with a lot of gue and hair thin pieces. I used a candle to heat the sprue but perhaps that’s to hot? Any tips regarding this?
I was looking through the parts trying to locate any bottle necks and hard-to-achieve details. What I could use are some hints regarding painting of the wheel bolts (is that the correct term?) To get it to look realistic I guess you want to lay sort of a wash between the bolt and the wheel and then you want the bolt itself to be painted silver or chrome. Anyone done this before and have some hints for a guy that’s only been painting bike wheels in 1/12…?
Thanks Luke - I have an account on another place for hosting pics. I presume that will be fine, so long as I just get the URL right.
Joel:I am very much looking forward to replies on problem 1. I have had some kits recently where they actually do not supply the antenna’s - you are supposed to make them with stretched sprue. I am yet to have success - I usually end up taking wires, pins or whatever comes handy for an arial…
As for painting wheel bolts: are you talking about the big one (that needs to be loosened in changing the wheel - typically in a pit stop) or the small ones on the brake assembly? The big ones I find easiest if you mentally break it up and paint the straight edges first, then fill in the centre. (With you being used to bike wheels, this should be fine.)
The smallish ones, I tried a few techniques and at this stage I take a fine round brush (can’t recall the number off-hand, sorry) with a little paint on and simply touch the top of the bolt. It does the job for me - dry-brushing causes more redo’s than anything else.
If on a rally car, where they have quite a few smallish bolts to loosen the wheel, instead of one big one, try the following. Paint your rim the correct colour. Seal it wit a gloss layer (NB: Of another type of paint than your normal thinner!). Make a black/brown wash and give the indentations around the bolts a wash, removing excess with and earbud dipped in your normal thinner. Then just dab on the colouring for the bolt - it should stand out really well and you’ll have the natural “shadows” in the recesses.
Well, that’s just my 2c… Looking forward to alternative suggestions!
New to this board and just found this group build. It sounds like what I need to get started on my Fujimi 917K. I’m trying to post a pic here as a test to see how this board works. Here goes…
[#welcome] Daryl Huhtala to the FSM Forums; and great car!
joelwideqvist - i dont use stretched spur, but like SeaBee, I use stiff wires or a hair off a large house-painting paint brush. These brush hairs are long and thin and you can cut them to any length.
SeaBee - you may already know this, but I’ll type it for others who want to know. Right mouse click on the enlarged photo format, select properties, and copy the photo’s address URL in full (eg this is my example - http://img67.photobucket.com/albums/v205/lbsyl/Tam24PeugeotWRCFSMGBlbs01.jpg). Place this inbetween the two symbols [ img ] place here [ /img ], but don’t leave any spaces inbetween the brackets (I need to leave the spaces so that a red square mistake doesnt come up - you’ll know what I mean if you leave a space).
Sorry, have to do some other stuff before getting to start the engine on mine! [:D][:D] But at least I’m up and running! Will post pic(s) as soon as I have something sensible to photograph.
Even my wife was excited yesterday eve - for the first time she came to me, asking whether I’ve started building yet… (Allready one good thing came of this GB! [;)] )
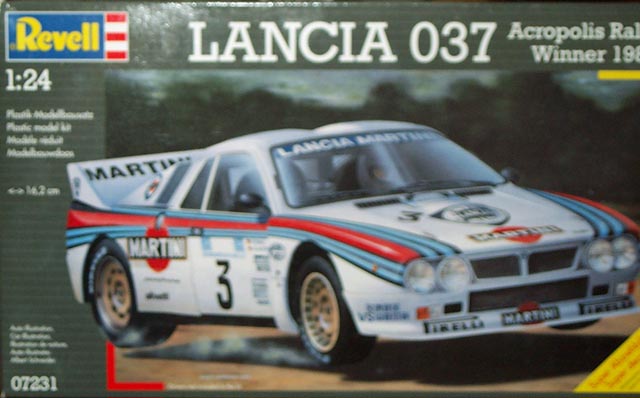
Modelling’s been on the back shelf for the last few months with moving house and getting married, but this gives me a reason to have a crack at the Revell 1/24 Lancia 037 that’s been sitting in a box for the last couple of years. And the timescale is realistic for us less-than-ubermodellers!
Found a car with a lovely scheme and my idea was to superdetail the kit. And then you realize that the decals doesn’t corespond to the actual car… Don’t you just hate when this happens?
I can accept minor flaws but to have the roof “206” decal that you can see in this image printed in white instead of yellow makes you wonder…
There went my great build [xx(] I think it’s pretty impossible to paint it in yellow so I have one idea to try. I found the sheet from another manufacturer (That I haven’t heard of before, perhaps I could get the decal from that one instead and hope that the quality is OK. Great build → Expensive build…
you could scan the decal (the orginal in white print - is that correct?) and have a graphics programme (like Adobe Photoshop or PaintShop Pro) and change the colour to yellow, and then print it out on decal paper on an ink-jet printer. You can make your own decals!
haha thanks for the welcome, luke, no need to give “her indoors” an excuse, she’s grateful I’m out of the way so she can catch up on the soaps!
Just one Q for anyone that may know… is it the case that the Revell 037 is a reboxed Hasegawa mould? If so, will the Hasegawa-designed etched parts be suitable for it? It’s the back grille I’m keen to replace, the idea of drilling out the holes in the plastic fills me with trepidation [:O]
I had that in mind but I think I’ll try the All Model decal’s first. Otherwise I have to buy paper and the stuff to go on top of the print so they could equal in cost. If the new set is wrong as well (perhaps in size this time…) I’ll go your way —> an even more expensive model [:D]
/Joel
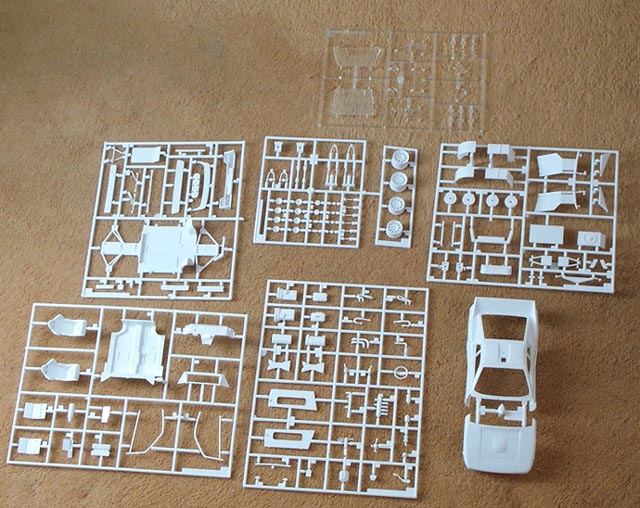
Crikey! What am I letting myself in for! 140+ parts!
That’s about twice the number of anything I’ve built so far (well except maybe the Italeri PzIV, but millions of road wheels don’t count [xx(]), so this is going to be an interesting few months!