Please help. I’m an experienced modeler, but my current diorama has got me worried to white hair. I am creating a 1/72 Higgins boat, LCVP, with its bow ramp down on a Japanese help Pacific island during WWII with US Marines charging ashore onto the beach with a Japanese machine gun bunker set back in the jungle a short ways. Thanks to some modelers on this site, I’ve made a lot of jungle flora, trees and palm trees to 1/72 scale. I’ve got the right kind of fine grain sand for the water bottom and beach, but what scares the hell out of me is the water. I’ve read numerous articles on how to make artificial water and purchased a box of EnviroTex lite clear resin to create my water with but you get no second chance if you goof up on this step. Seeing the resin will also envelop the aft end of the Higgins boat, it will render it DOA as well if not done properly.
How can I create that aqua blue water that starts out almost transparent near the shore and gets darker the deeper it gets? I was thinking about painting the sea bed shades of aqua becoming lighter as I approach the beach and then pouring my clear resin on top of that. What do you men suggest?
Well, for starters, you might want to consider a medium other than resin, for a couple of reasons. 1) youi’re going to have to pour quite a few thin layers, because if you pour 1 thick layer the heat it generates as it cures will melt your beautiful Higgins boat, and 2) getting textures, as in breaking waves and surf, in the resin, is really hard (at least I found it so using the Woodland Scenics product).
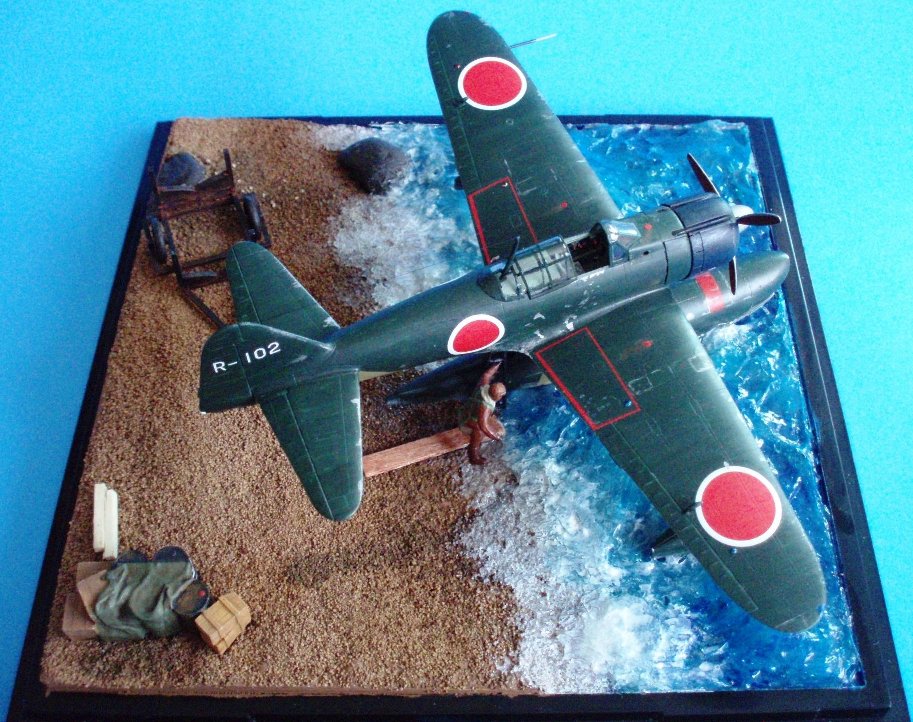
I ended up using layers of acrylic gel medium and a careful paint job for my 1/72 beach diorama with an A6M2-N Rufe in the Aleutians, so I wasn’t going for that turquoise blue that you’re after … but the principles are the same - careful, graduated paint job, multiple layers of gel, and the additional paint to highlight and for the froth on the beach. It turned out OK:
You are pretty much right on about the hazards of Envirotex and other clear epoxy resins. One shot to get it right. Thick pours of the stuff also create at lot of exothermic heat (as in enough to warp plastic), and the stuff subsides as it hardens, making your water do physically impossibe things such as crawling up the side of the boat. Been there, done that, got the T-shirt. Guilty on all counts.
Consider building a shadowbox of clear plexiglas (hardware shop item). Sides will slope into the beach. A top piece will overlay the sides and project up onto the beach, just short of your finished waterline. Cut a rectangular hole into which your LCVP fits (close fit is better). Blend the plexiglas/boat side together with some Future floor polish. Future can be tinted with food coloring. Waves & chop can be done with some artists acrylic medium, tinted with acrylic greens & blues. Blend everything together and up onto the beach using Future. Future on your finely ground sand makes a nice wet-look.
Mistakes are easier to clean. Future cleans with ammonia. If you painted your LCVP with acrylics that may mess them up too – but you won’t have to start from square-one.
Bob Santos did a similar method for this 26’ MWB rescuing a downed flyer diorama as shown on SteelNavy
You get to see the underwater details you worked hard to put onto the LCVP.
But looking down you see the water surface and just a bit of depth
If you do go the Envirotex route, pour in lifts of thicknesses not greater than 1/4 inch. An eigth may be better. I think Envirotex can be tinted with their proprietary coloring - or experiment first with food coloring. Pour short of your finished depth and finish with Future for gloss and to minimize the anti-gravity water crawl.
Thank you for the advice. I have a full jar of Liquitex Glosss Heavy Gel. Is this what you’re referring to? Also, once the gel set up, did you then paint the surface of the gel layer by layer?
Thank you for your responce. I had considered using Plastruct or Tamiya ocean surface plexiglass, but I didn’t know how to creat depth in sany bottom aqua water clear water. I know how to create surf and mild waves using Liquitex Gloss Heavy Gel which I have. Please comment.
The Higgins boat needs to be in shallow aqua water with its ramp dawn in about 6” of water. What if I painted the shallow sea floor starting with the outer edge a darker aqua color and lighter as I approached the beach surf line eventually leaving the last several feet clear (all 1/72 scale)?.
Let that dry and seal everything the artificial water will come in contact with and then pour in the artificial water (I’m leaning towards Woodland Scenic 16oz Water Effects seeing it’s water based and non-toxic. I have bad lungs) and let it set up. The deepest area of the water would be is about 1/4” to 3/8”.
I know how to create surface water effects plus gentle waves.
To me, this would be the lowest risk approach to having success the first time.
1. The Higgins boat needs to be in shallow aqua water with its ramp dawn in about 6” of water. What if I painted the shallow sea floor starting with the outer edge a darker aqua color and lighter as I approached the beach surf line eventually leaving the last several feet clear (all 1/72 scale)?.
Yoru’re still going to need some color in the water, from the surf if nothing else. Look at pictures and movies of beaches and ocean suft and waves - the surf zone is an active place, lots of different kinds of colors and types of wave action. But your basic premise is correct, grading the color from darker (deep) water to ligher (shallow) water.
2. Let that dry and seal everything the artificial water will come in contact with and then pour in the artificial water (I’m leaning towards Woodland Scenic 16oz Water Effects seeing it’s water based and non-toxic. I have bad lungs) and let it set up. The deepest area of the water would be is about 1/4” to 3/8”.
You can try the Woodland Scenics stuff, but again, you’ll have to “frame” the scene since it’s a liquid, otherwise it’ll run all over the place. You also have to be extremely careful to let it set up in a dust/grit free place - it’s a frickin’ magnet for any kind of airborne contaminant. You also have to be very careful to avoid bubbles as you pour the layers. As Ed said, with that kind of stuff, you get ONE shot to get it right.
3. I know how to create surface water effects plus gentle waves.
I am unclear on your approad here, are you planning to use acrylic gel medium on top of the Woodland Scenics water to get the gentle waves and water effects? I have not tried that approach and don’t know if you can apply gel medium over the Woodland Scenics product without any compatability issues arising. I’d do a small test first, because, again, you get ONE shot at it if you use that stuff.
Thanks so much for your response. Yes, the diorama is in a side walled frame and yes, I know I have to pre-seal every part of the base that will come into contact with artificial water. The frame is a 1” high rectangle with the deepest part of the water line at ¾”. The deepest part of the ocean starts at the ¾” bottom of the frame and rises as it meets the beach at about ¼” and then from the beach to the top surface where the jungle begins.
Once ocean area is sealed and ready for the artificial water, I going to fill it with tap water to the beach line, check the waterline around the LCVP, drain the tap water into a measuring cup and then measure how much water was required. That way I won’t come up short on artificial water. I bought an 8oz pack of EnvioTex Lite resin, but I’m just not comfortable with it plus it would require multiple layers of mixing and pouring of about 1/8” per layer to reduce the catalytic heat generated from deforming the LCVP.
I’m thinking that Woodland Scenics ‘Realistic Water- 16 fl oz’, a water based product would be a lot less risky plus I have very bad lungs and the resin would aggravate them. The Woodland product readily mixes with acrylic paints for water depth layering as you suggested. I’ve put so much work and time into this that this artificial water business has me half scared.# Best regards,# Chuck Evans
Oh, one more thing- I’m thinking of using Liquitex Gloss Heavy Gel, a popsicle for back spreading and white acrylic paint to create mild waves and surf. I found how to use this technique on-line. I also know how to make the water surface mildly choppy before the water dries.
Thanks again. If you would give me your email address, I’ll send you some photos of my 1/35 armor dioramas you could cretique.
Here’s some things to keep in mind as you try to create the water on a landing beach. First, to hold the boat on the beach and not have it swing sideways (broach) the cox’n would keep the propeller turning. Therefore there will be churned up white water aft of the stern. Depending on the beach gradiant this churned up water will also have sand churned up in it. The amount of surf on the beach will also have an effect on how much force is needed to keep the boat in position. That surf is not always at a right angle to the beach causing the boat to start to swing in the direction the surf is running. Not all beaches have pristine white sand. Iwo Jima, for instance had black volcanic sand.
Good points. The boat will be fixed in place perpendicular to the beach. I’m going to glue the bottom leading edge to the beach. I hadn’t thought about the coxswain keeping forward thrust on the engine to hold it on the beach head and will indeed requite a wake with churned up sand. Do you have any diorama like this you could share a photo of with me?
Yes, this will not be volcanic Iwo. I’m thinking Saipan to Tarrawa. Both had crystal white sands.
I don’t believe that Marines assaulted the beach from LCVPs at Tarawa. The LCVPs got hung up on the reef and the initial wave marines were forced to wade across the reef under fire. Later waves were transferred from LCVPs to LVTs at the reef-line. The LVTs brought them
One thought on “sculpting” acrylic gloss gel - I usually use a paint brush since it give me better control over the shaping of the waves and wavelets. I use anything from a coarse bristle disposable paintbrush to a wide No. 5 camel hair to a smaller No. 2 sable hair, depending on the size of the waves. The gel washes out of the bristles easily enough, and you can wipe off the buildup on the inside of the gel container.
One thing I discovered for getting realistic “froth” in the surf line was to put down a thin layer of gel, let it get almost dry and then stipple it with the coarse disposable brush to give it a very rough surface, then put thinned Titanium White acrylic paint over that, stipple that, too, and you end up with a nice “rough” look to the water’s edge.