She looks good, nice work!
I applied the second coat of primer with Iwata RG-3L3 spray gun and I am very happy with the results. I expected to use my Iwata Eclipse HP-CS air brush for touch up and hatch covers, but the spray gun has an adjustable air cap that allowed me to change the size of the spray pattern for fine detail. So, the entire model has been primed with a spray gun and not a single run or evidence of overspray.
Using Vallejo Surface Primer, I did not need to thin the paint or add retarder. The spray gun with a 1 mm nozzle applied the paint with a smooth surface that should allow for smooth finish coat of Vallejo #71.043 Olive Drab. So far, I have not found a single problem with the results. However, the equipment is a little overwhelming because the spray gun is much larger than my air brush and it’s recommended that I use an air pressure gauge and water separator to get the best results.
If you can get past the size difference in the equipment the results so far are outstanding. The spray gun is easier to clean, but now I wish my spay booth was wider, so I have more room to work. I have a lunge disease from exposure to asbestos in the Navy and it’s made worse with allergies and asthma. My wife will not let me paint without a spray booth and respirator, but I’ve learned to work with the limitations of personal protective equipment.
Harold


That looks really good! [Y]
I’ve never tried a spray gun, probably for the best since I have a habit of flooding the paint on too thick. I’ve joked before about ‘hosing something down with olive drab’.
But what you’ve got looks perfect, if it works for you stick with it!
Gamera, I am so impressed with the Vallejo Surface Primer that you recommended, it’s easy to apply and preserves the fine detail in the model. It will be my first choice in the future.
Harold
I applied a second finish coat of Vallejo Olive Drab #71.043 and the results are a smooth finish coat without any overspray or roughness. However, I did develop a small run on top of the barrel and gun mantlet. I also missed a few places on the road wheels, so after I give this coat 12 hours to dry, I will lightly sand the runs and give the areas that need it another coat of paint.
Four observations I made:
-
The Vallejo Olive Drab paint is more susceptaible to runs on small areas with the Iwata spray gun than the Vallejo Surface Primer.
-
I was able to use the Vallejo Surface Primer and Olive Drab paint without any thinner or retarder in the spray gun.
-
I will probably use my Iwata air brush for painting small areas in the future because use of the spray gun is hindered by the size of my spray booth.
-
The photographs below make it appear the paint on my M4A3 Sherman has a grey tint instead of a green tint. I have included a picture of the Sherman with an M5 3-Inch Gun I did at Christmas to illustrate a point. When I used blue tape to secure paper inside my paint booth and expose the blue filter it changed the way my camera sees the color of the model. Please see photographs below:
Overall Conclusion: The Iwata spray gun solved my overspray issue on large surfaces; however, I need more room to paint. The Vallejo Surface Primer will be my first choice in the future.
Harold


That is an excellent finish!
For the runs, just lightly sand them down and respray. It’s not an uncommon problem and it’s easy to fix.
You’ve done an outstanding job on this so far. Can’t wait to see how you finish it. [:D]
Yeah, that finish looks perfect!
Good advice there, I’d just sand out the problems and spray another coat of primer over it.
Thank you, Mike, and Gamera for you kind support.
I lightly sanded the runs on the barrel and gun mantlet and applied a touch-up coat of Olive Drab to them and the road wheels. Also removed the Liquid Mask from vision blocks on the commander’s cupola and gave the hatch covers a finish coat of paint.
The next step is painting the tracks. I have not decided whether to paint the tracks for a clean display, or dirty them up a bit. I ordered a Vallejo Wheels and Tracks color kit #71.213 which has not arrived yet. In the meantime, I will paint the tools and other accessory items including the gas, water and oil cans.
I also have not decided whether to add crew members or which decals to use. This model was intended to be a skill-building project and an opportunity to try painting with a miniature spray gun. I never expected it to be a keeper. My wife suggested I build some shelves in my studio to display models. I had no plan originally to keep any models when I started building military minitures in 2017.
Harold


Sorry Harold, but she’s definitely a keeper and one to display.
I’d gloss her , decal, and play with some washes if I were you. There’s still some fun to be had here. [:D]
We practice with every build. Keep having fun!
I’ve never done any weathering or special effects painting, so perhaps this is a natural extension of what I started out to do with this model. Thanks Mike for the suggestion I’ll give it more thought.
Harold
She looks like a keeper to me- again nice work!
Thank you Gamera, you were right on the money with Vallejo Surface Primer. I recall that last year you were talking about ‘modulation’ as it applies to painting. Is that something you do early in the painting process, or can it be added to paint already applied?
Harold

First off let me say I like colour modulation. A lot of people here don’t. So use it or don’t at your own discretion.
It’s simply using darker paint in the shadows and lighter paint on where the sun hits the tank. I generally paint the whole thing with a coat of primer like you have before I do anything. Then just spray some of your olive drab with a little black mixed in on the shadowed areas- underneath the tank and turret, under the fenders, etc. Then spray the sides with straight olive drab paint. Then add a little tan/buff to the olive drab and spray the upper surfaces where the light would hit.
I usually use this AK Interactive set, it makes it easy as falling off a log. But you can mix your own with olive drab, black, and tan/buff.
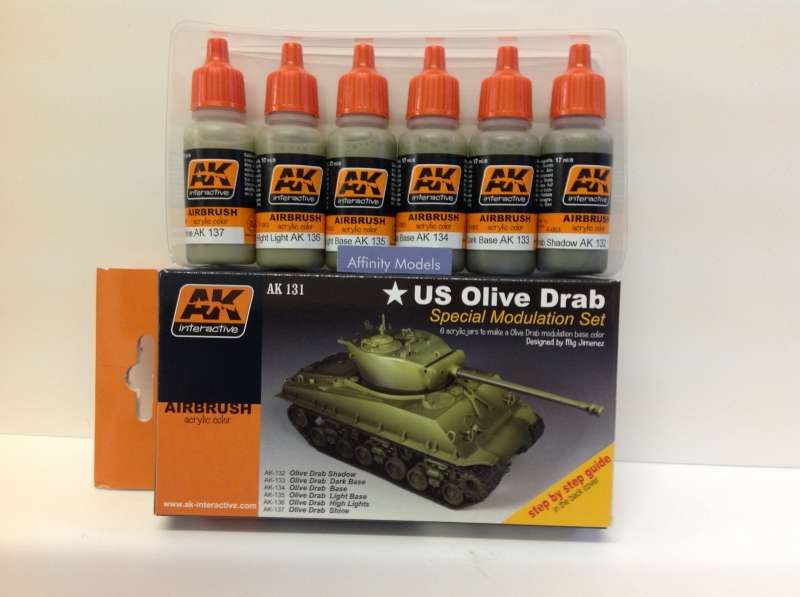
As to washes you’d be better off asking someone better than me. I just use the AK Interactive wash for olive drab vehicles as a pin wash. That is just get a little on a brush and touch it to details you want to pick out. I used to mix my own but had trouble getting it consistant- personally I find the cost of the pre-mixed stuff worth the hassle. And I don’t just apply a wash over the whole tank anymore, I had lots of stuff go wrong with that.
P.S. I really wish someone else would chip in. I consider myself a competent modeler but there’s a lot better guys than I here.
Gamera, thank you for the information and venturing out in the less familiar topic of washes.
Harold
Excellent job on the Sherman sir! The kit sounds like a worthy addition to my stash. Thank you for sharing :).
Thank you Willy.
TY for the posts here, I’m learning a lot. I too have an Iwata RG-3 and have yet to figure out how best to set it up for conssistant results. I’ve watched You tube videos on the subject and still don’t have the hang of it yet because of all the adjustments one can make on this air gun. I use Duplicolor laquer primer bought at my local auto shop. It’s inexpensive in the pint cans, readily available and works well for me.
Jay Jay, regarding the Iwata RG-3 set up… I used Paul Budzik’s YouTube video https://youtu.be/7LKZrAokENA to set up my RG-3. Before I get started I must ask if your RG-3 is a fan cap model? If you’re not sure, please see the first picture below. My RG-3 is a standard round cap model and Paul Budzik only covers this model in his video. The standard round cap model include three nozzle sizes: RG-3L-1 (.4 mm), RG-3L-2 (.6 mm) and RG-3L-3 (1.0 mm). There are only 2 (two) adjustments on the spray gun it’s self, (1) the air cap and (2) the material flow. However, once set the air cap would only need to be changed if the viscosity of the paint material changes significantly.
-
In the video Paul suggests adjusting the air pressure at the inlet of the spray gun with an air pressure gauge, not at the air compressor. Set the air pressure with no material flow, in other words no paint or water in the paint cup. I set the air pressure with the trigger of the spray gun fully pressed and held open. To do this you need an air compressor that can deliver a constant 36 PSI of air pressure. I had to use a pancake style air compressor with a 6 gallon air tank, the type sold for small nail guns.
-
In the video Paul set his air pressure at the inlet to the spray gun between 25 – 30 PSI which is what I did; however, that required me to set the air pressure with the air compressor regulator much higher so it’s not turning on all the time. On most small air compressors the compressor will turn on automatically when the air pressure in the storage tank reaches a predetermined level. I set the pressure in my air compressor to 100 PSI in order to maintain a constant 25 – 30 PSI at the spray gun with the trigger fully pressed.
-
The next step is to set the air cap by loosening the jam nut (black knurled ring) and turning the air cap to optimize the air-paint material atomization. Paul suggested doing this with water in the paint cup and listening to the sound of spray and observing the spray pattern coming out of the nozzle. My air compressor makes so much noise I couldn’t hear any change in the sound of the spray, so I used the factory recommendation for setting the nozzle to protrude .3 – .5 mm out of the air cap. To do this I used a digital caliper set to millimeters. Please see the second and third pictures below.
-
The last step is the material flow adjustment. The adjustment knob was already set on my spray gun to 5/16” as shown in the fourth picture below, so I just left it there. Depending on what size nozzle you have (.4, .6 or 1.0 mm) you may need to change this setting to increase or decrease the volume of paint. While spraying paint I kept the spray gun at right angle to the surface being painted and approximately 8” way. I also found it helpful to press the spray gun trigger first pointed away from my model to get paint moving then make overlapping passes while holding the trigger to apply paint. Otherwise I would get a heavy shot of paint in one spot.
I hope this helps… I am 100% satisfied with the Iwata RG-3 spray gun for painting 1/35 scale model hulls, but it requires a little practice. The end result was a smooth, almost egg shell texture finish with no overspray anywhere on the model. I did have a small run trying to paint the barrel of my Sherman mainly because my paint booth is to small for this spray gun plus 8” of working space.
Harold


Today I took this M4A3 Sherman off the shelf to mount a carbon fiber antenna on the plastic antenna mast (base). I received the carbon fiber aerial rods #A094 from Accurate Armor located in Glasgow, Scotland that Bish told me about. I used a .30mm drill bit and pin vice to create a 3mm deep hole in the mast. The carbon fiber rods measure .27mm in diameter, so the fit is perfect in this mast.
This type of antenna used in World War II came as a set of five 3-foot sections that screwed together. The length could be 15-feet tall, but most of the pictures I’ve seen shown the antenna with three or four sections on Sherman tanks. 15-feet in 1/35 scale is 5.1429 inches which is a little too much for display of a model 9-inches long. So, if I represent a 3-section antenna (9-feet long) it would be 3.0857 inches, or 3-inches in 1/35 scale which is perfect for my display.
I also decided to purchase a set of Friulmodel T-48 metal tracks on eBay for this model. Since I last worked on this in March 2020 I have learned how to weather tracks and I really like the way Friulmode metal tracks look on the M109A2 I’m working on, so I will try them on this Sherman.
Harold

Model three section antenna on a Sherman turret.

Antenna mast (base) on a Sherman turret

Friulmodel metal tracks for Sharman tank

This is something I almost never do; put a project aside unfinished. I completed the exterior paint on this Asuka Sherman about February 20th and installed an Accurate Armor carbon fiber antenna on June 13th that Bish told me about. Today I completed assembly of the Friulmodel type 48 metal tracks.
This is the third set on Friulmodel tracks I purchased this year and I love the way they go together; the finished look is about as close as we get in scale modeling to the real thing. However, on a Sherman I do not think we get a big aesthetic difference compared to the rubber one-piece tracks that come with the kit. The Sherman tanks did not have the ‘sag’ that later U.S. and British tanks had or the Russian and German tanks of World War II.


I also found a new way to assemble the Friulmodel tracks using a ‘Bessey Vise’ and ‘Mr. Glue’. Mr. Glue is a German, made industrial CA glue with the right viscosity for securing the brass wire pins without making a mess, or gluing the track segments together. I have tied a few difference CA glues in both medium and thin mixtures, but none have worked as well as Mr. Glue for metal tracks.
If you notice in Photograph #6 the Bessey Vise has a ‘V’ cut into the jaws that is designed to grip round objects, but it is perfect for griping track segments as shown in photograph #5 with a piece of wood as a spacer. I do not tighten the jaws very much, just enough to keep the track segments from moving.
Friulmodel supplies wire to use as pins, but I found if the wire is striaghtened by streching slightly it is much easier to work with in the vise. Please see photograph #4. I also pre-cut the wire pins using a piece of wood with a hole drilled in it to 3.8 mm length as shown in photograph #3. However, the length of wire pin may vary for difference types of track. Refer to the Friulmodel instructions.
Photograph #2 shows the Bessey Vise fully loaded with 15 track segments. The brass pins can be easily secured now with CA glue. Caution a little glue is all that is needed. To control the amount of glue applied I use a round wooden toothpick. Photograph #1 shows the Bessey Vice in my paint booth because it has good lighting and serves double duty as my assembly station.
#1

#2

#3

#4

#5

#6
