Another Normandy Scenario (WN48 Longues-sur-Mer Battery)

Another project on which I am working at is the recreation of one of the Casemates of the Gun Battery at Longues-sur-Mer, defined by the Germans as Wiederstandsnest (Defense position) 48 or simply WN48.

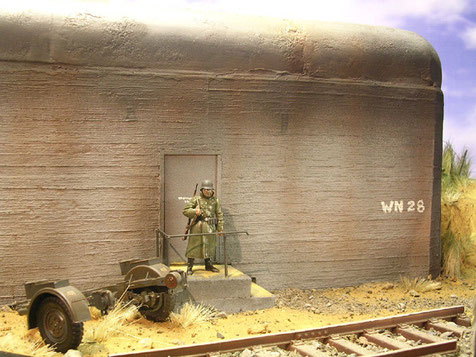
Here are actual pictures of the Bunker I have taken as a blueprint for my own recreation.


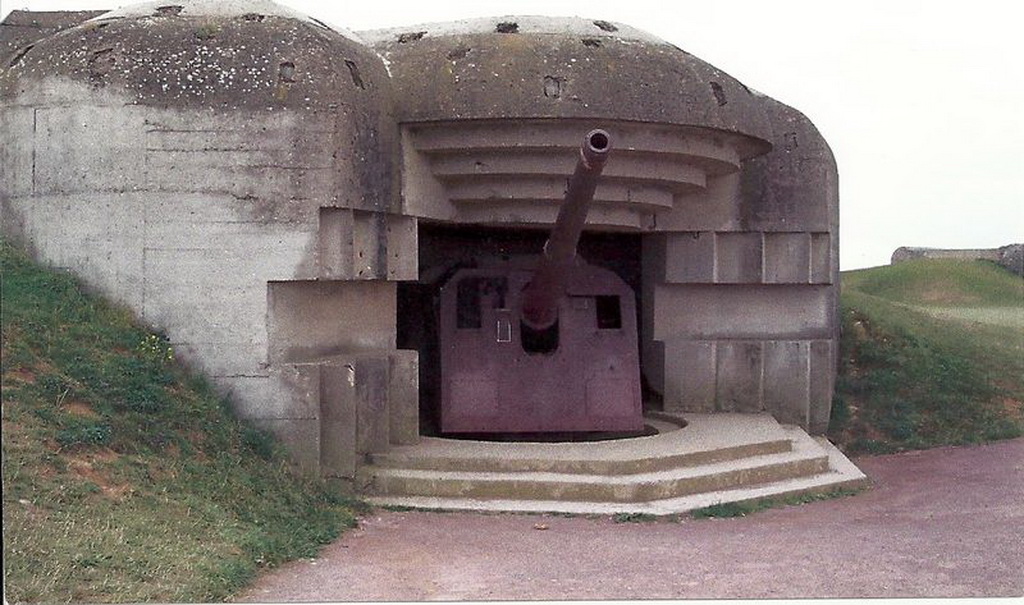
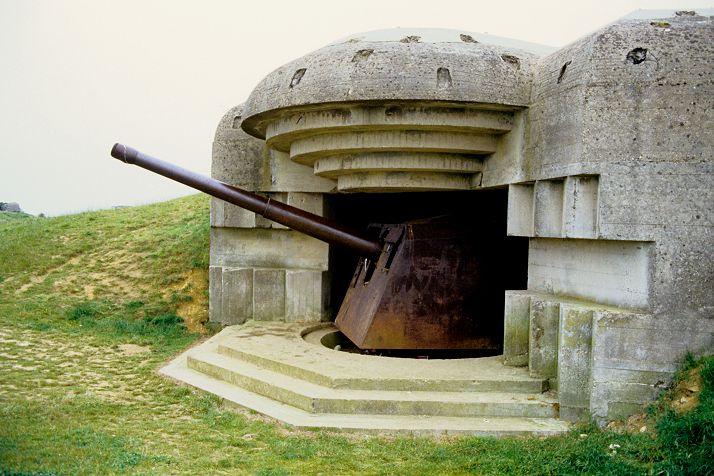
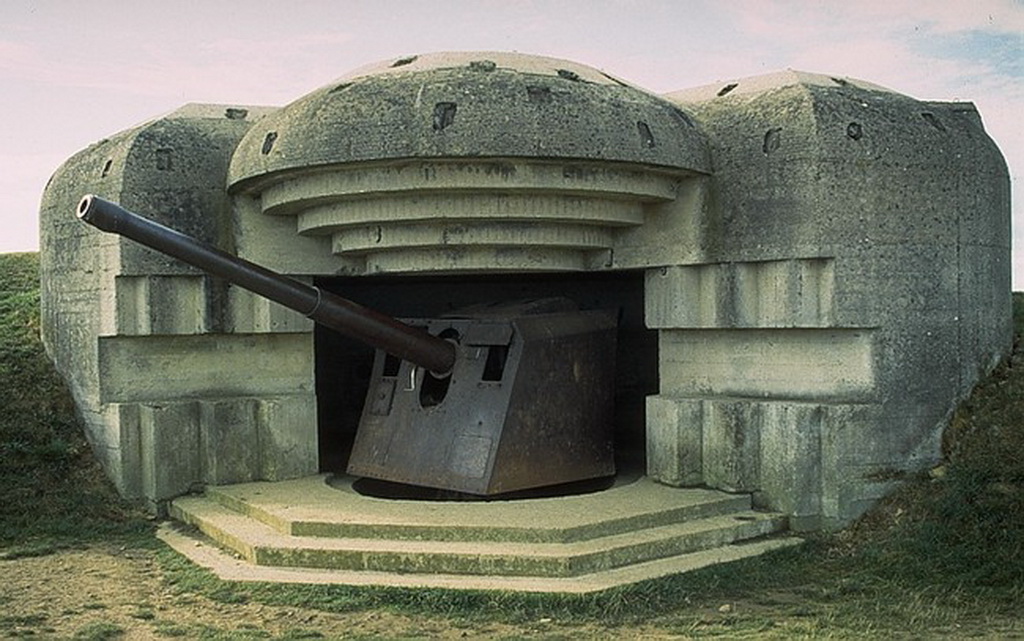
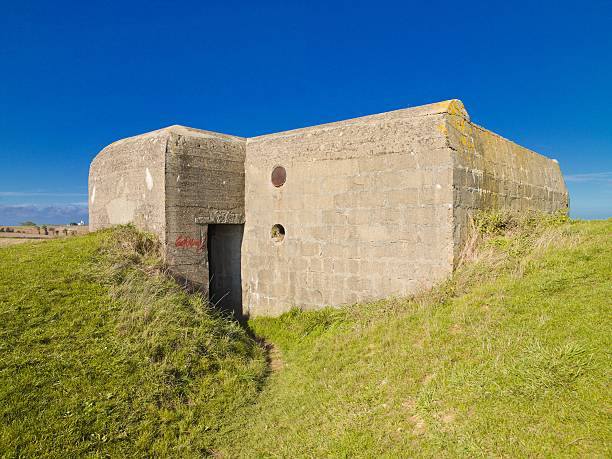
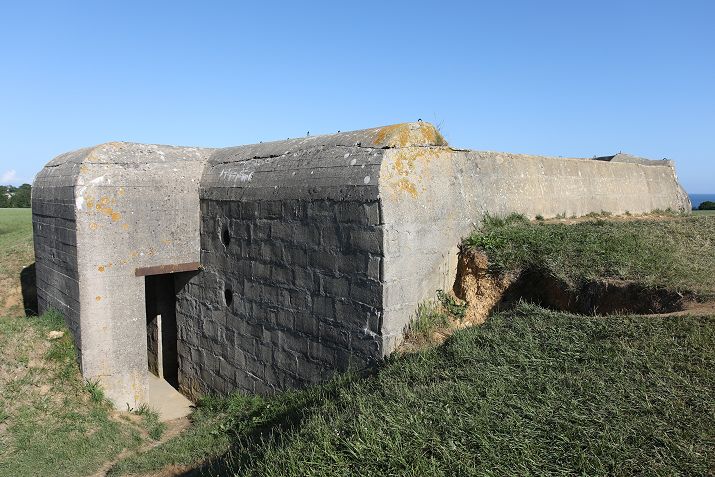
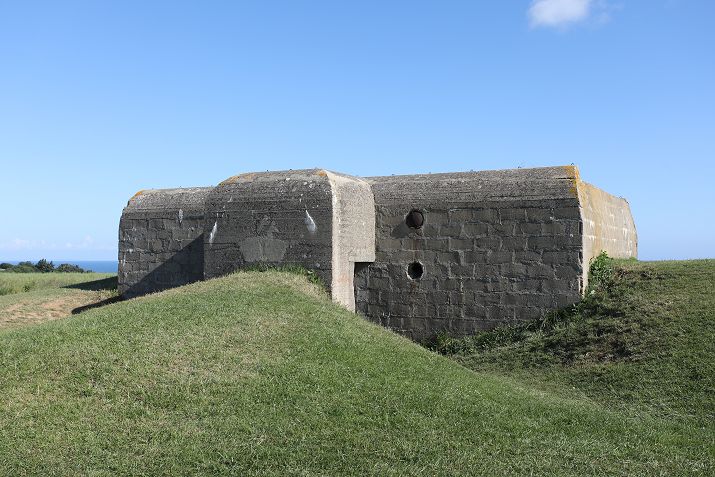
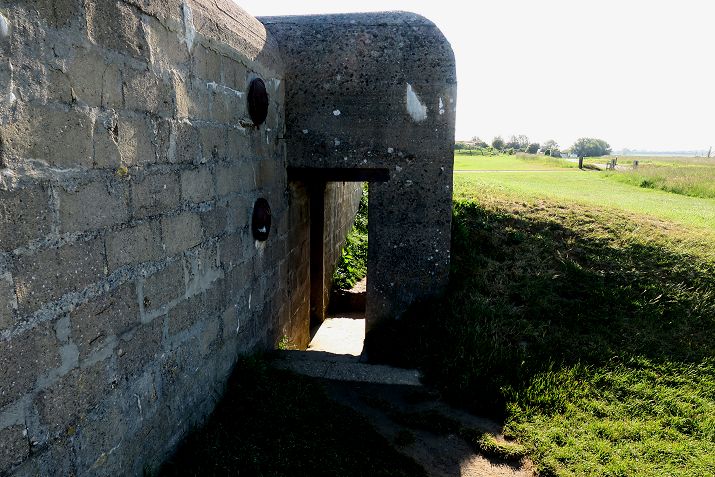
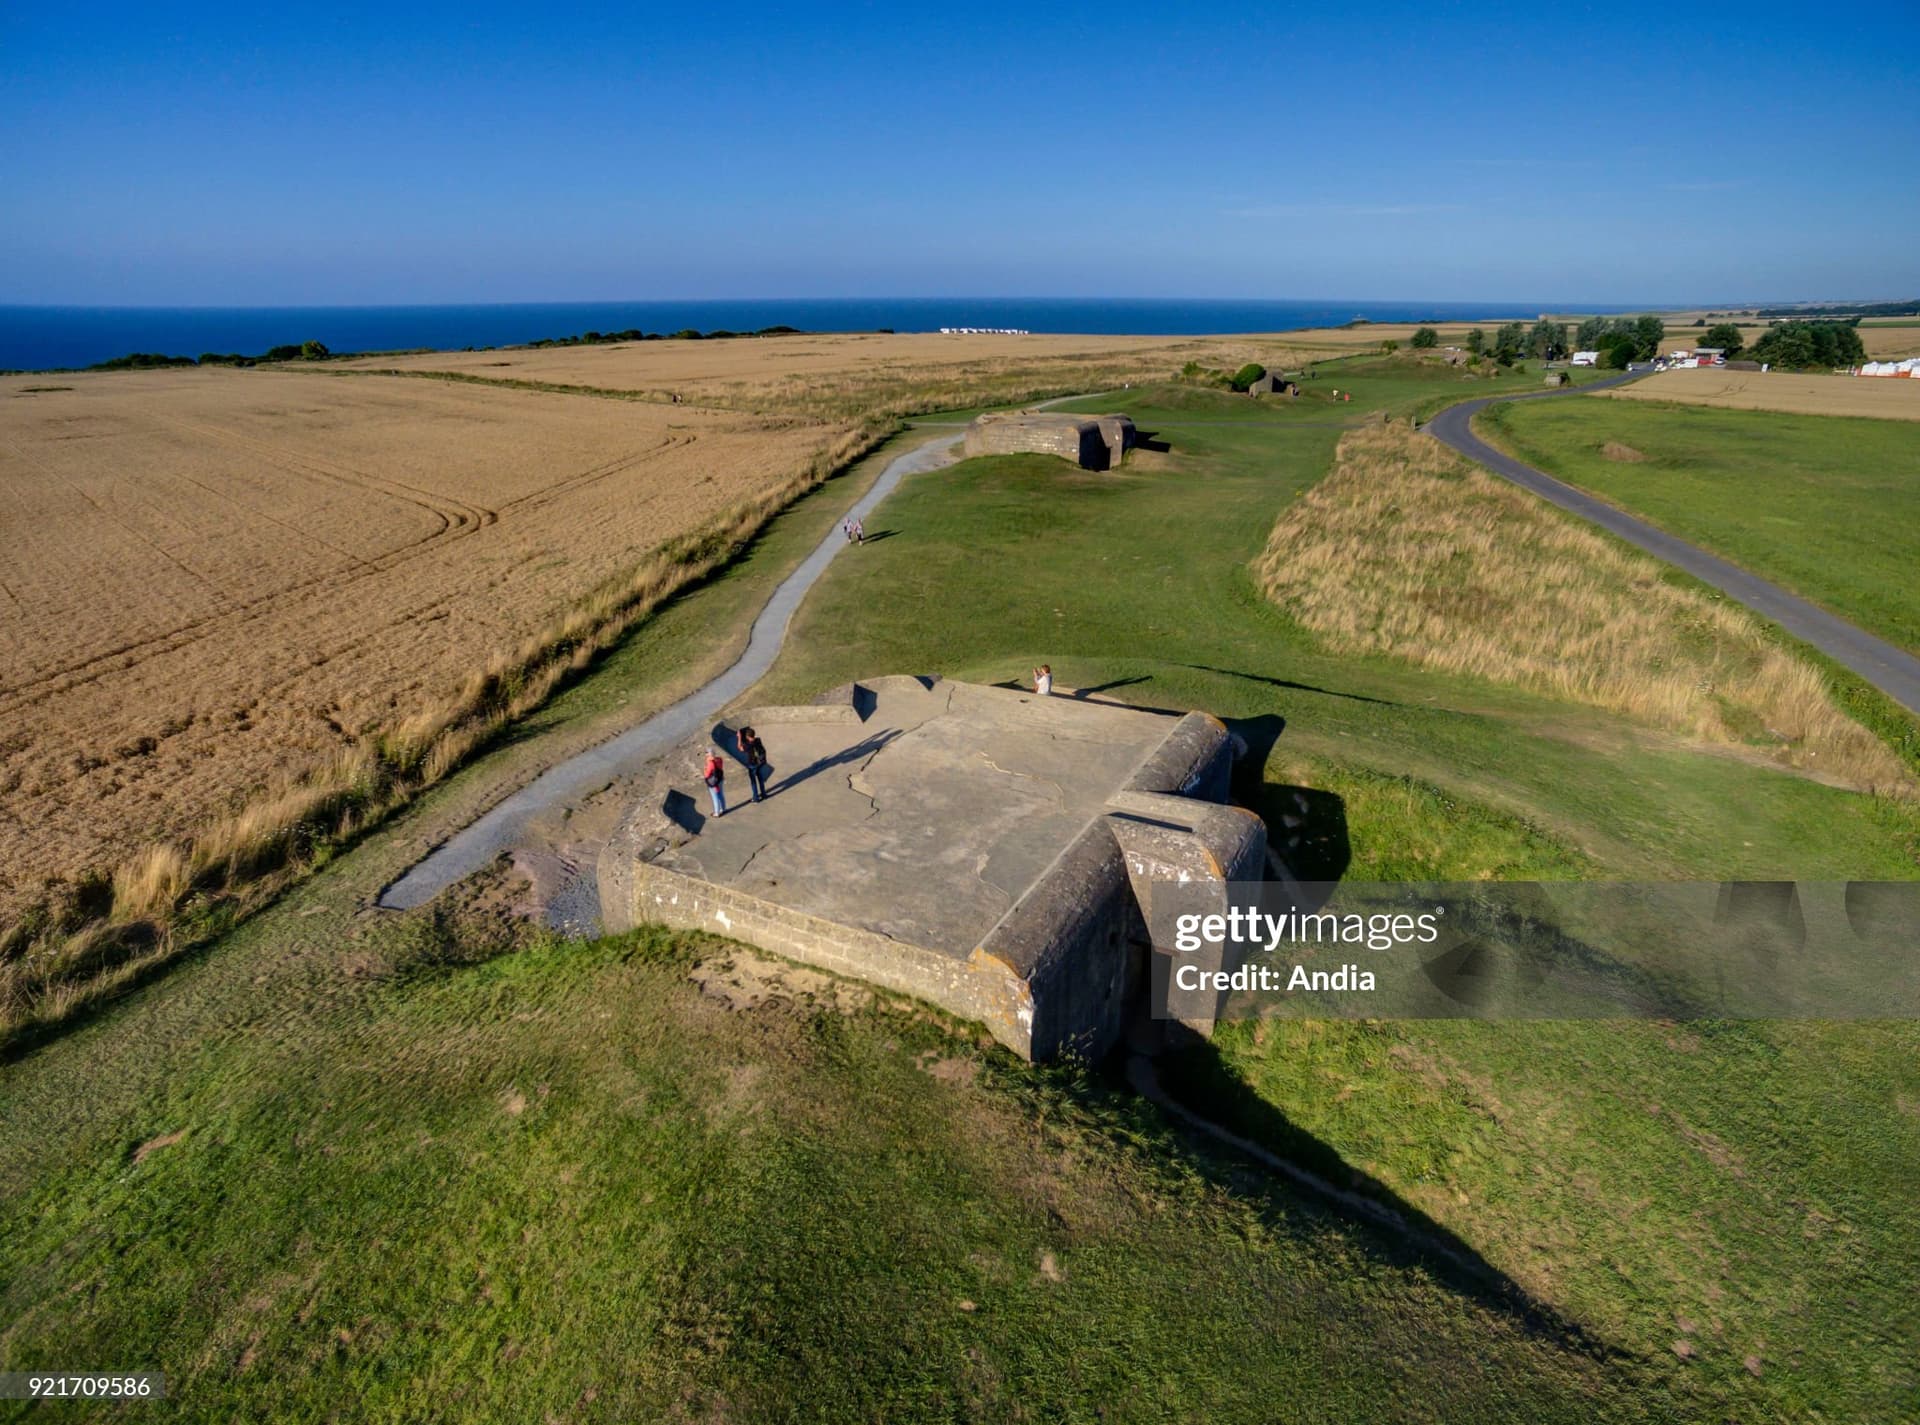
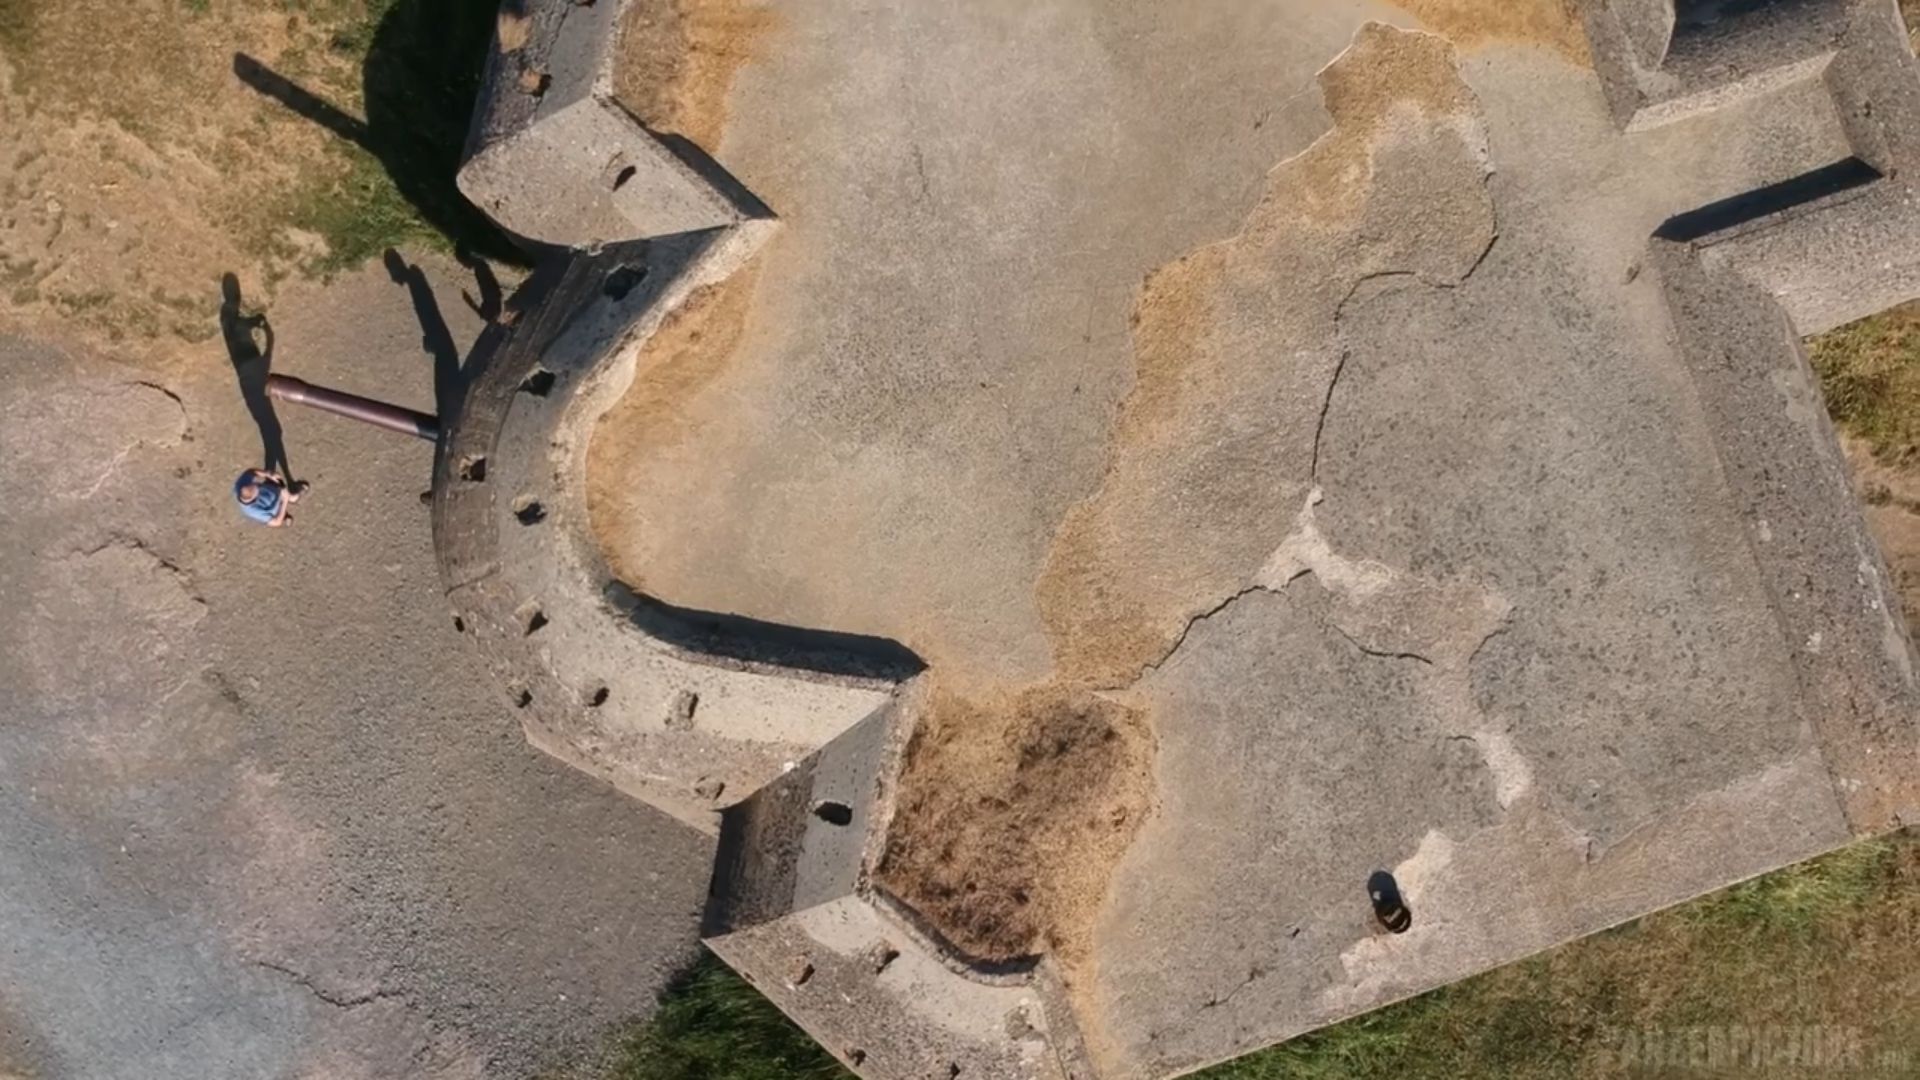
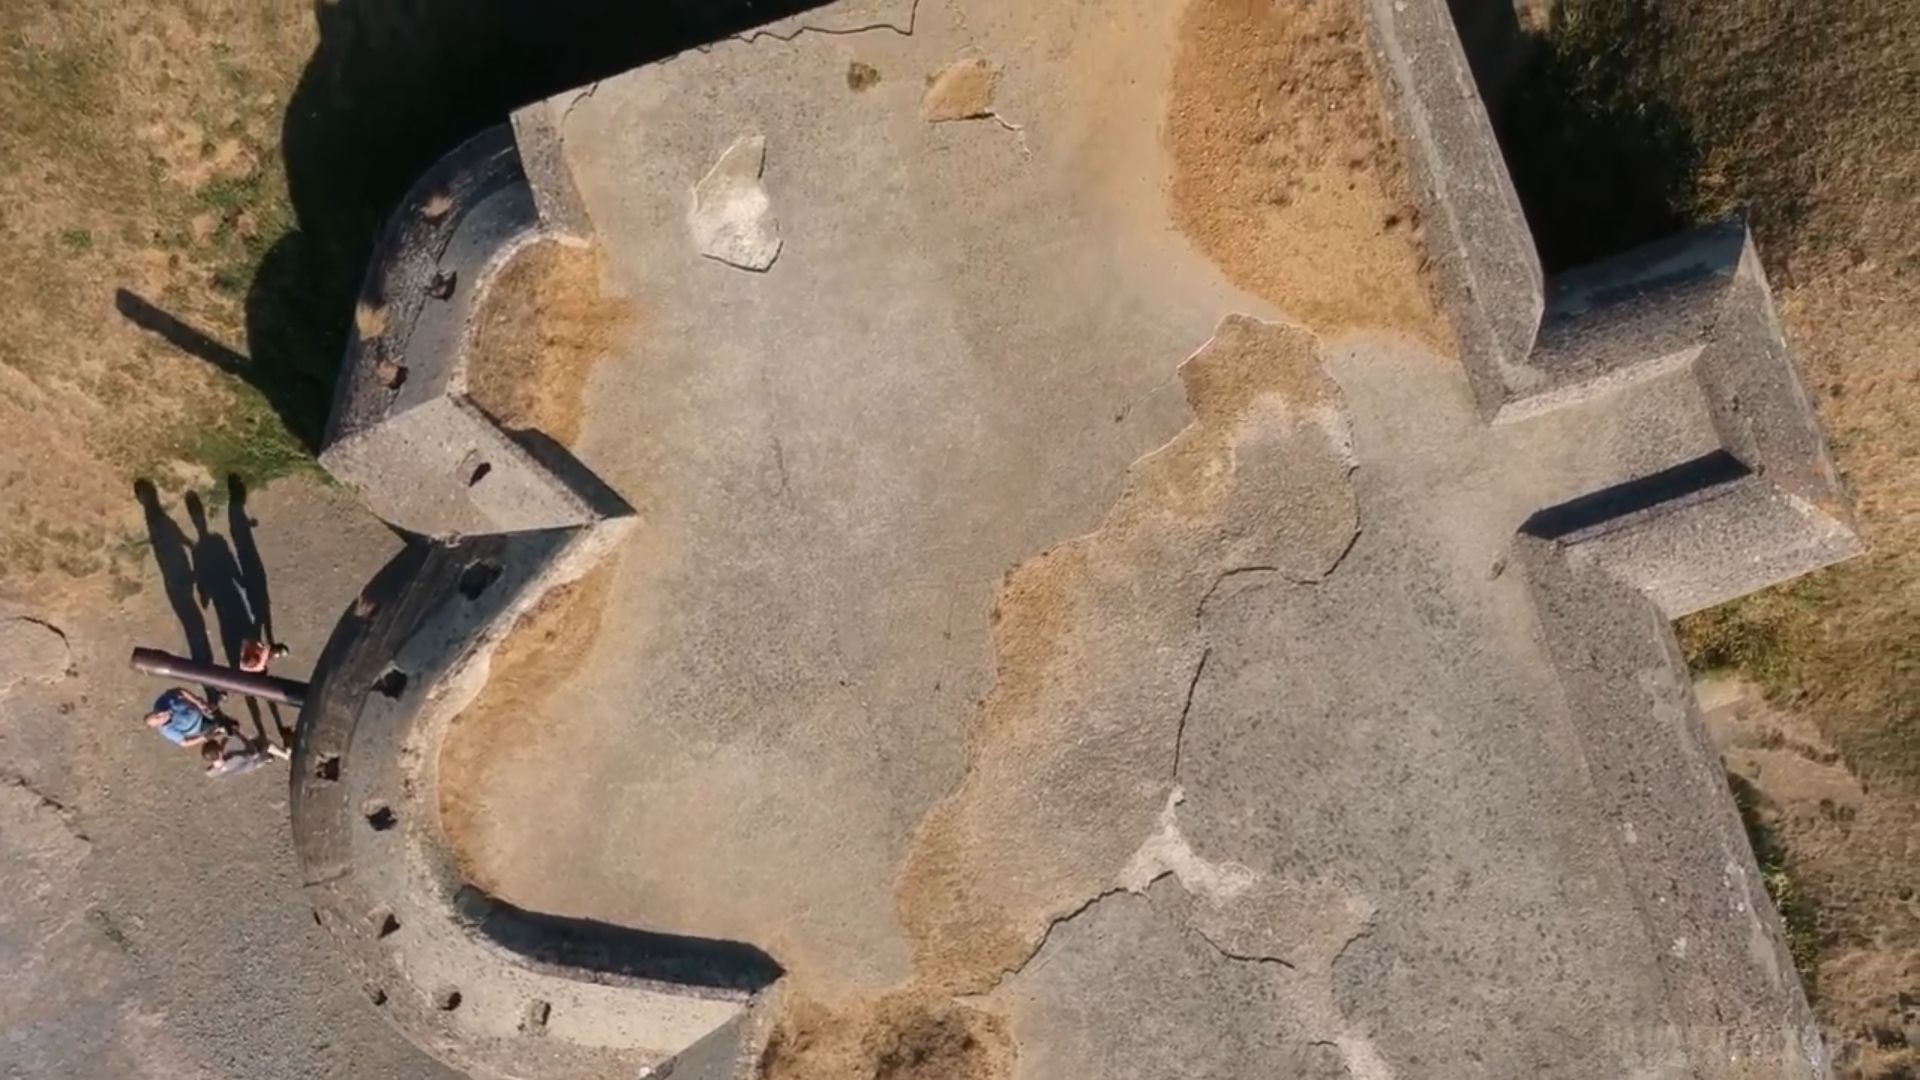
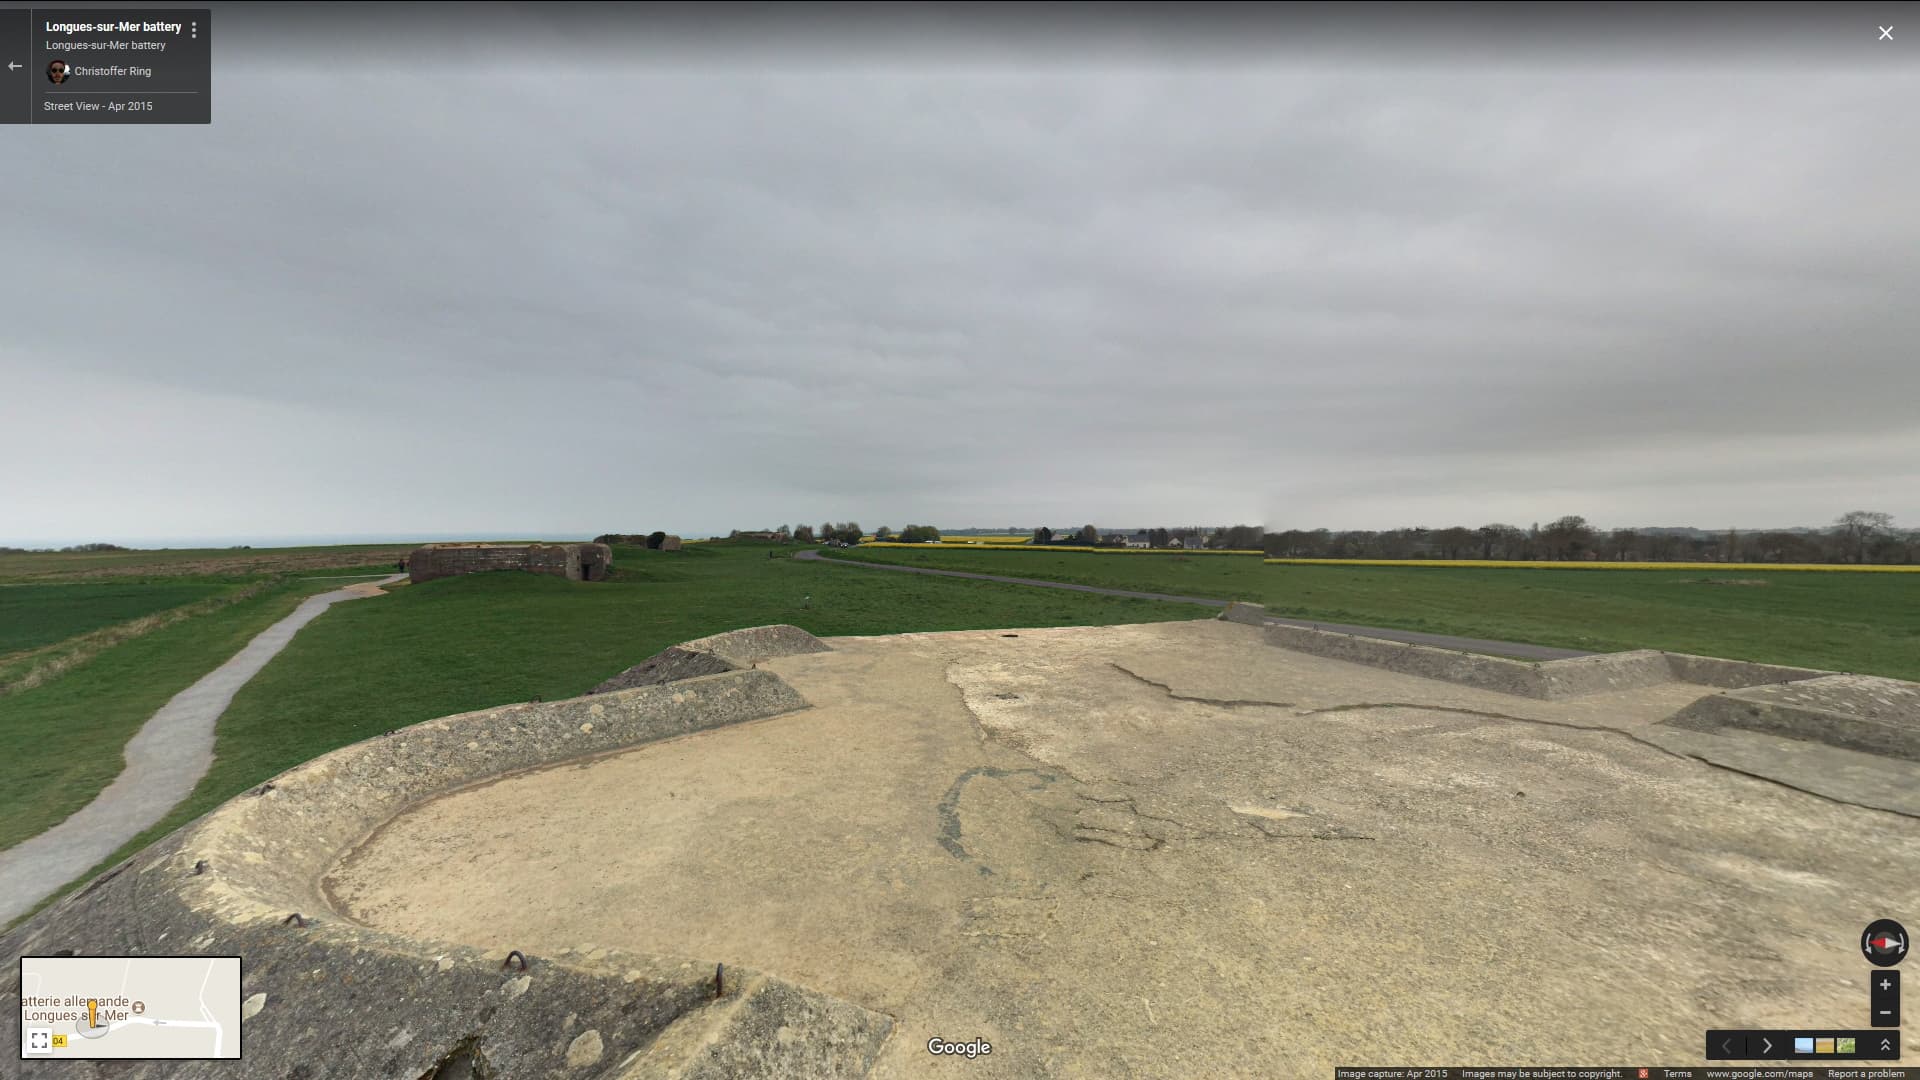
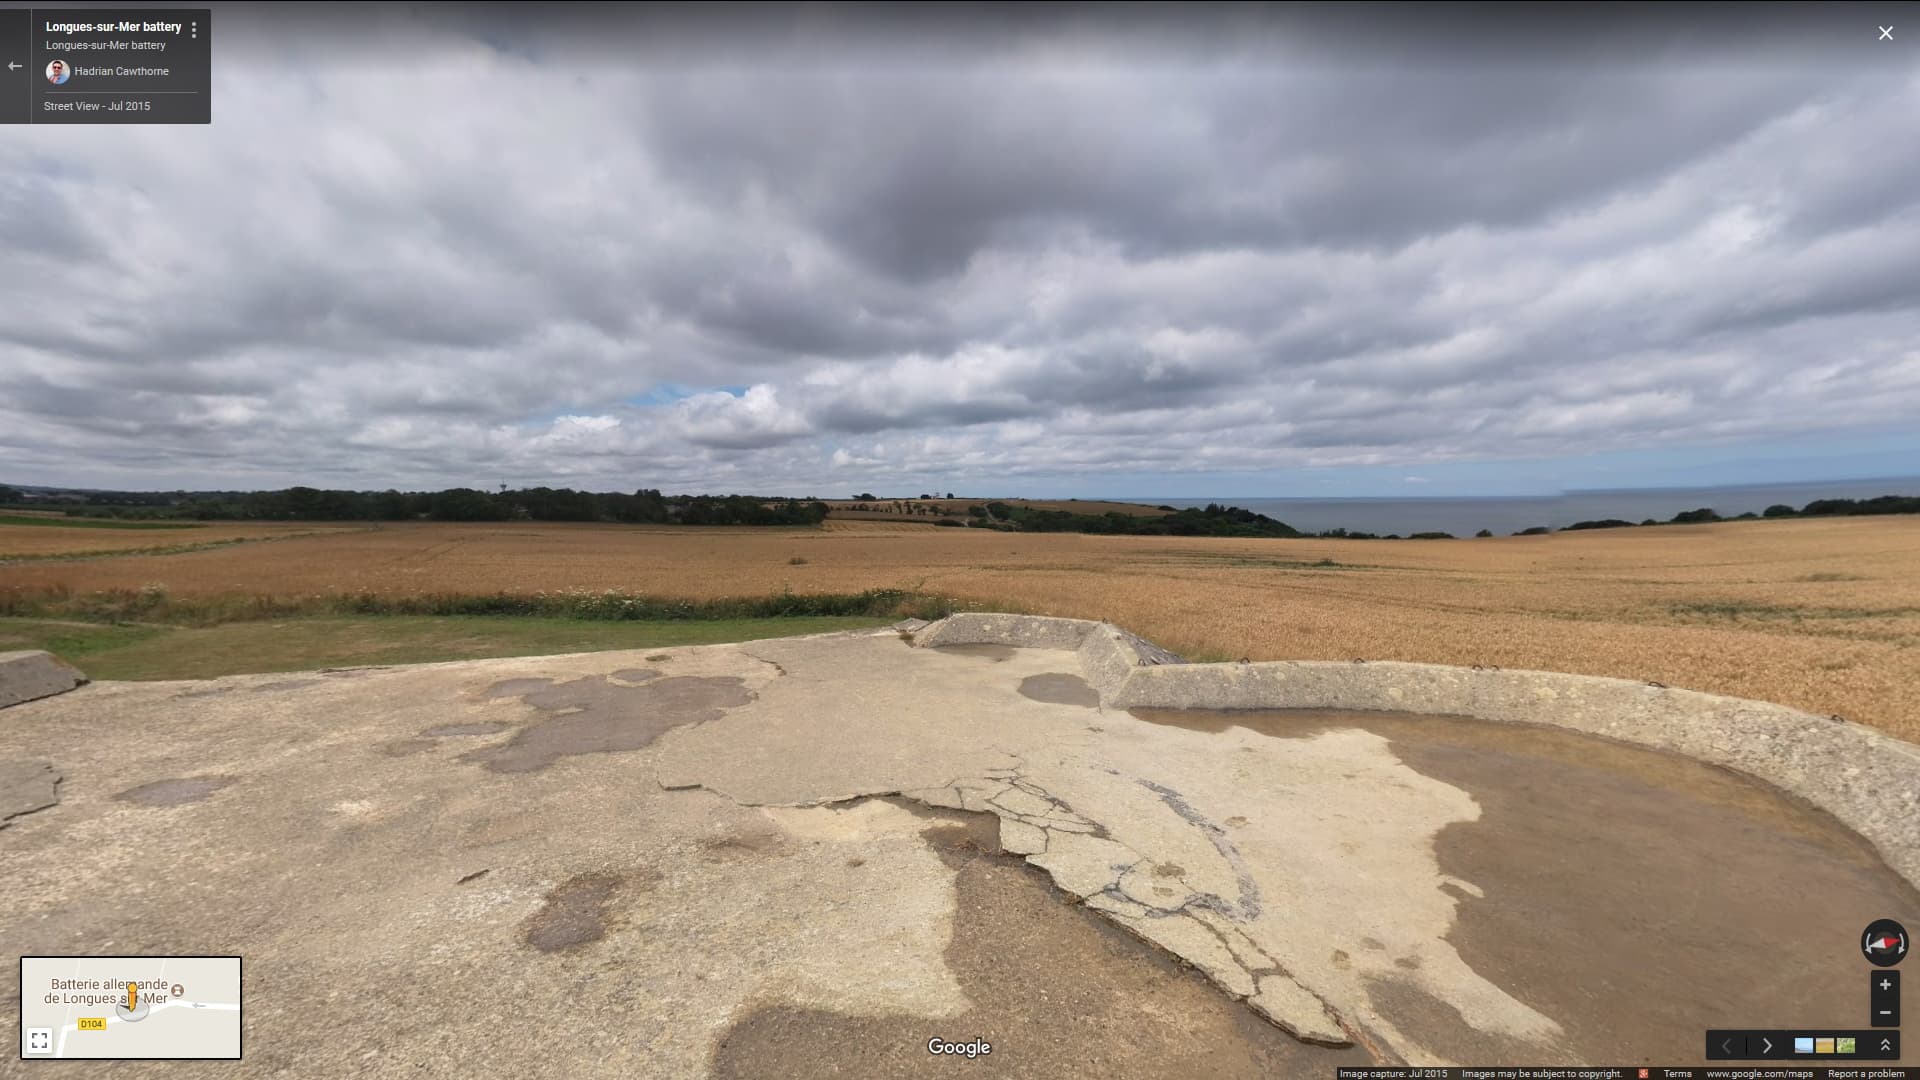
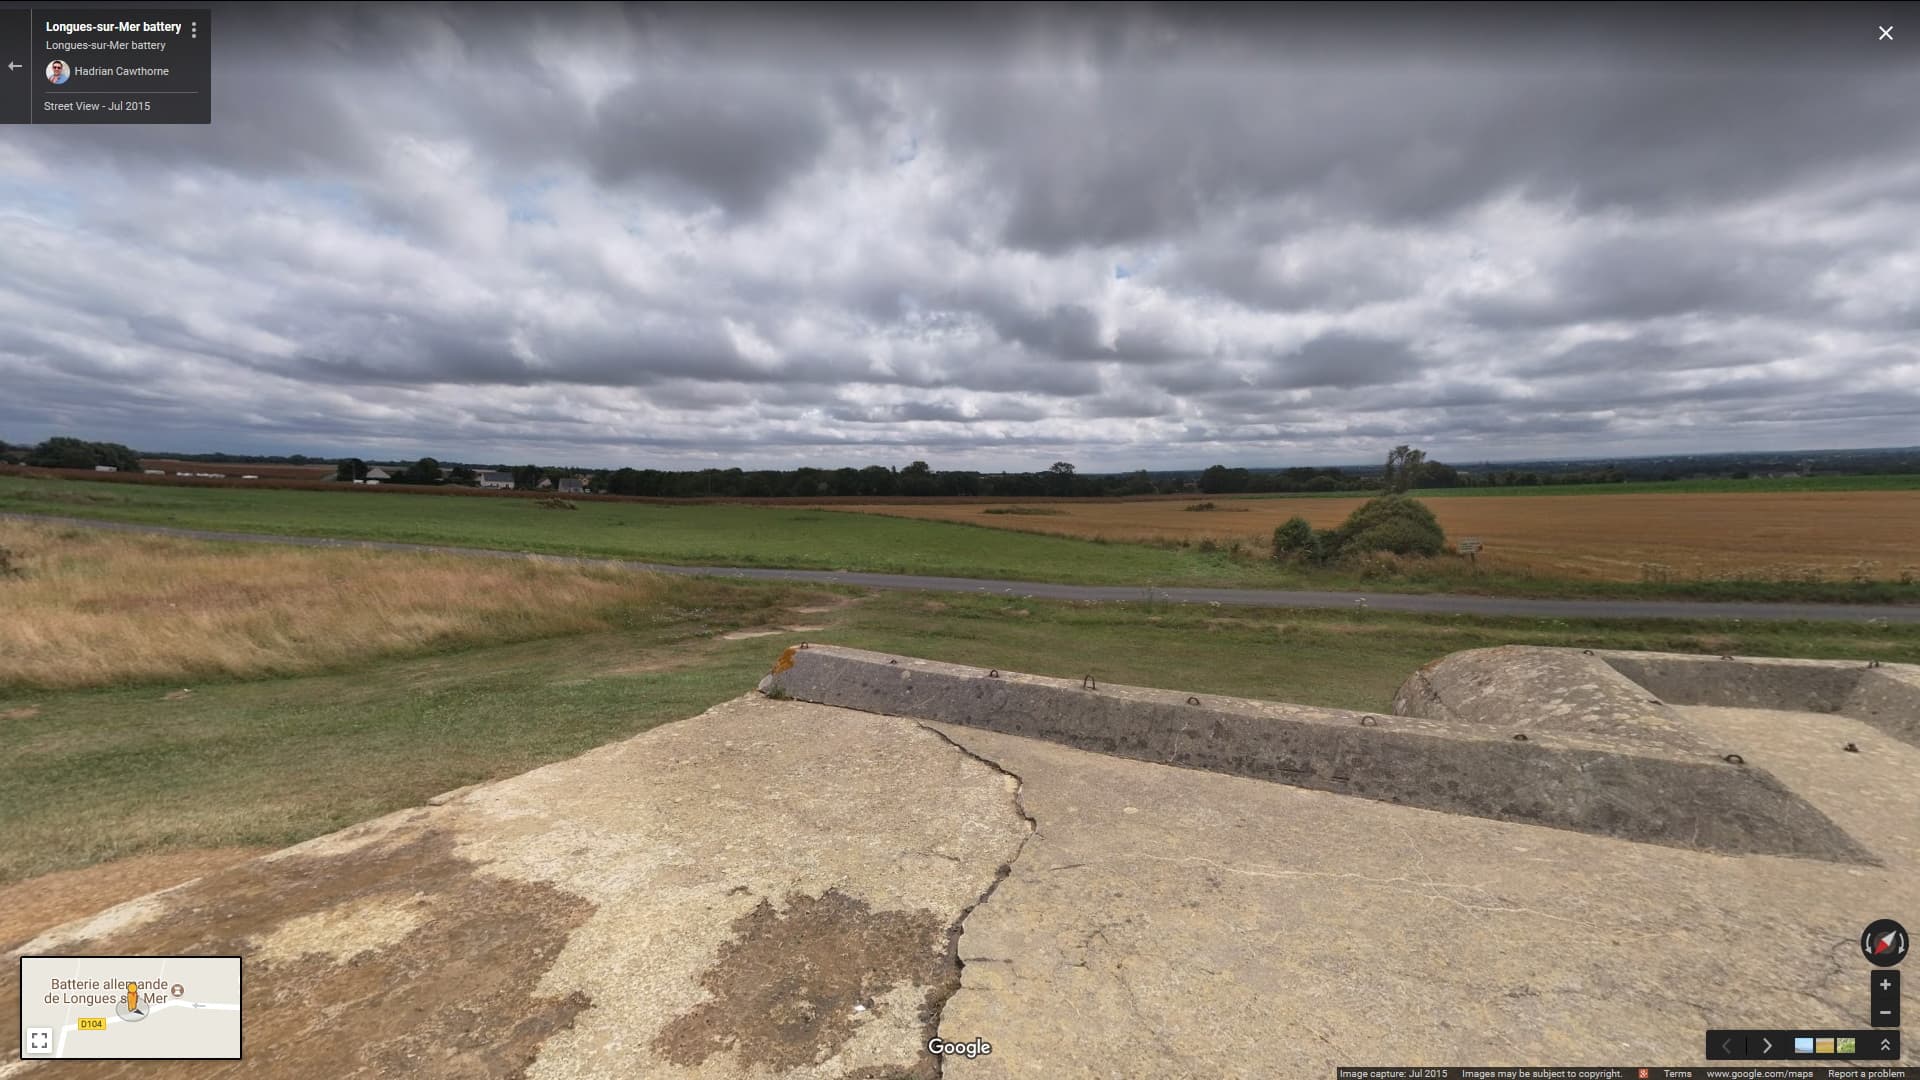
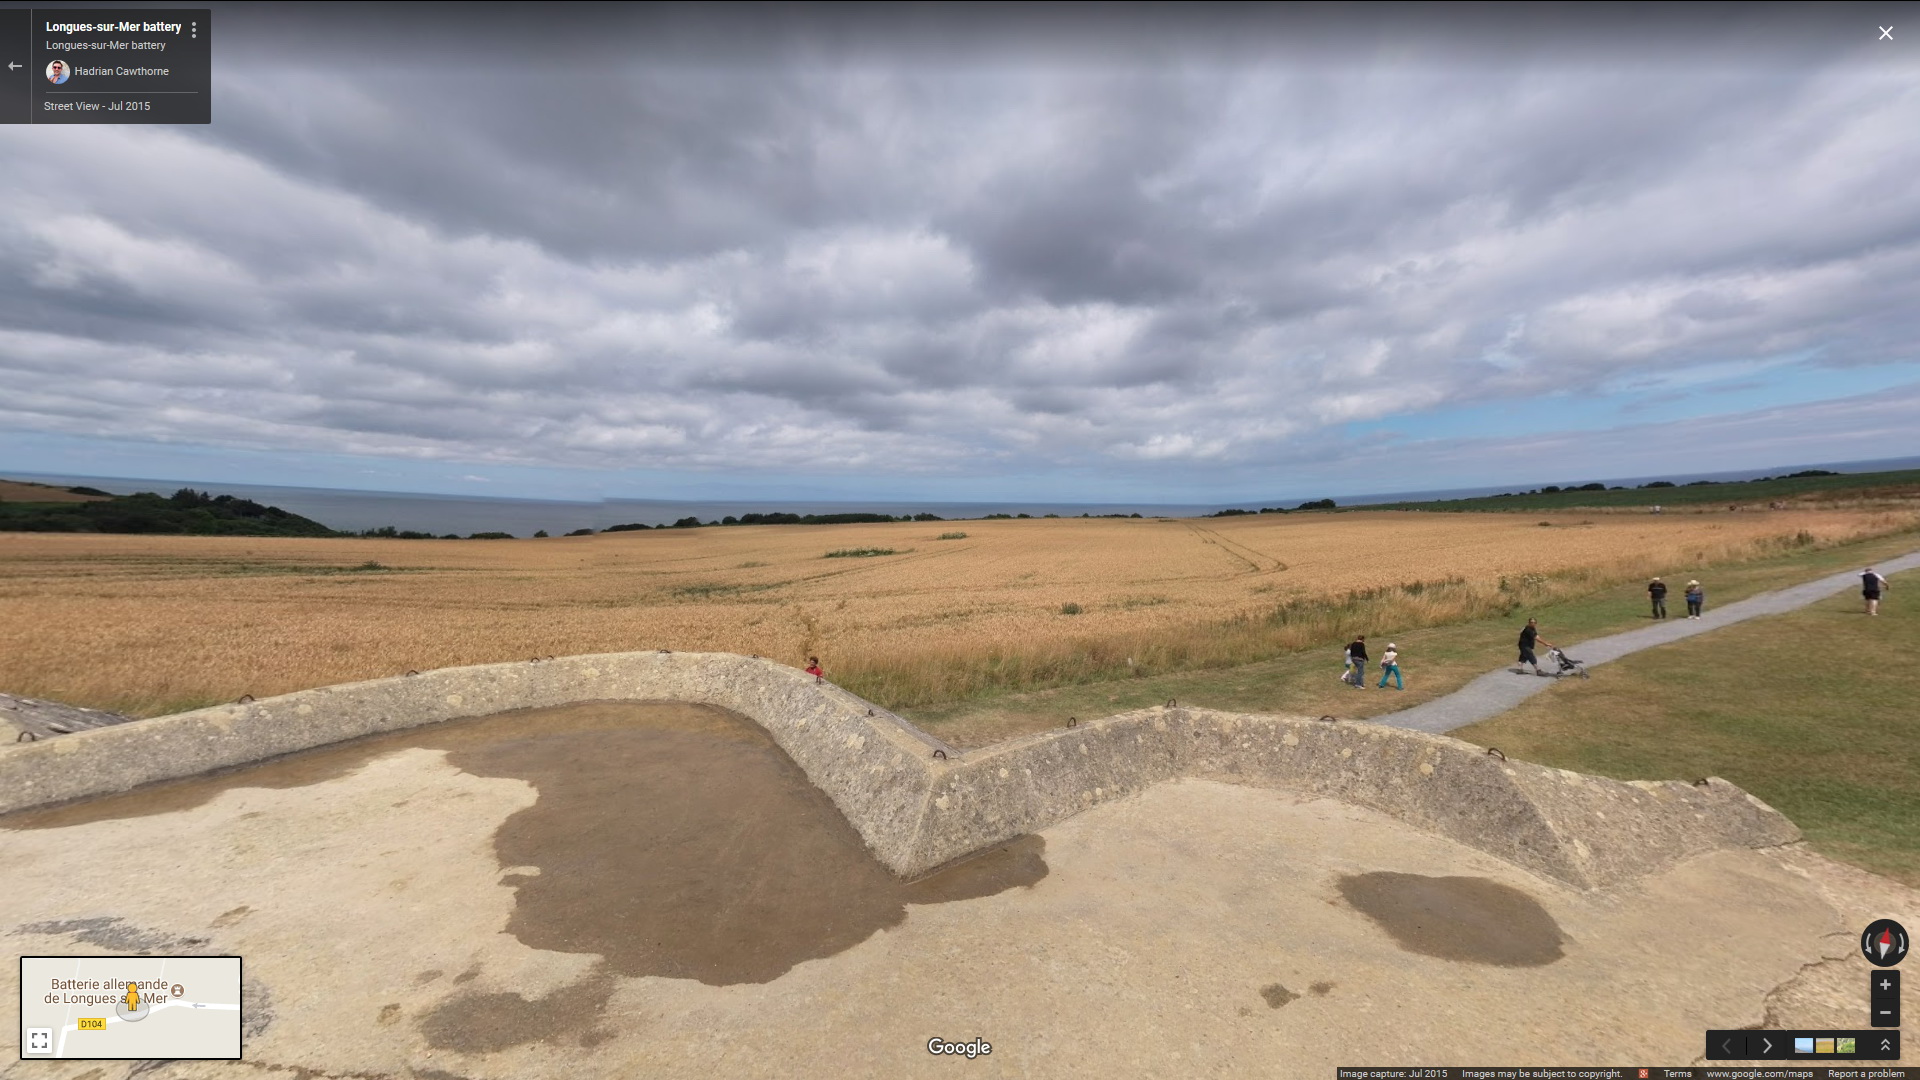
As you could see I referred to pictures of the front, the rear and top of that bunker (I believe it to be the 3rd of the four existing there).

Now, seeking a fine reproduction of the same. I only found two in 1/35 scale on the market and both were just prototypes of the actual ones at Longues.

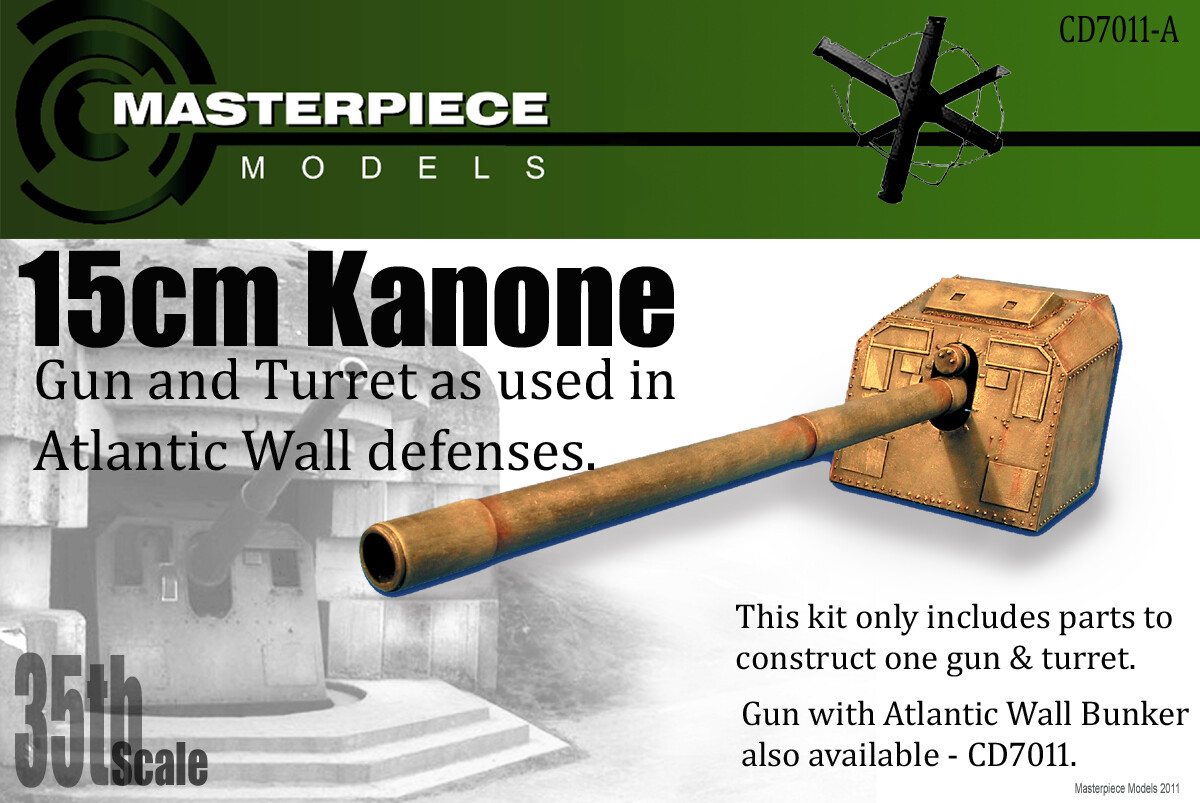
The only one worth considering was the one from Masterpiece Models, which also sold the Naval 150mm Gun turret and Gun.

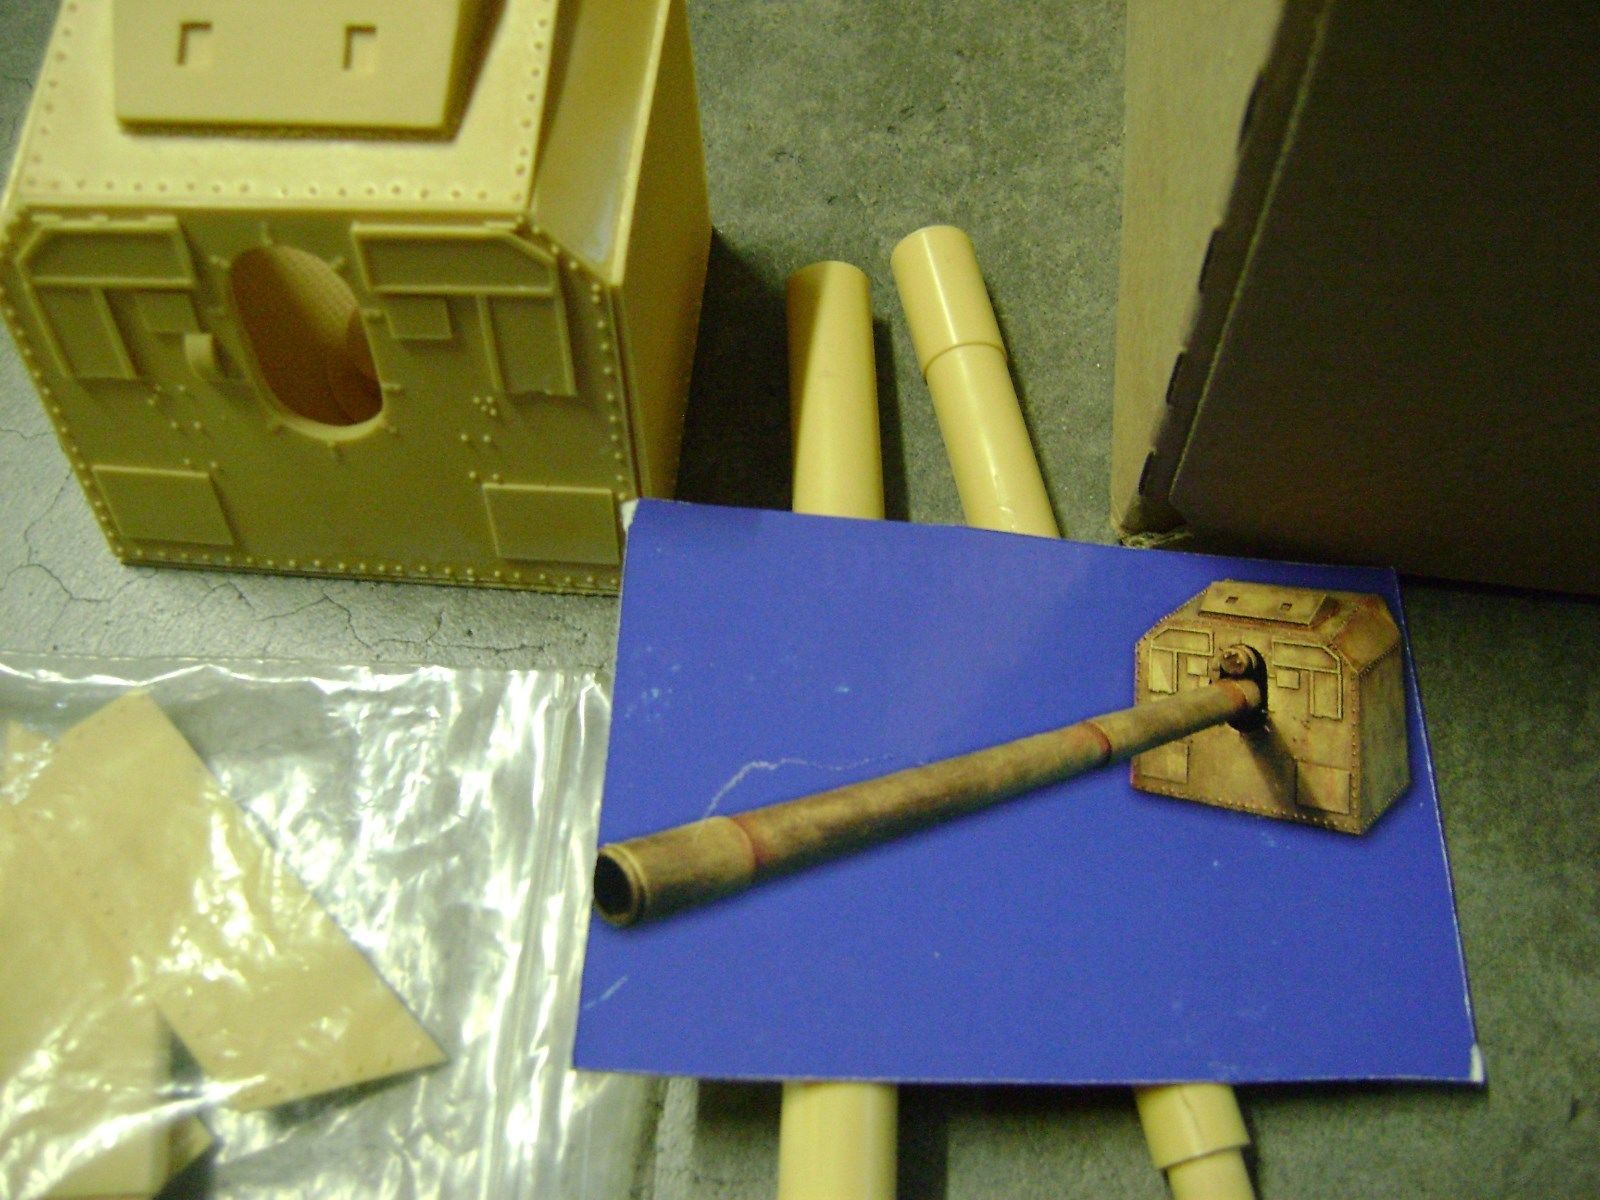
To my utter disappointment they were both wrong for my purpose but I bought them anyway.

Here are the depictions of the Boxes and actual built models by other modelers. You will immediately notice the huge differences between the boxed model and the actual one.


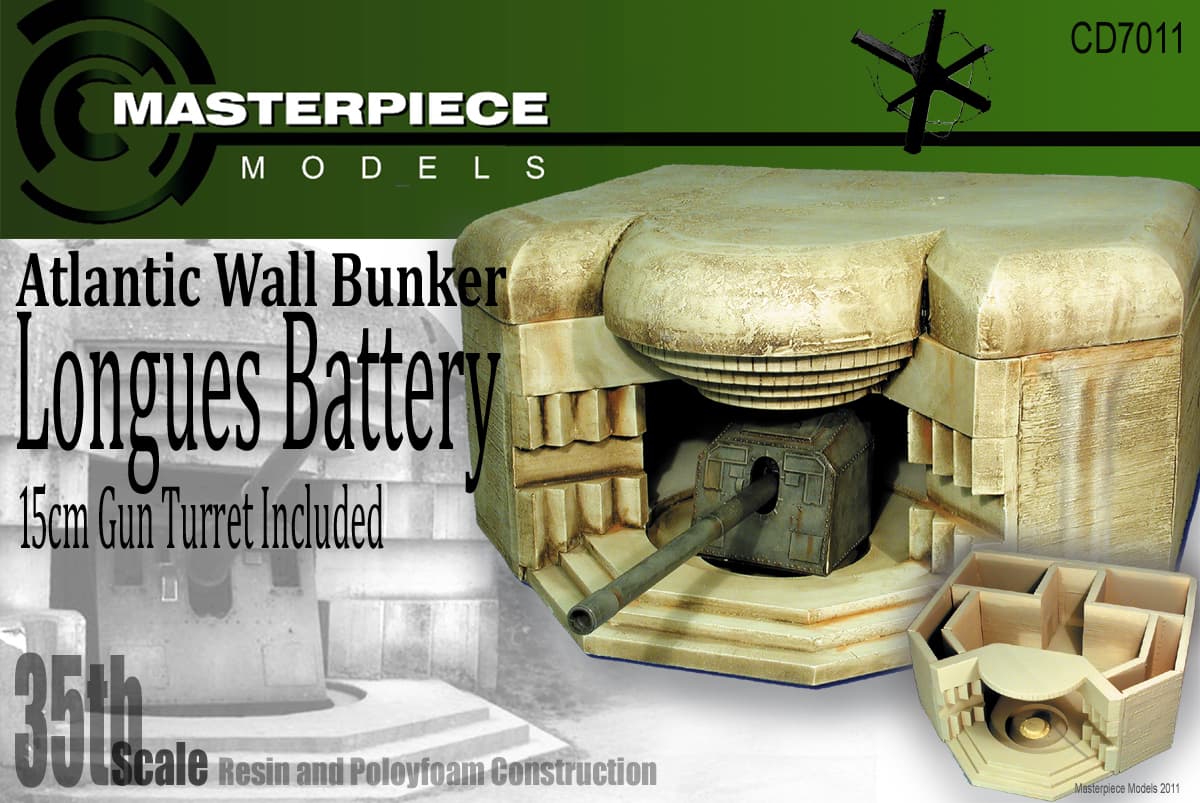
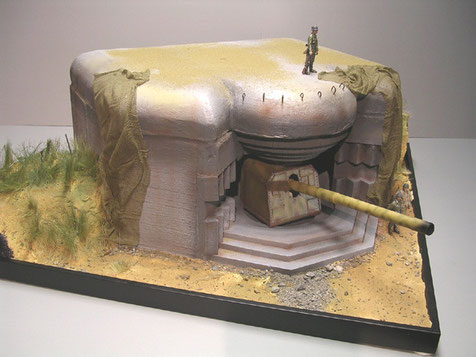
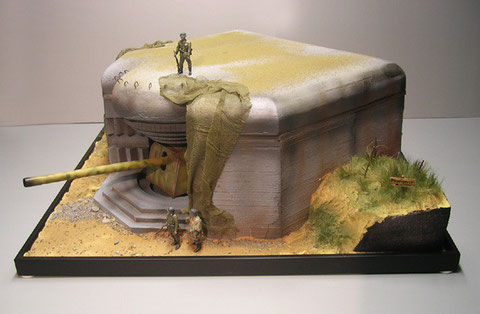
As you could see the roof is completely wrong and there is no rear wall protections to its entrance. The only correct part is the front of it.
My immediate impression of the model itself was that the interior was completely wrong and that the parts made out of resin foam (light weight) were completely misaligned and flimsy.
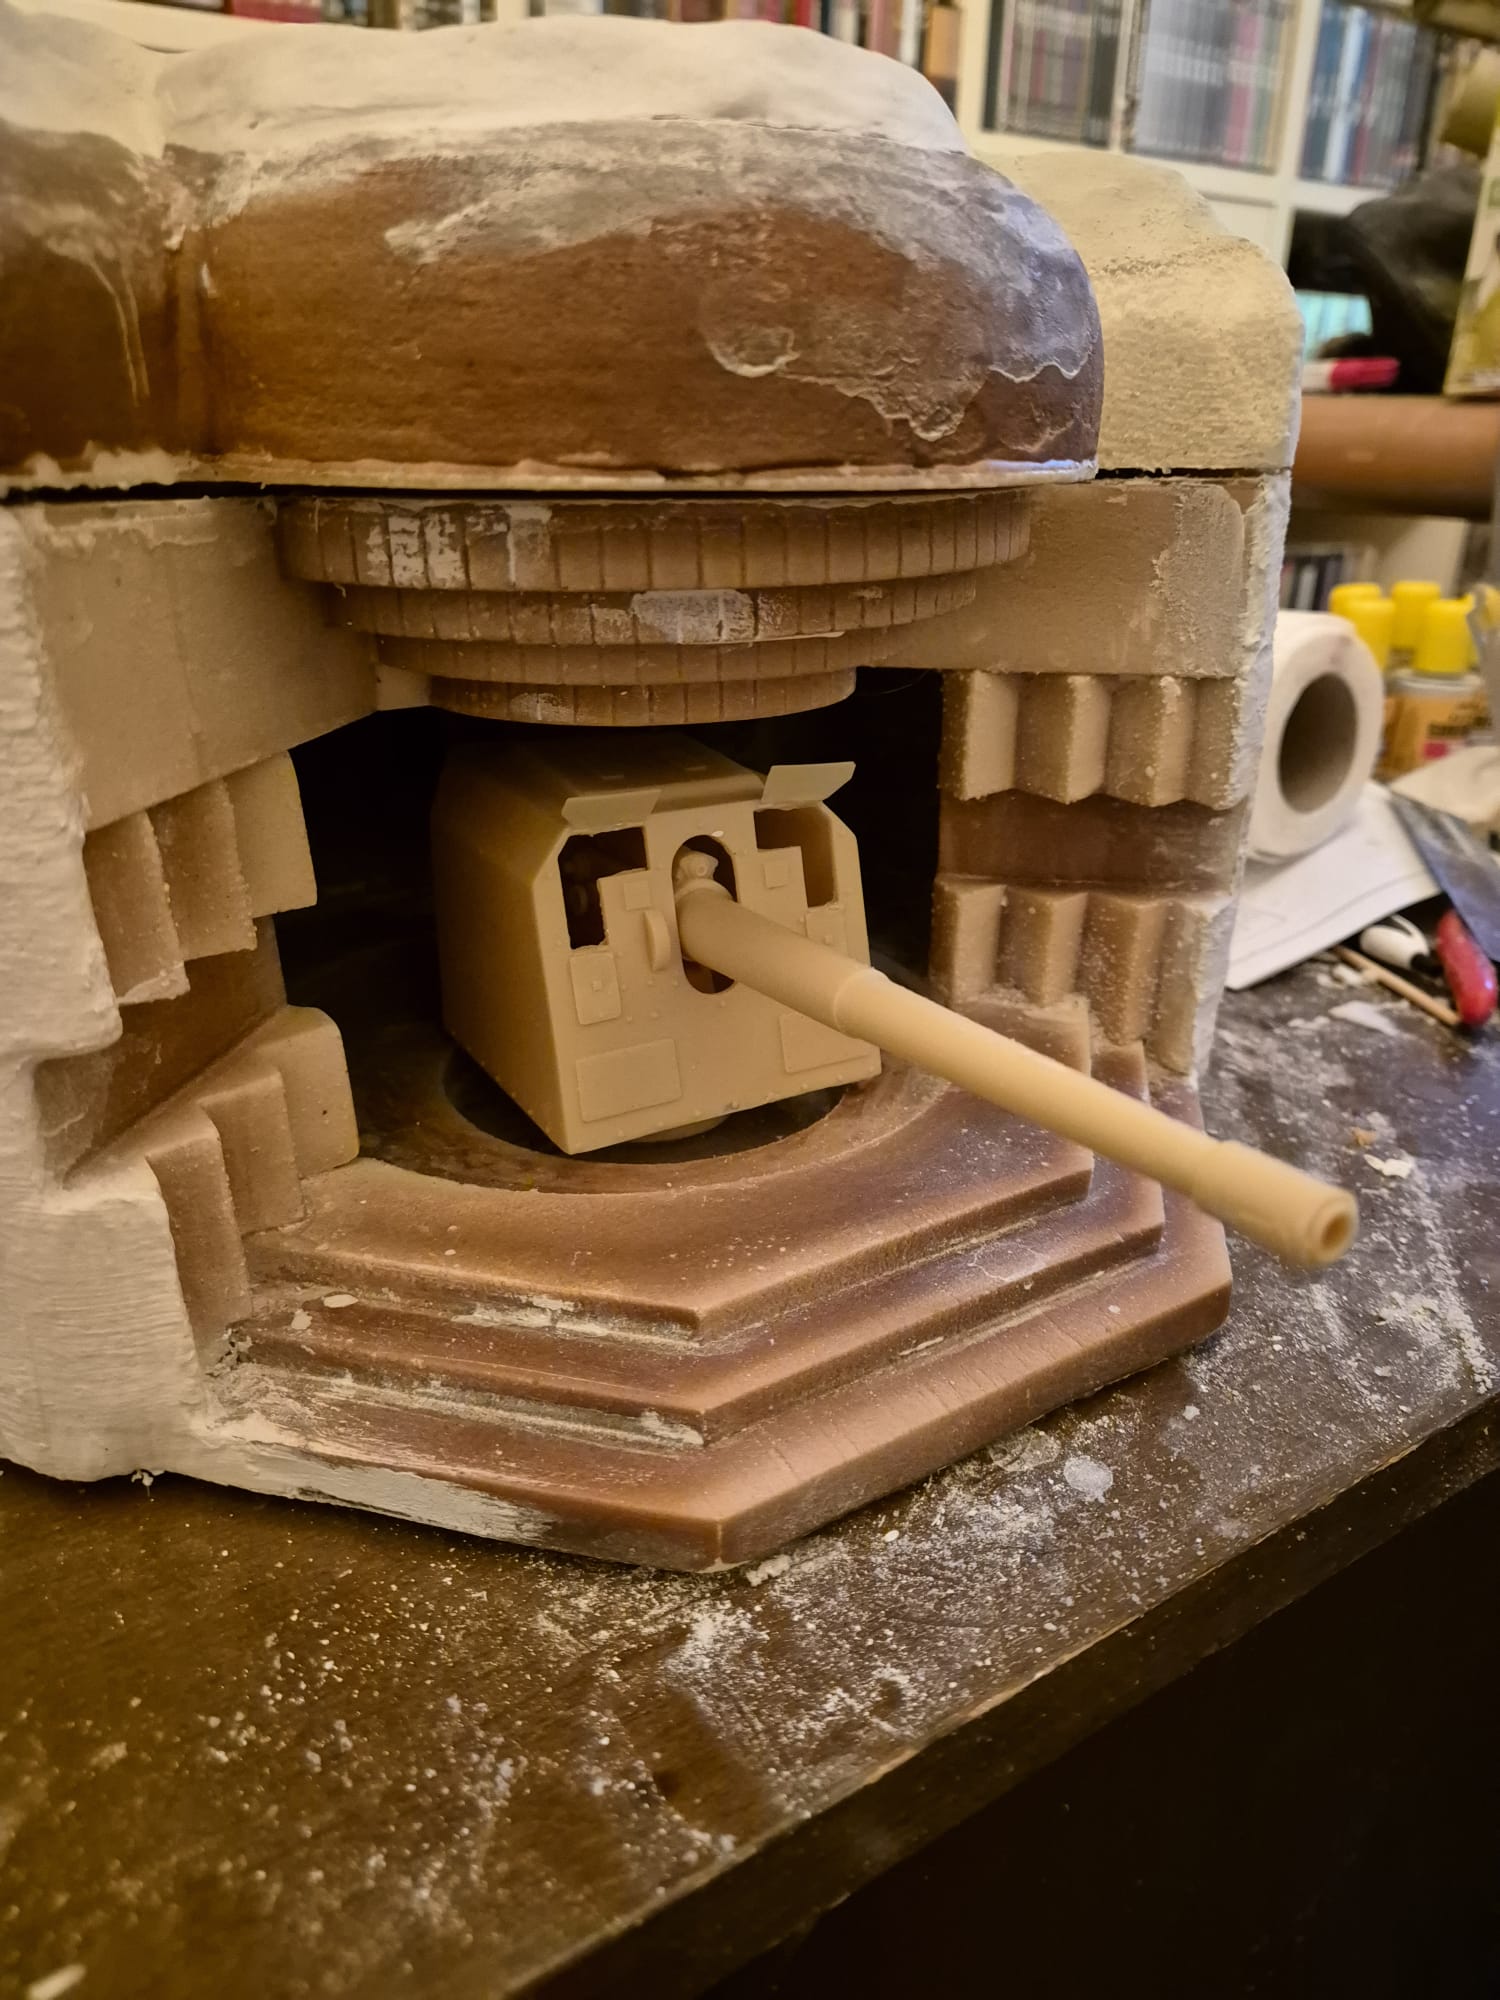
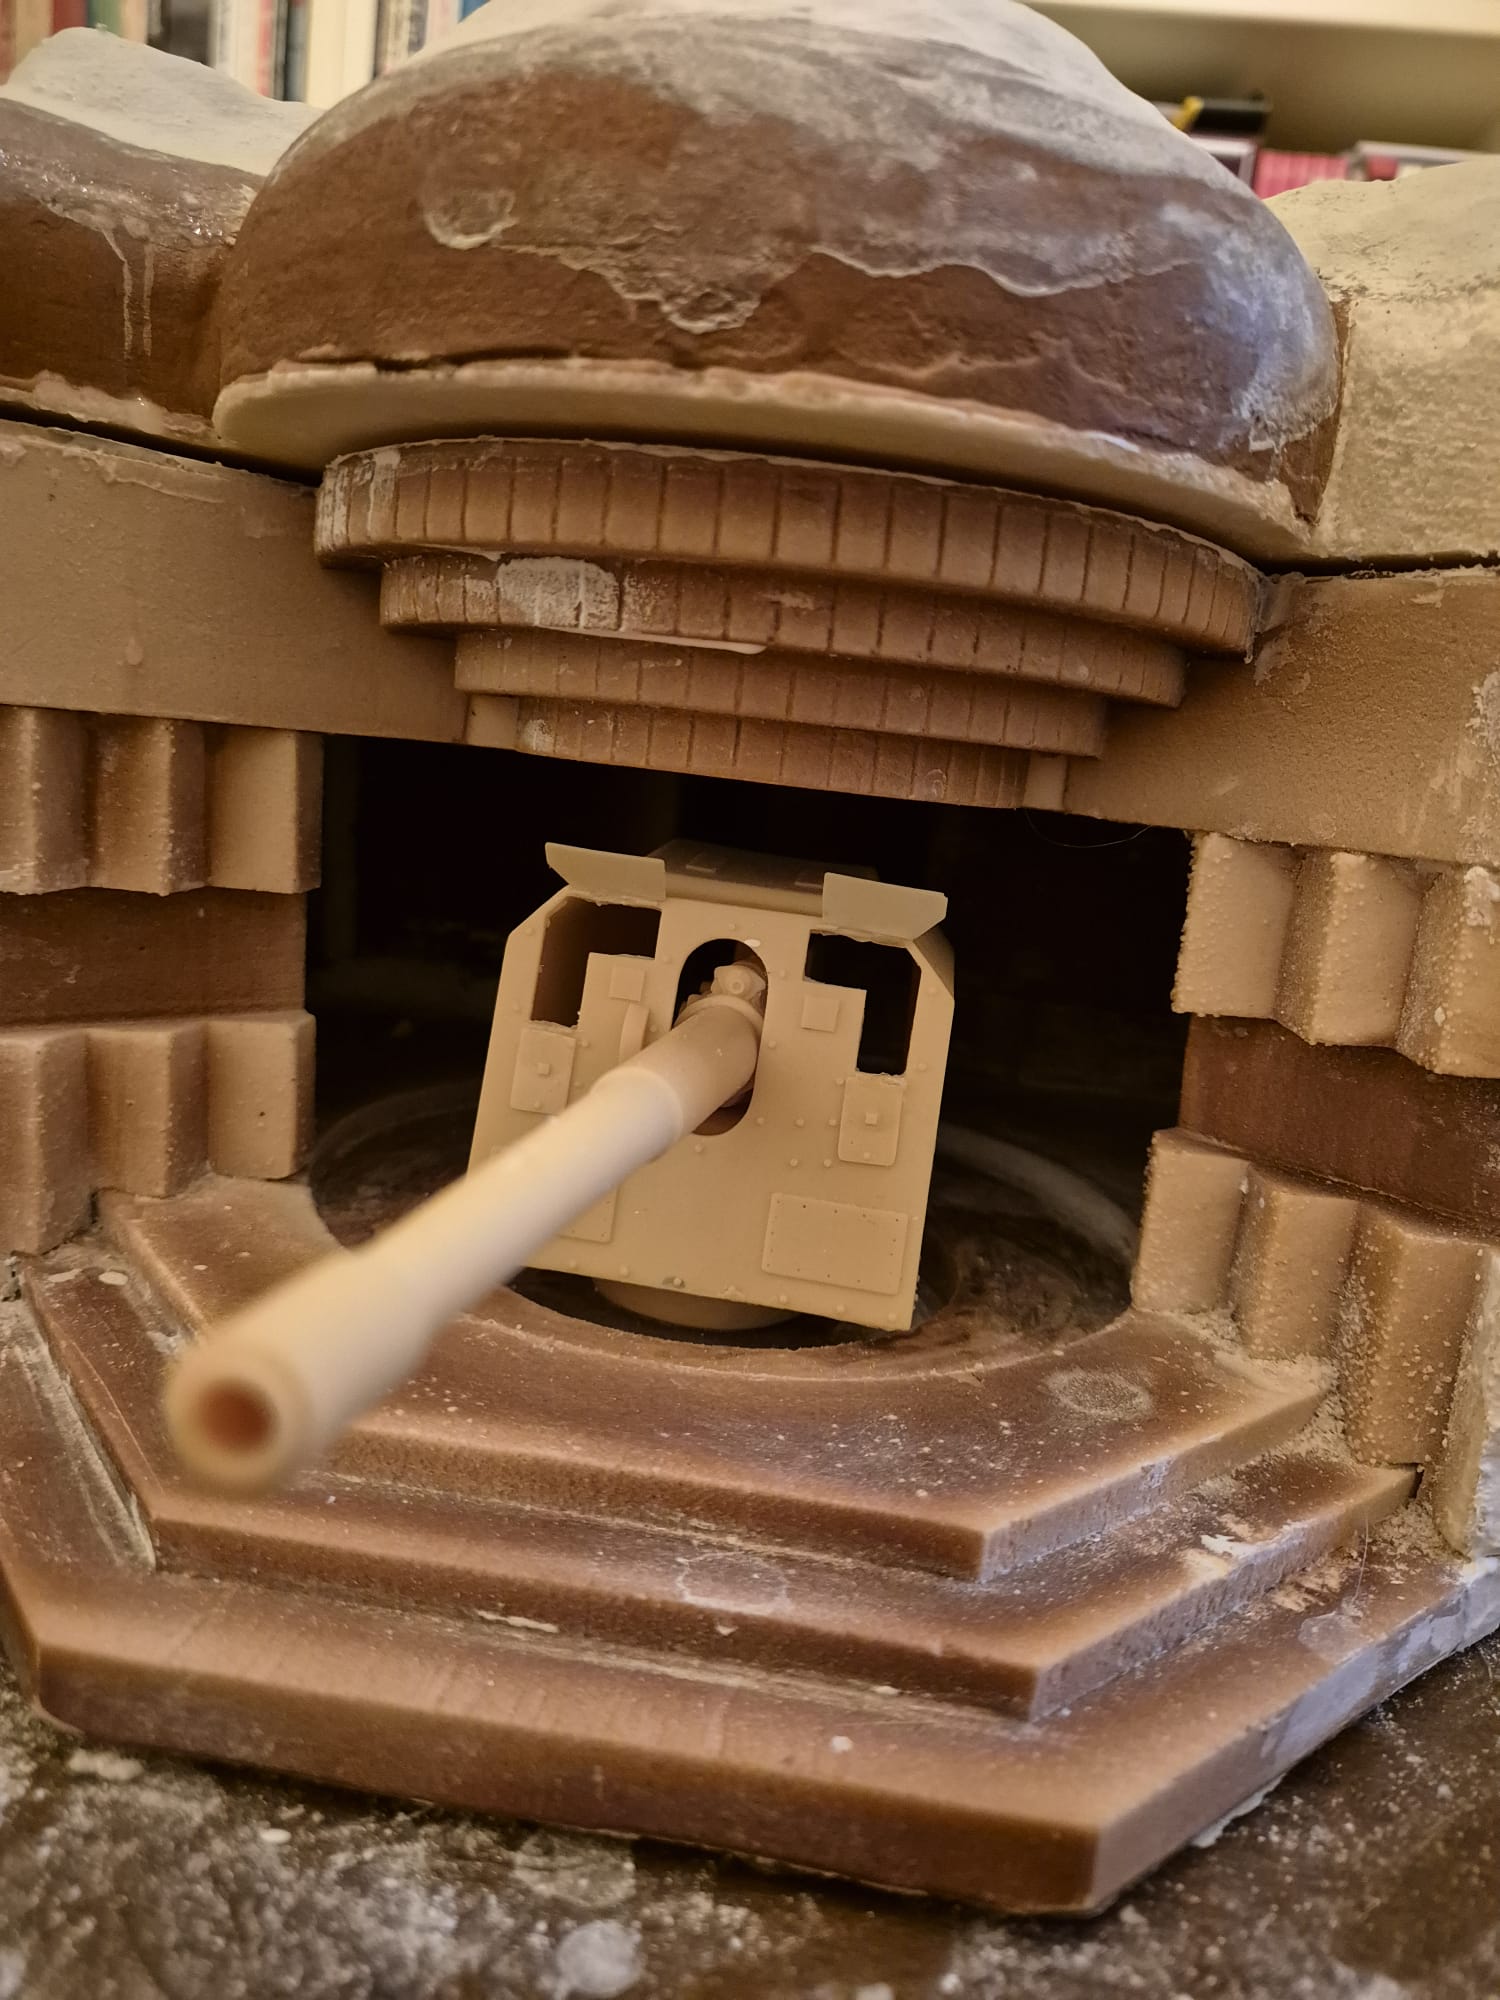
I therefore decided that I could easily do without the interior since all I needed was a very clear view of the exterior structure and the Gun itself.
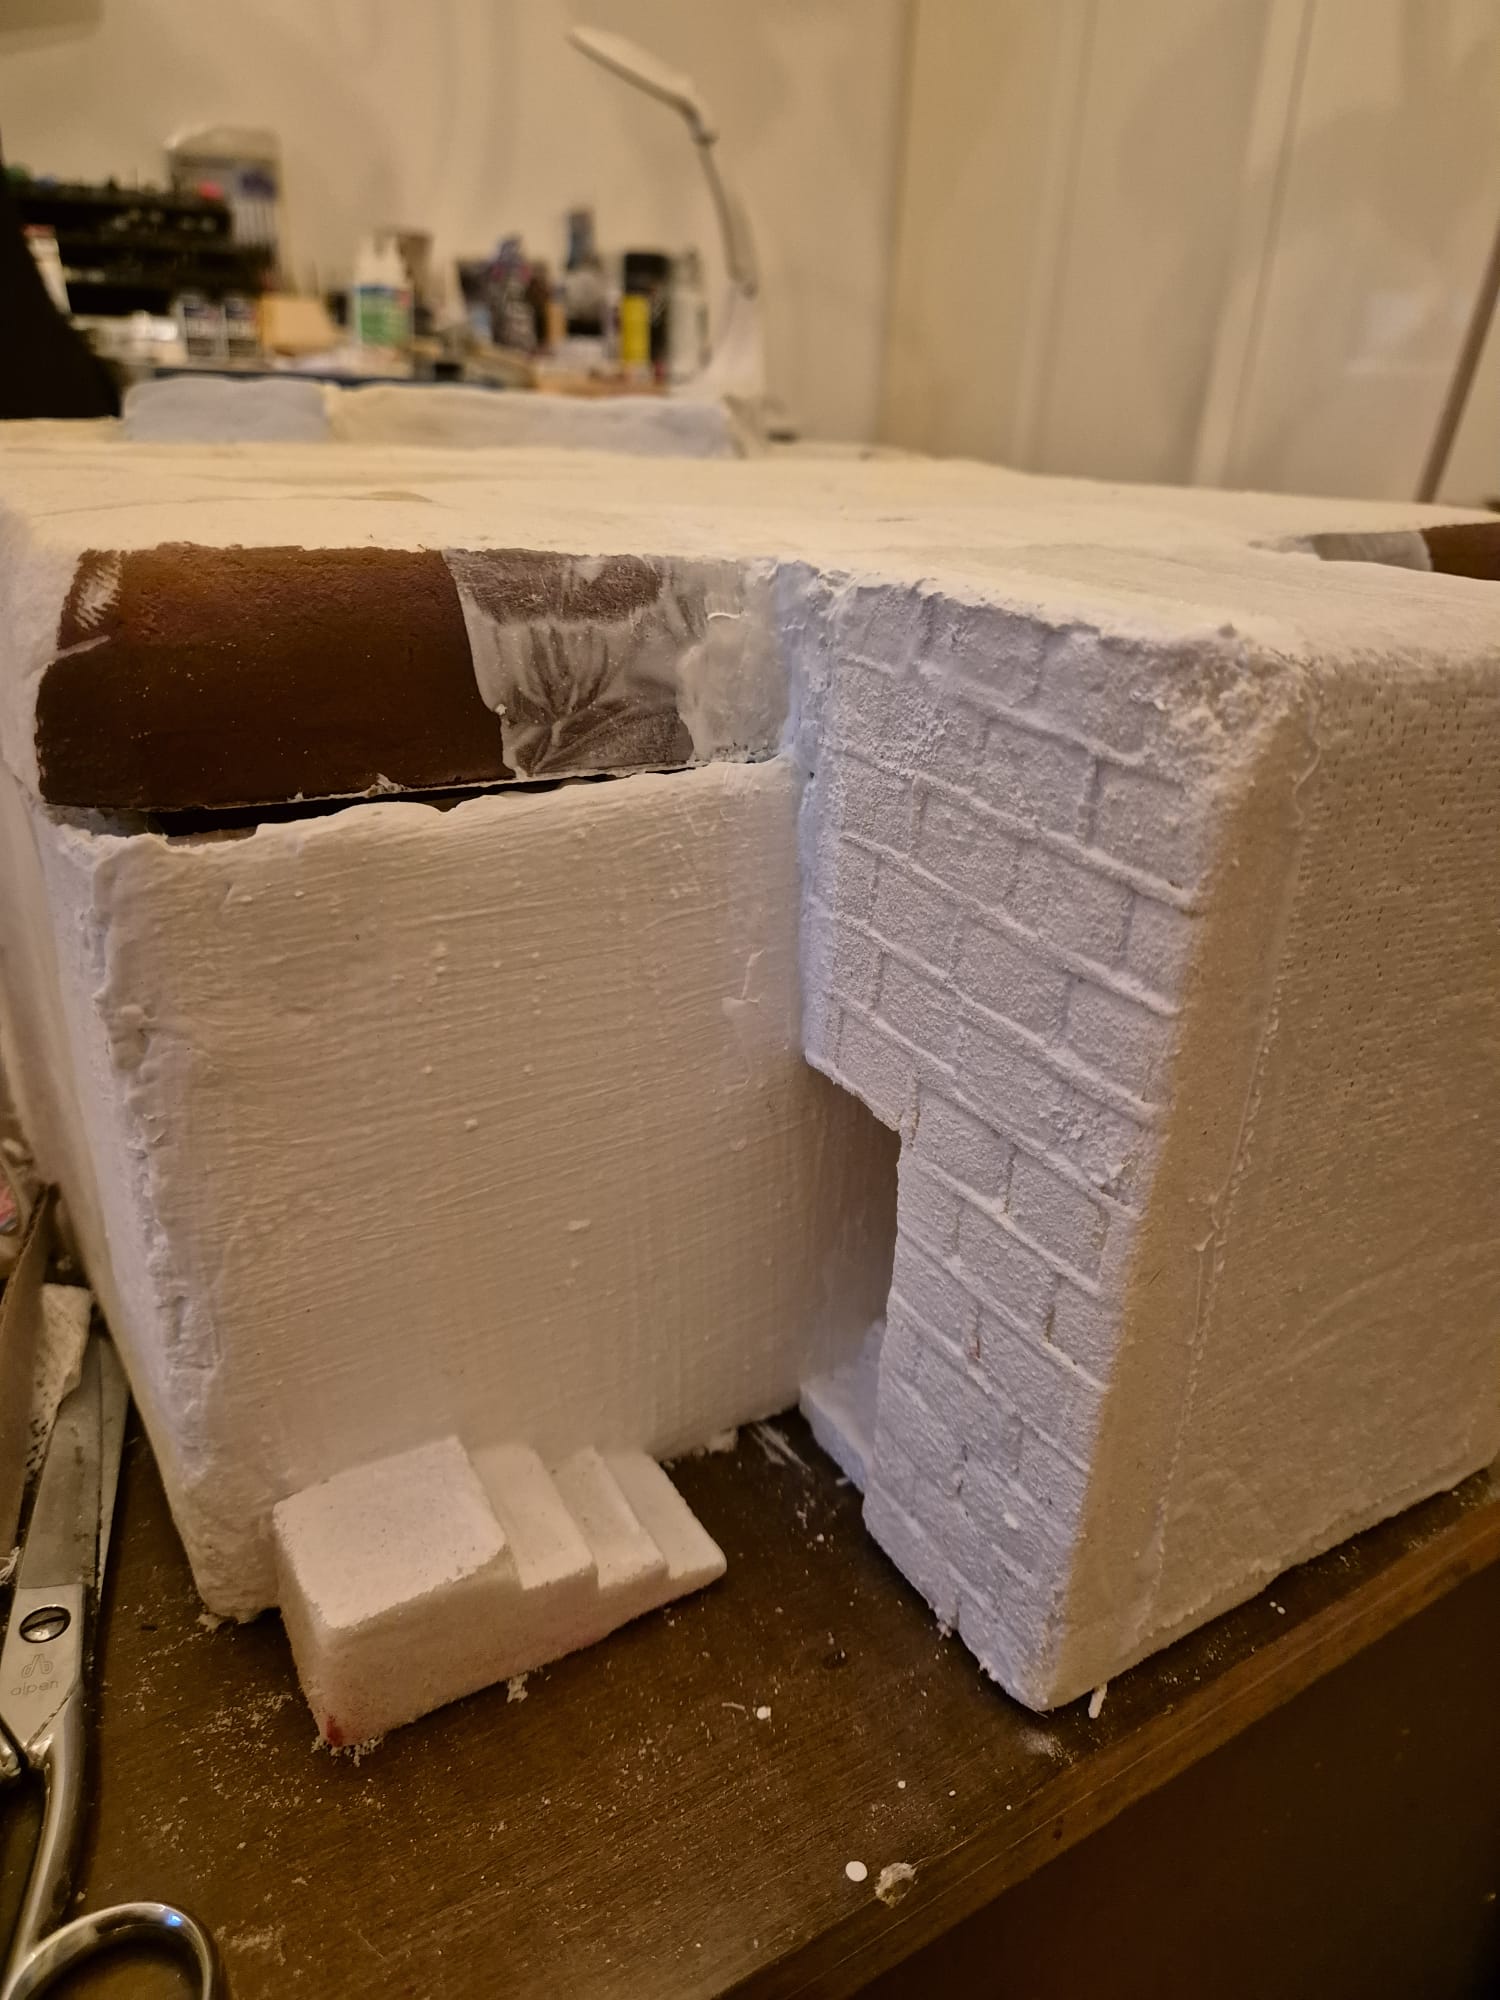
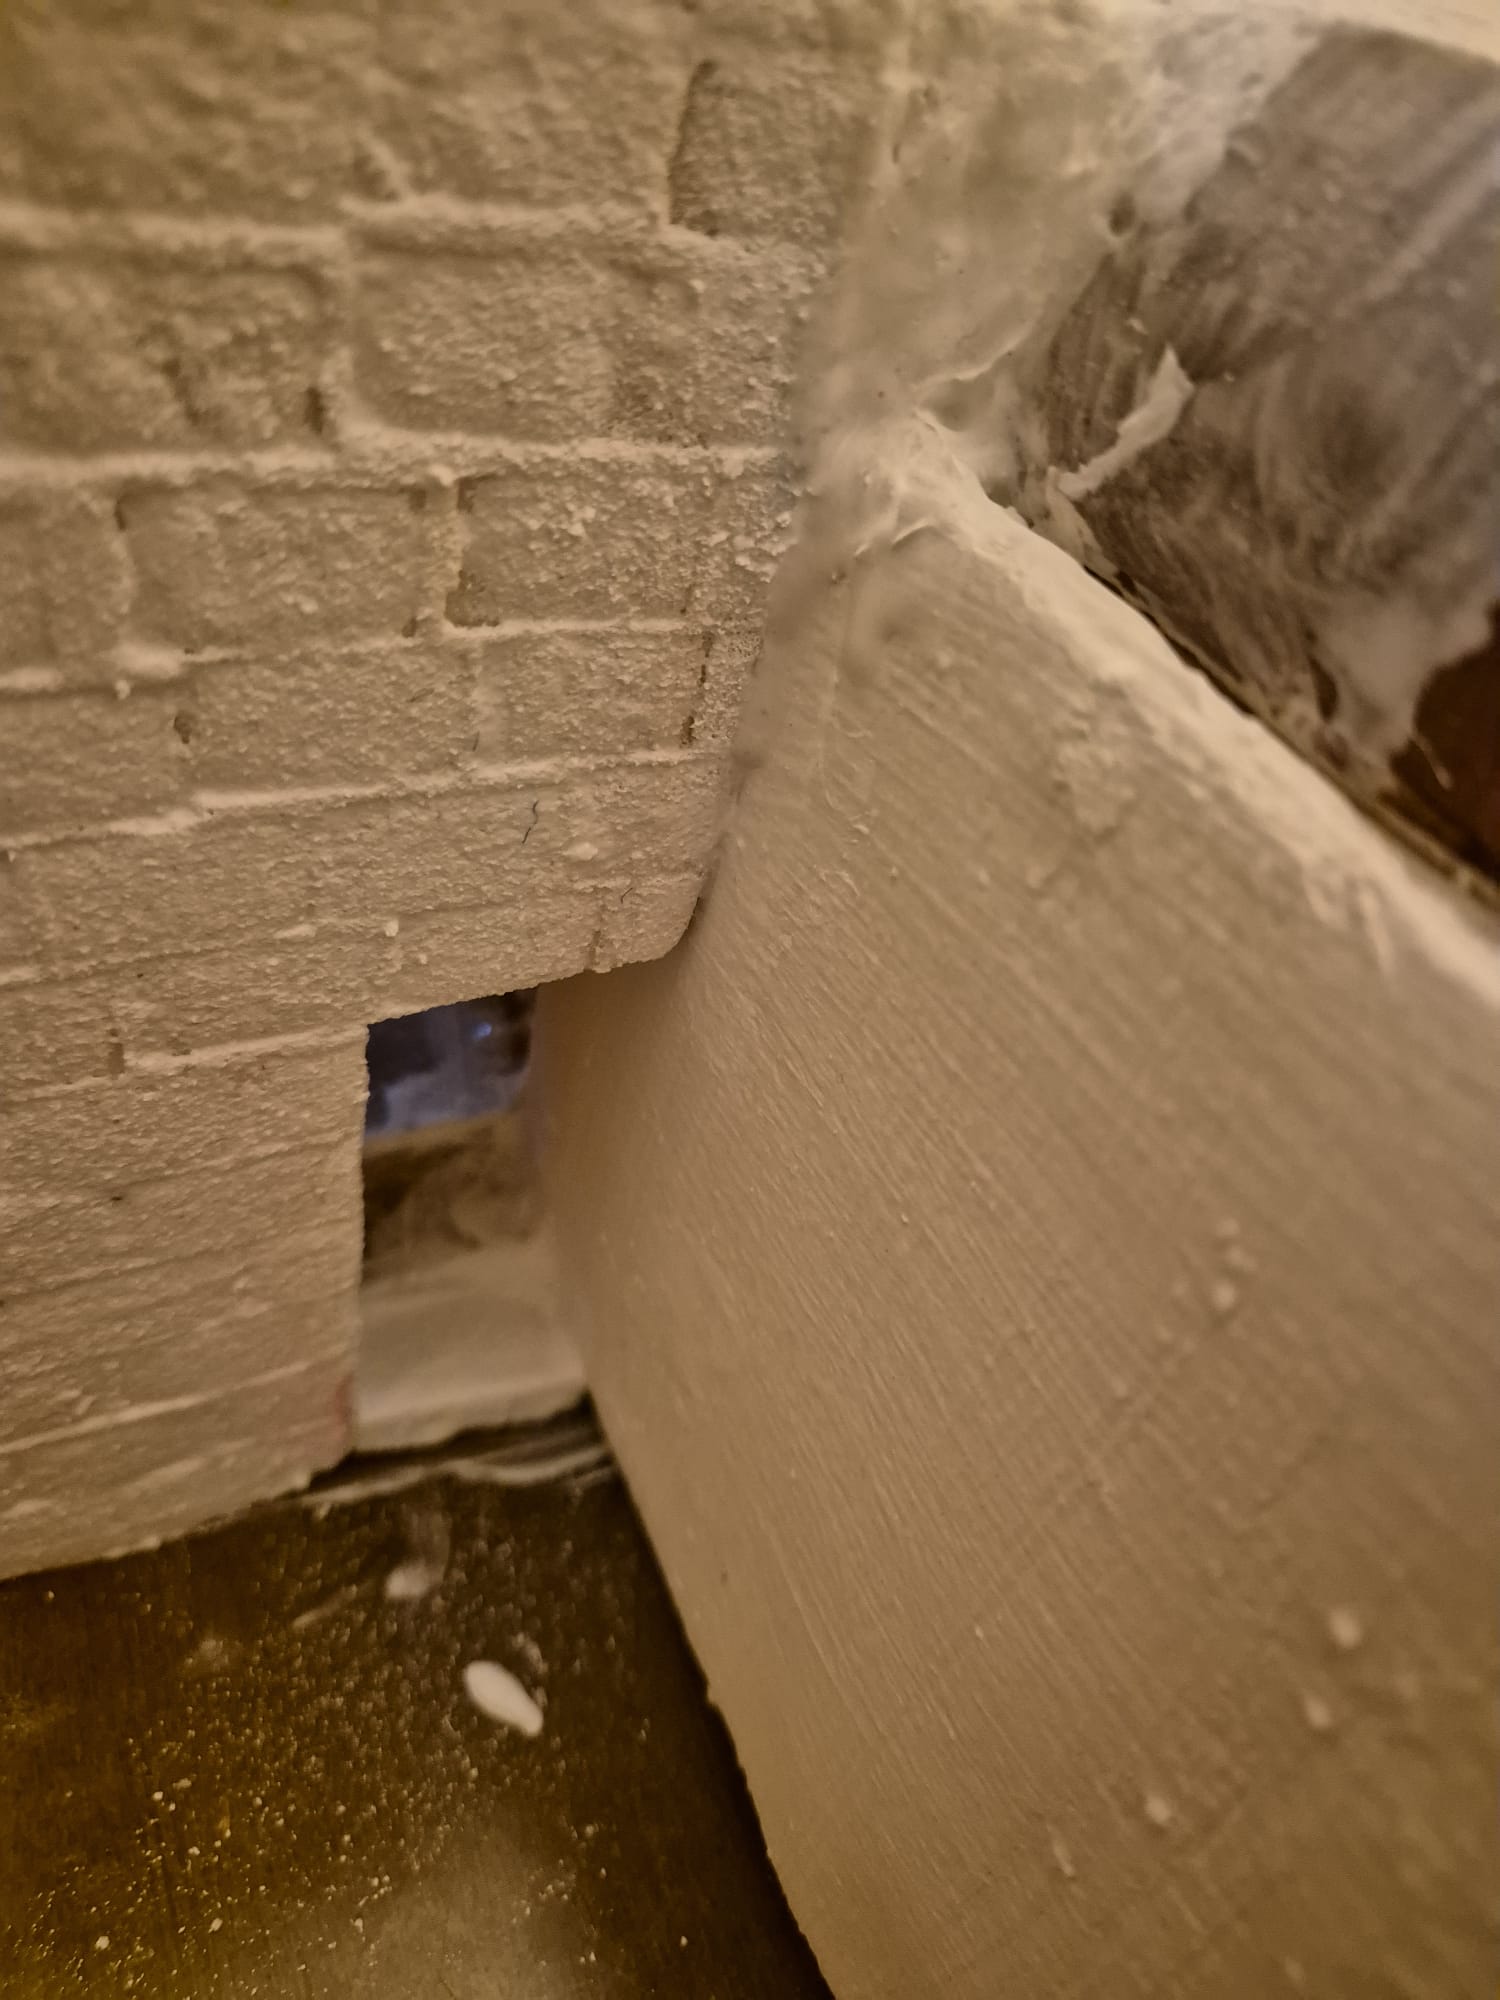
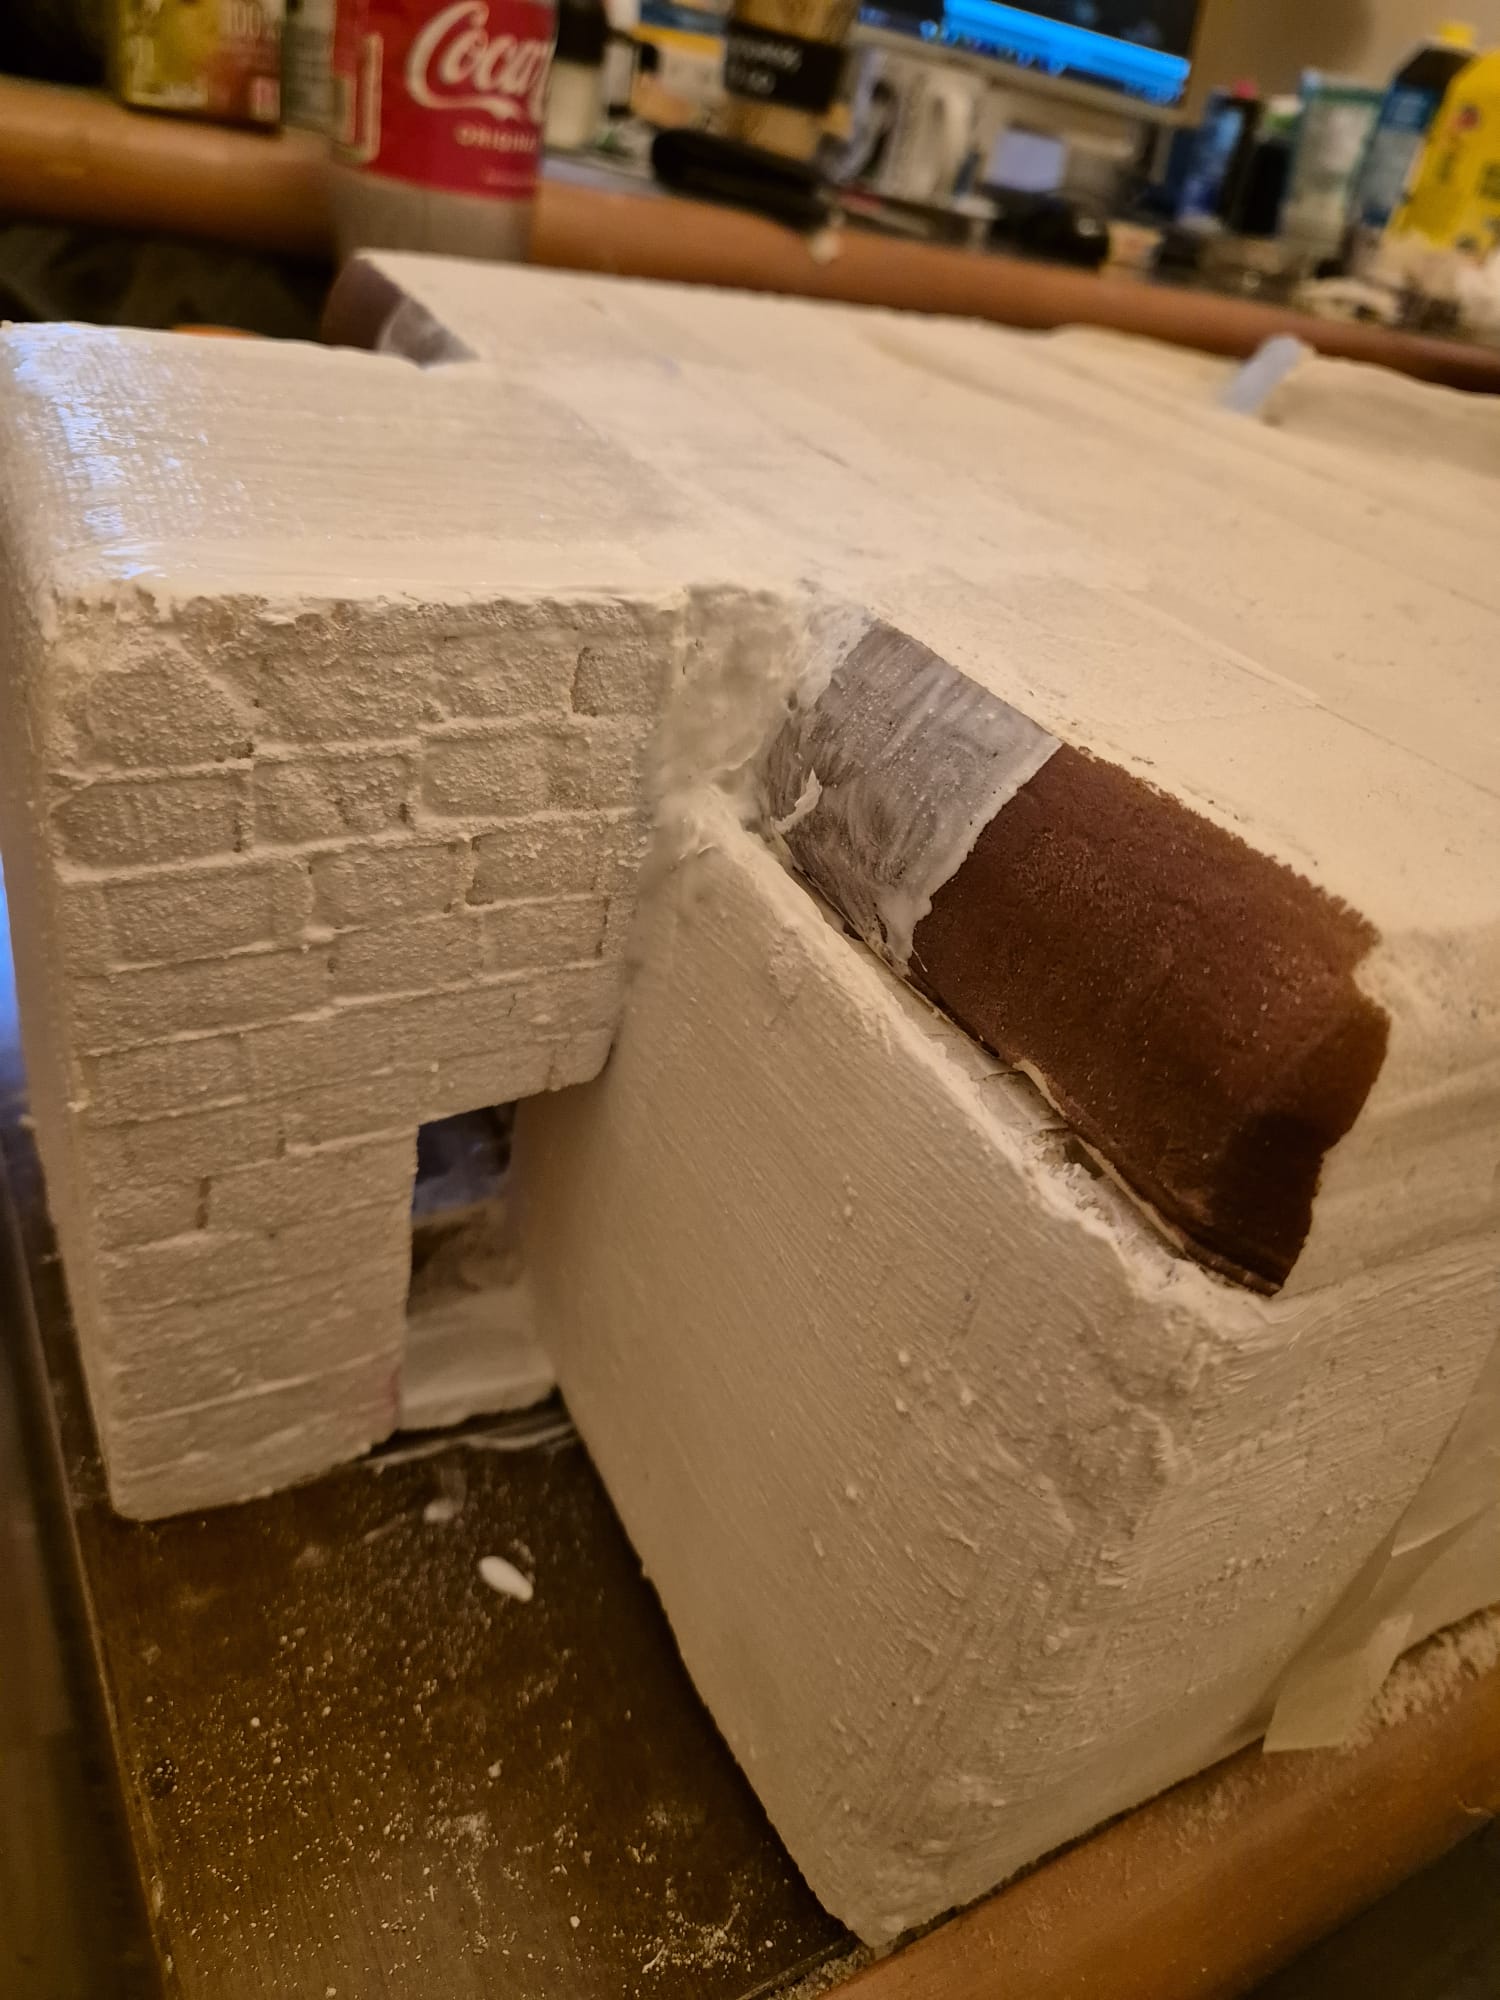
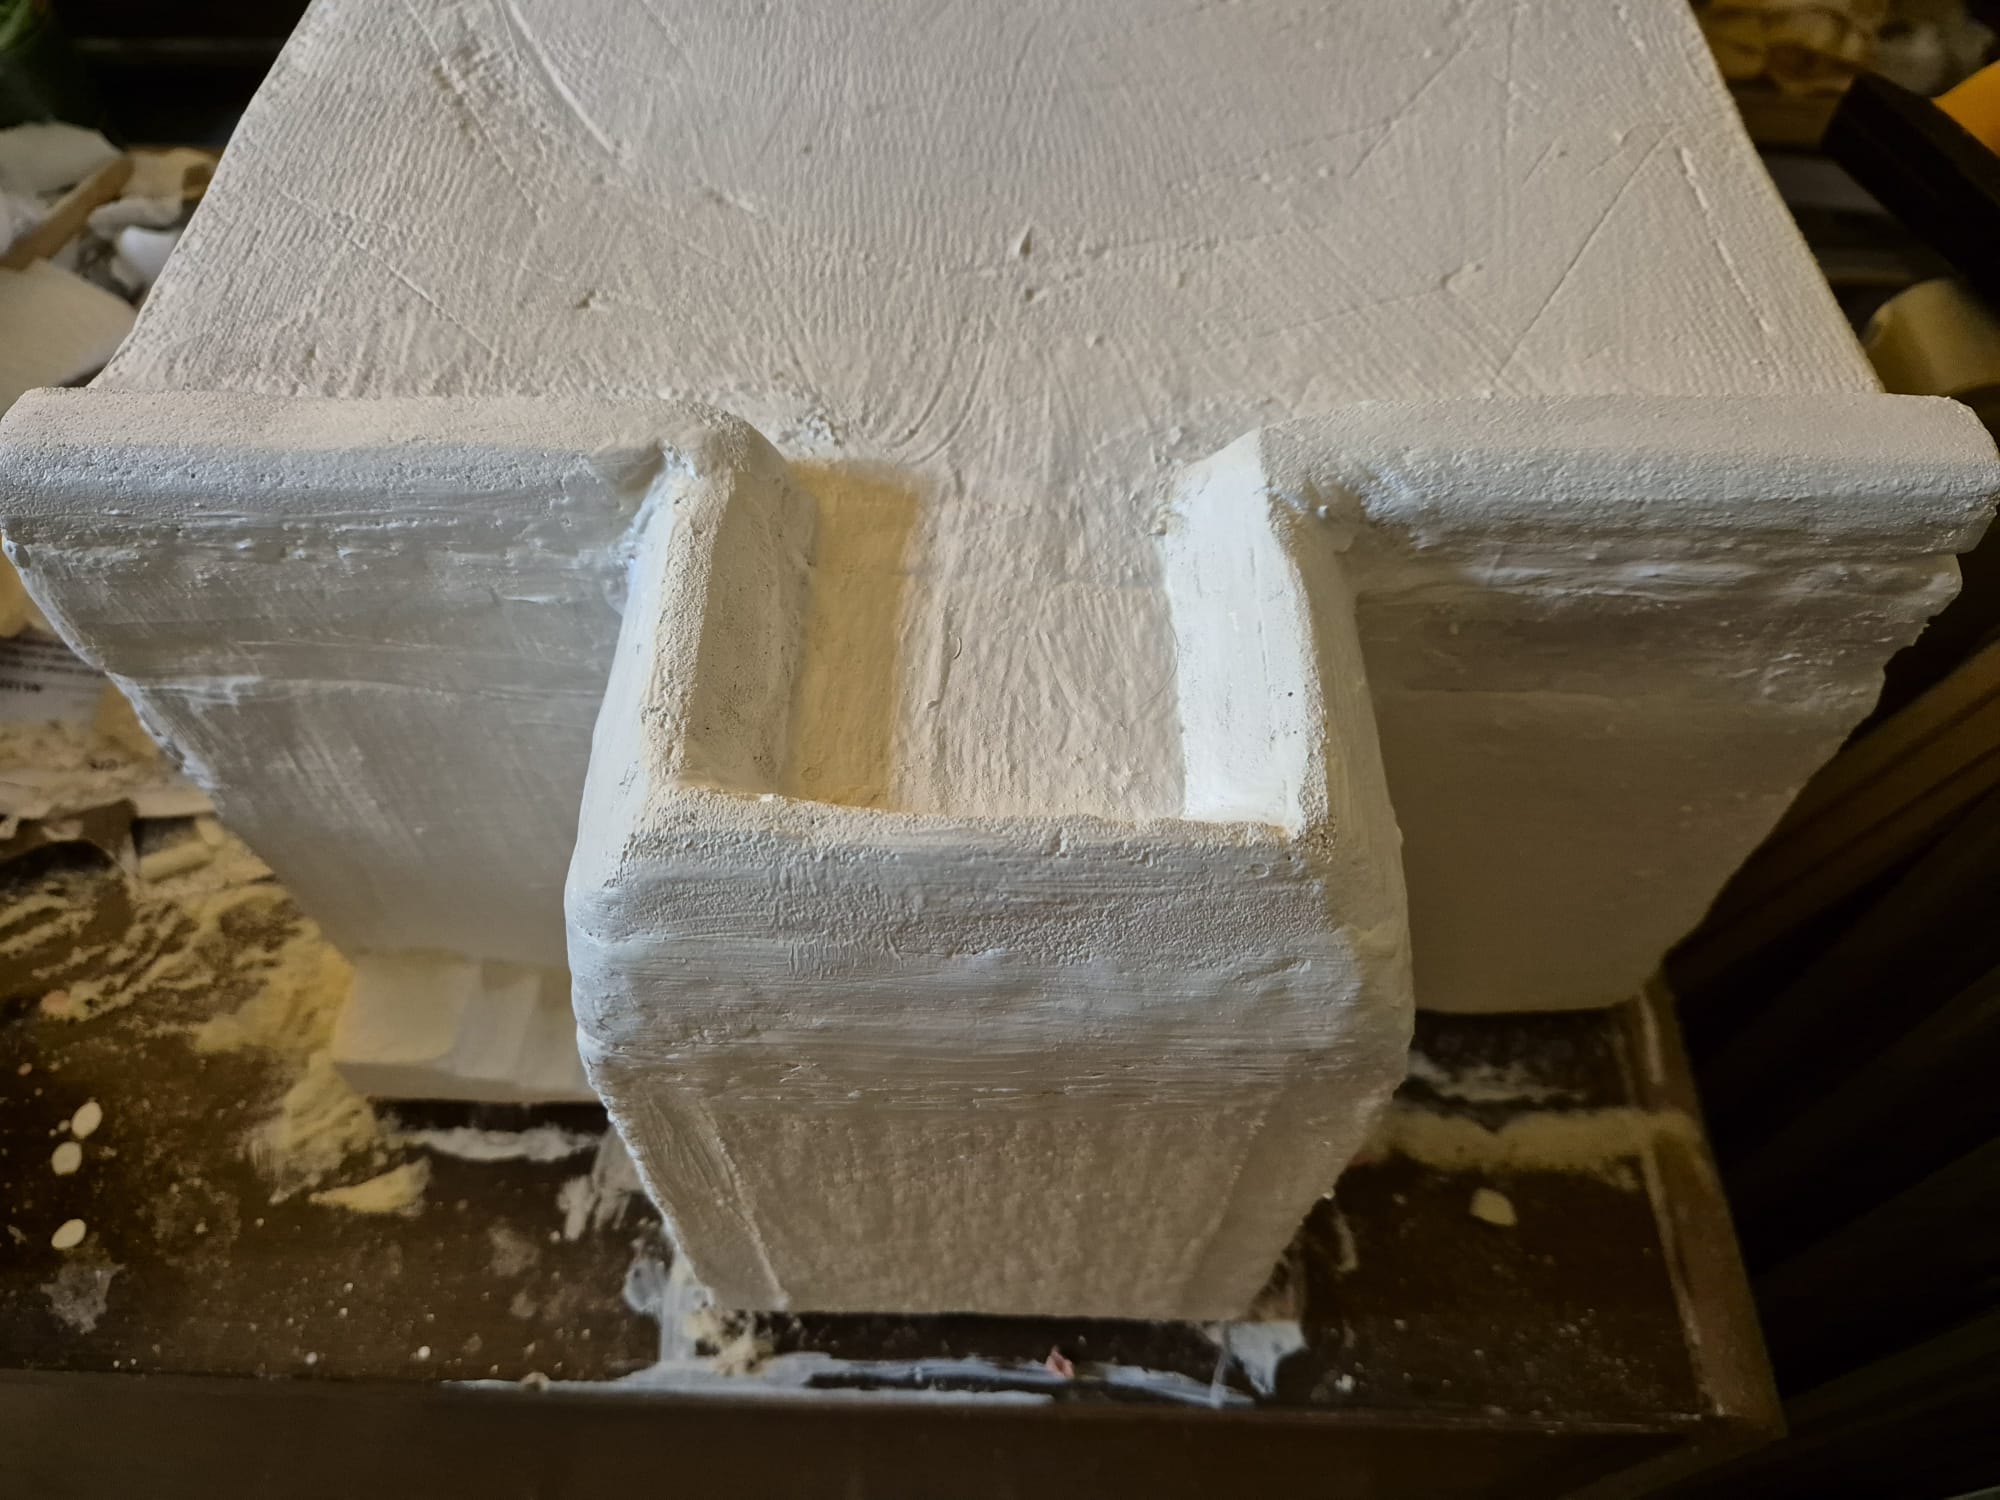
To make it solid and more sturdy I filled all the interiors with plaster and did the same to the outer walls except for the rooftop that had to be completely redesigned.
I also had to reinforce the walls with plaster cloth and that then covered with a resin modeling paste mixed with plaster powder.

Here are just a few pictures of the beginning of my ordeal.


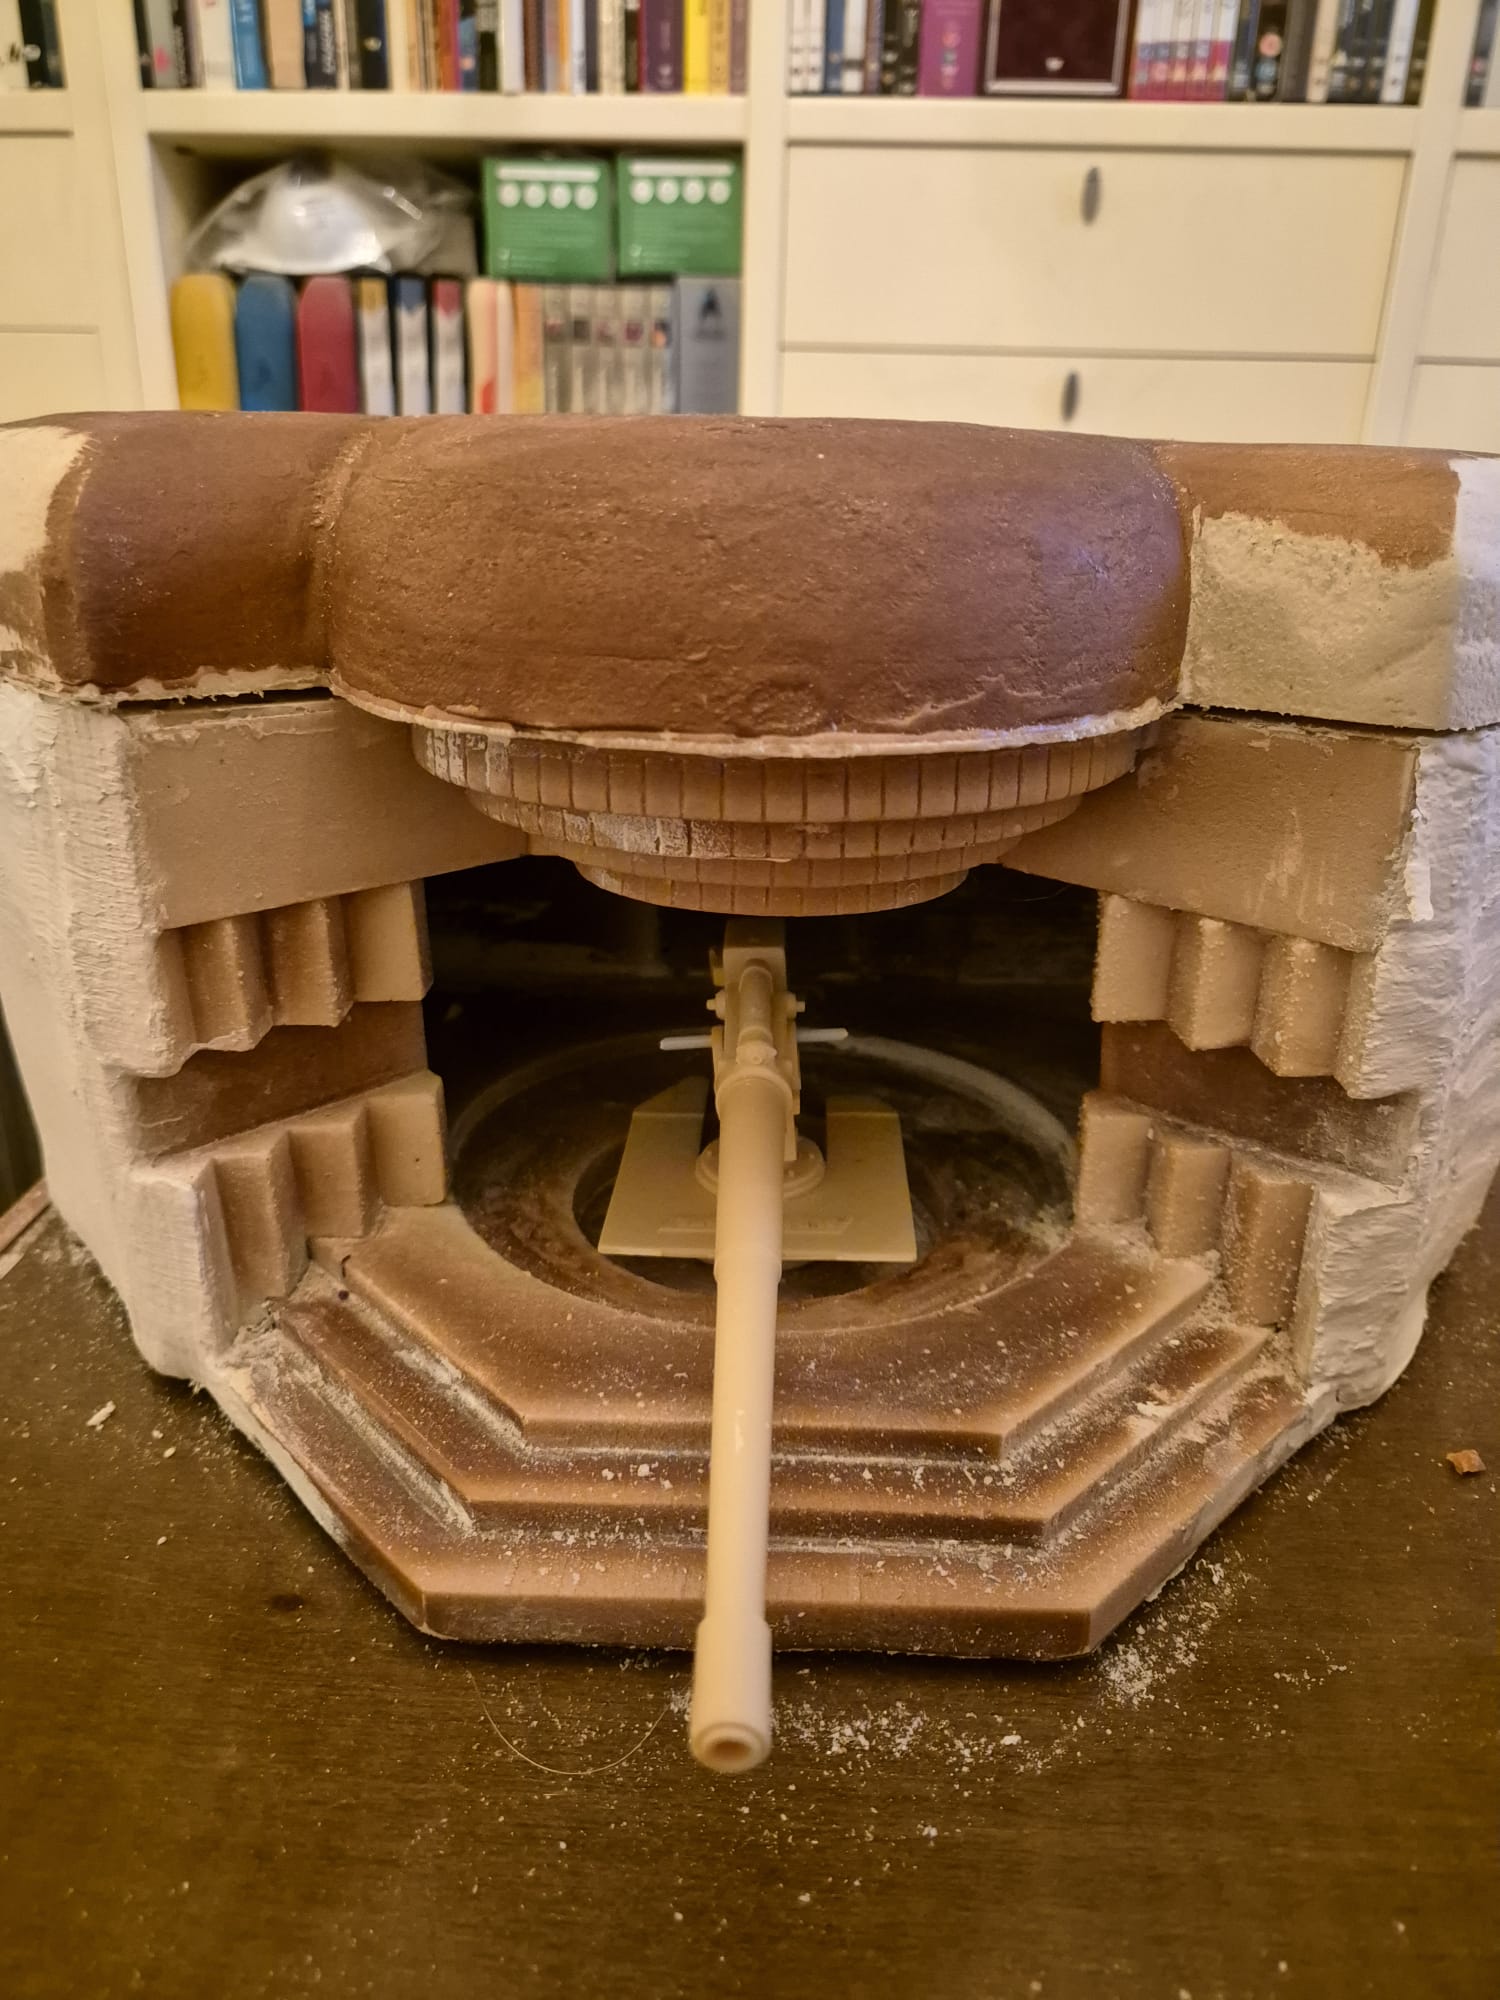
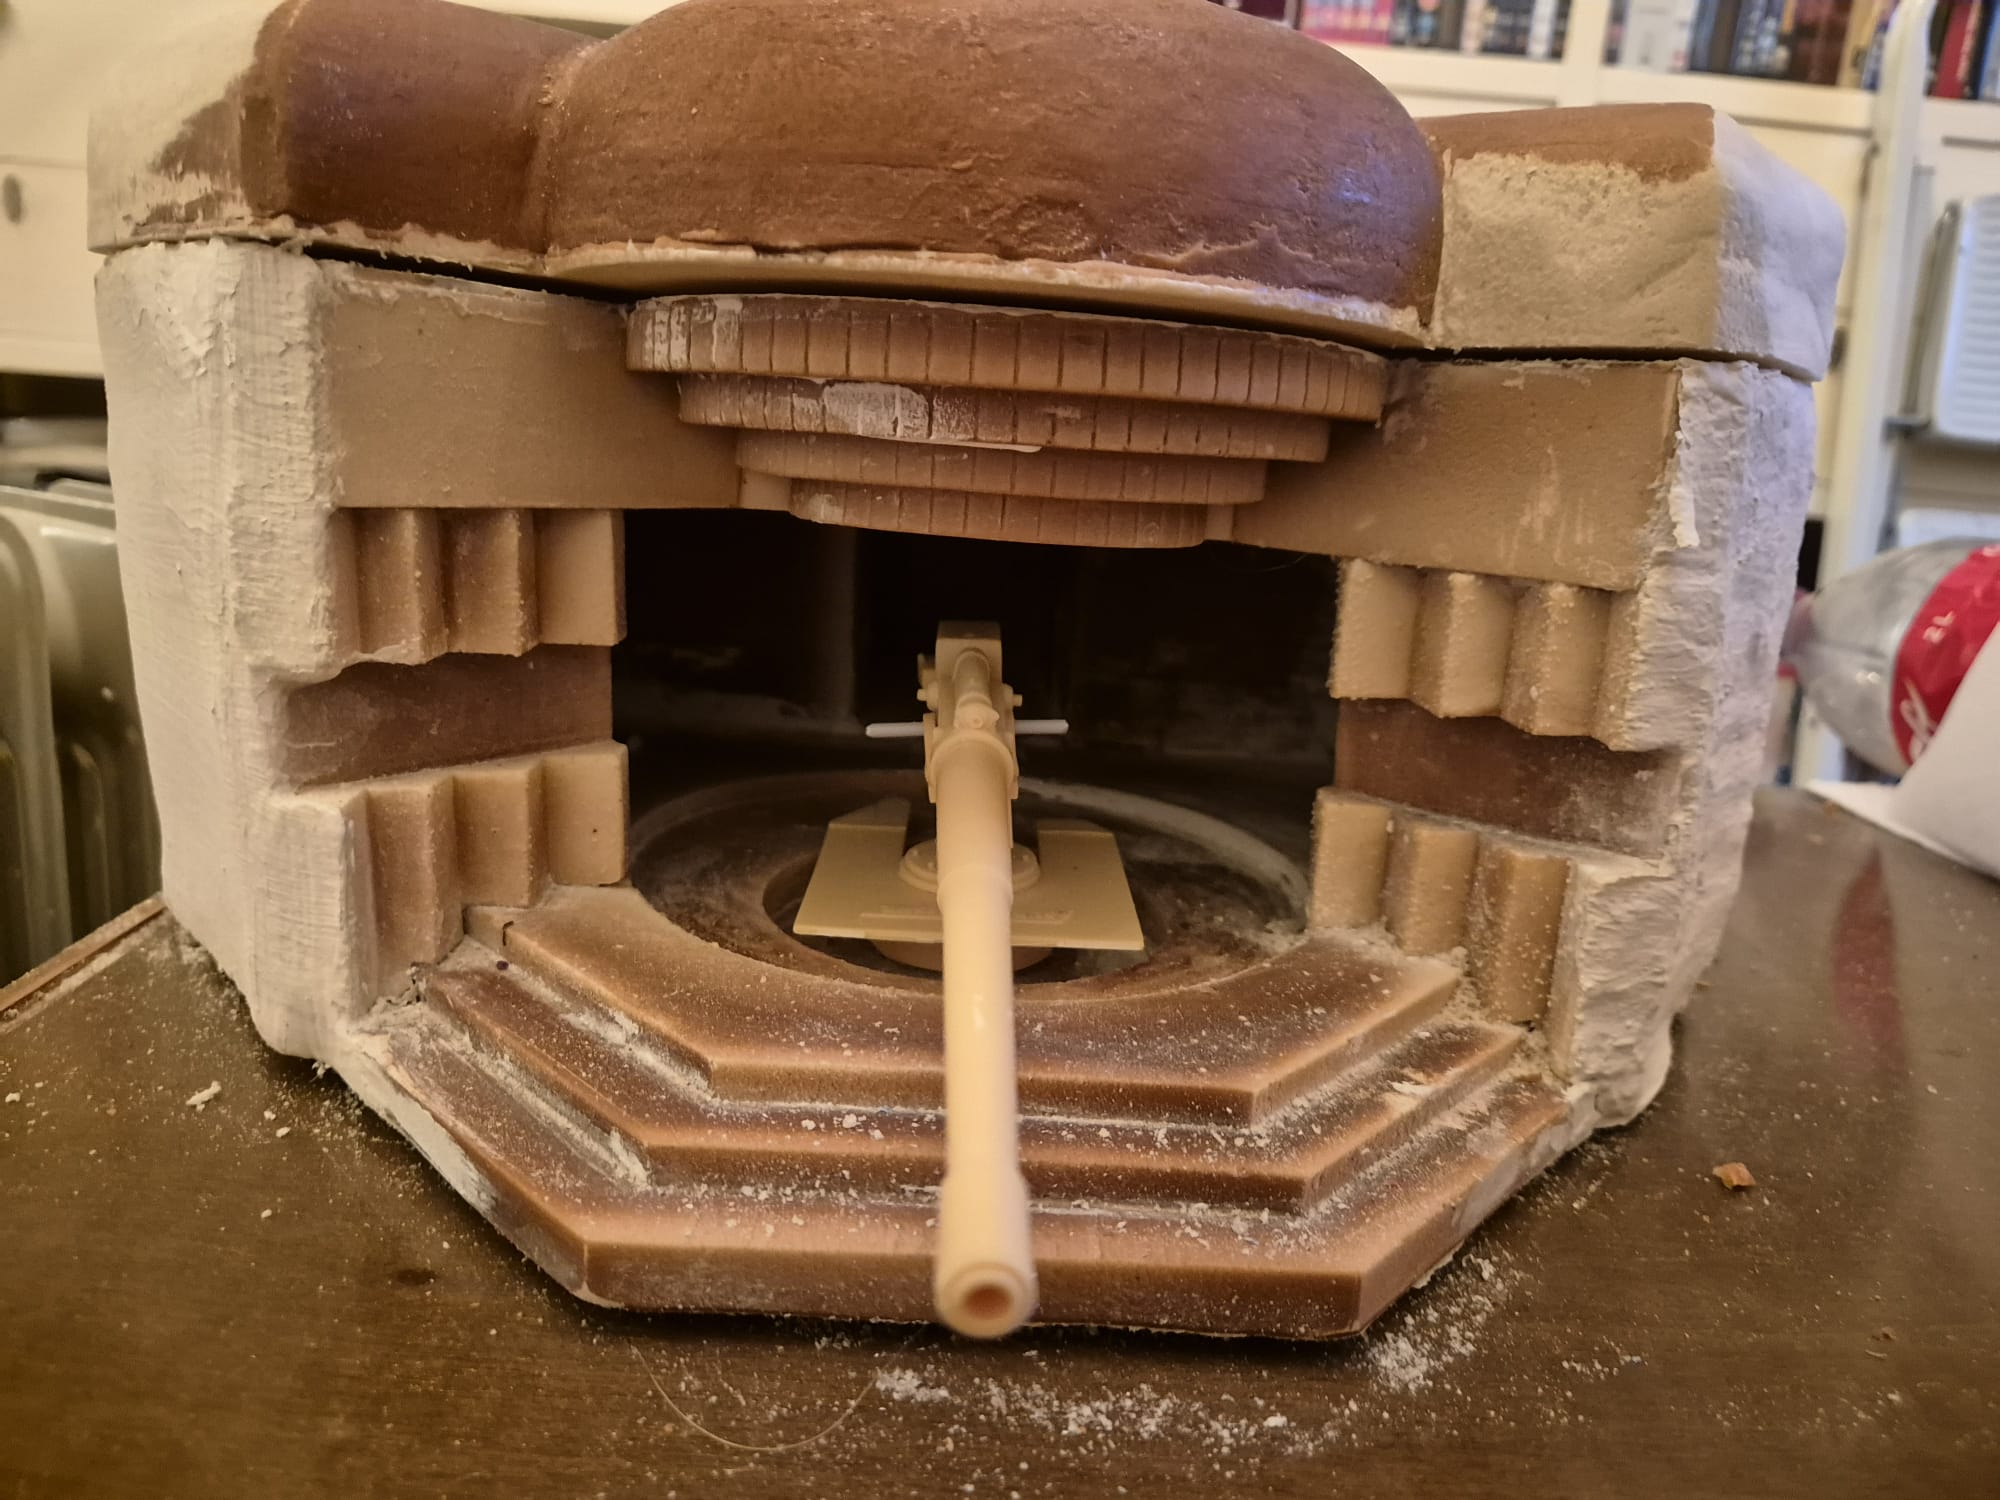
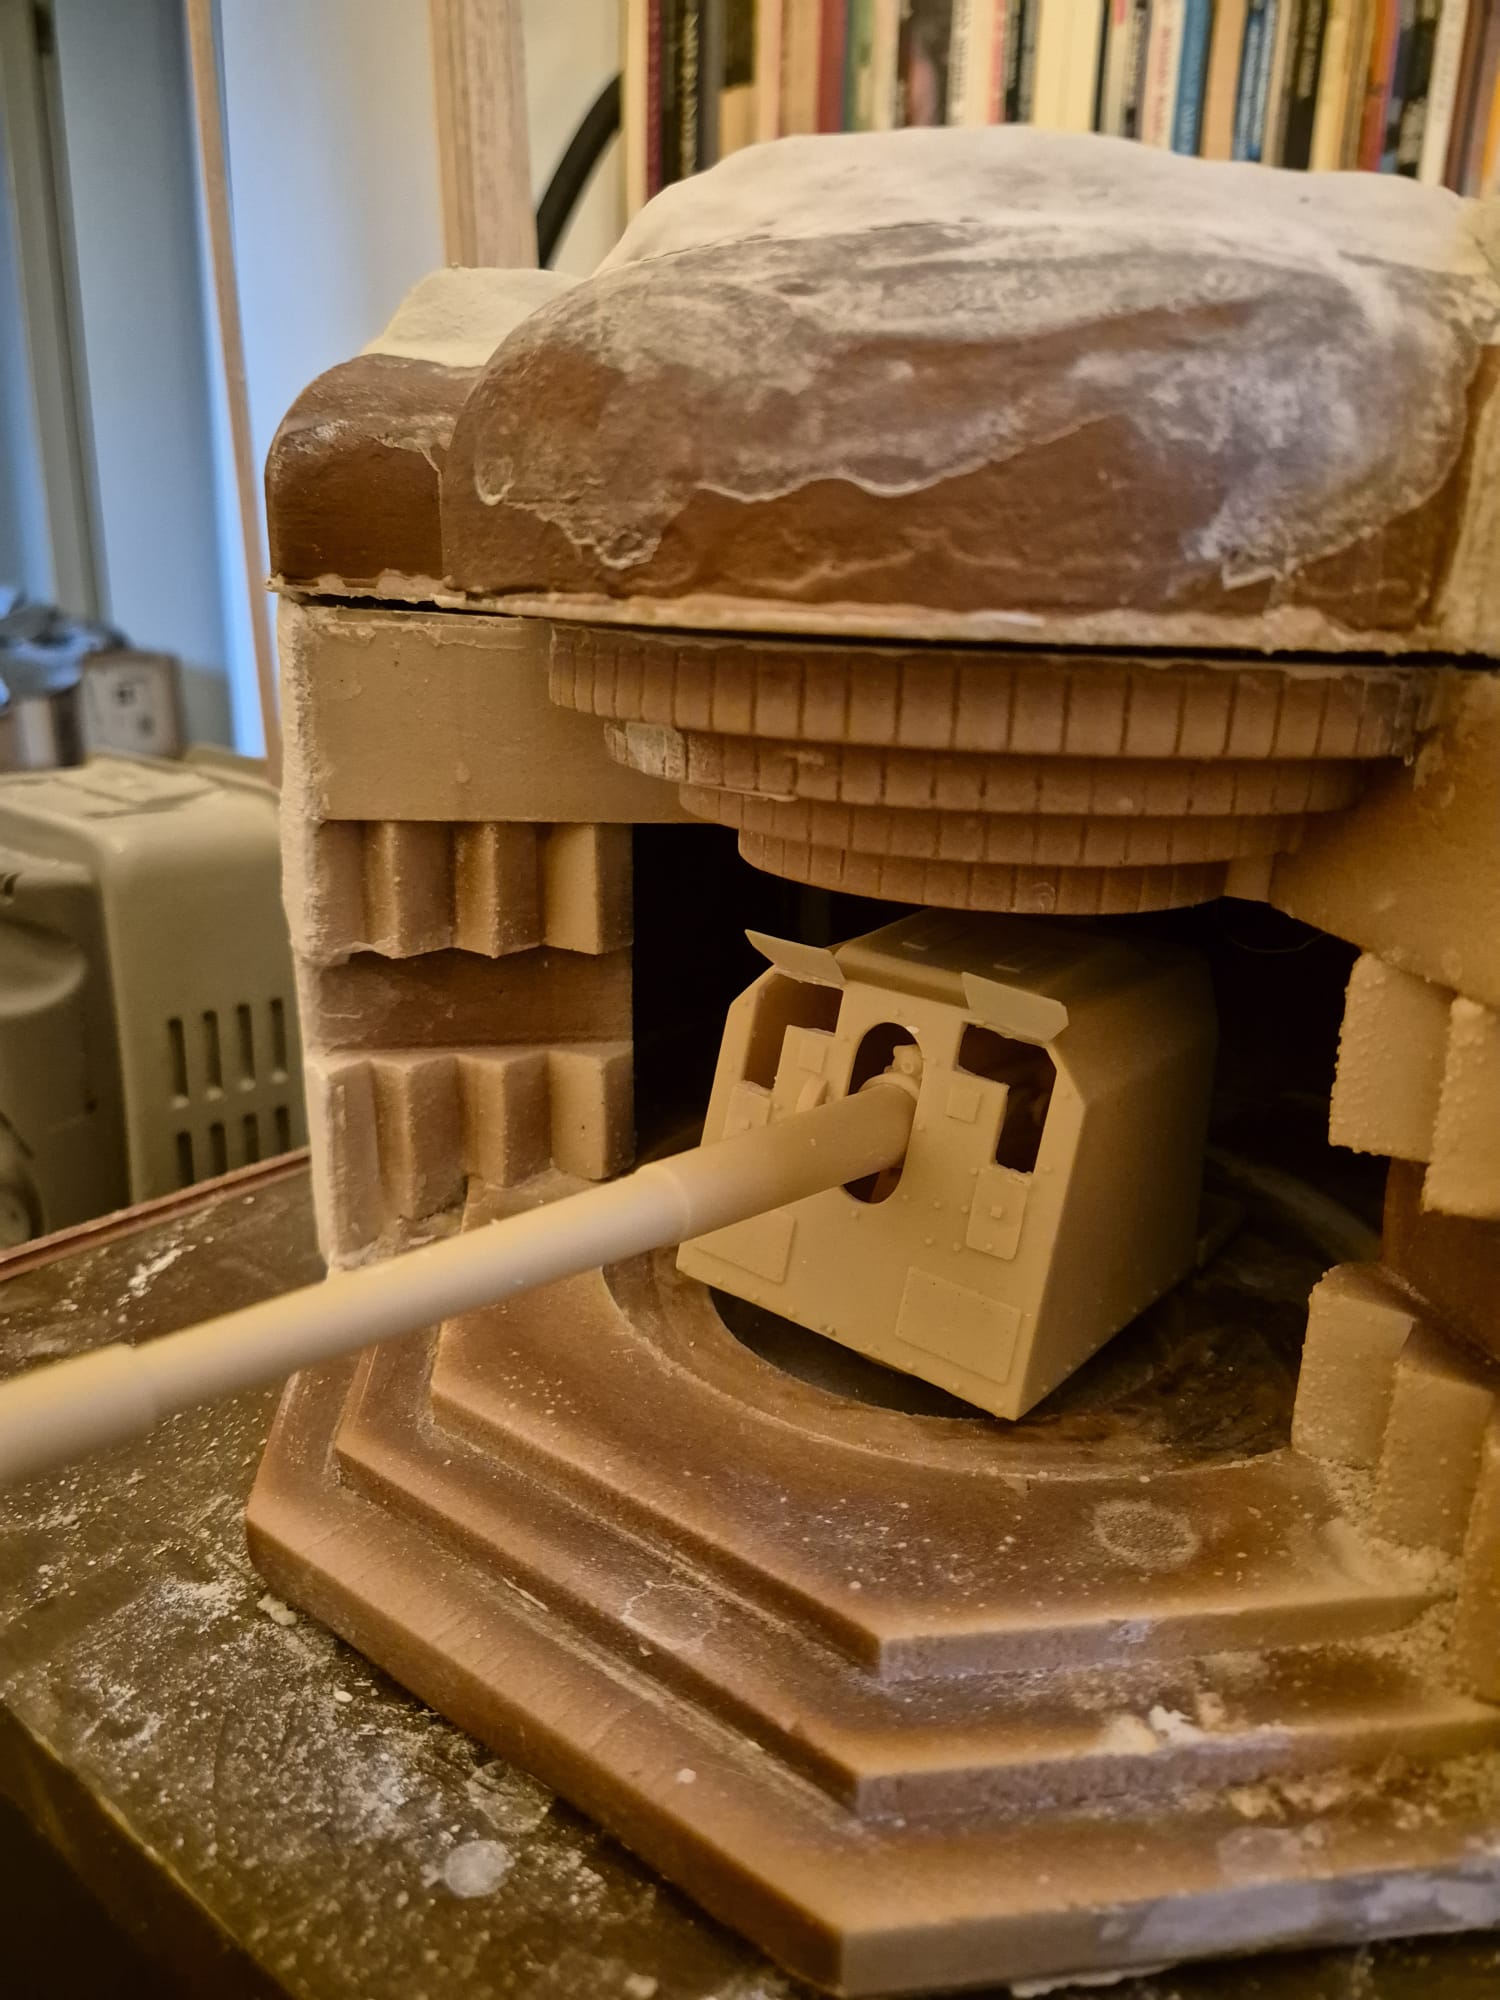
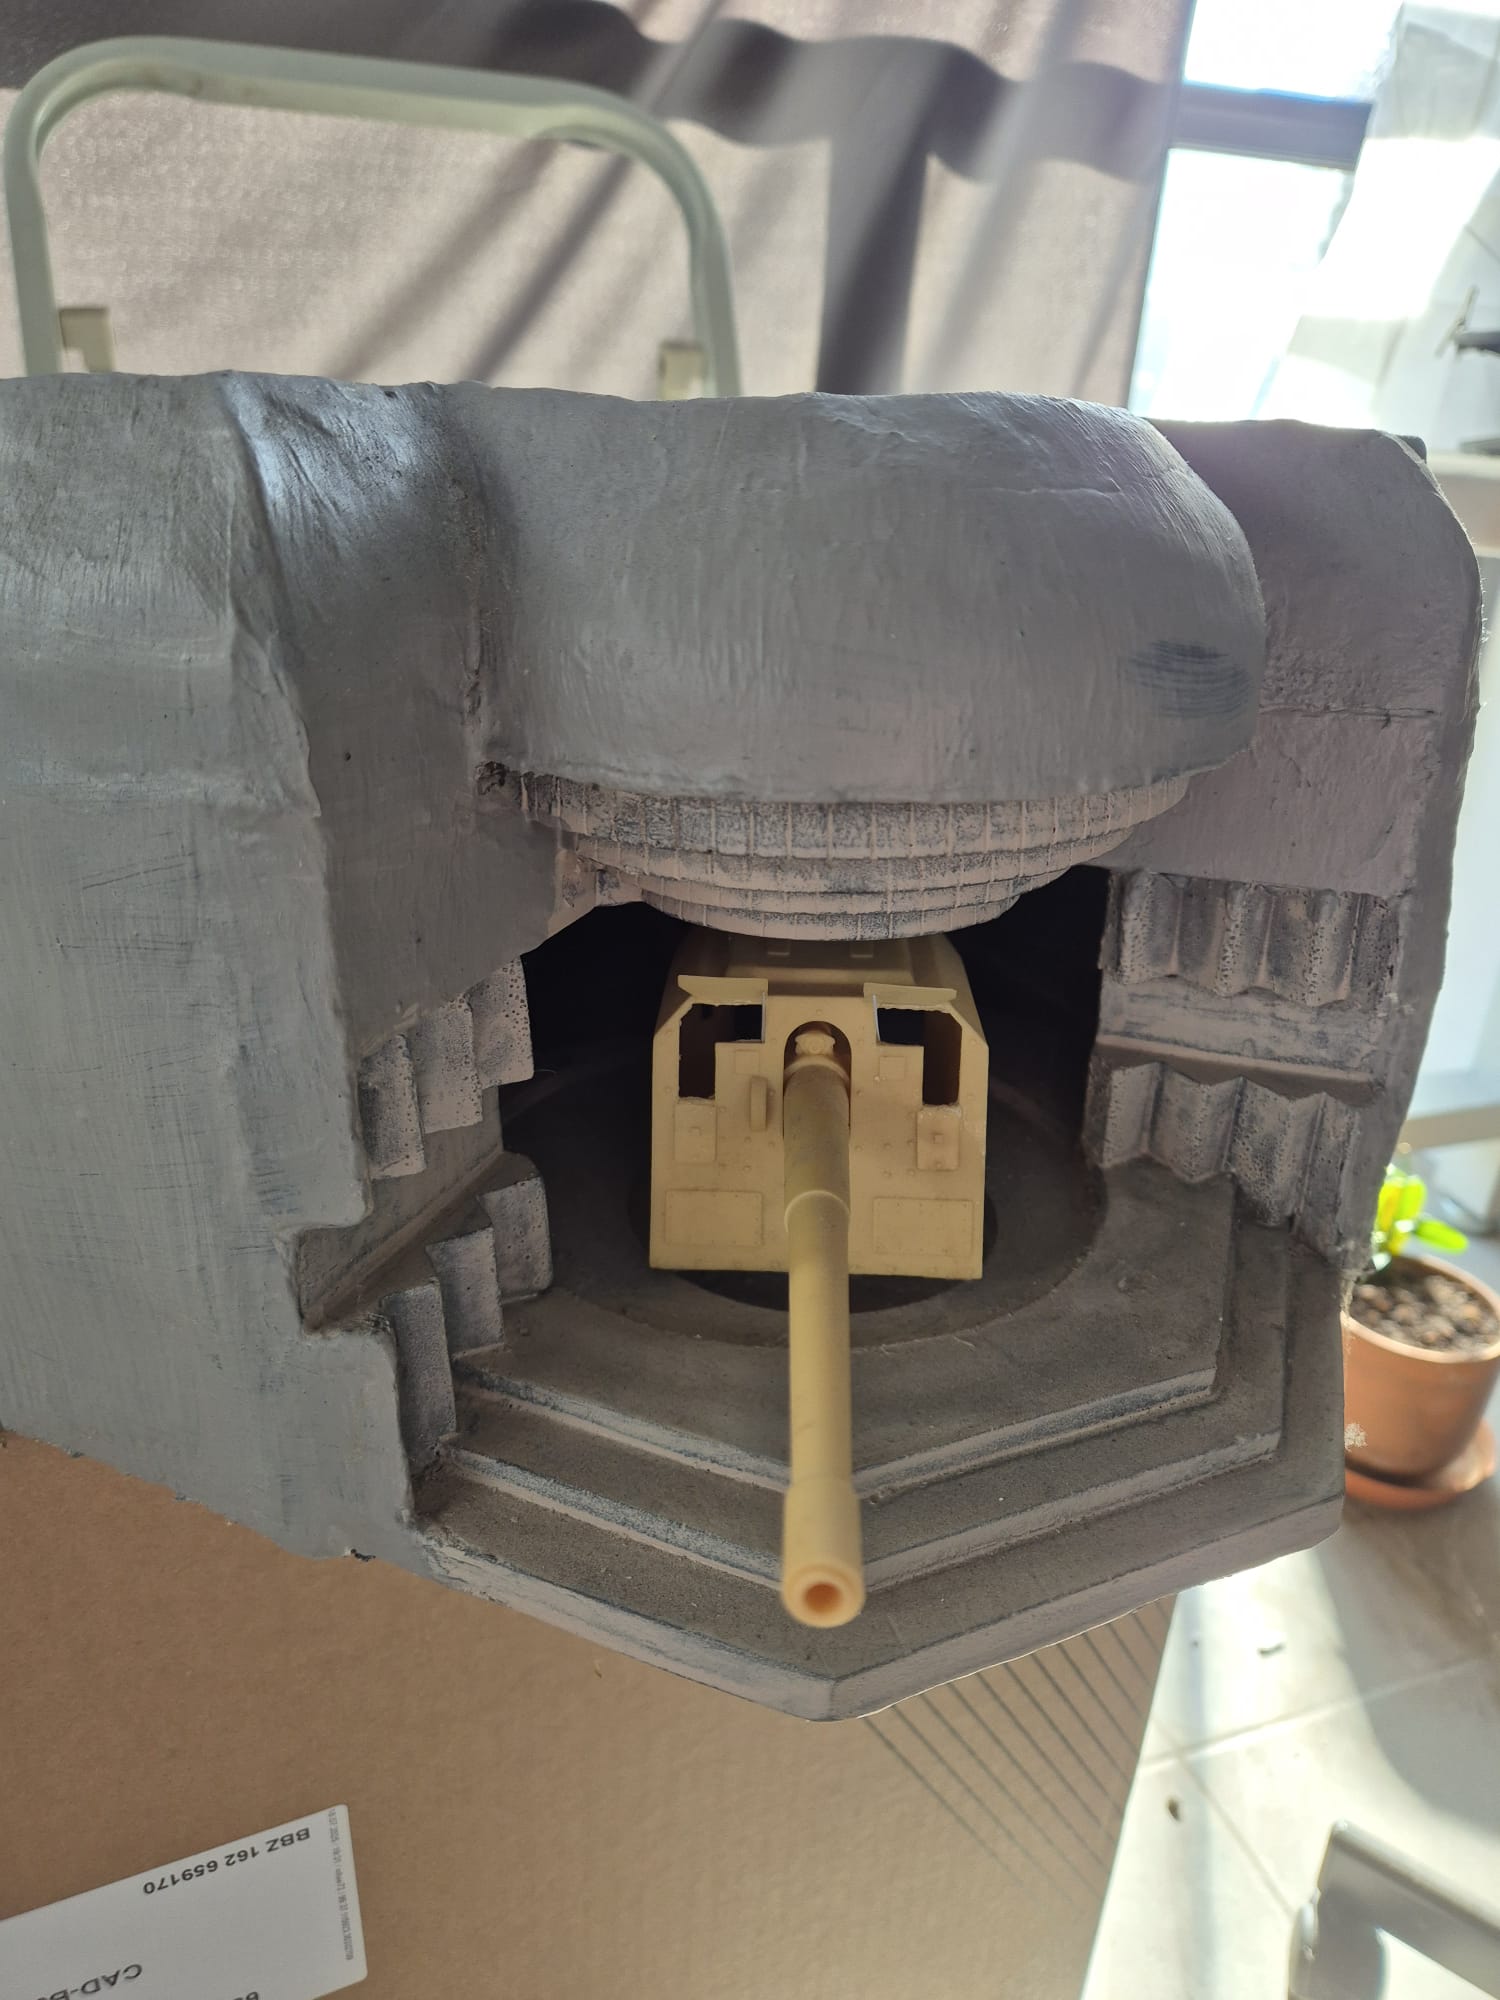
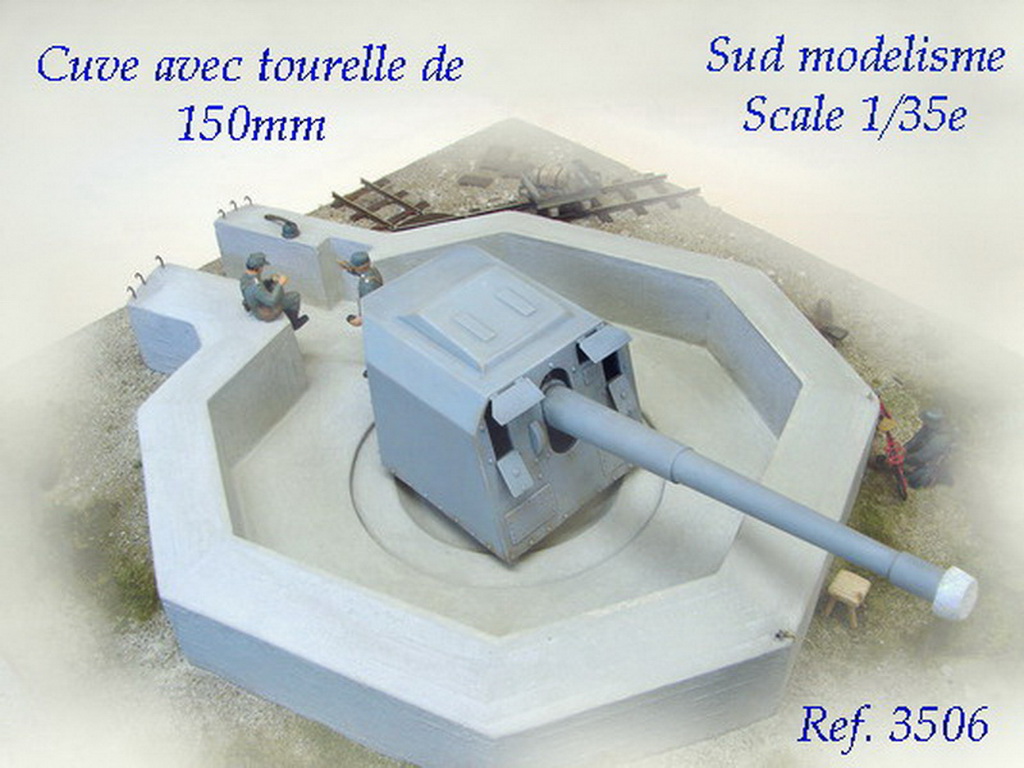
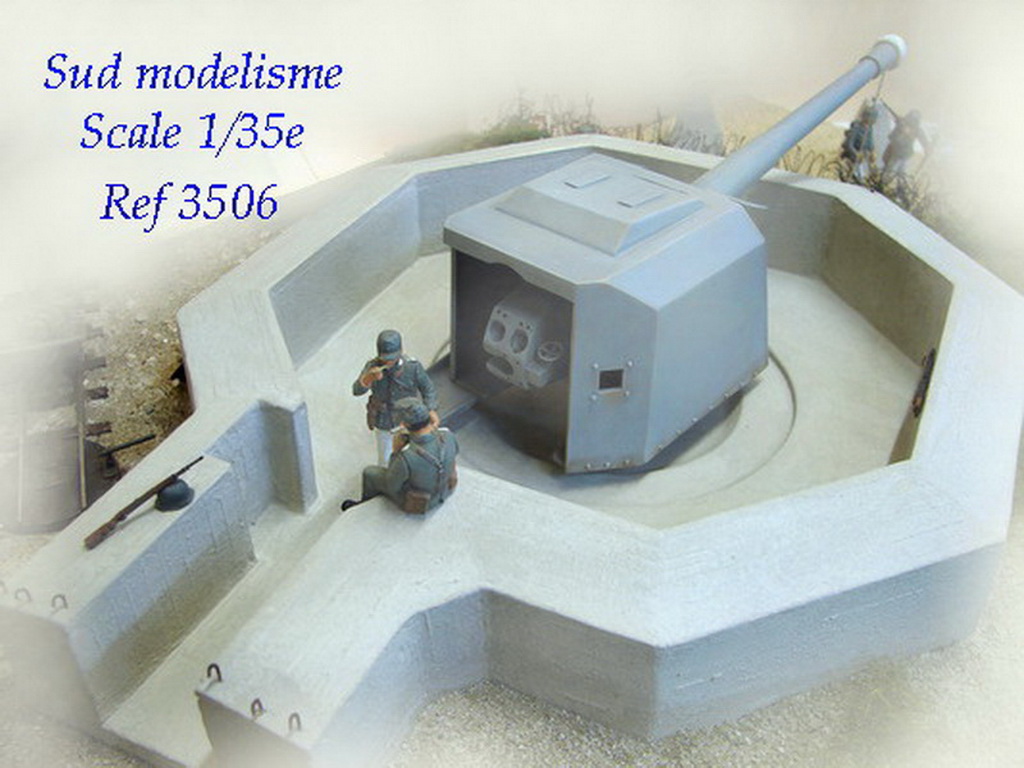
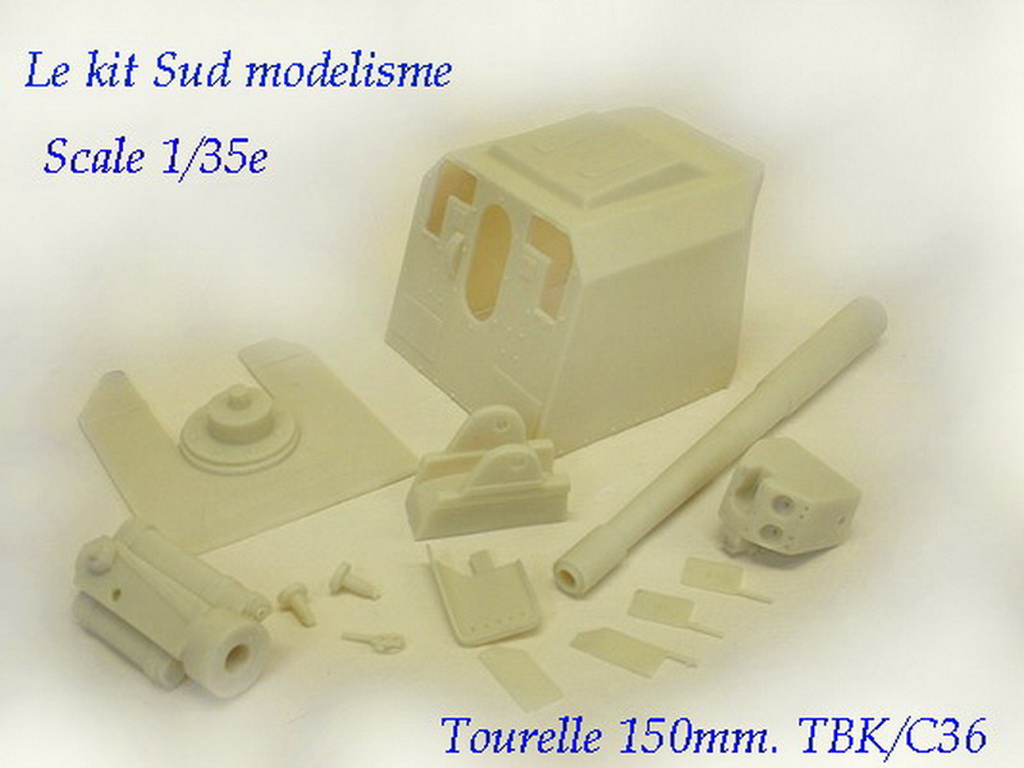
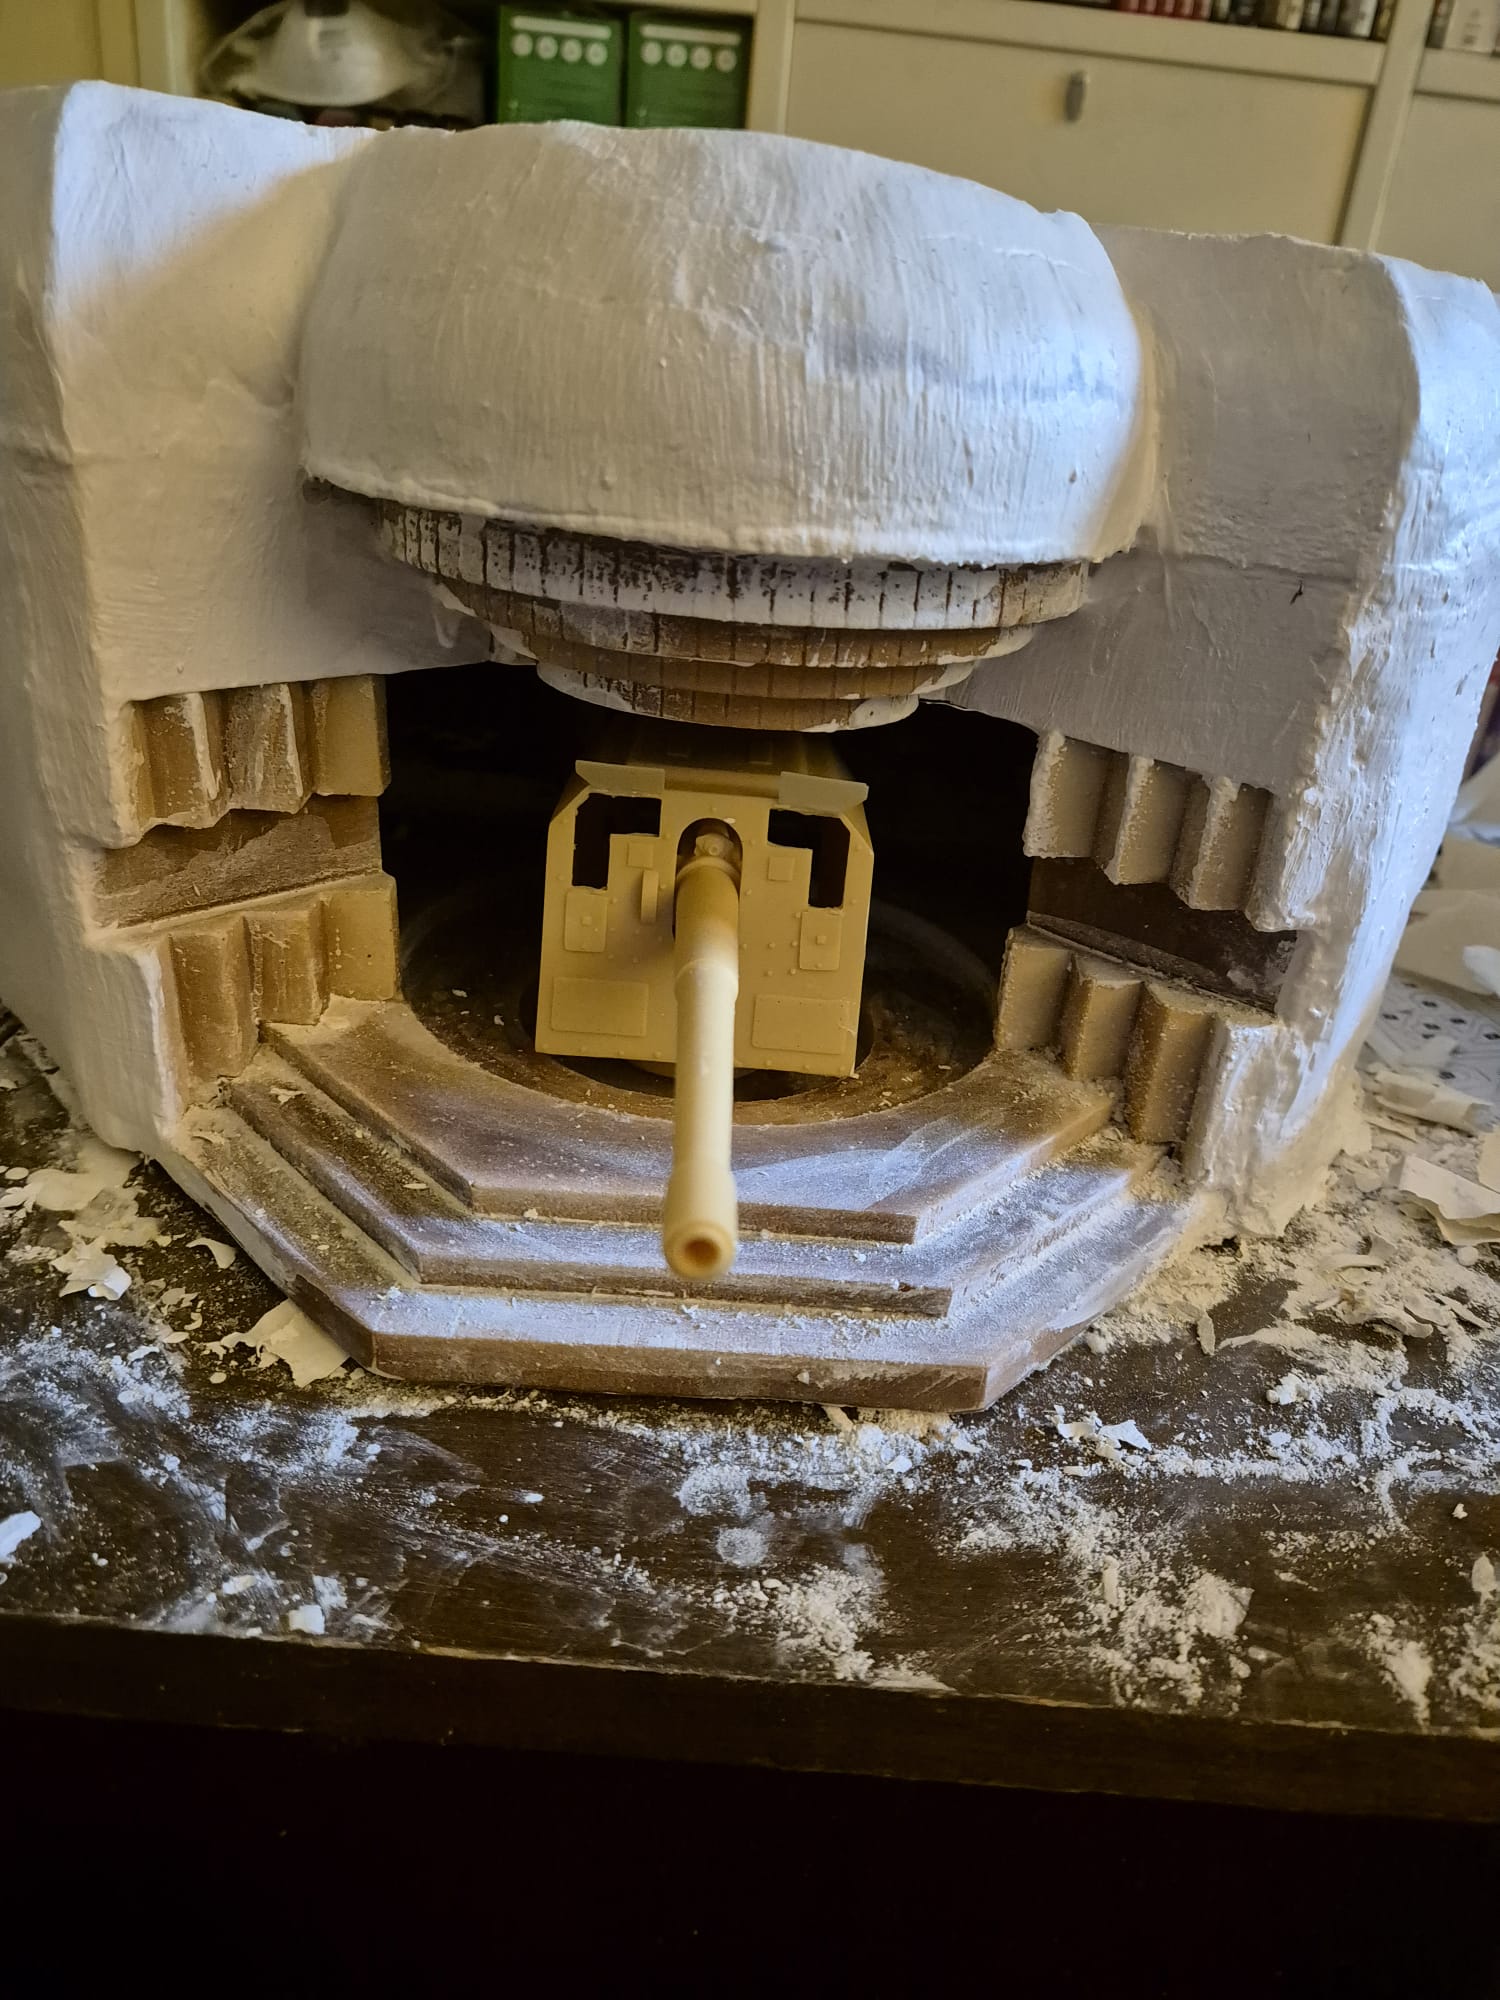
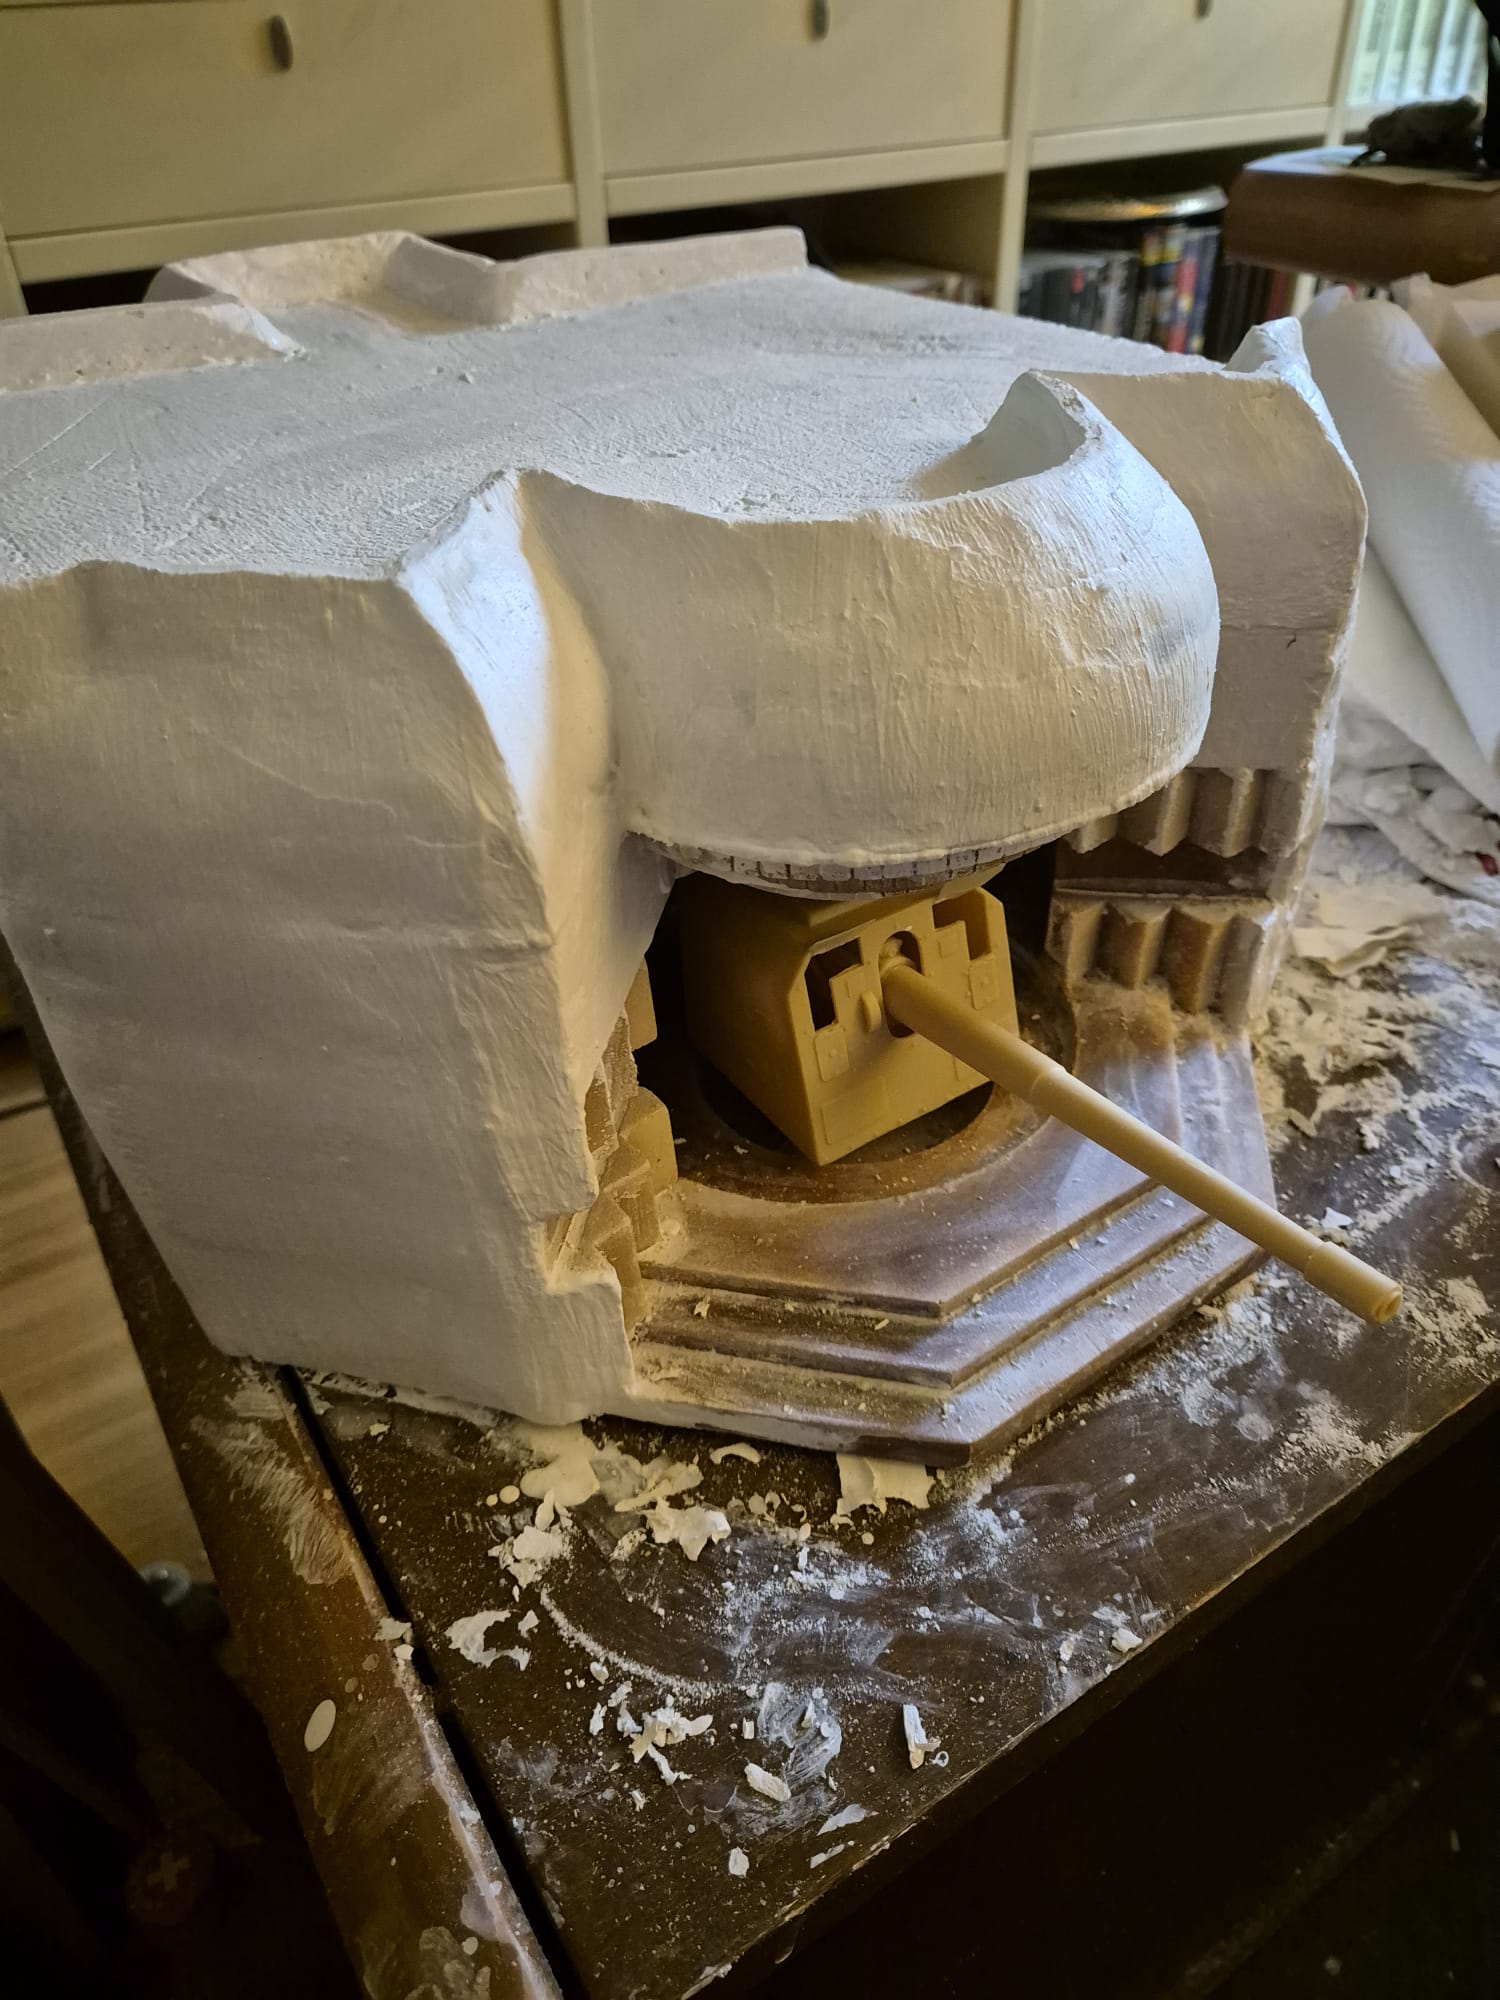
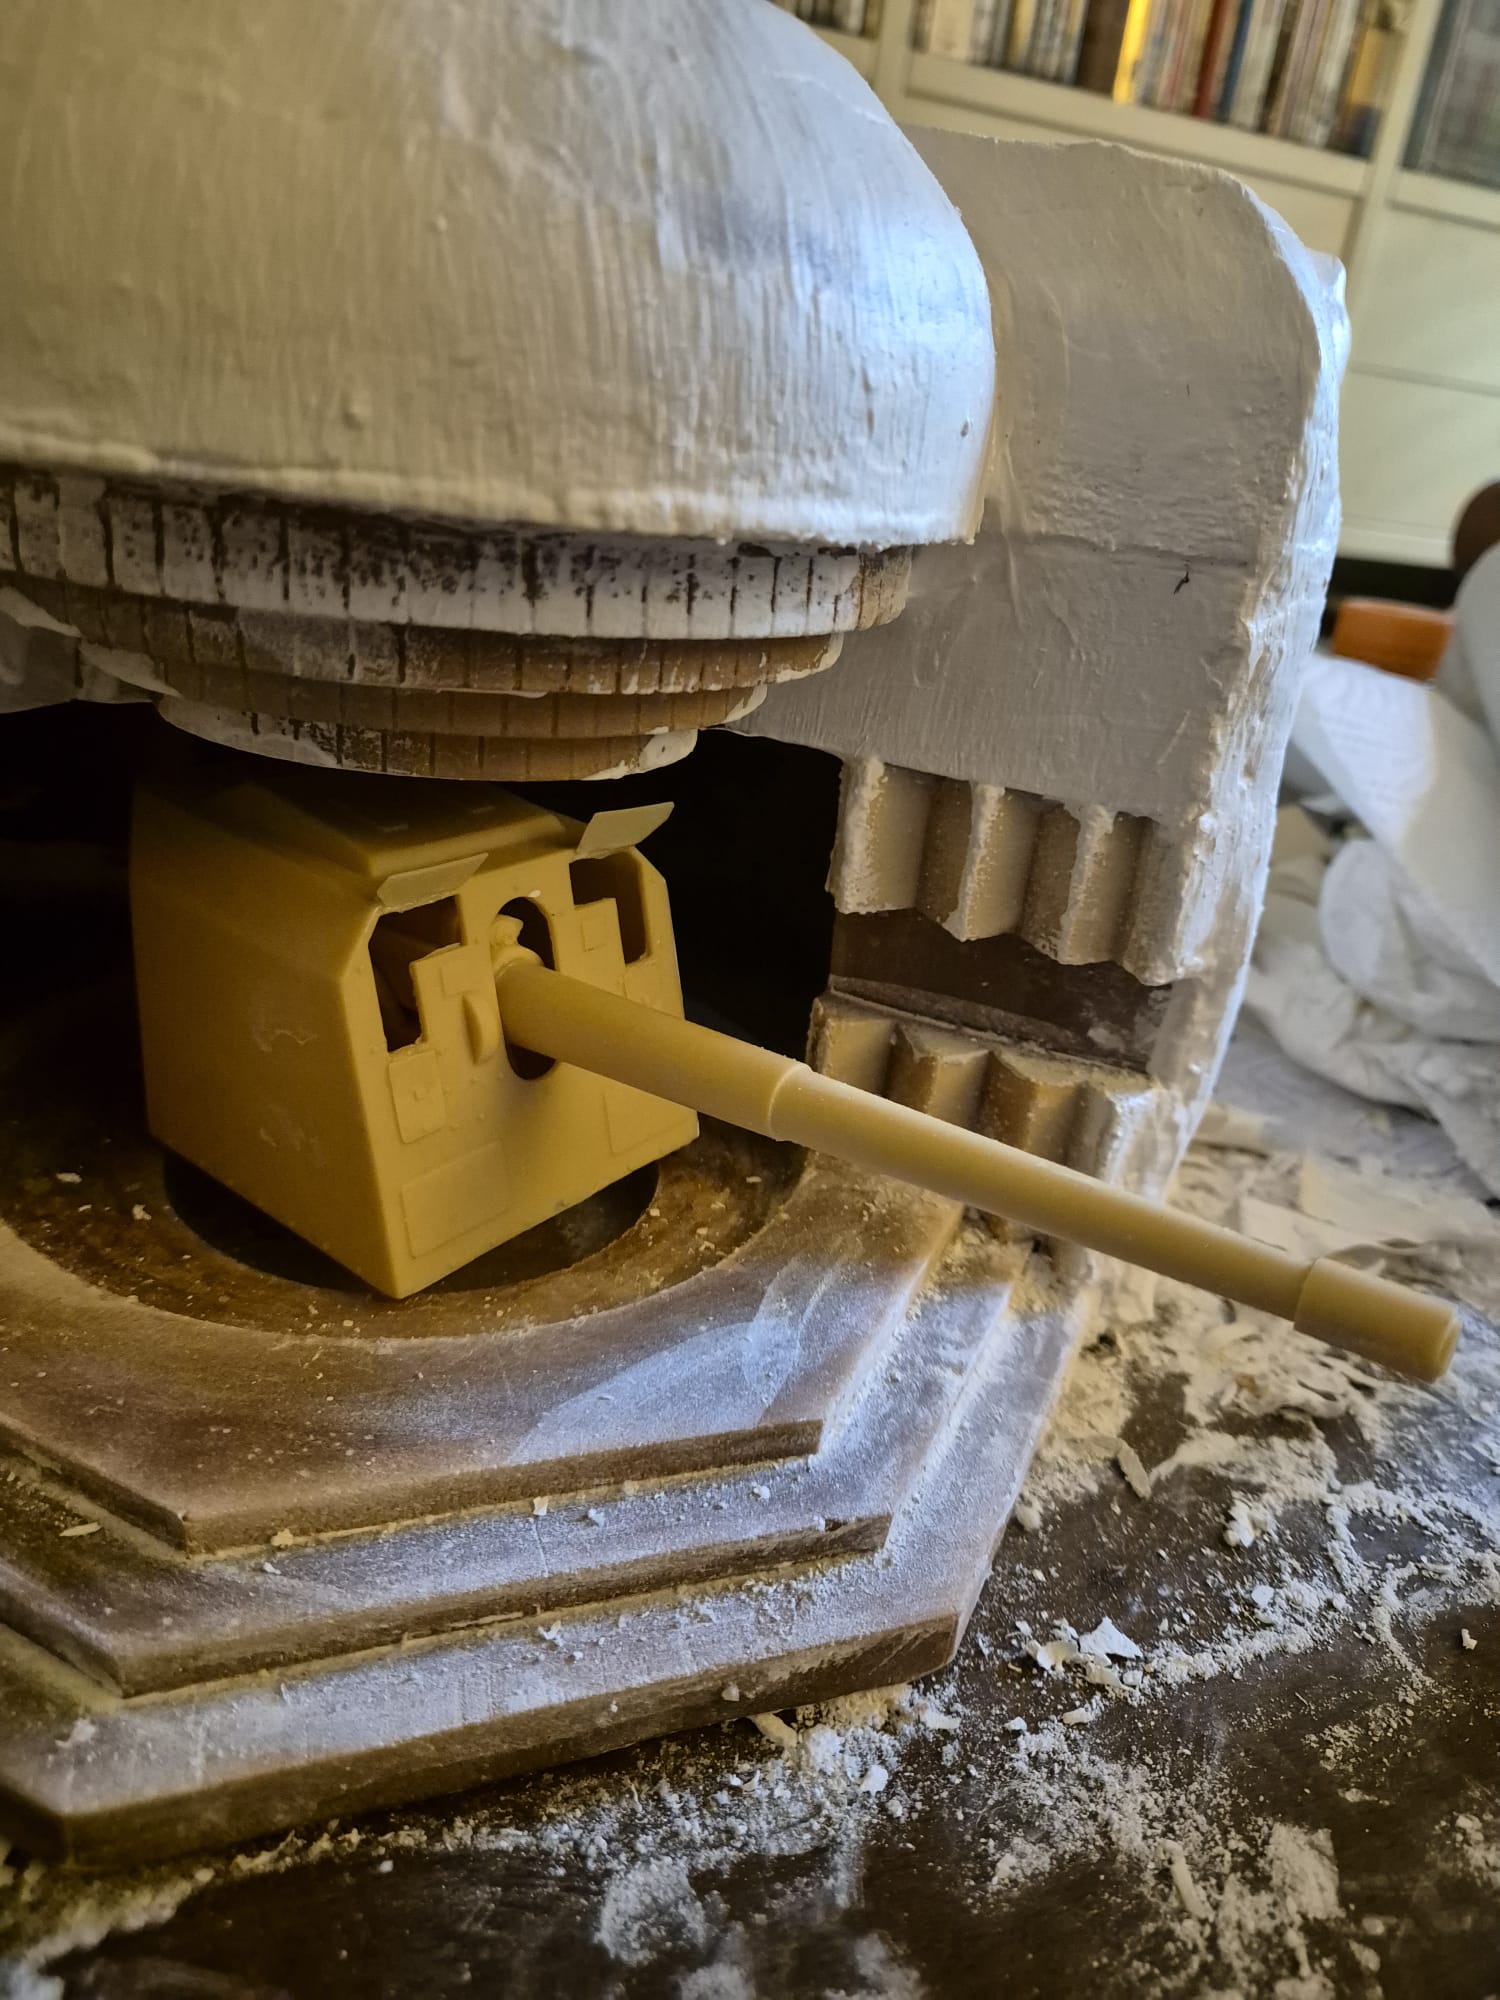
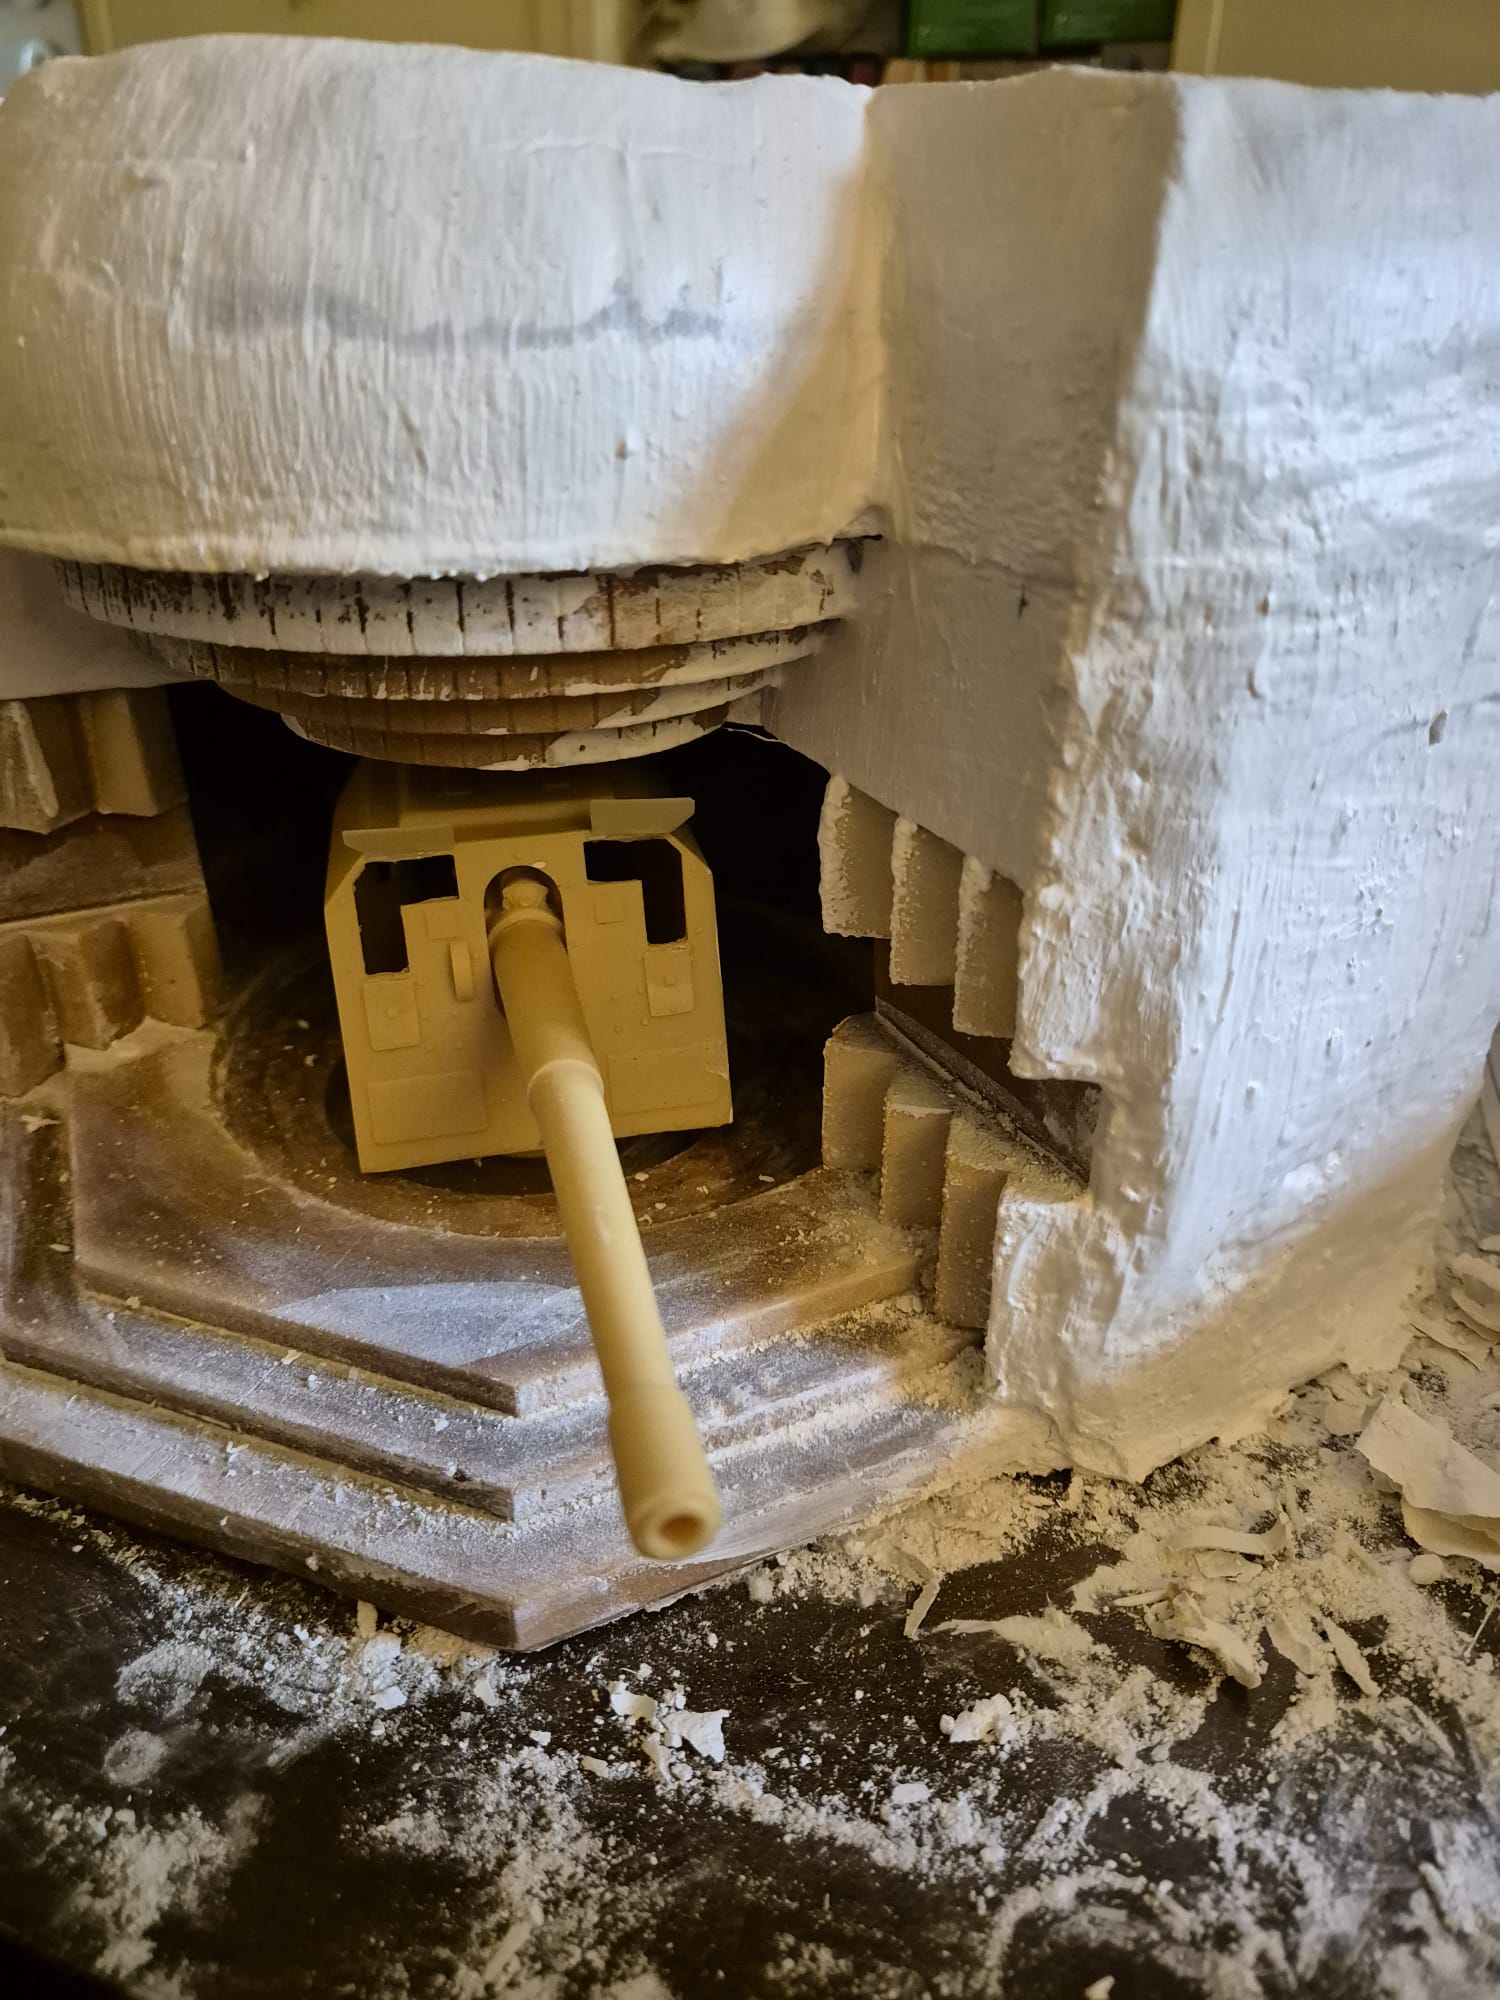
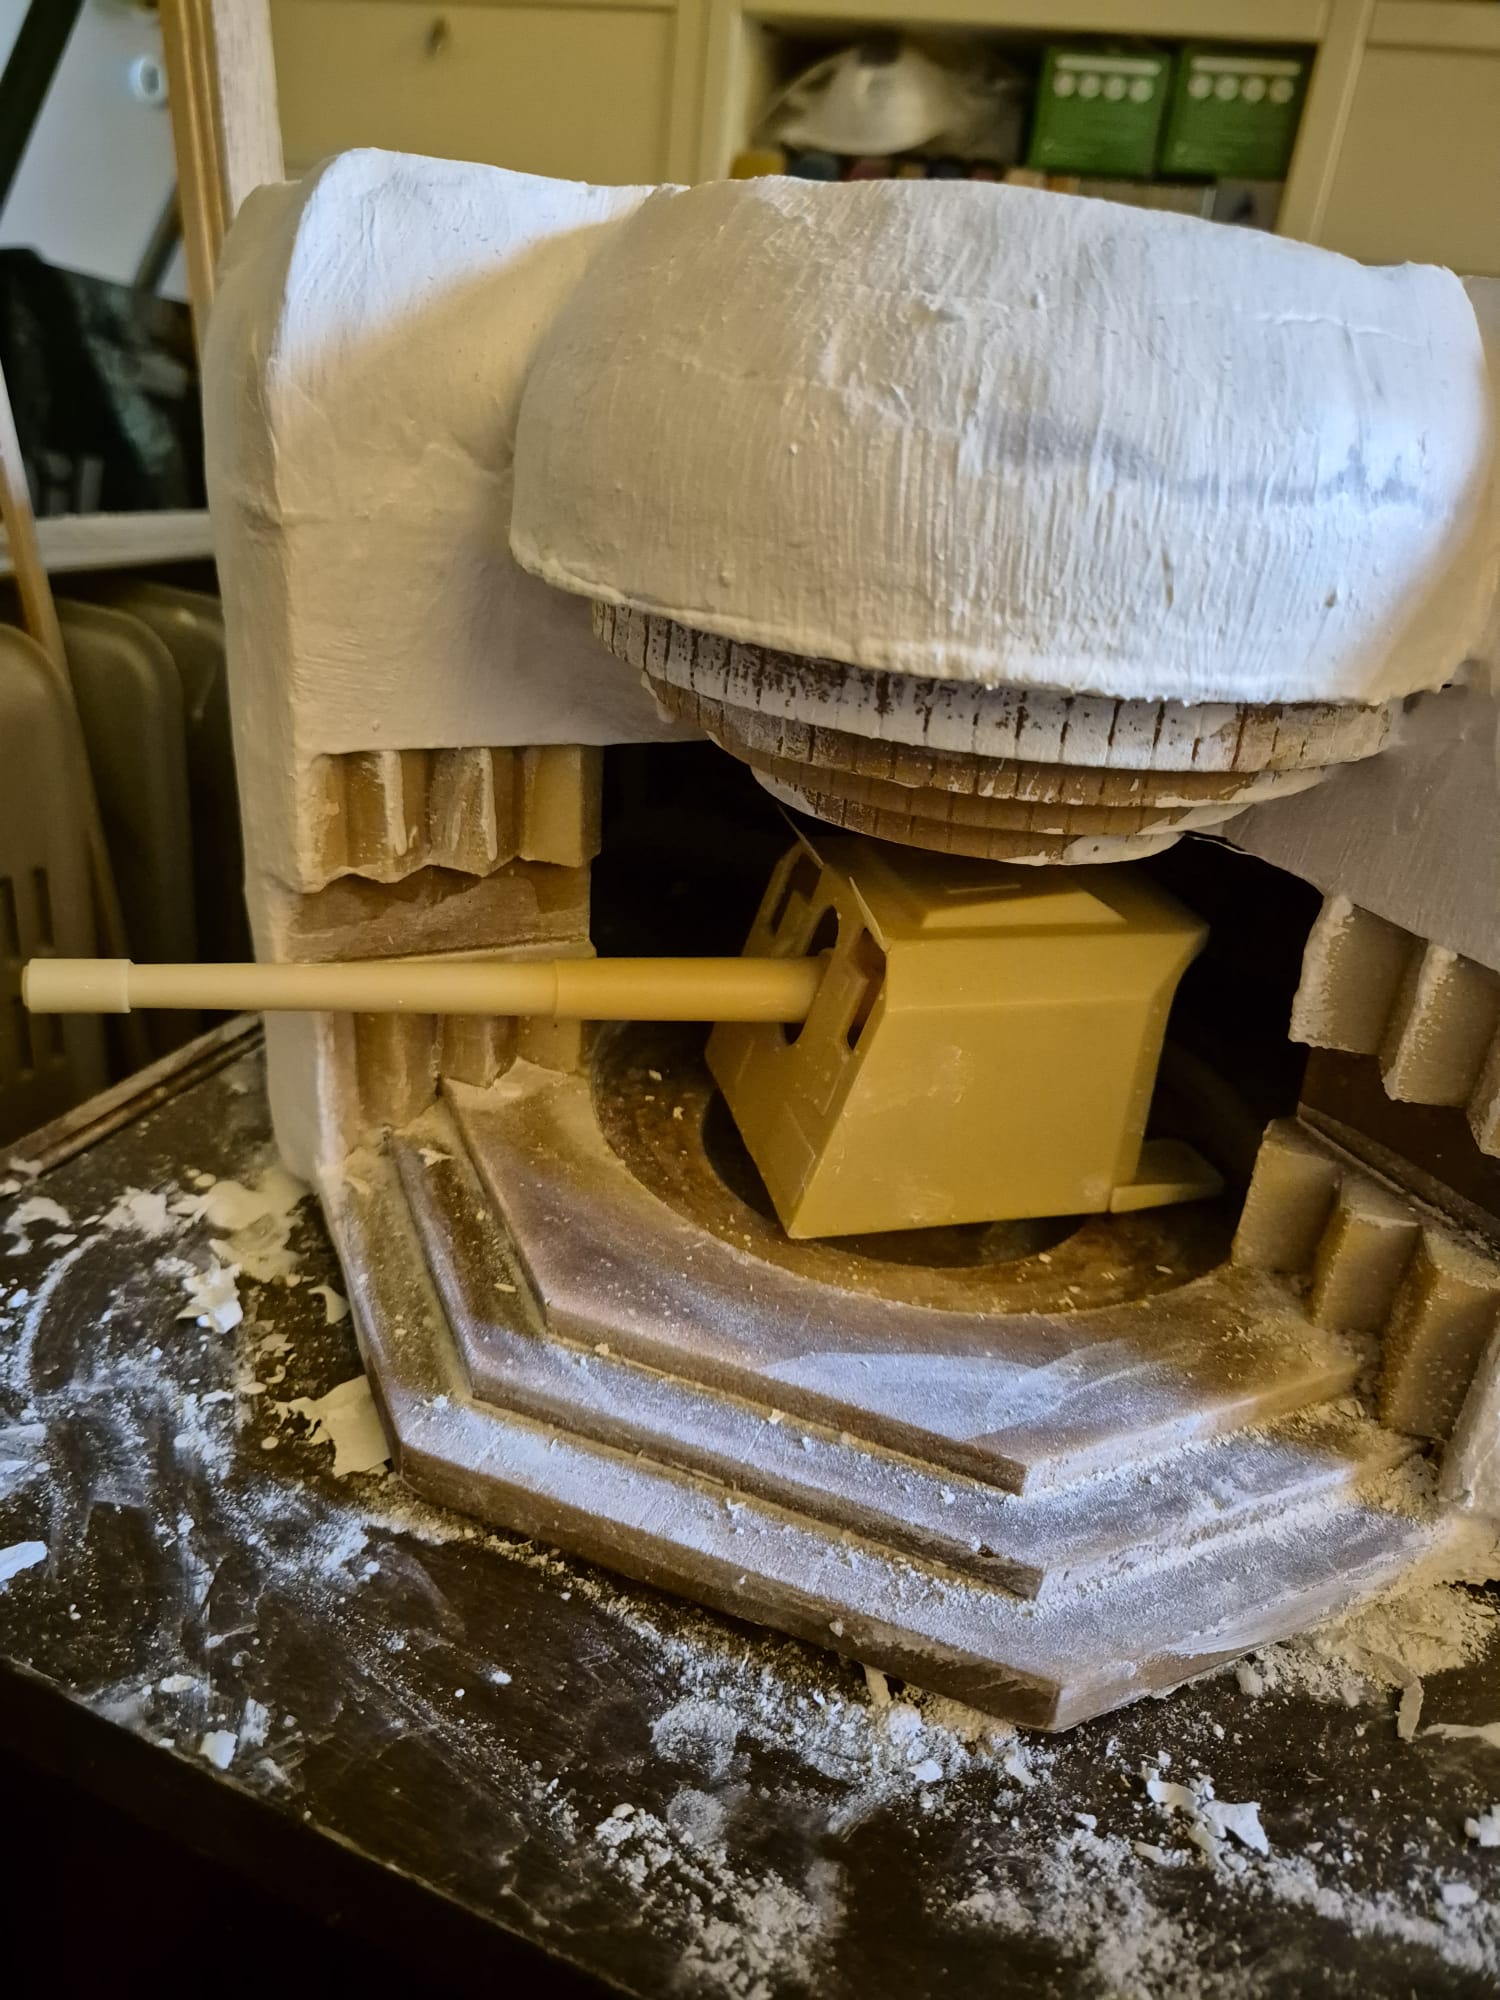
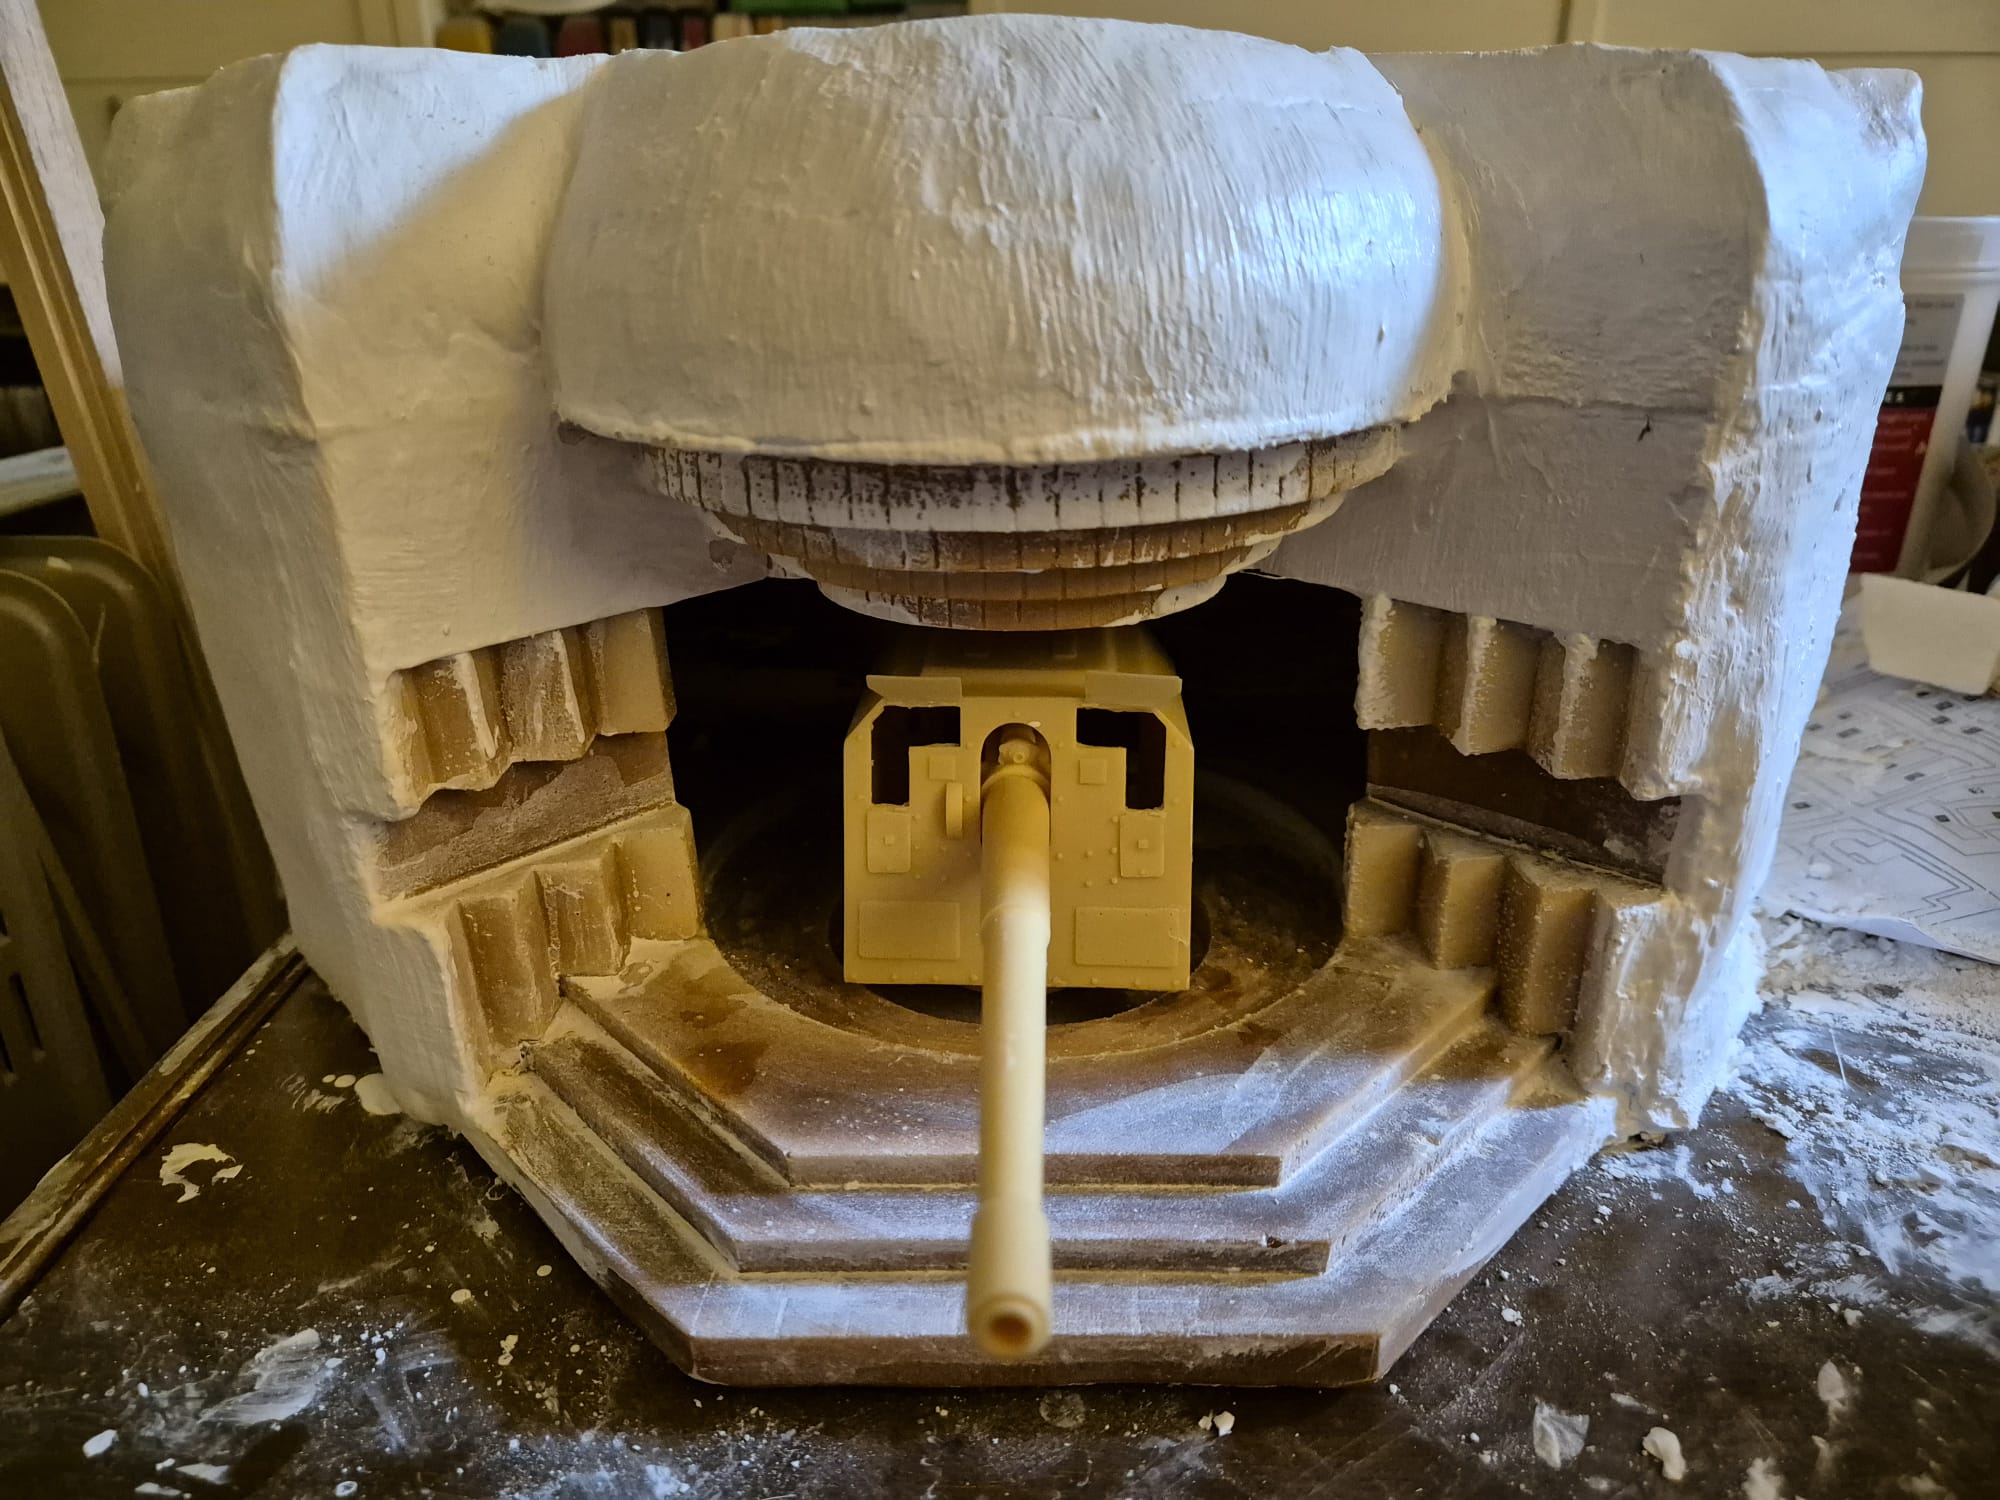
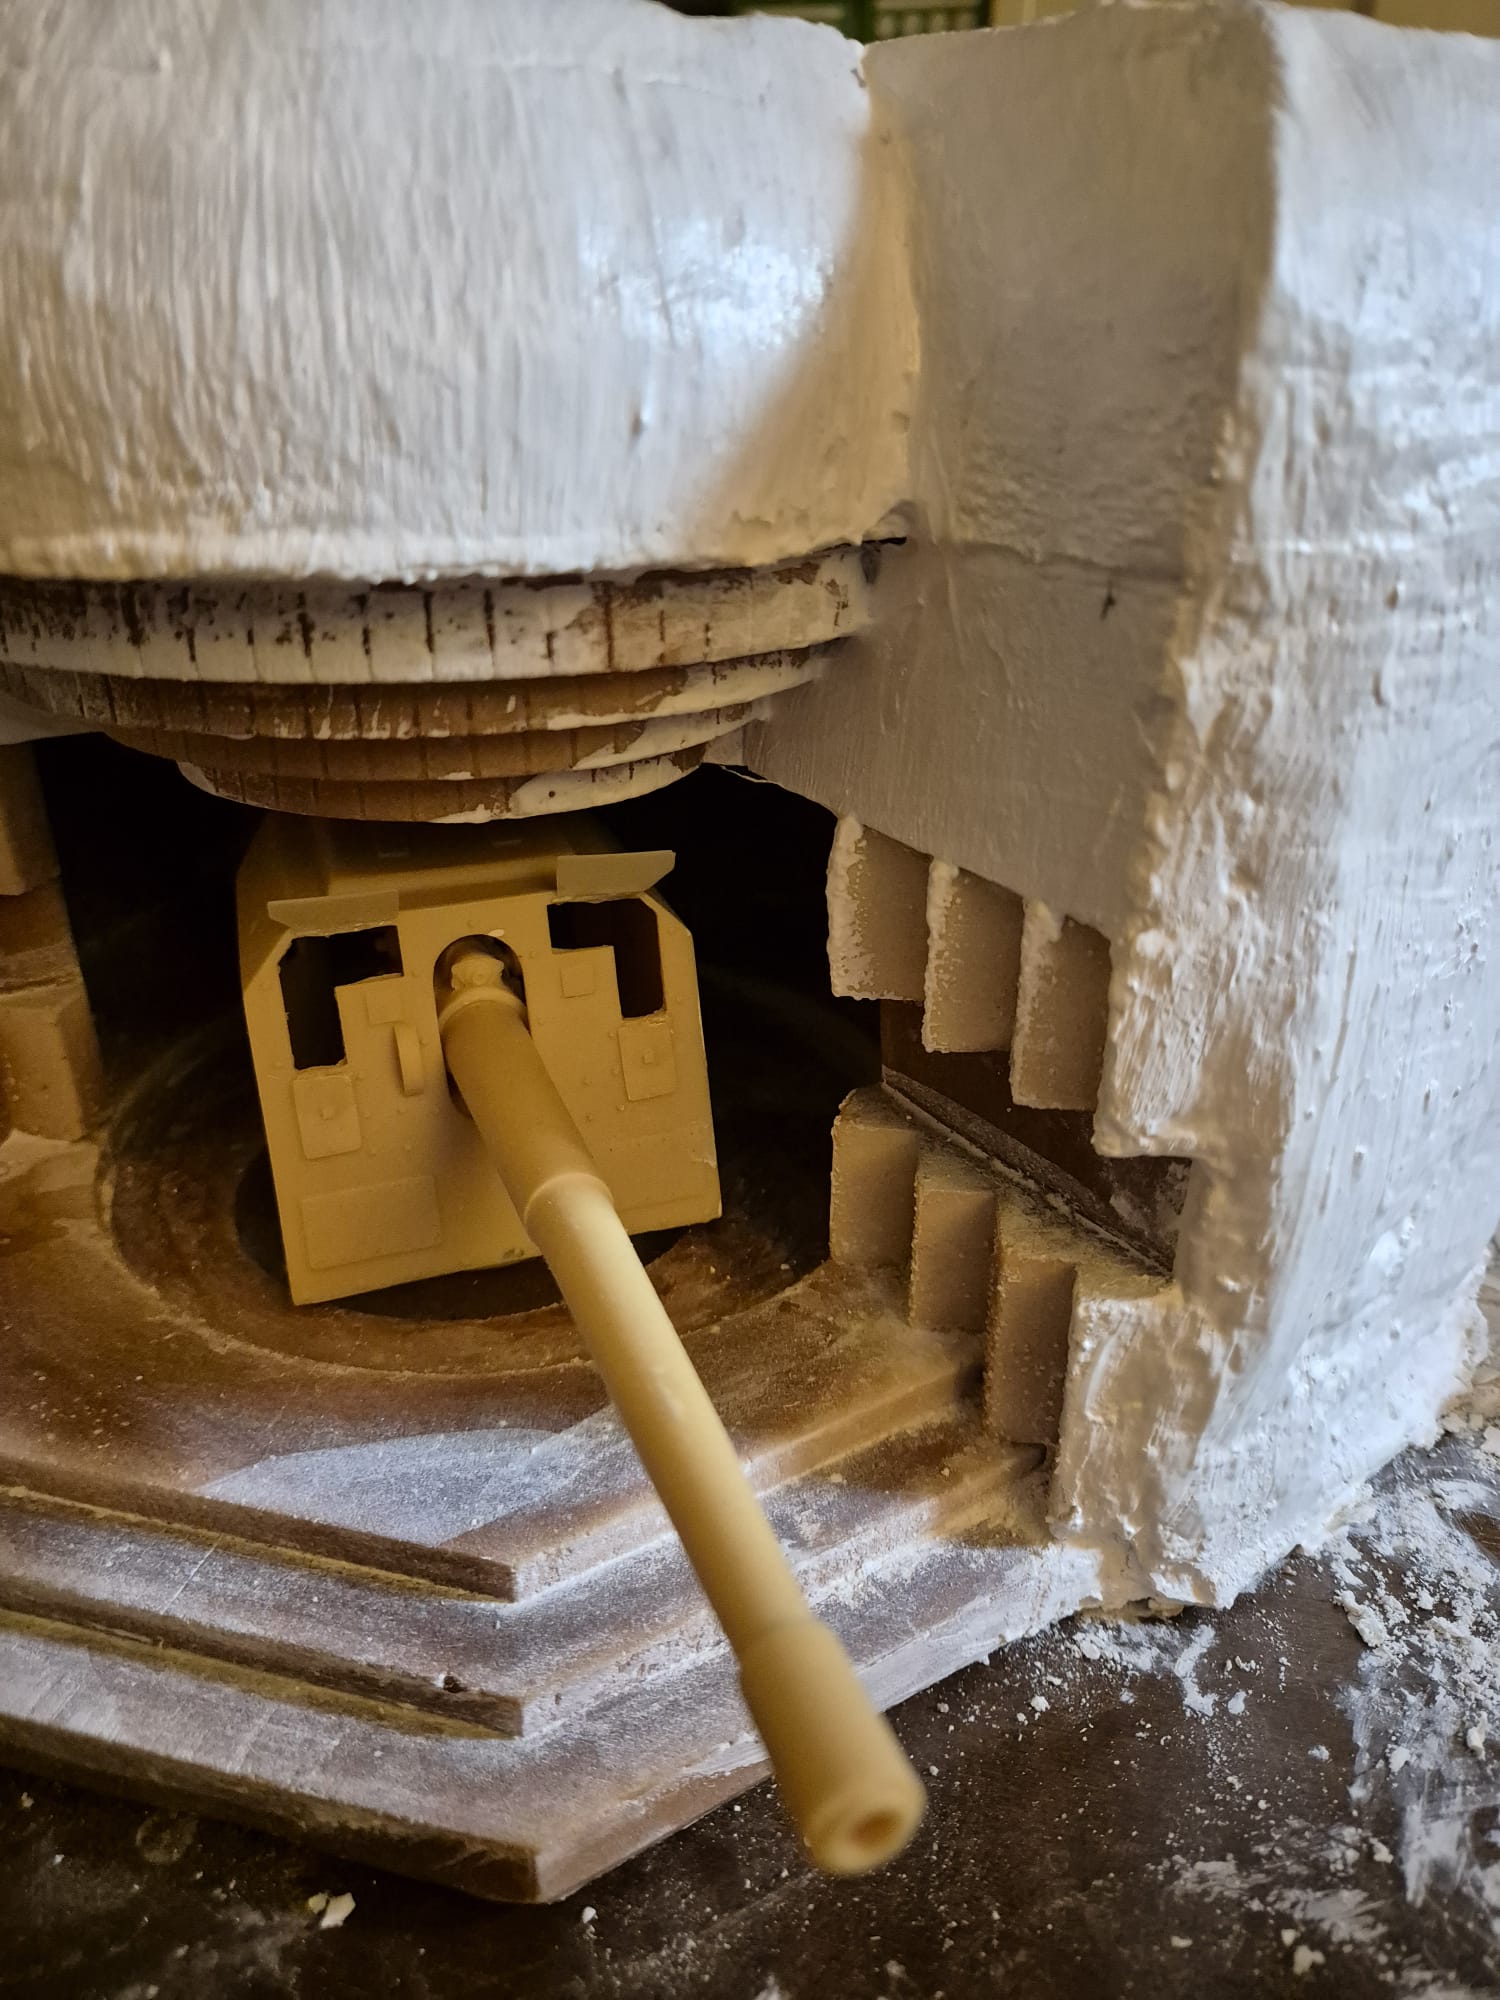
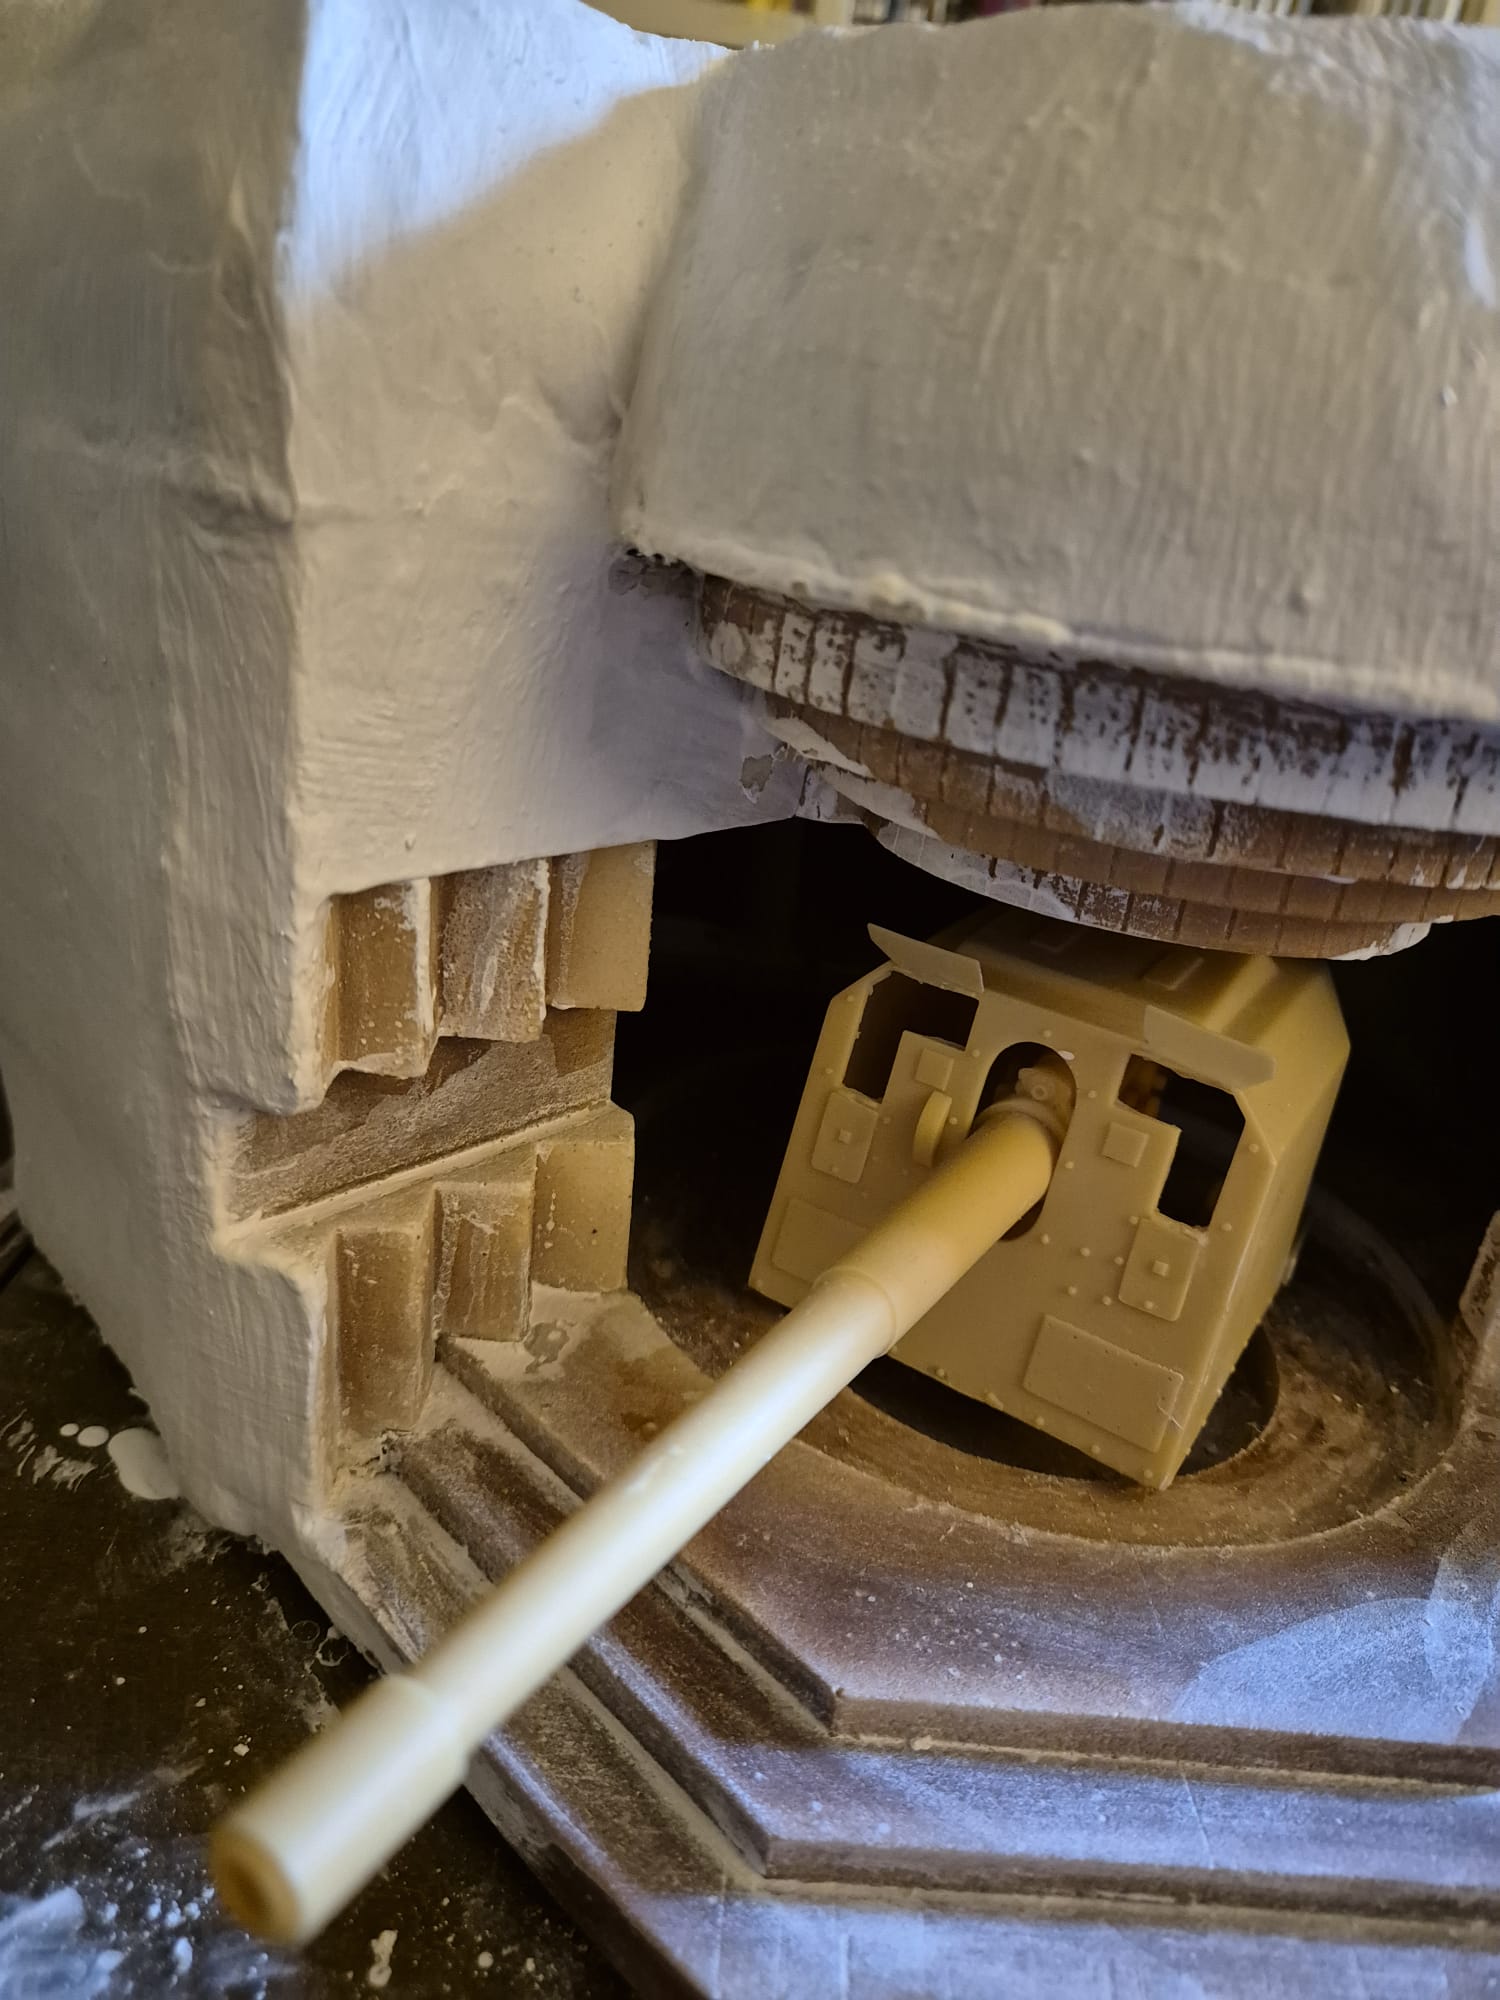
The Gun and Gun turret you have seen in the previous pictures were not from Masterpiece Models, since those were all of the wrong shape and the length of the Gun was also wrong.
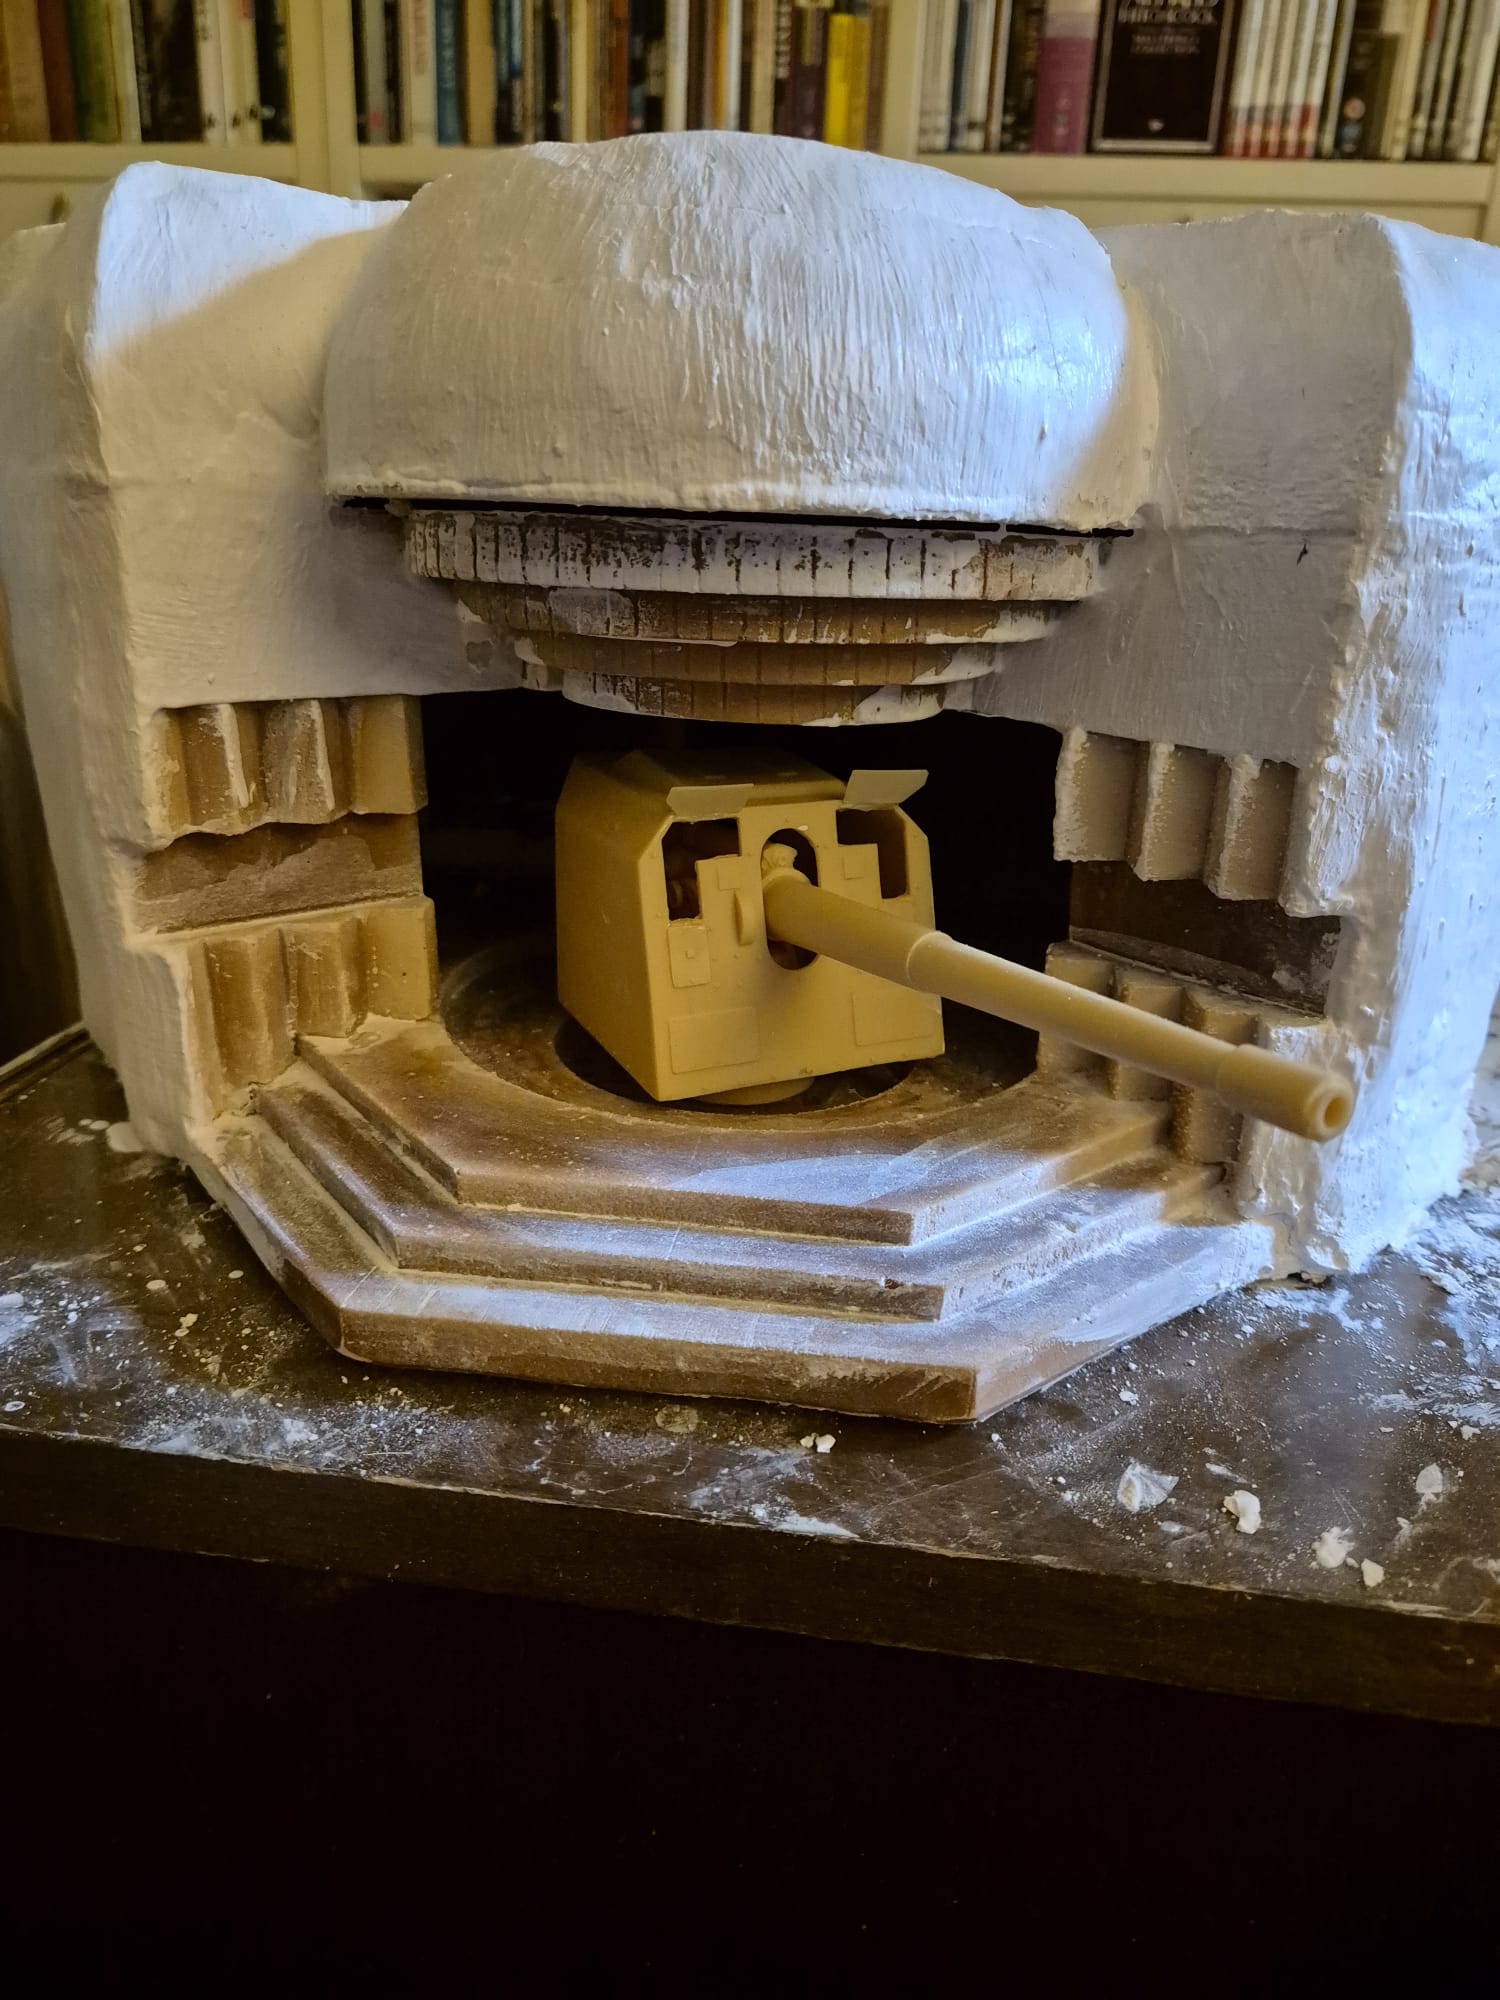
I therefore had to dish up more money to buy the correct one from a French Store called PN Sud modellisme which sold the correct reproduction of the turret and gun, including open shutters for the gunners to have a clear vision outside.

This is the said model:


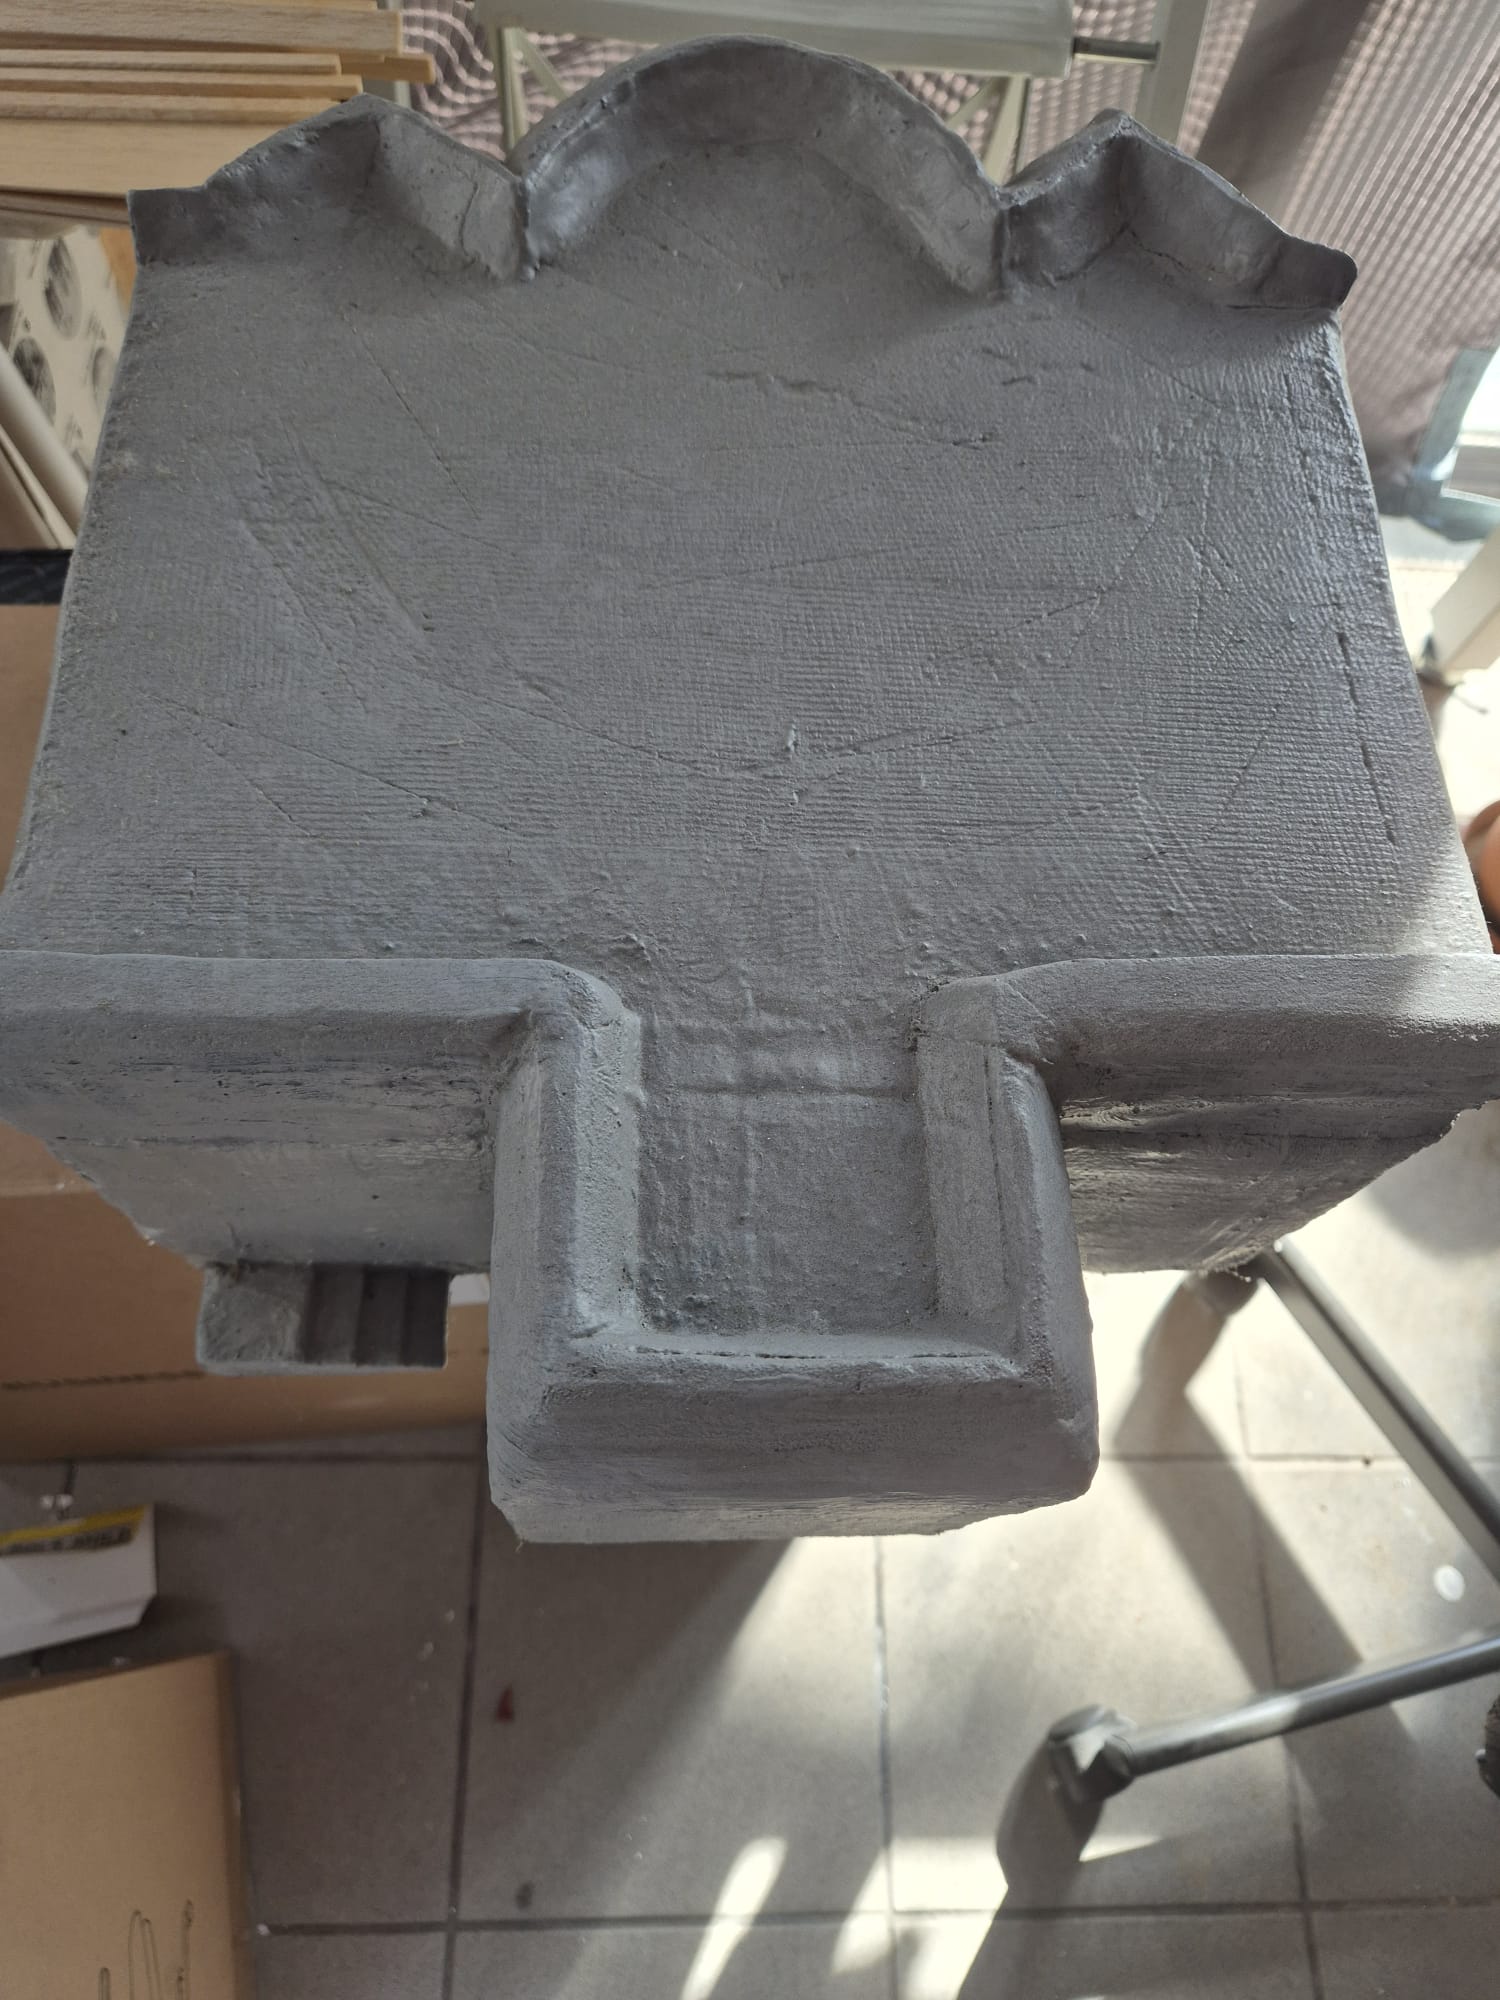
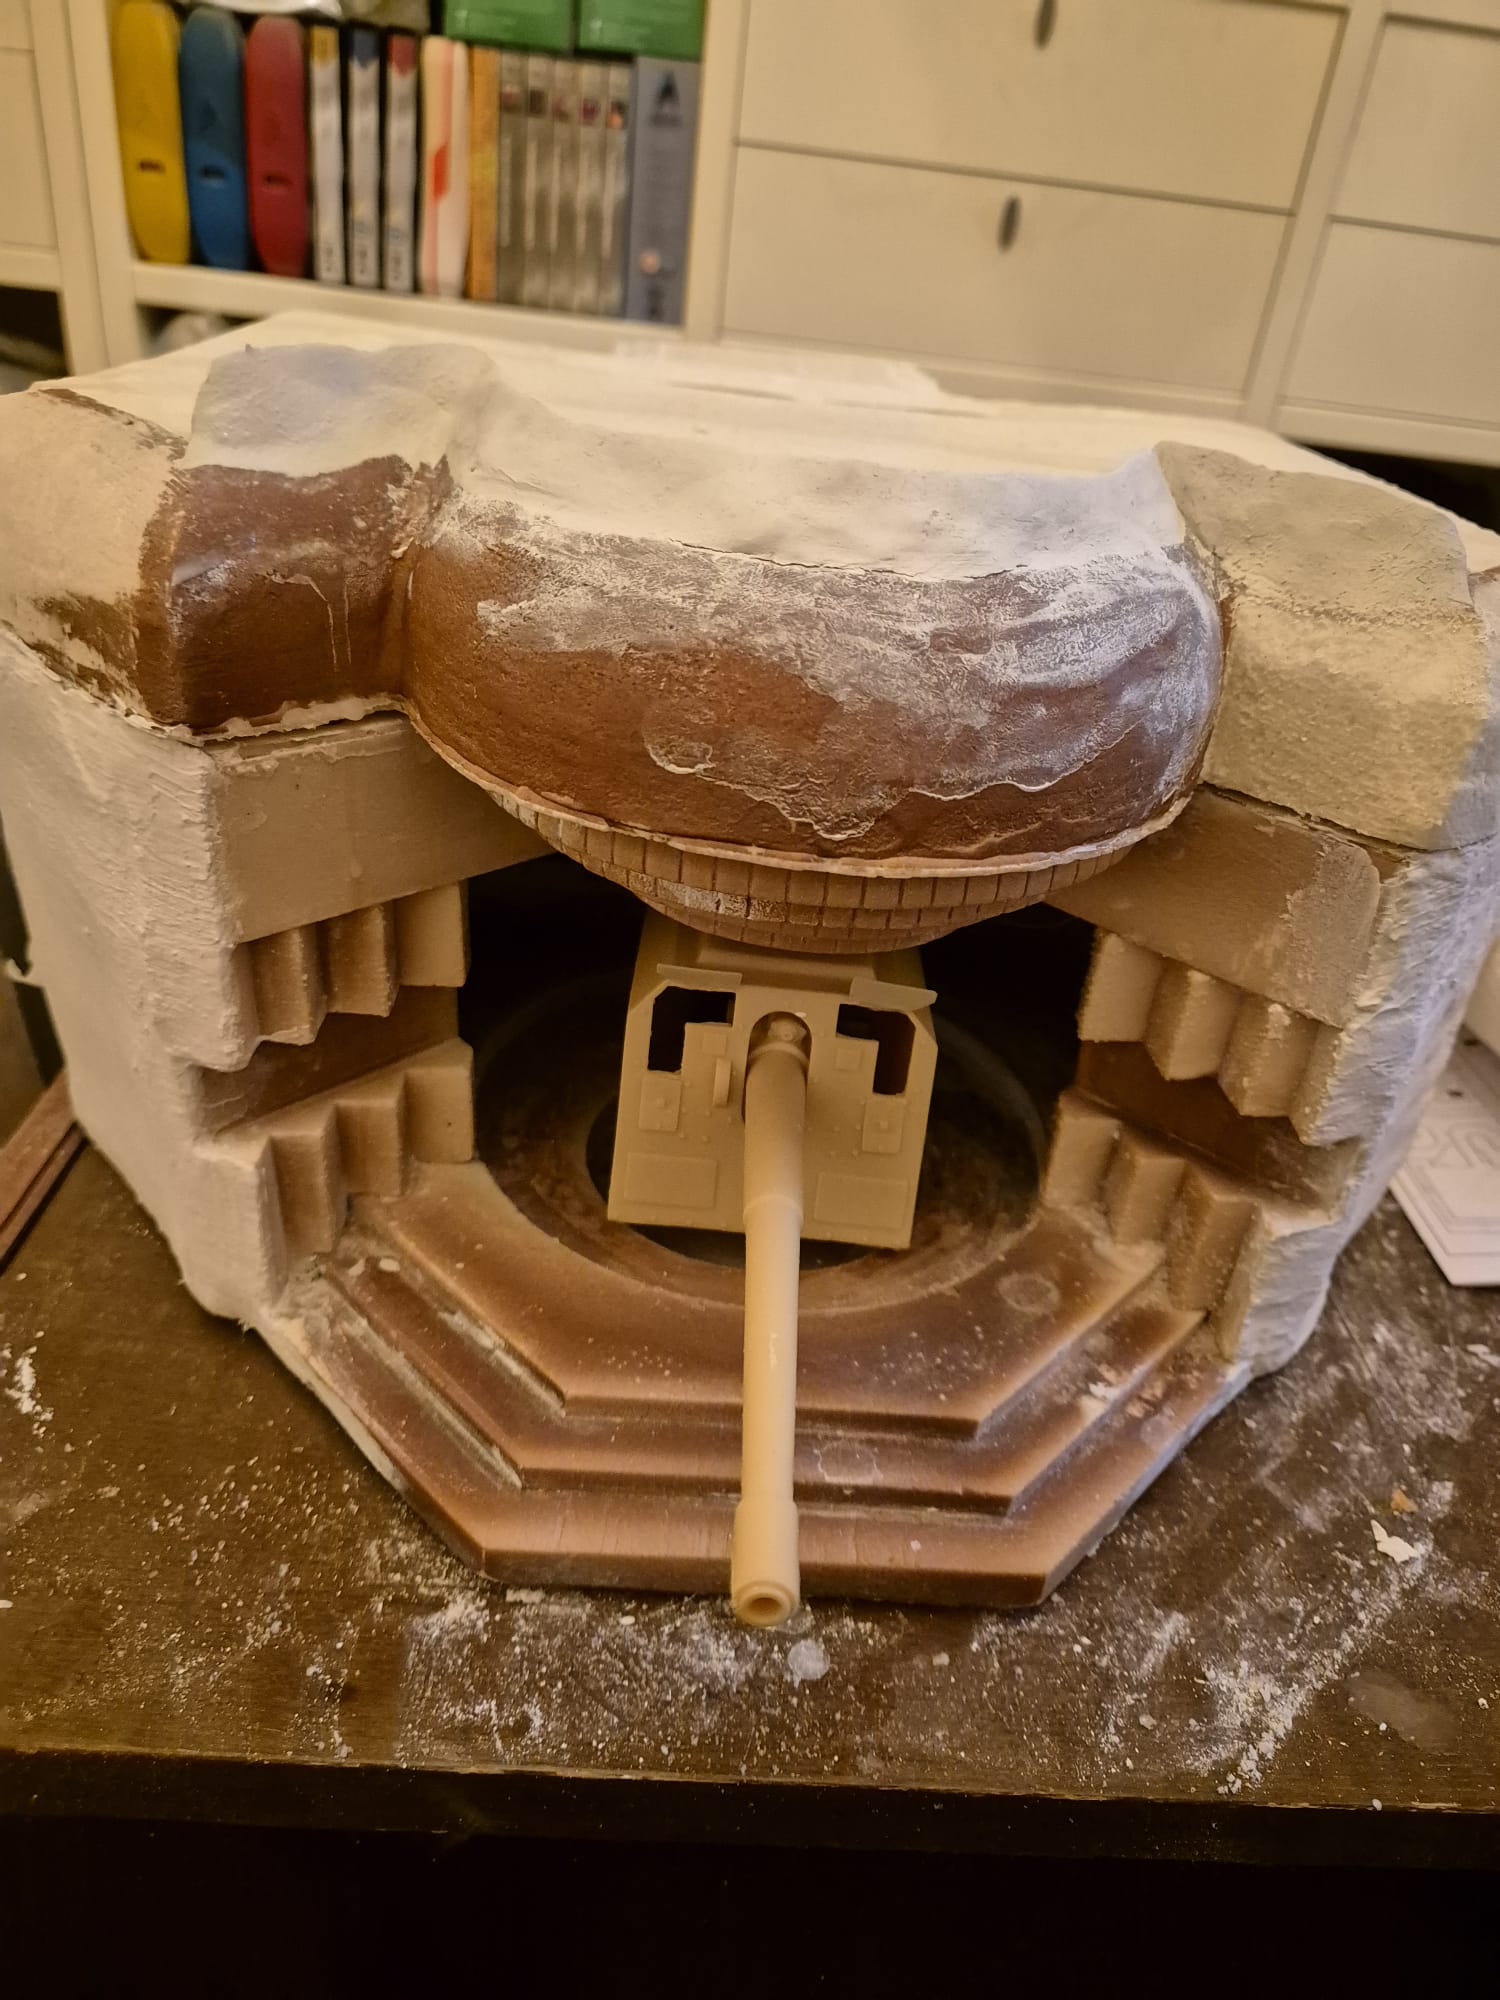
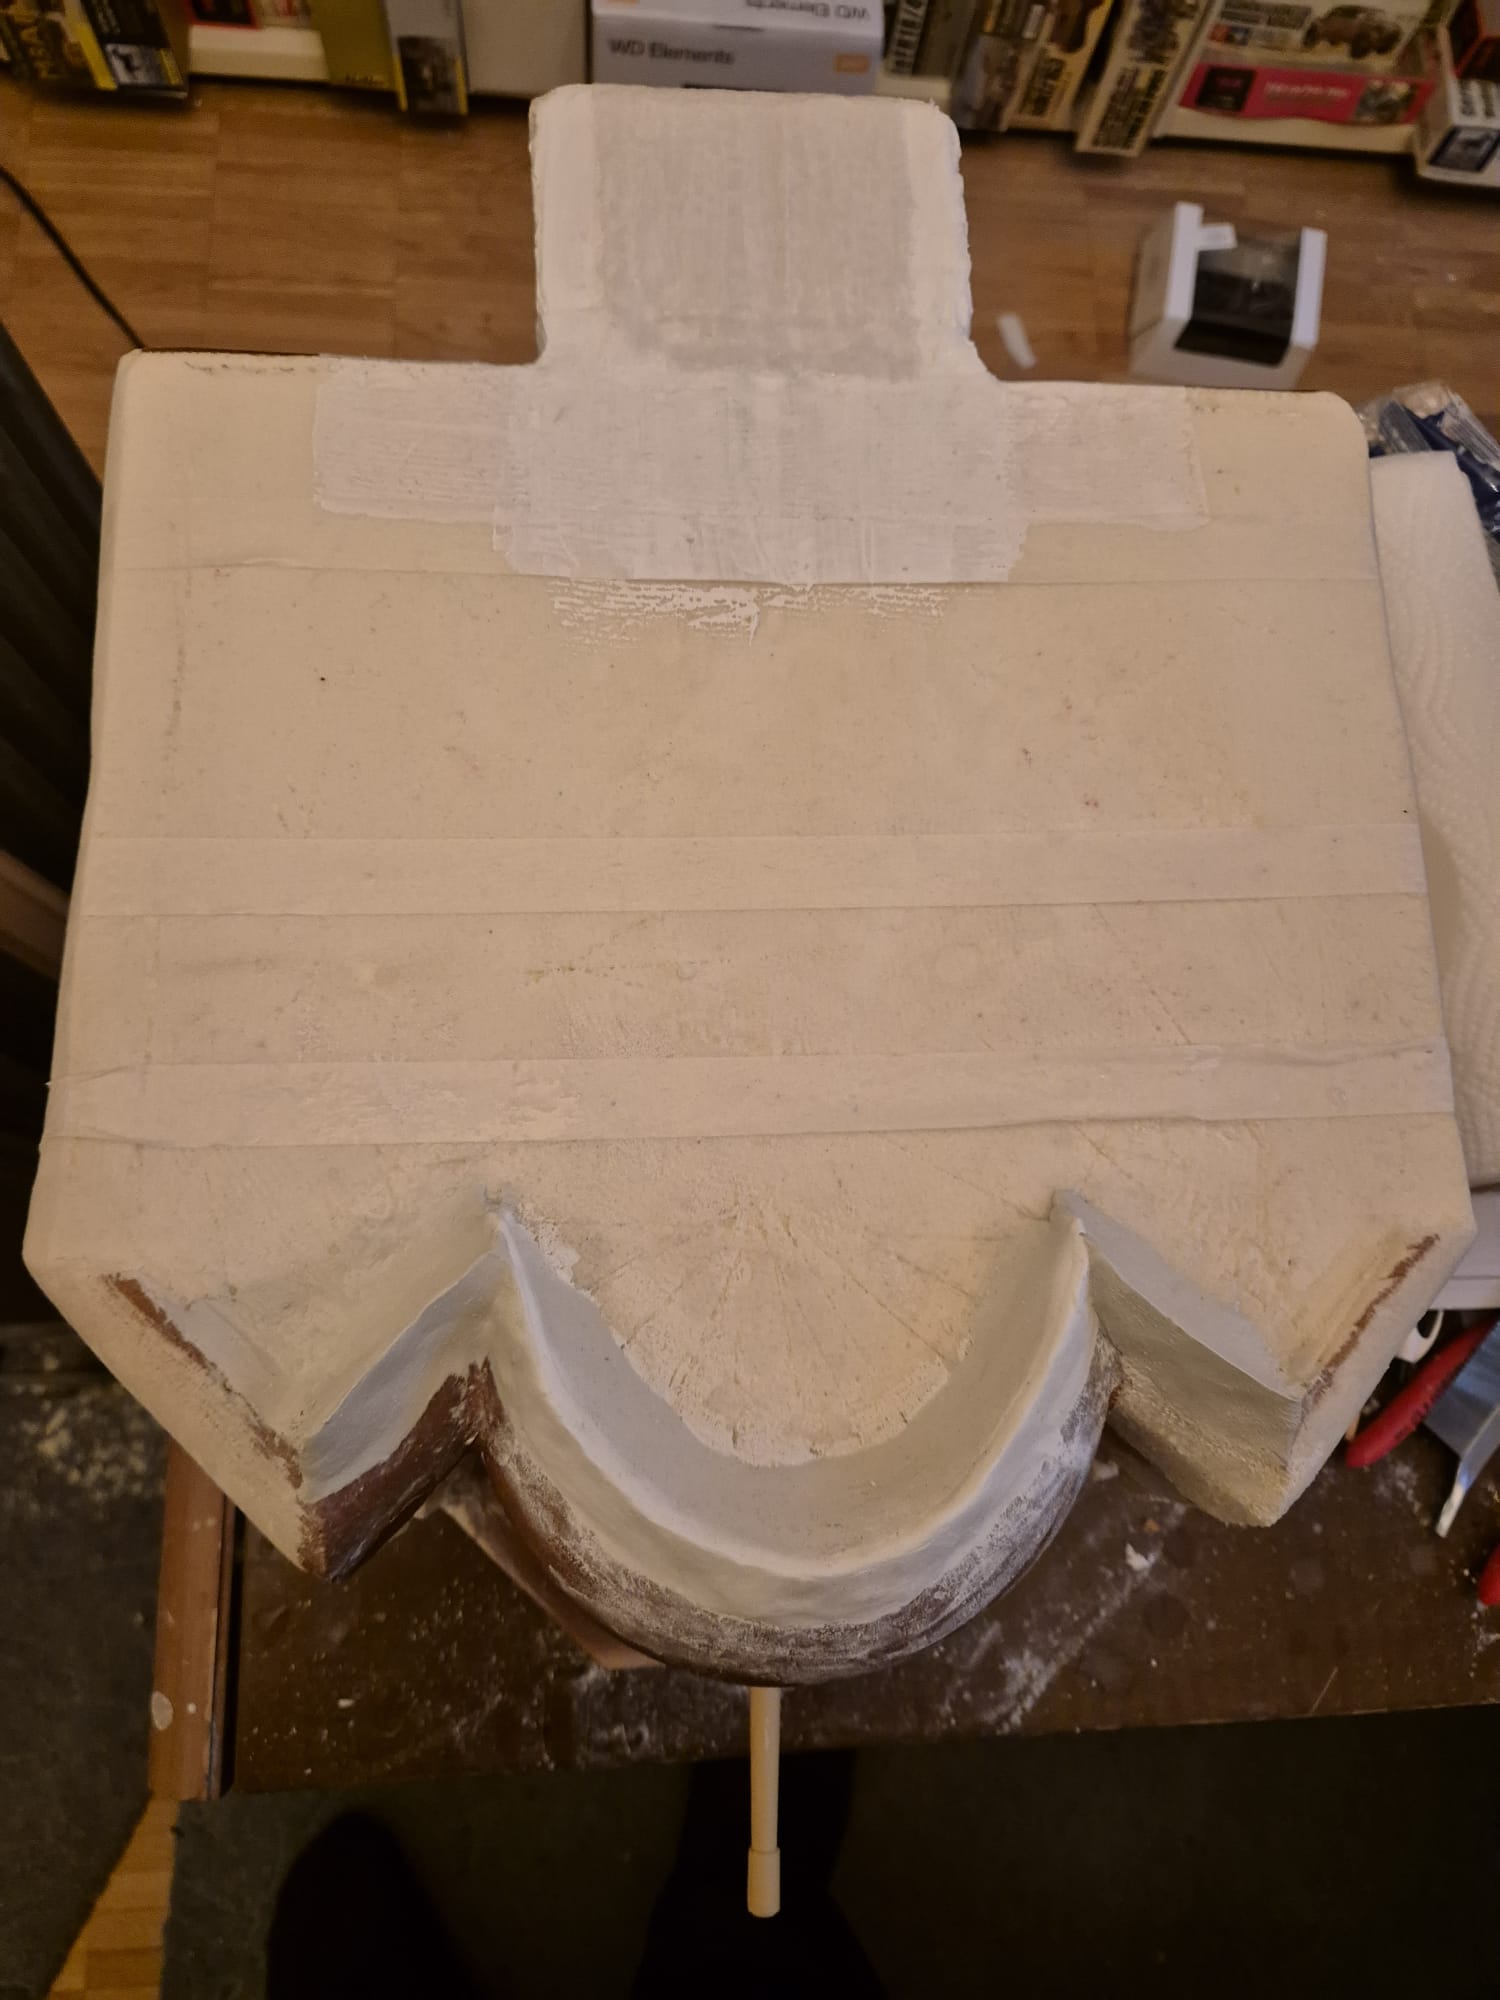
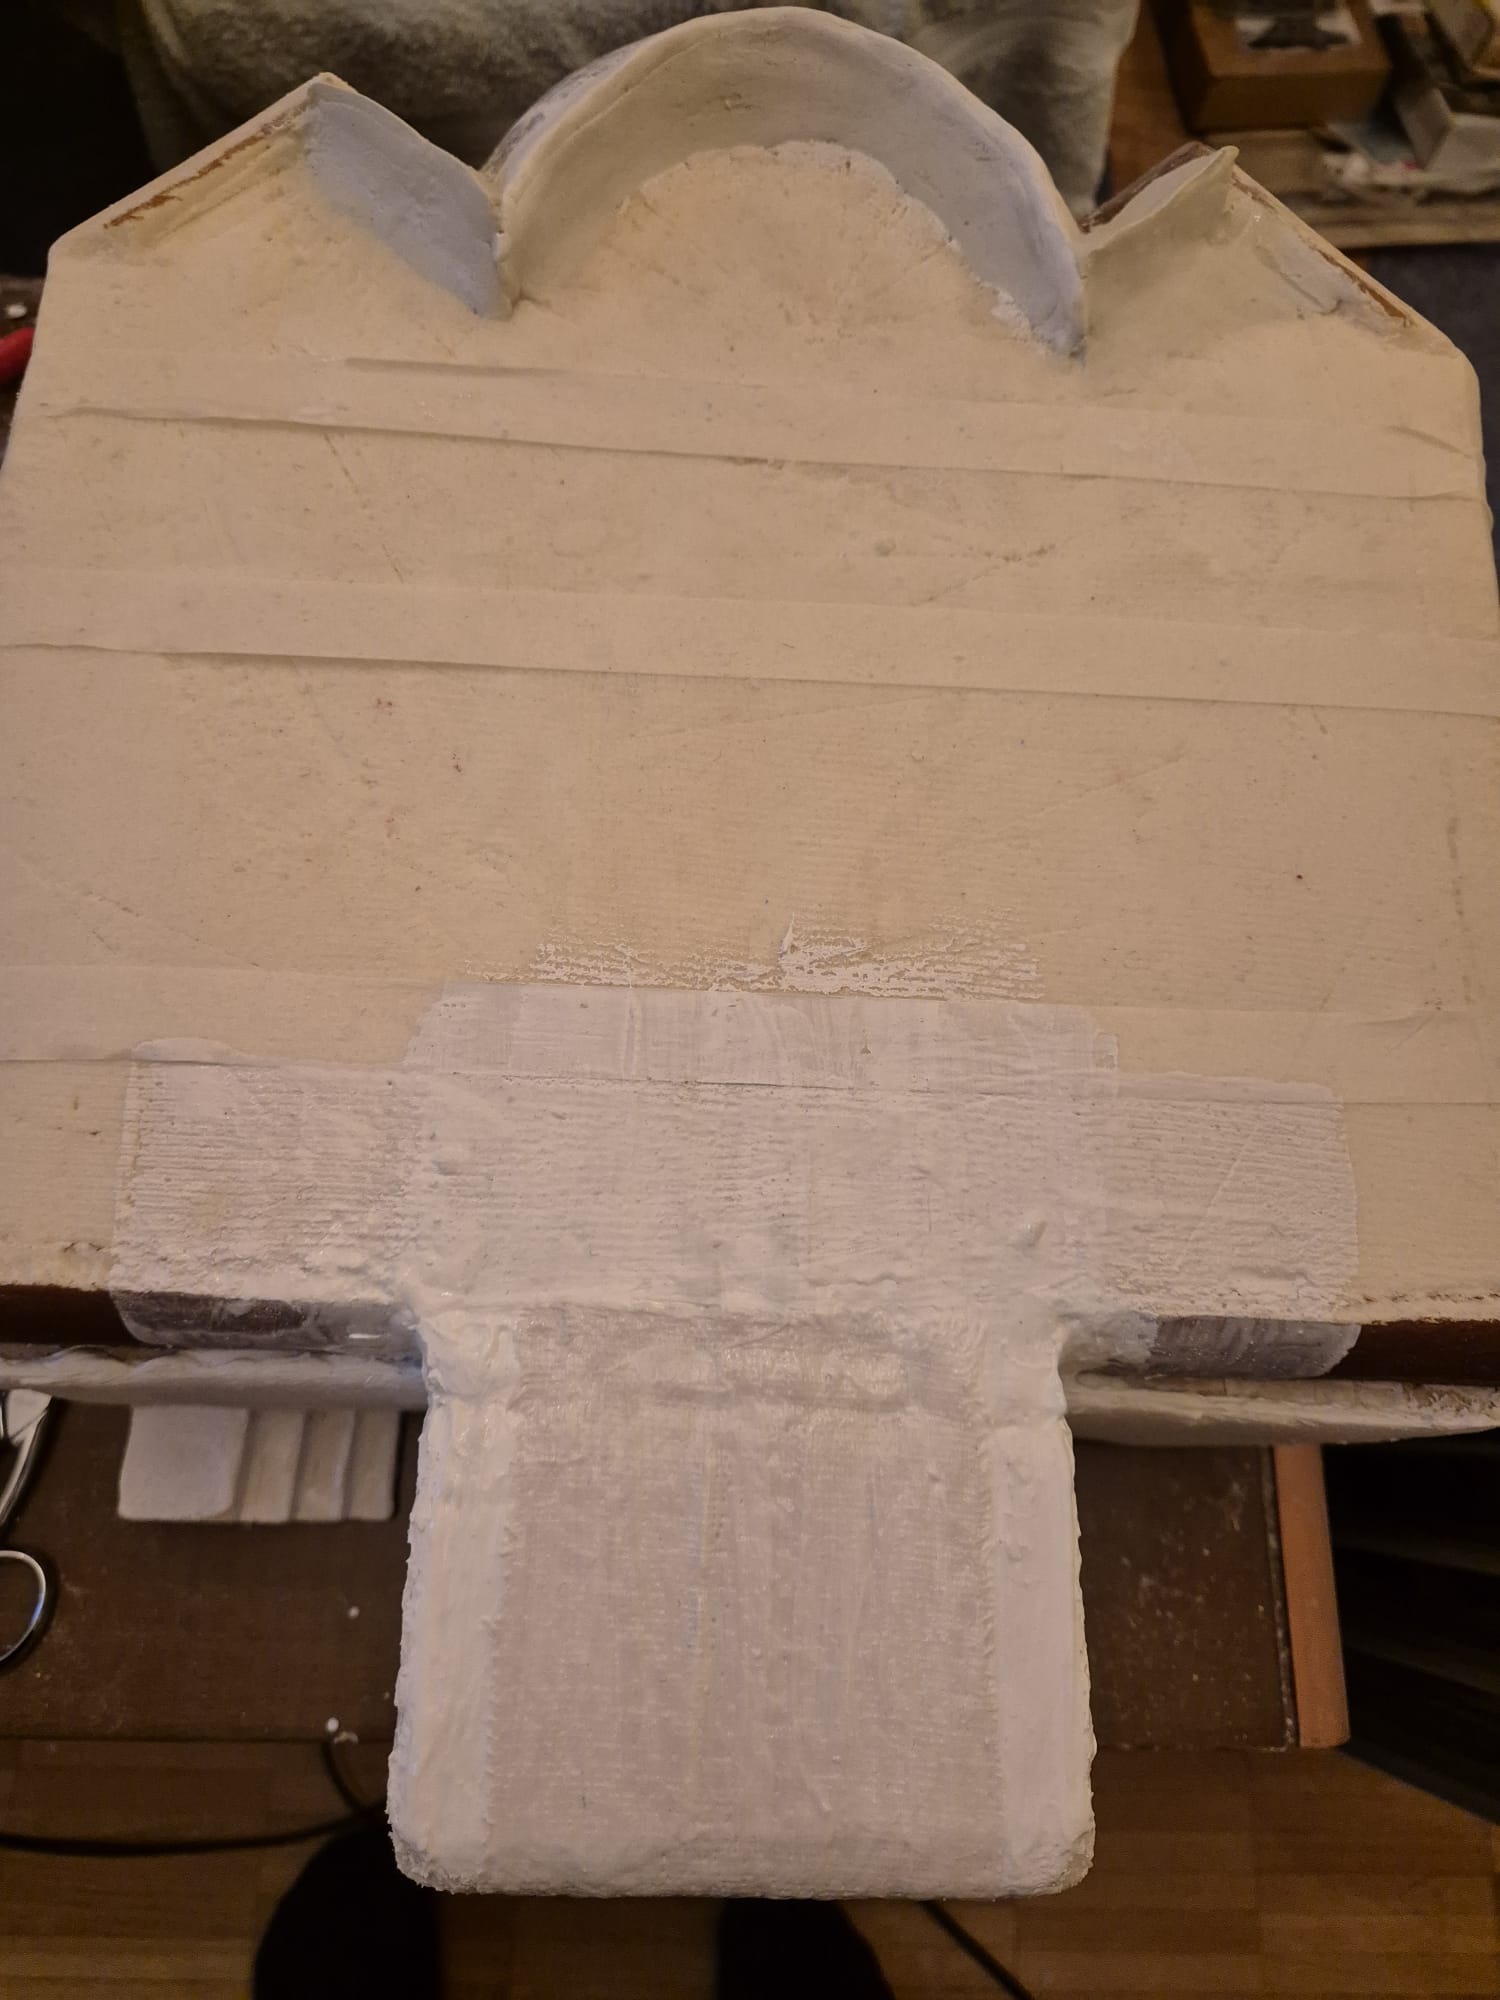
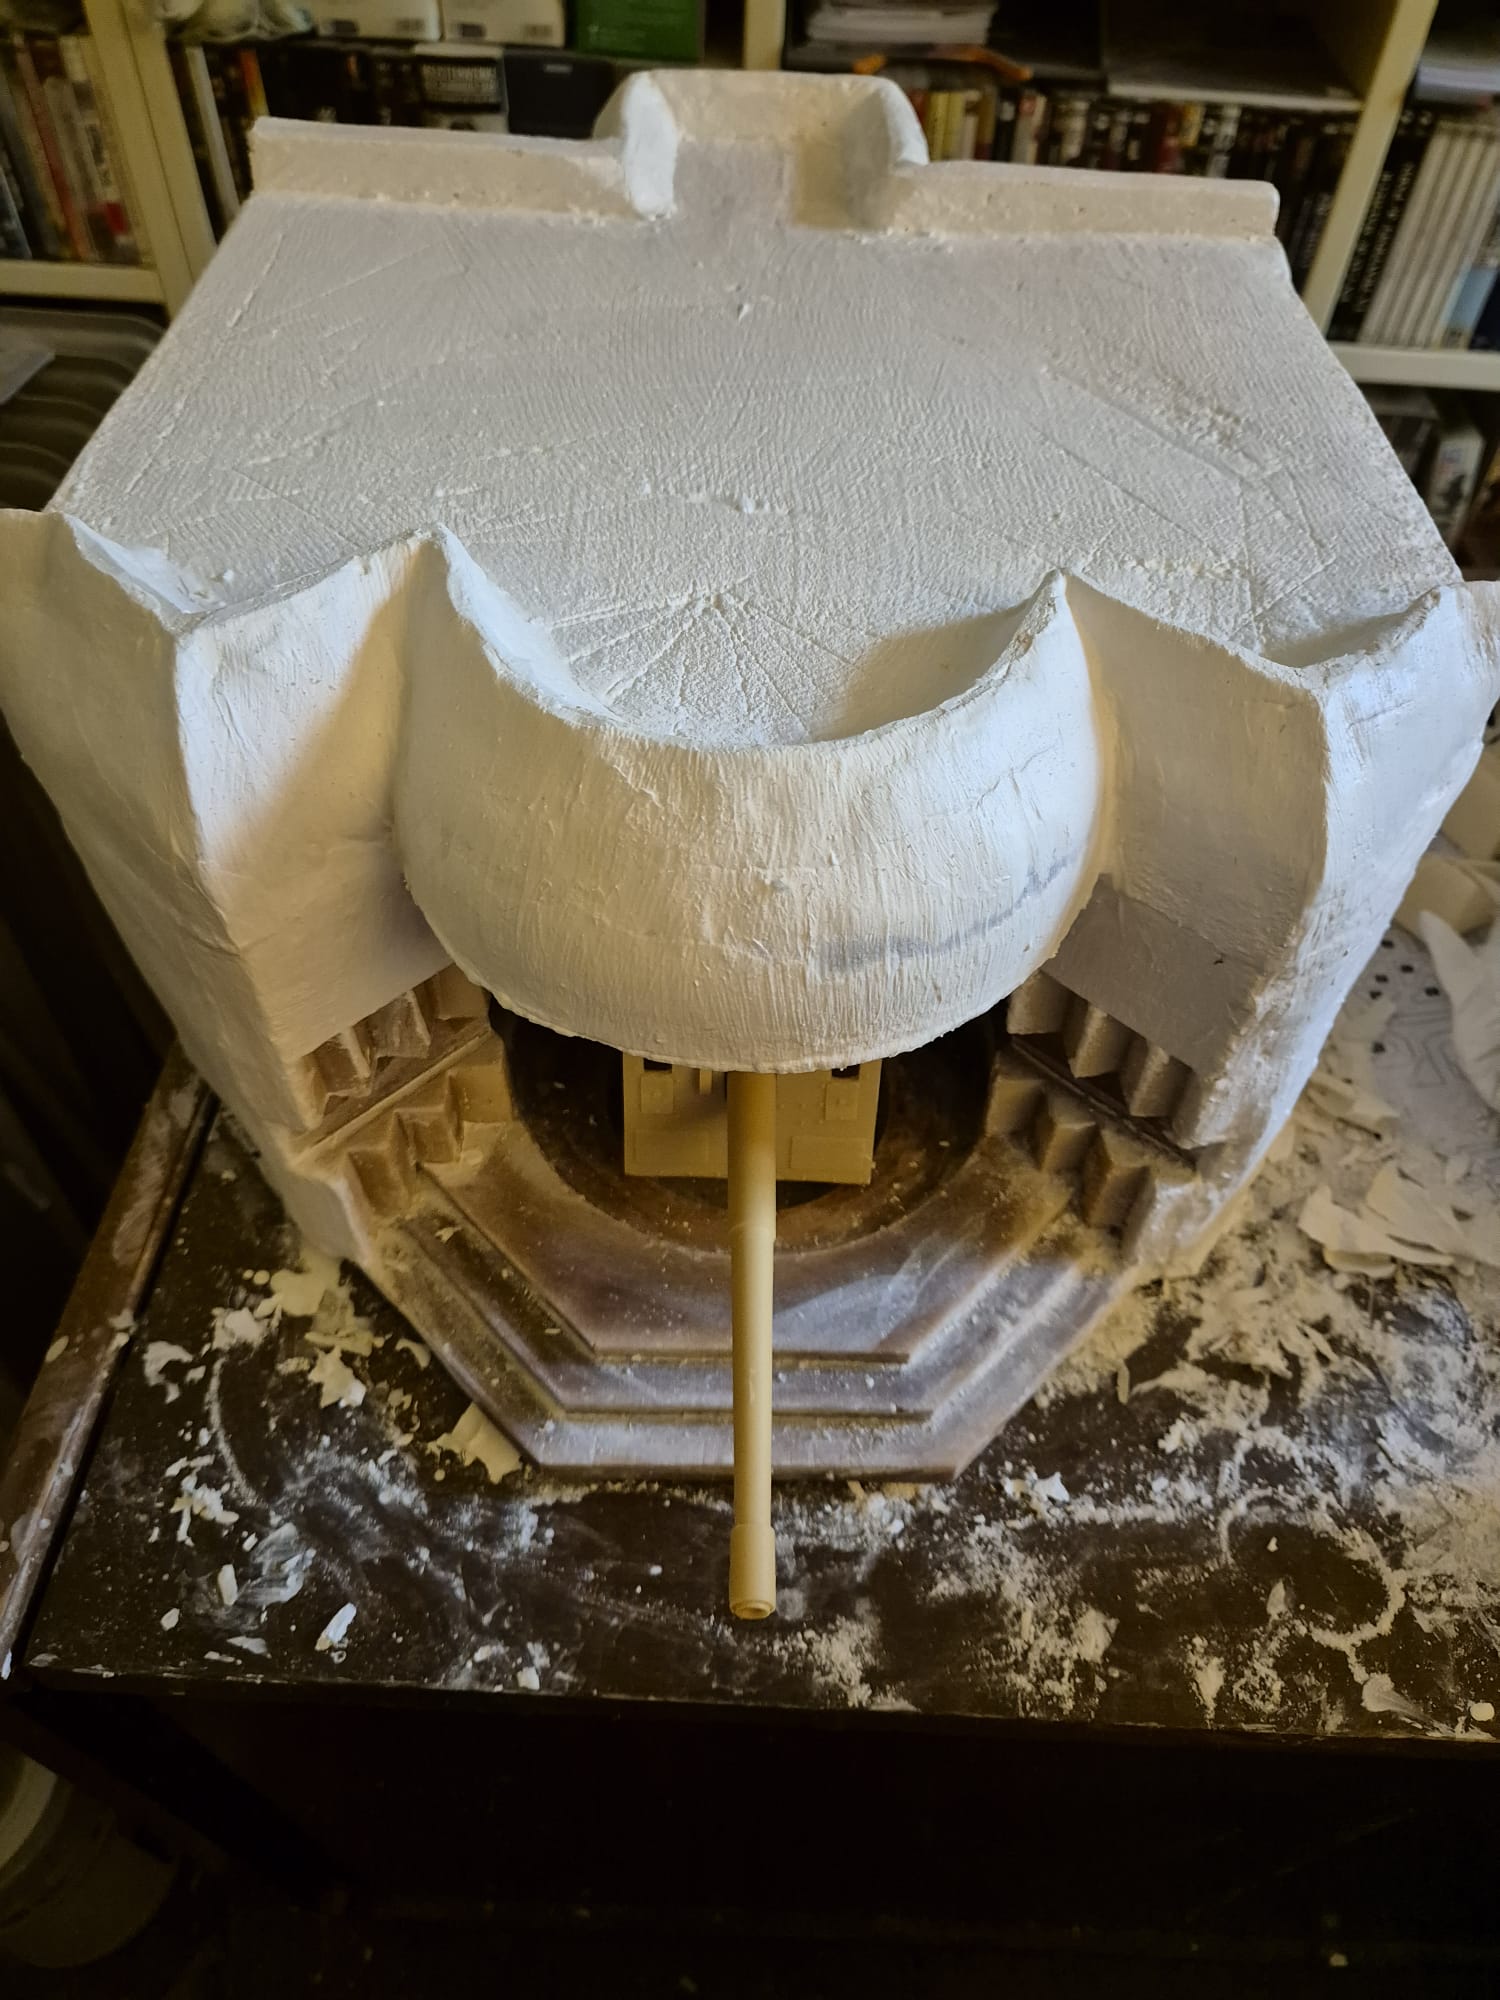
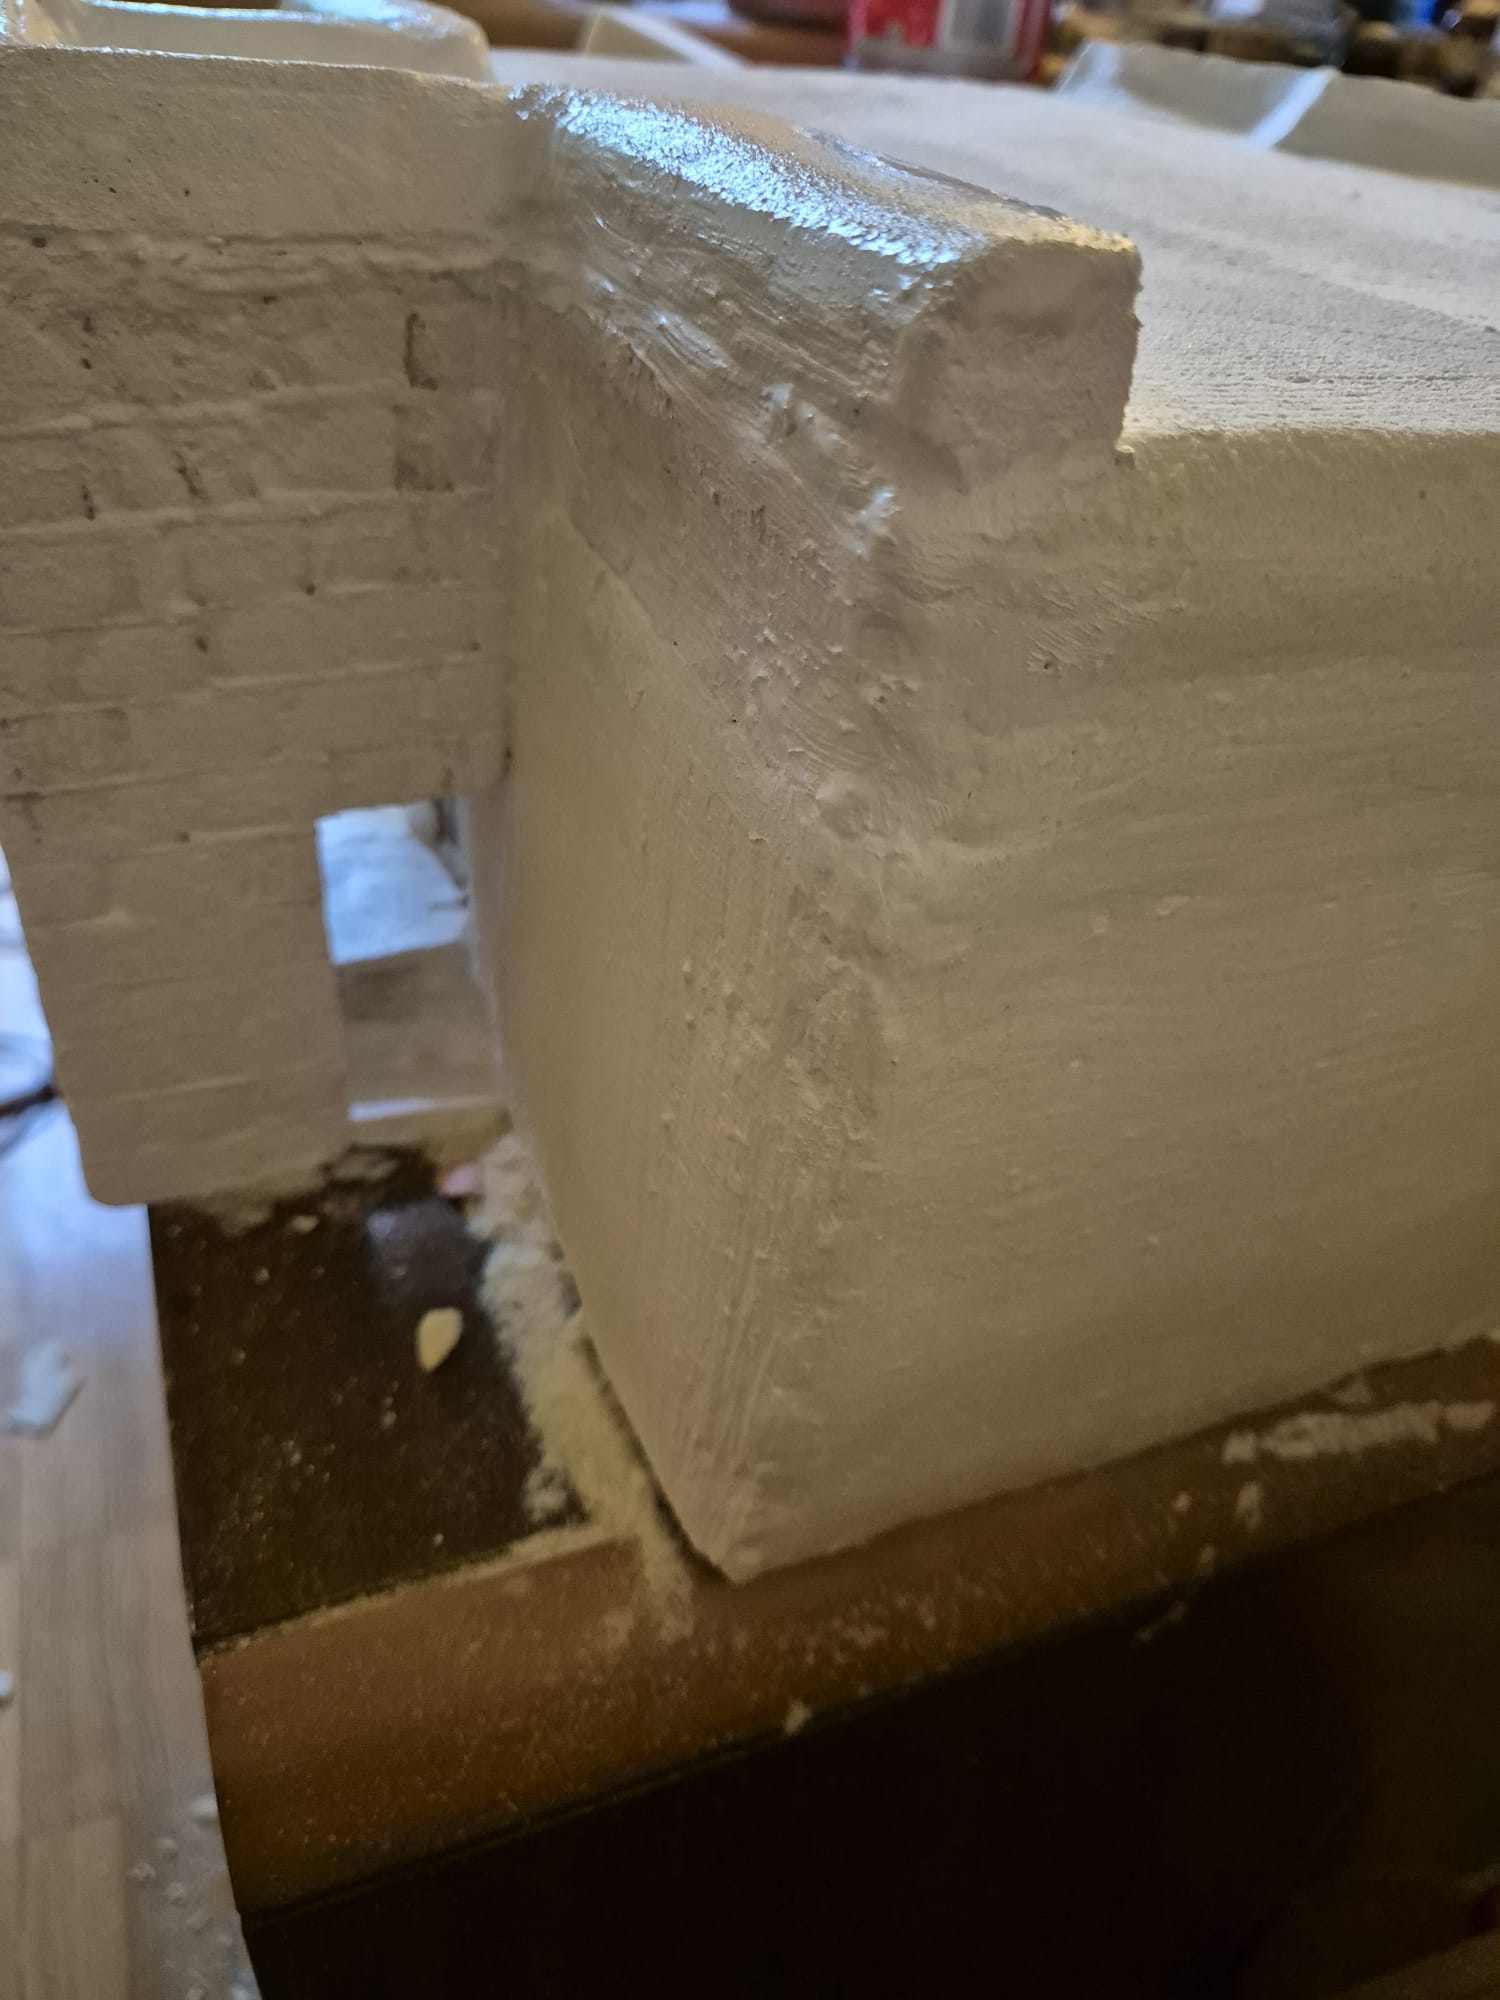
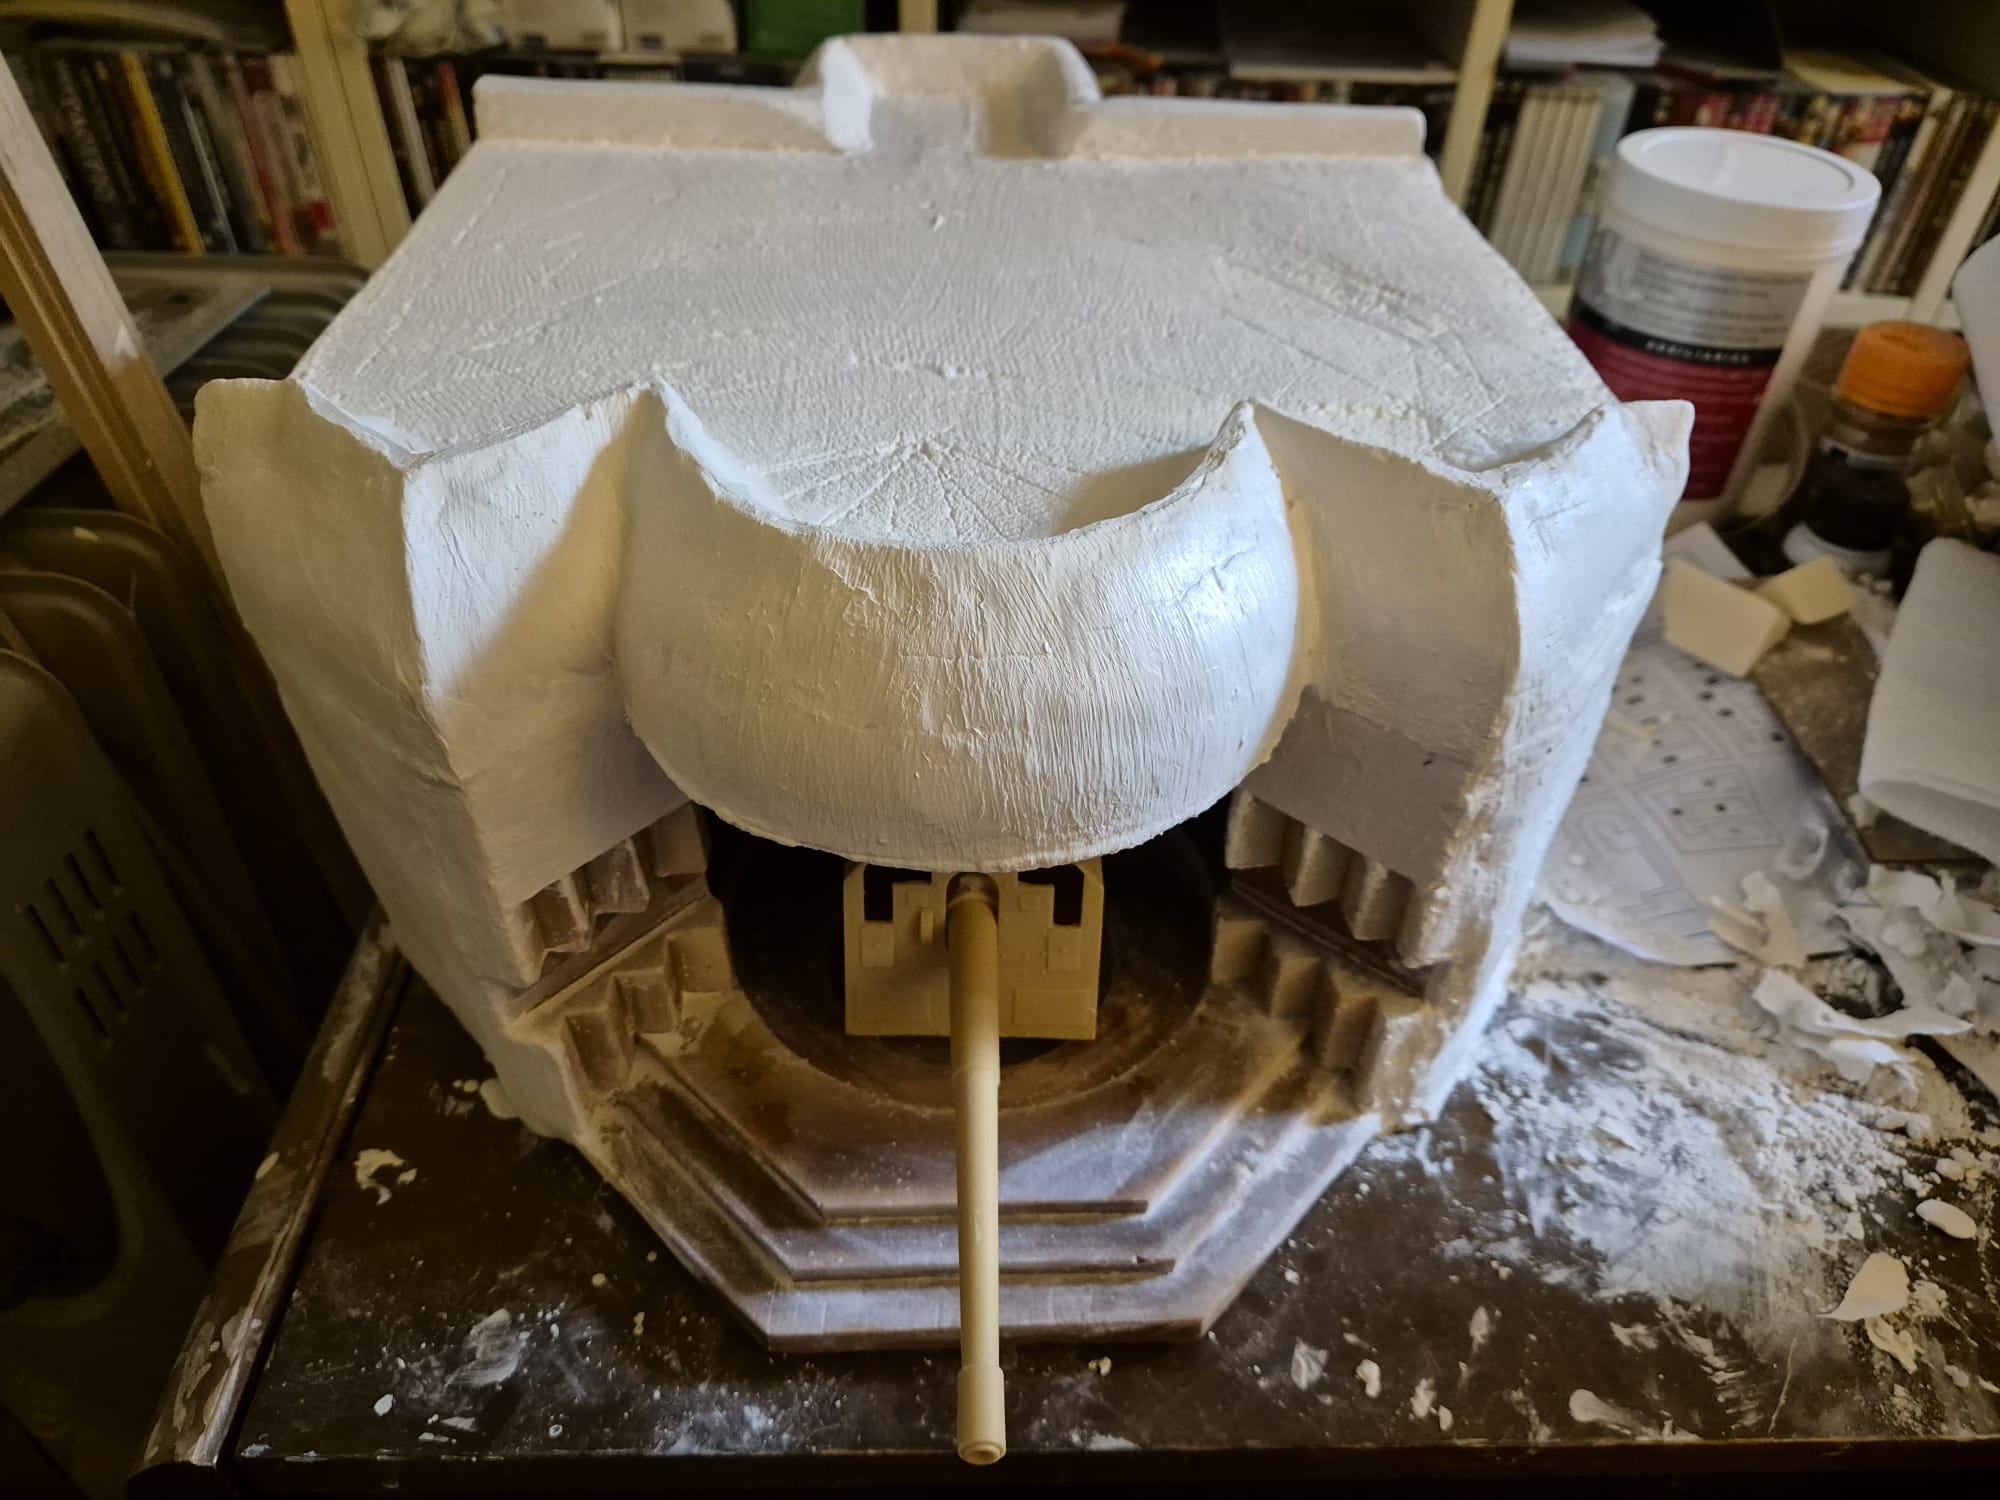
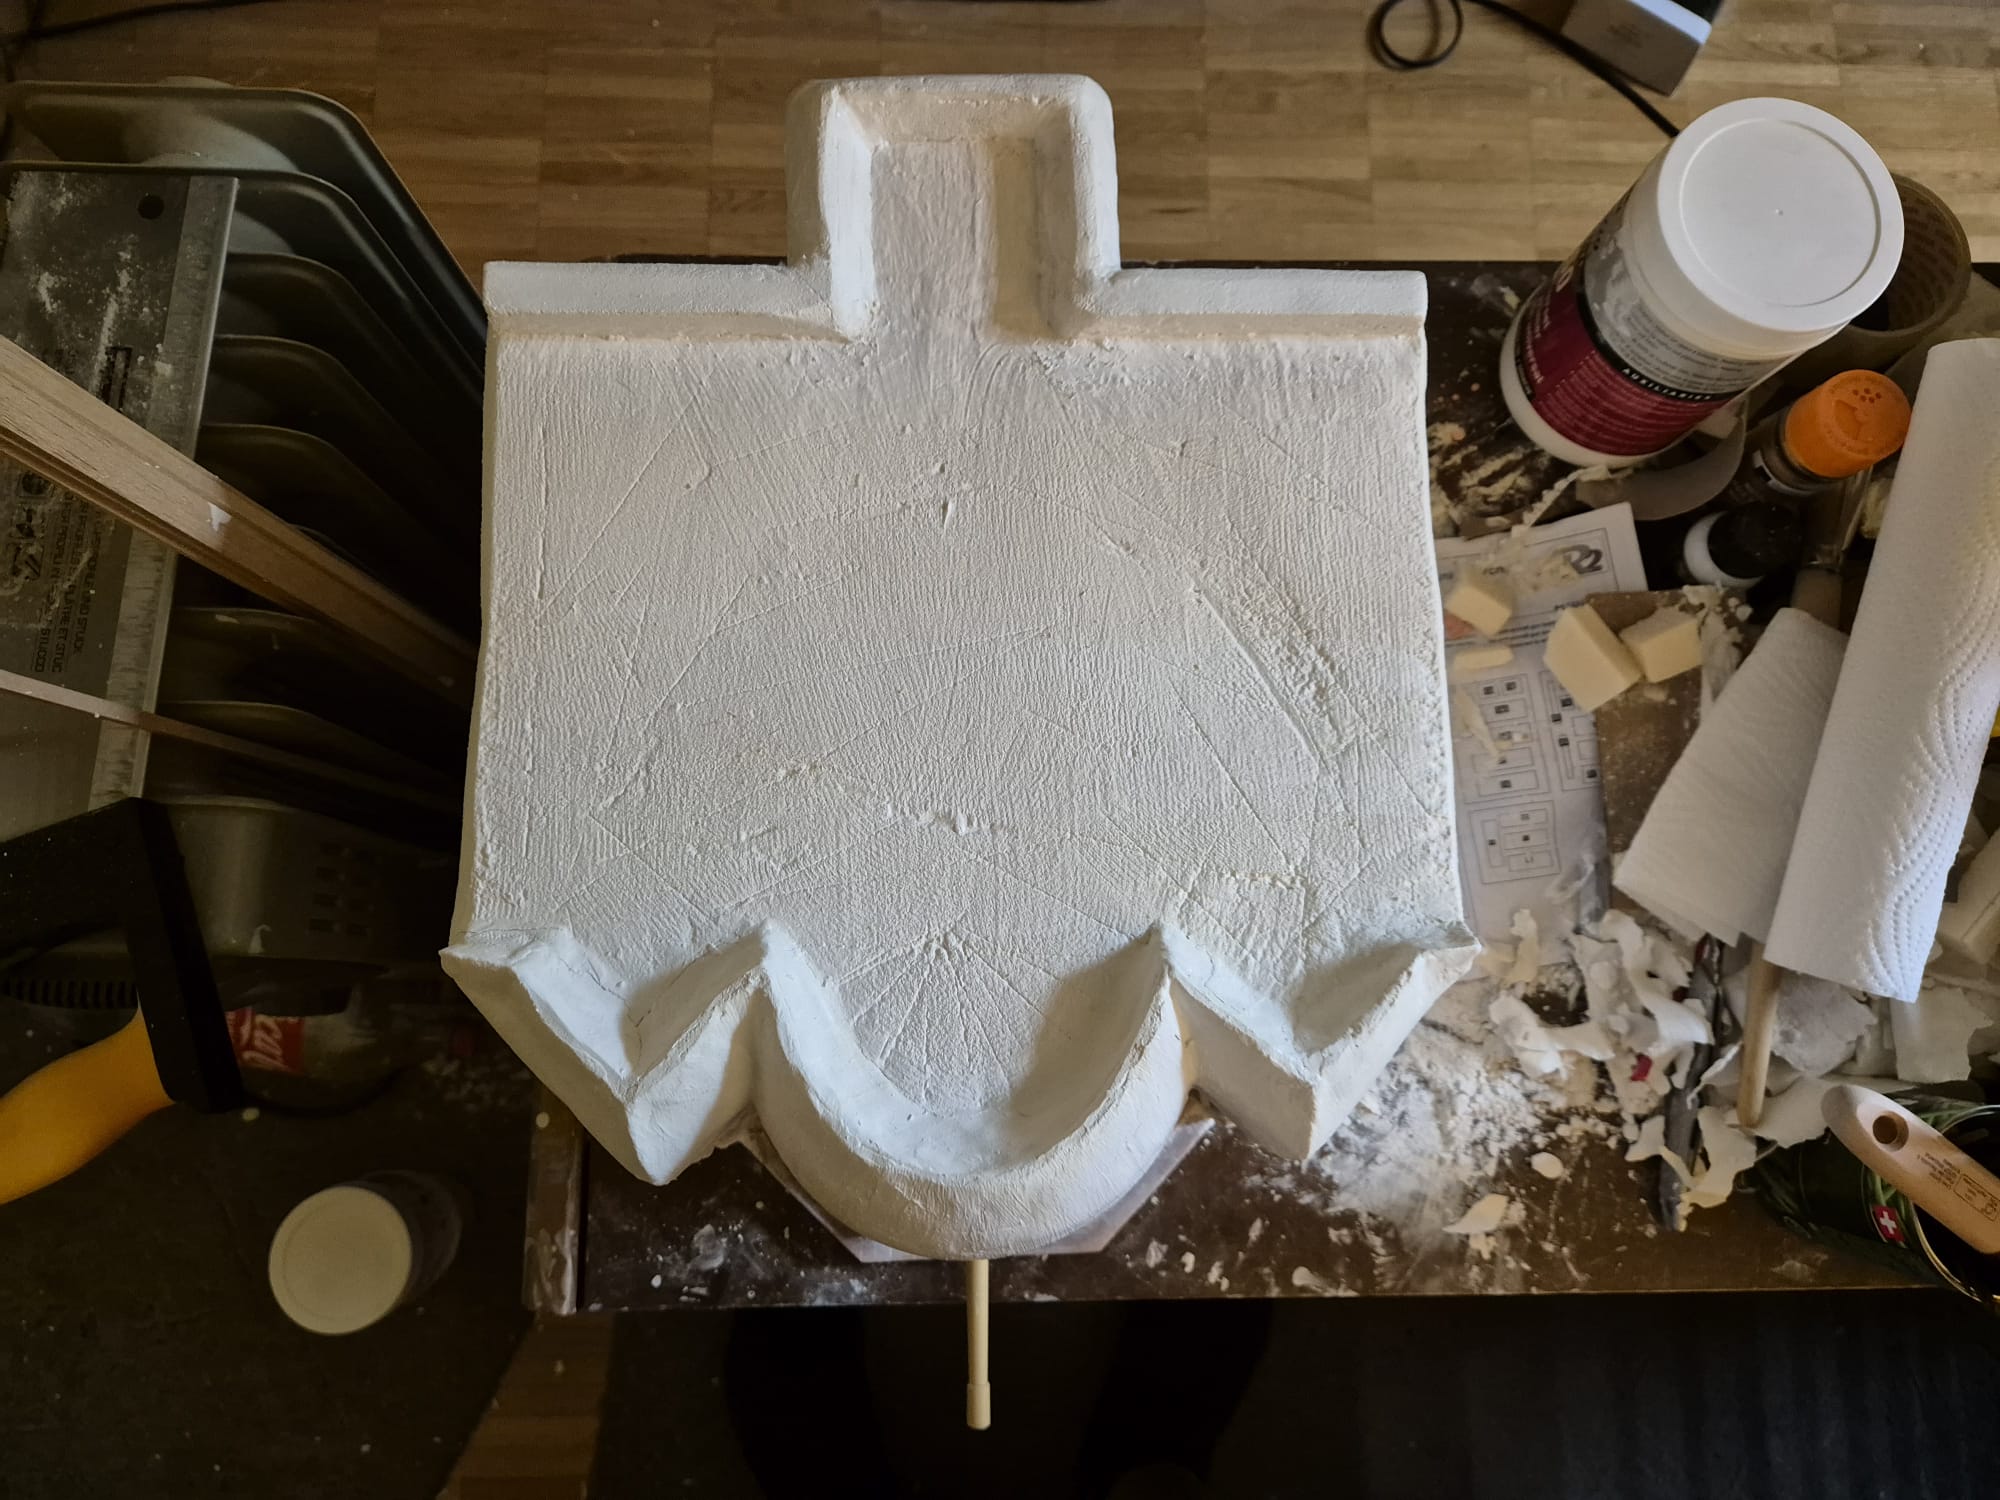
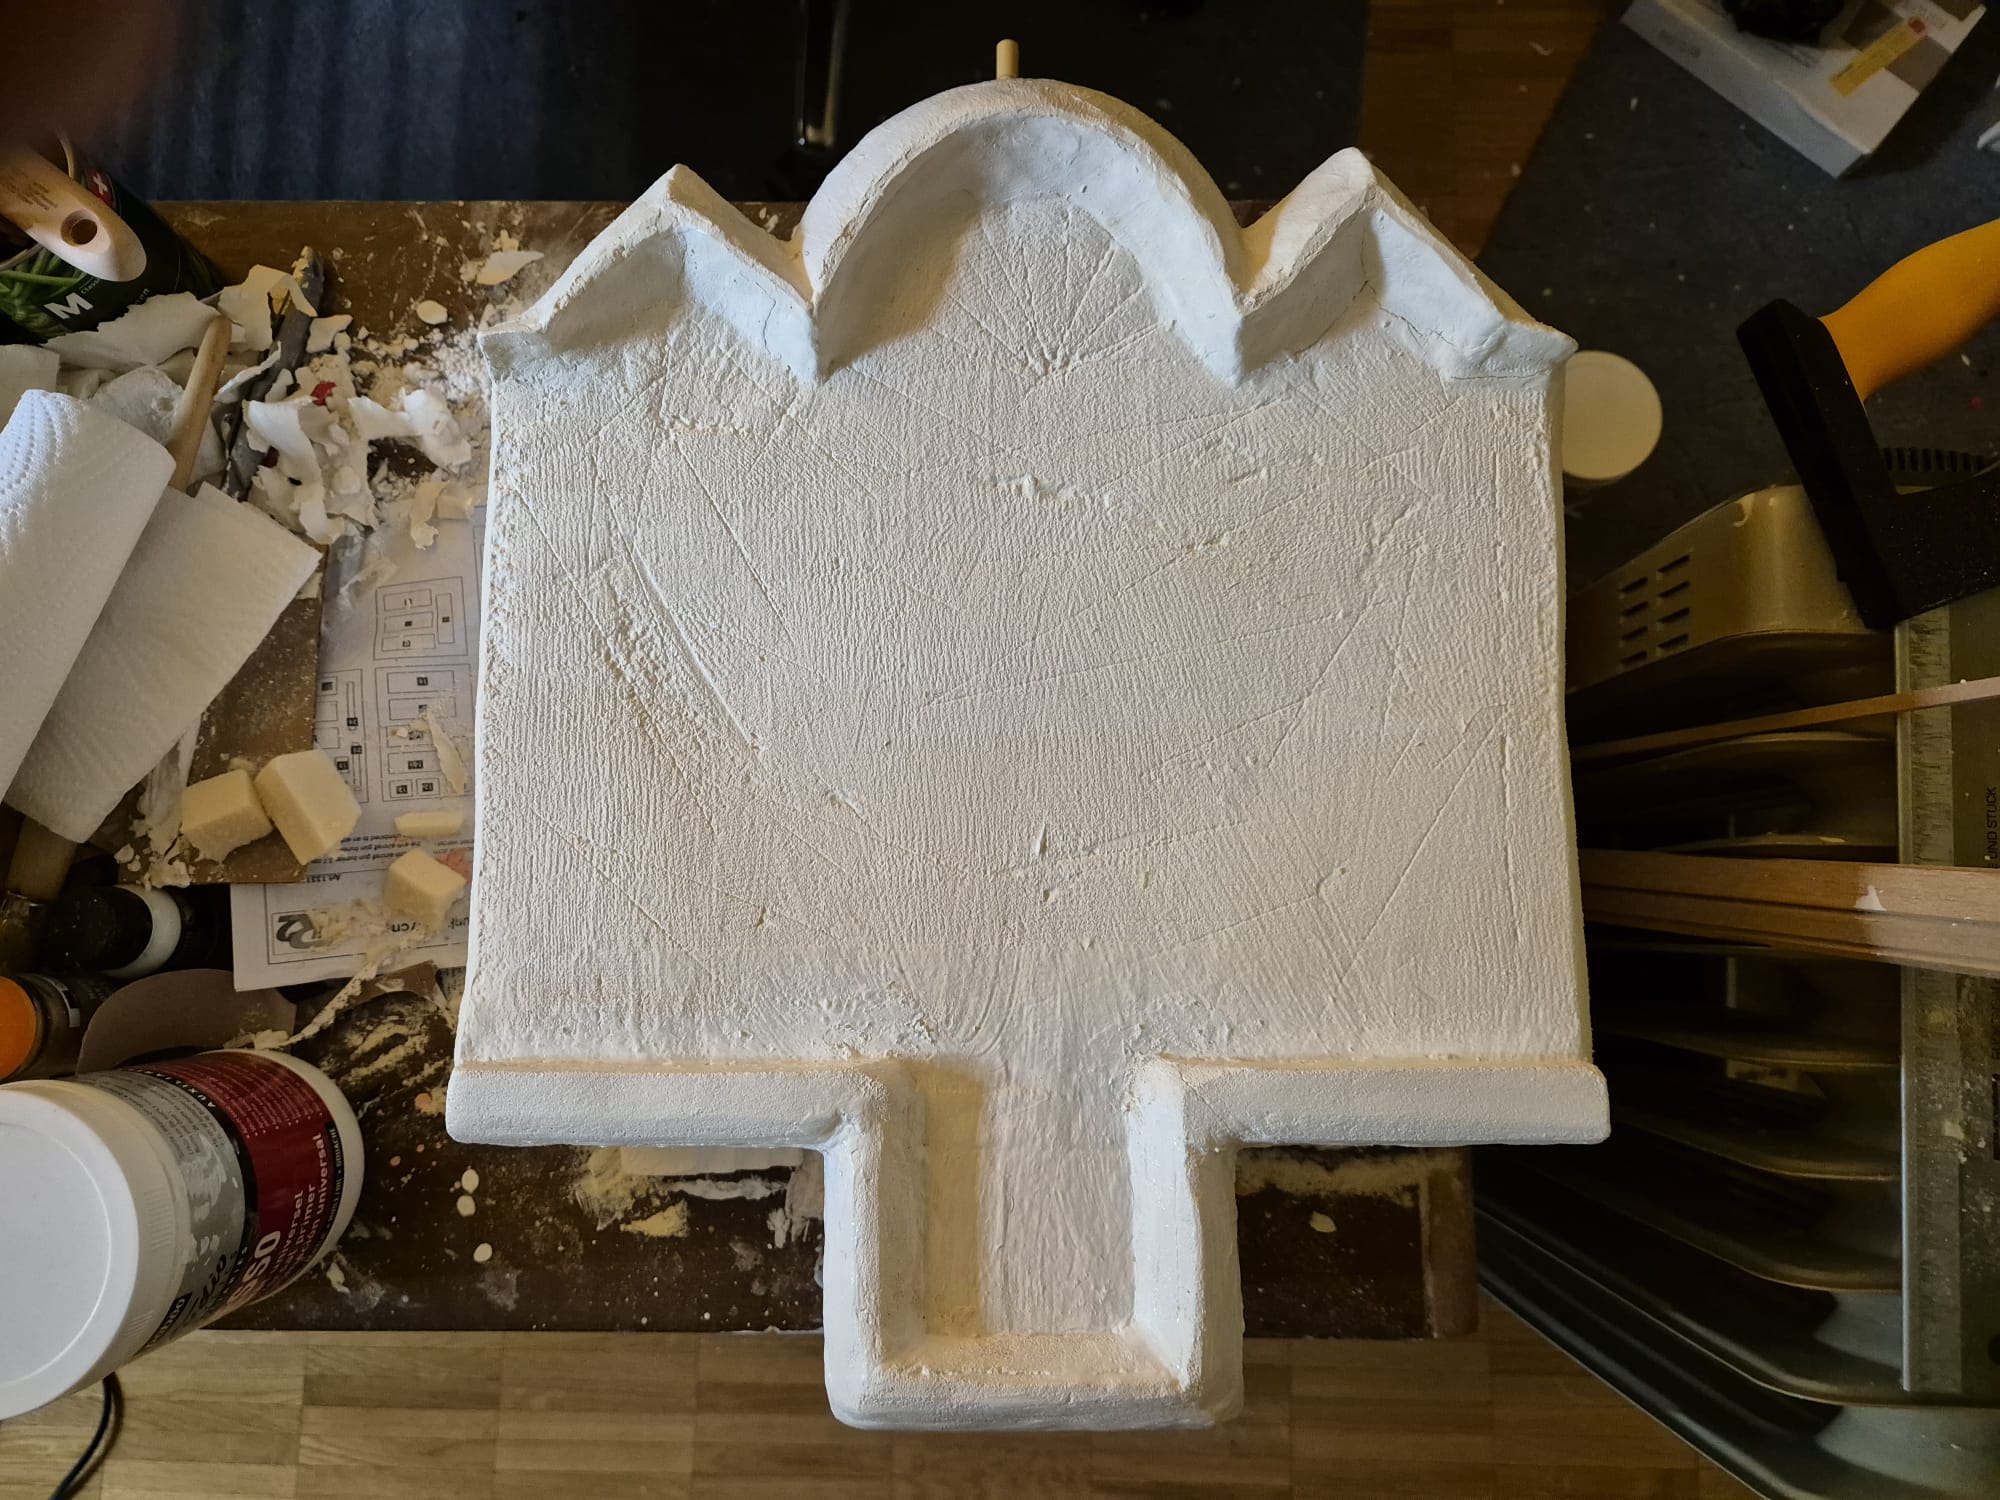
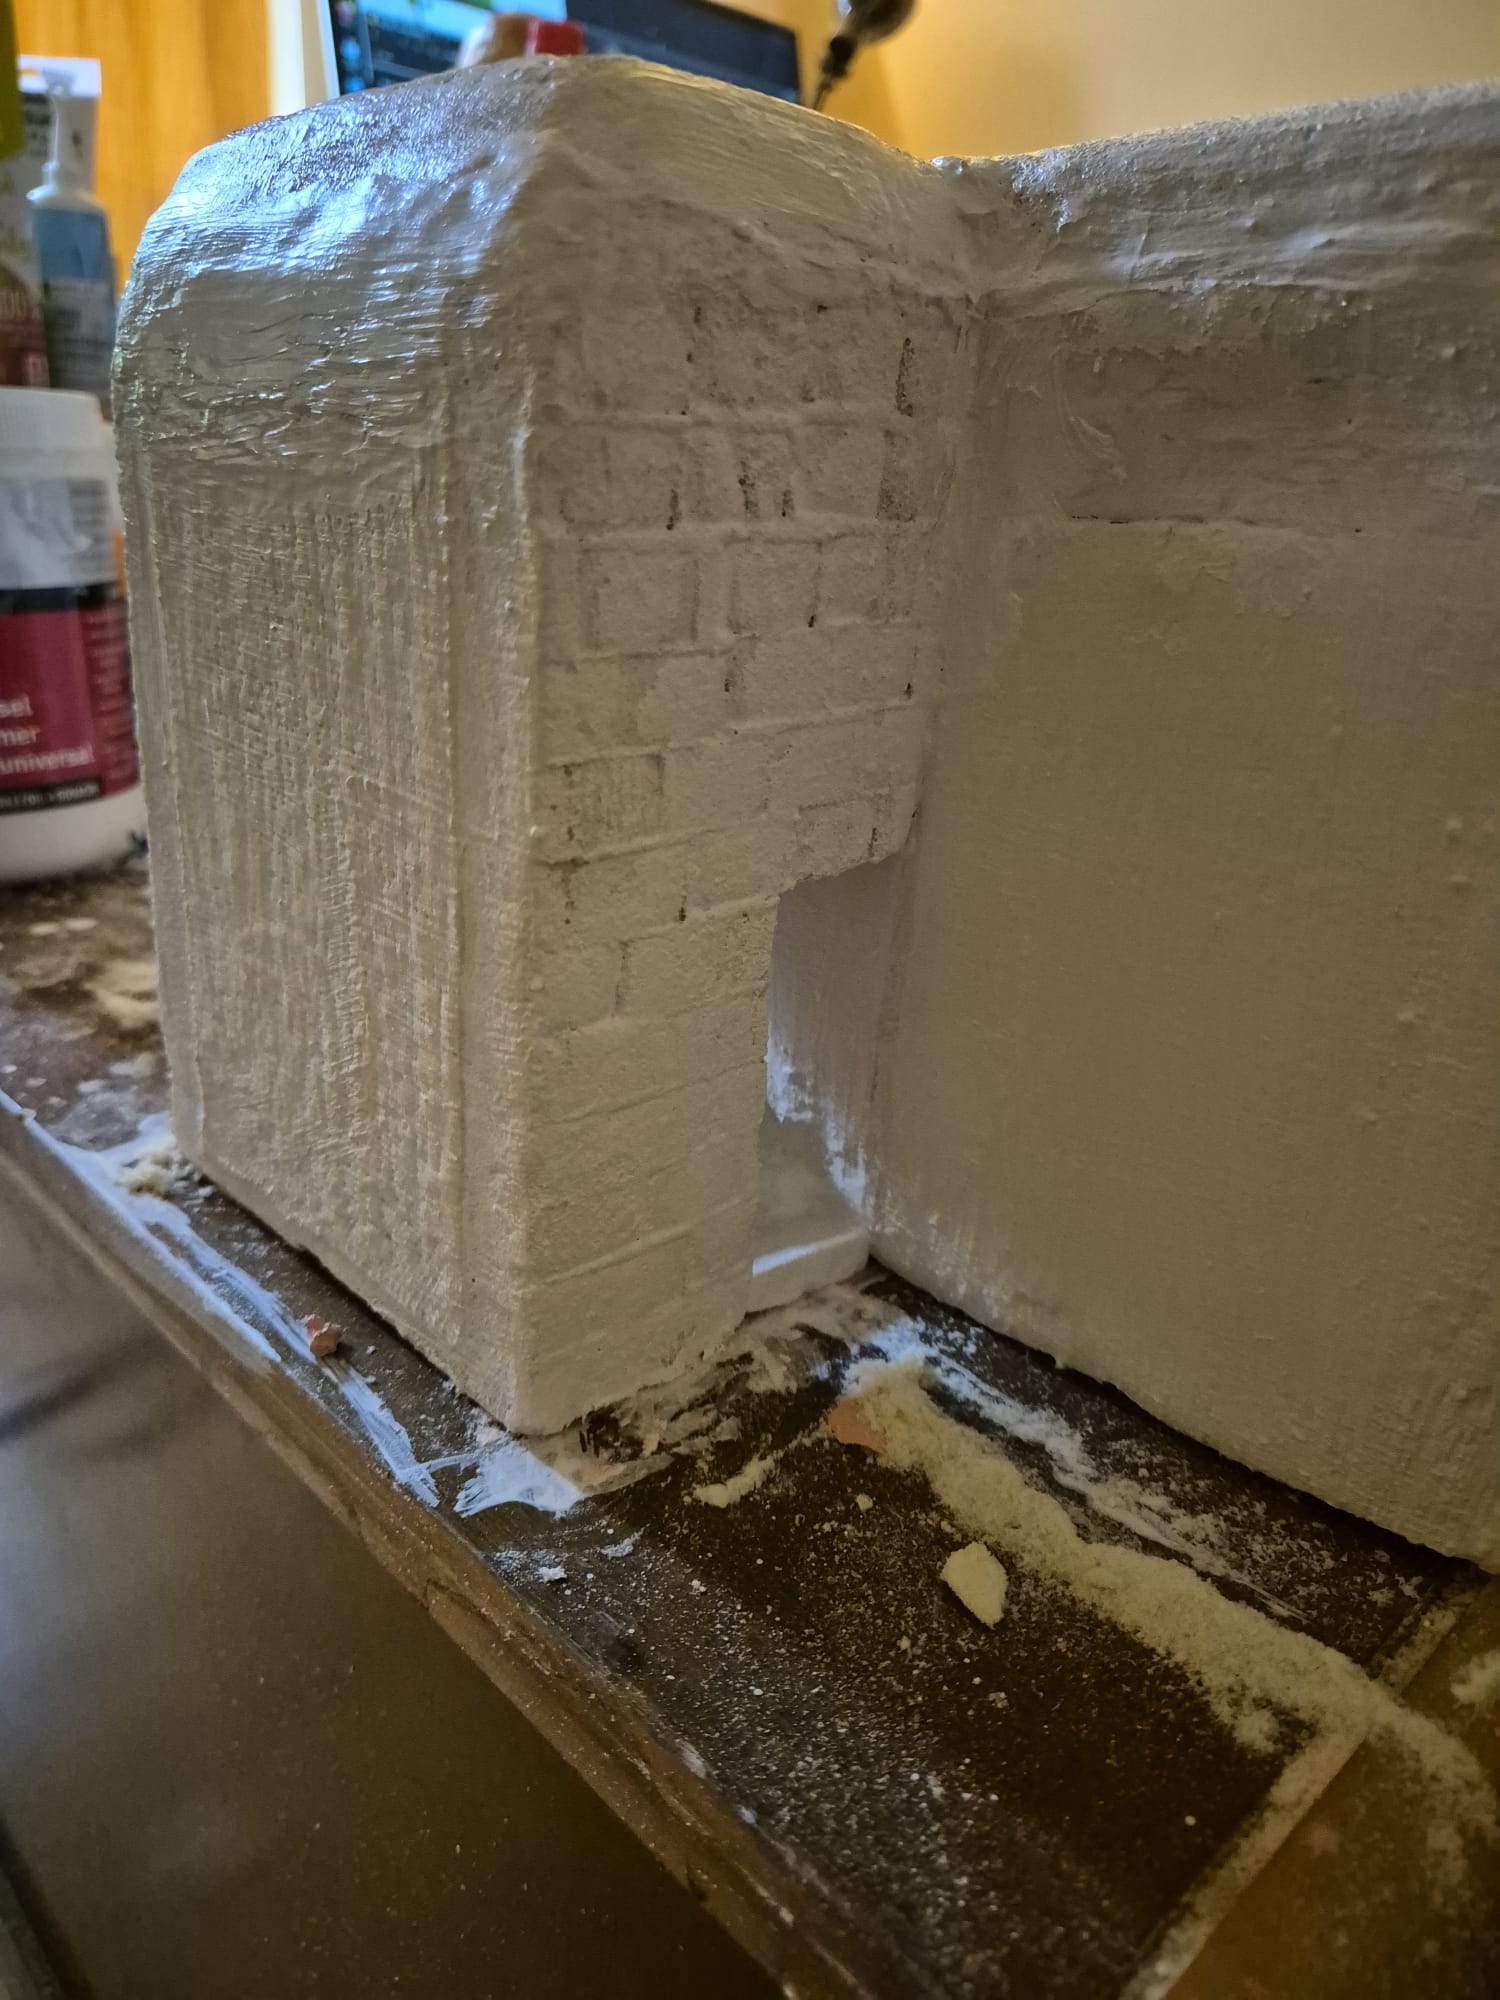
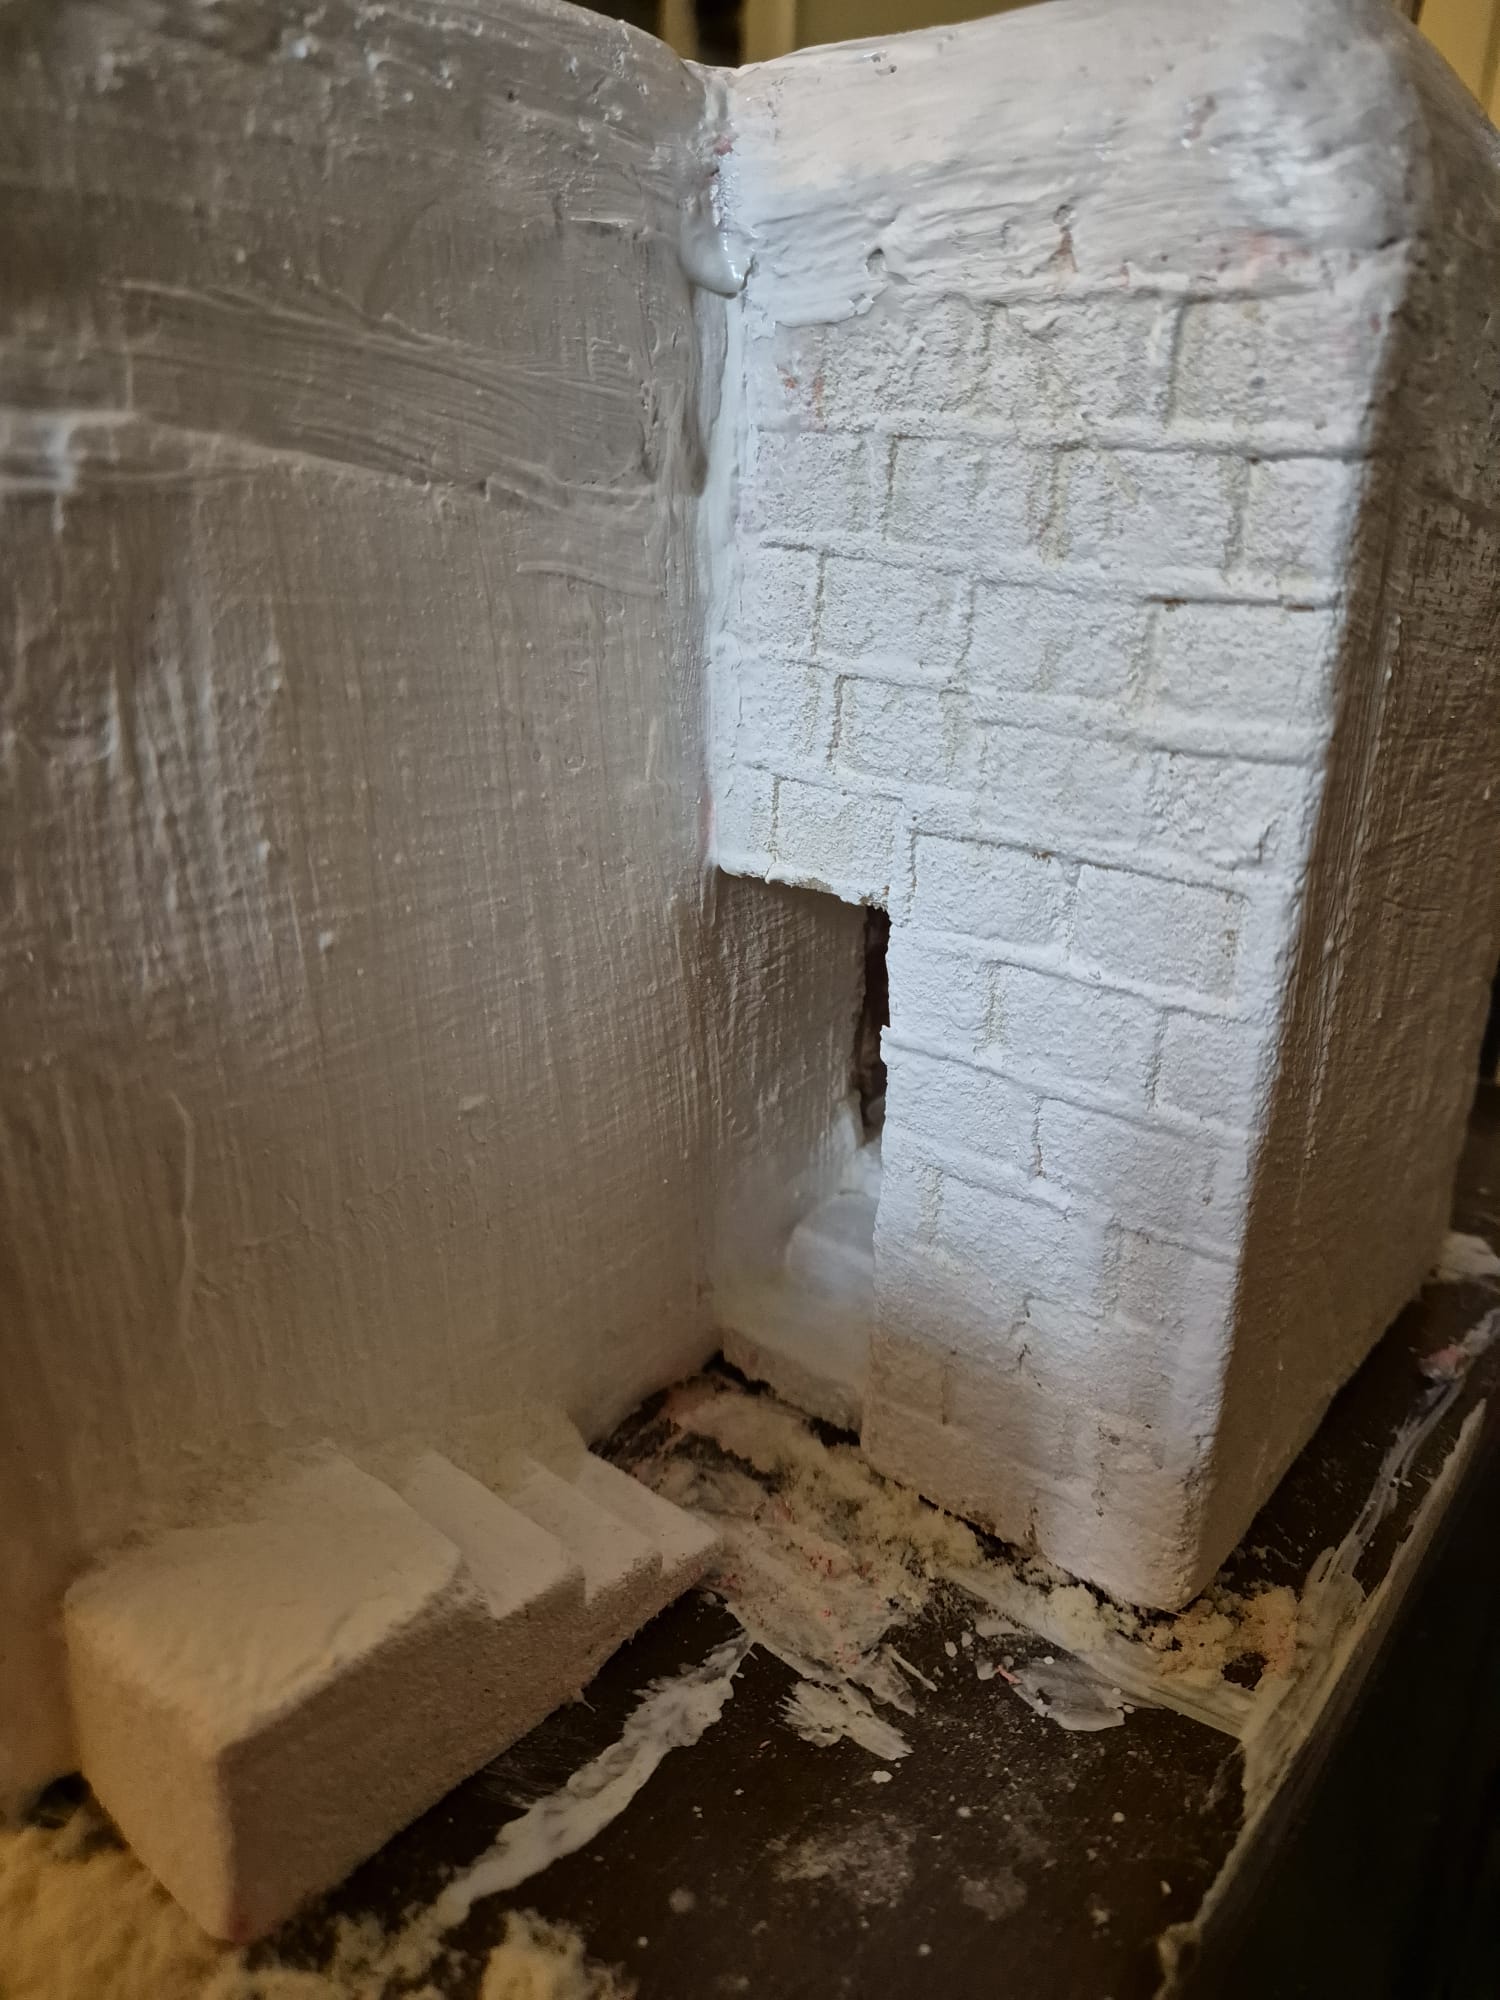
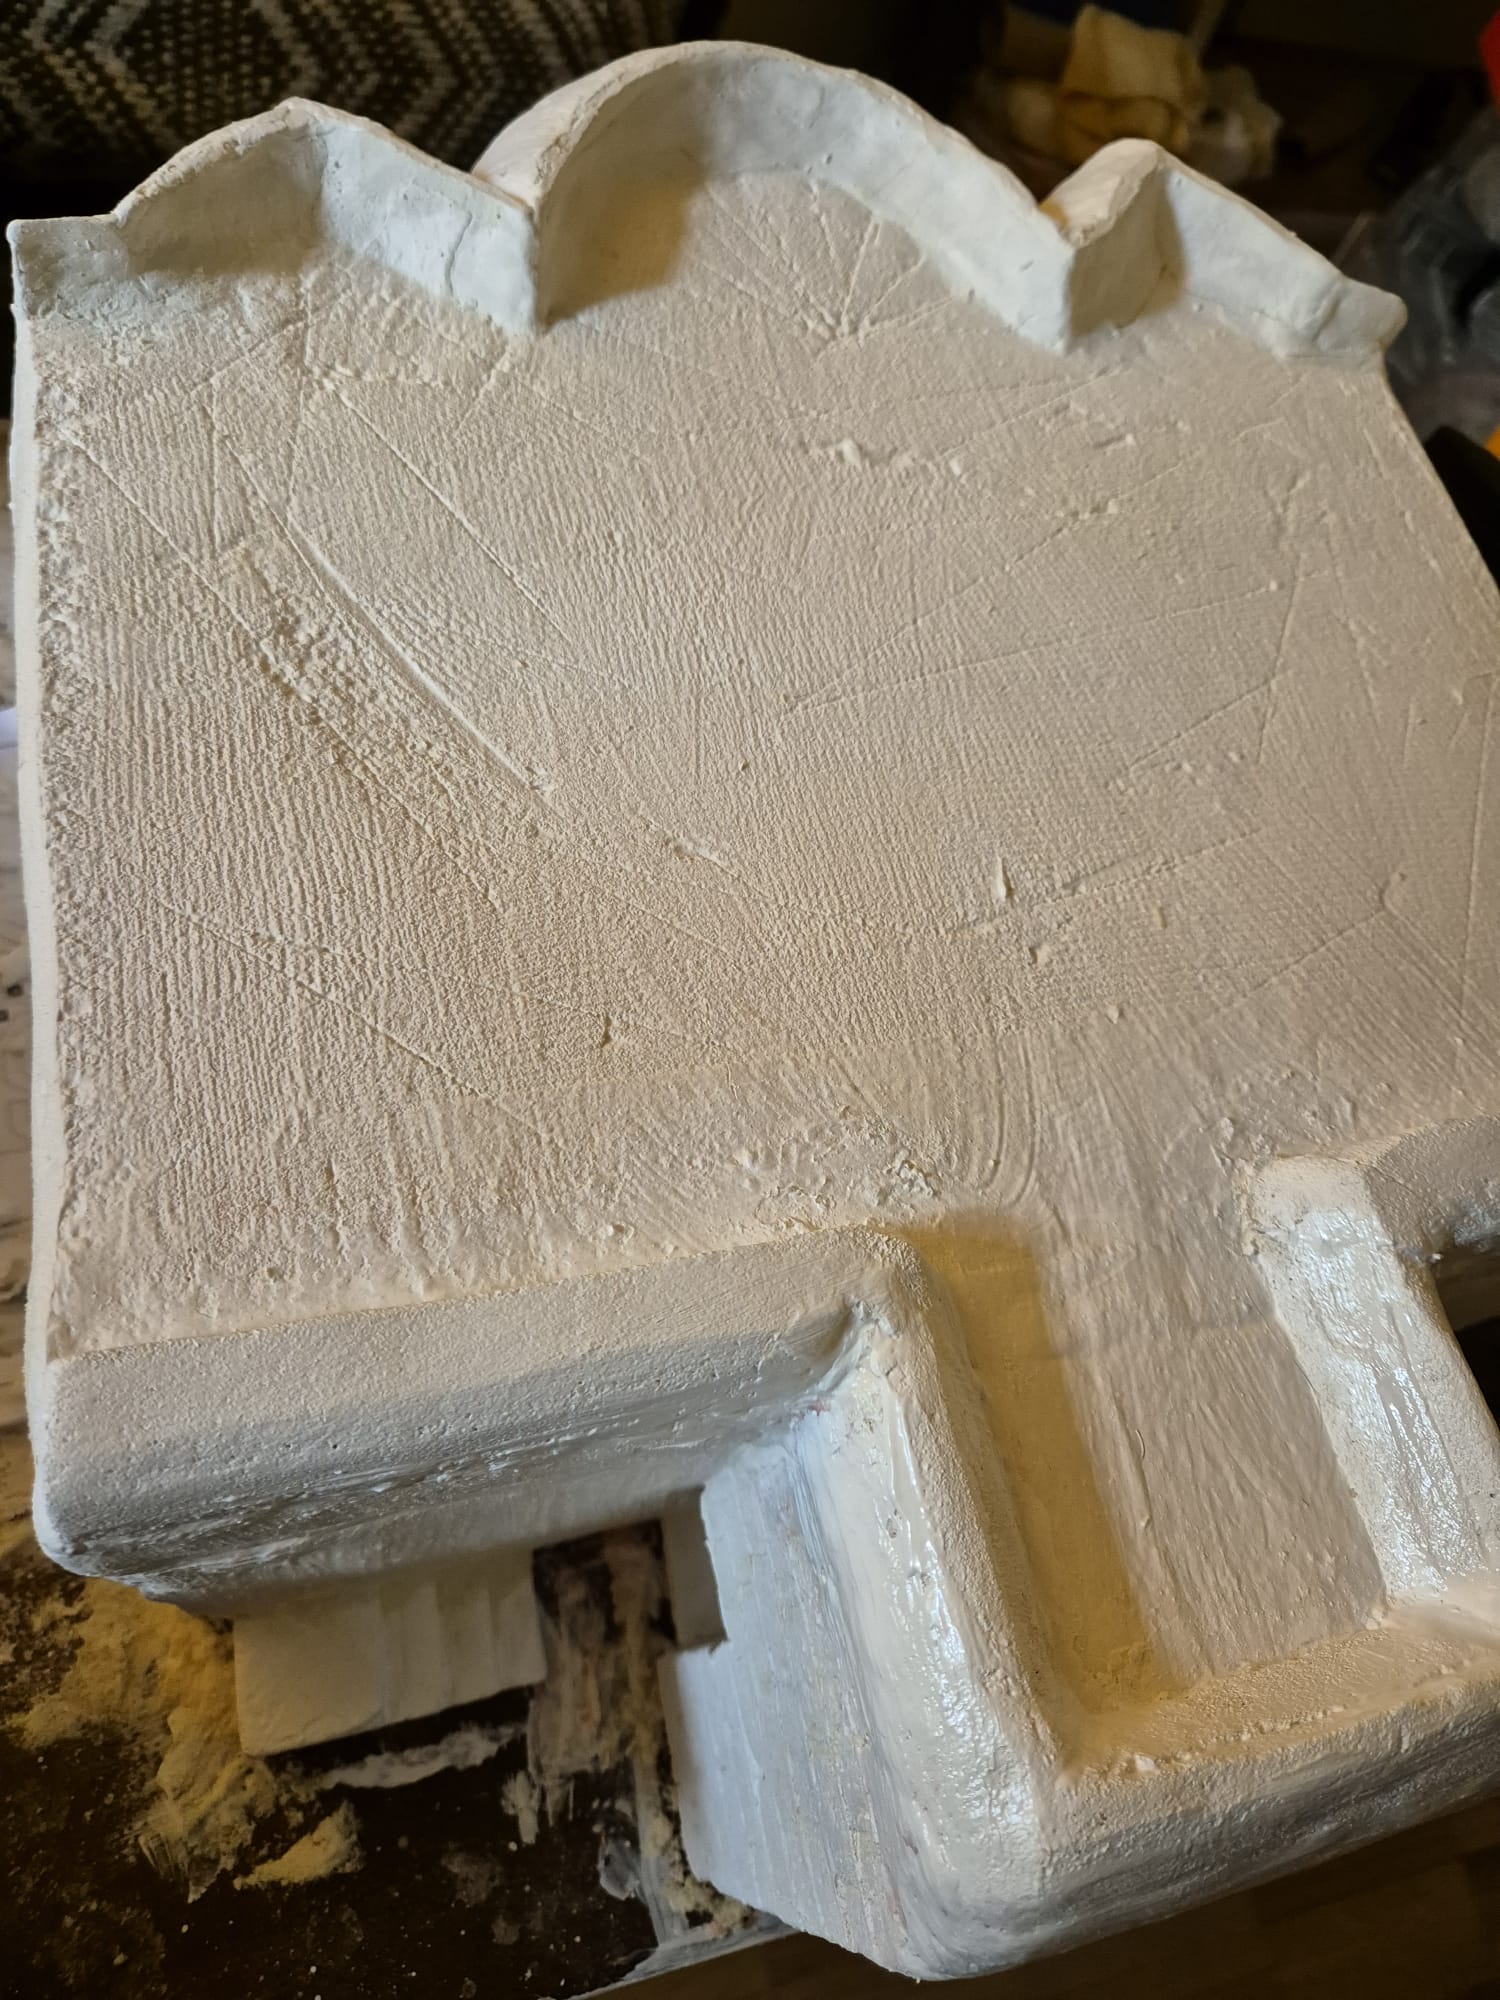
I then proceeded to sawing away the wrong contour of the roof and flattened it by sanding it completely flat. Furthermore I proceeded to apply the necessary parapets in front and on the rear of the rooftop.
The front was modeled with air drying clay modeled by hand and the rear with hard foam dipped into plaster and modeling paste.
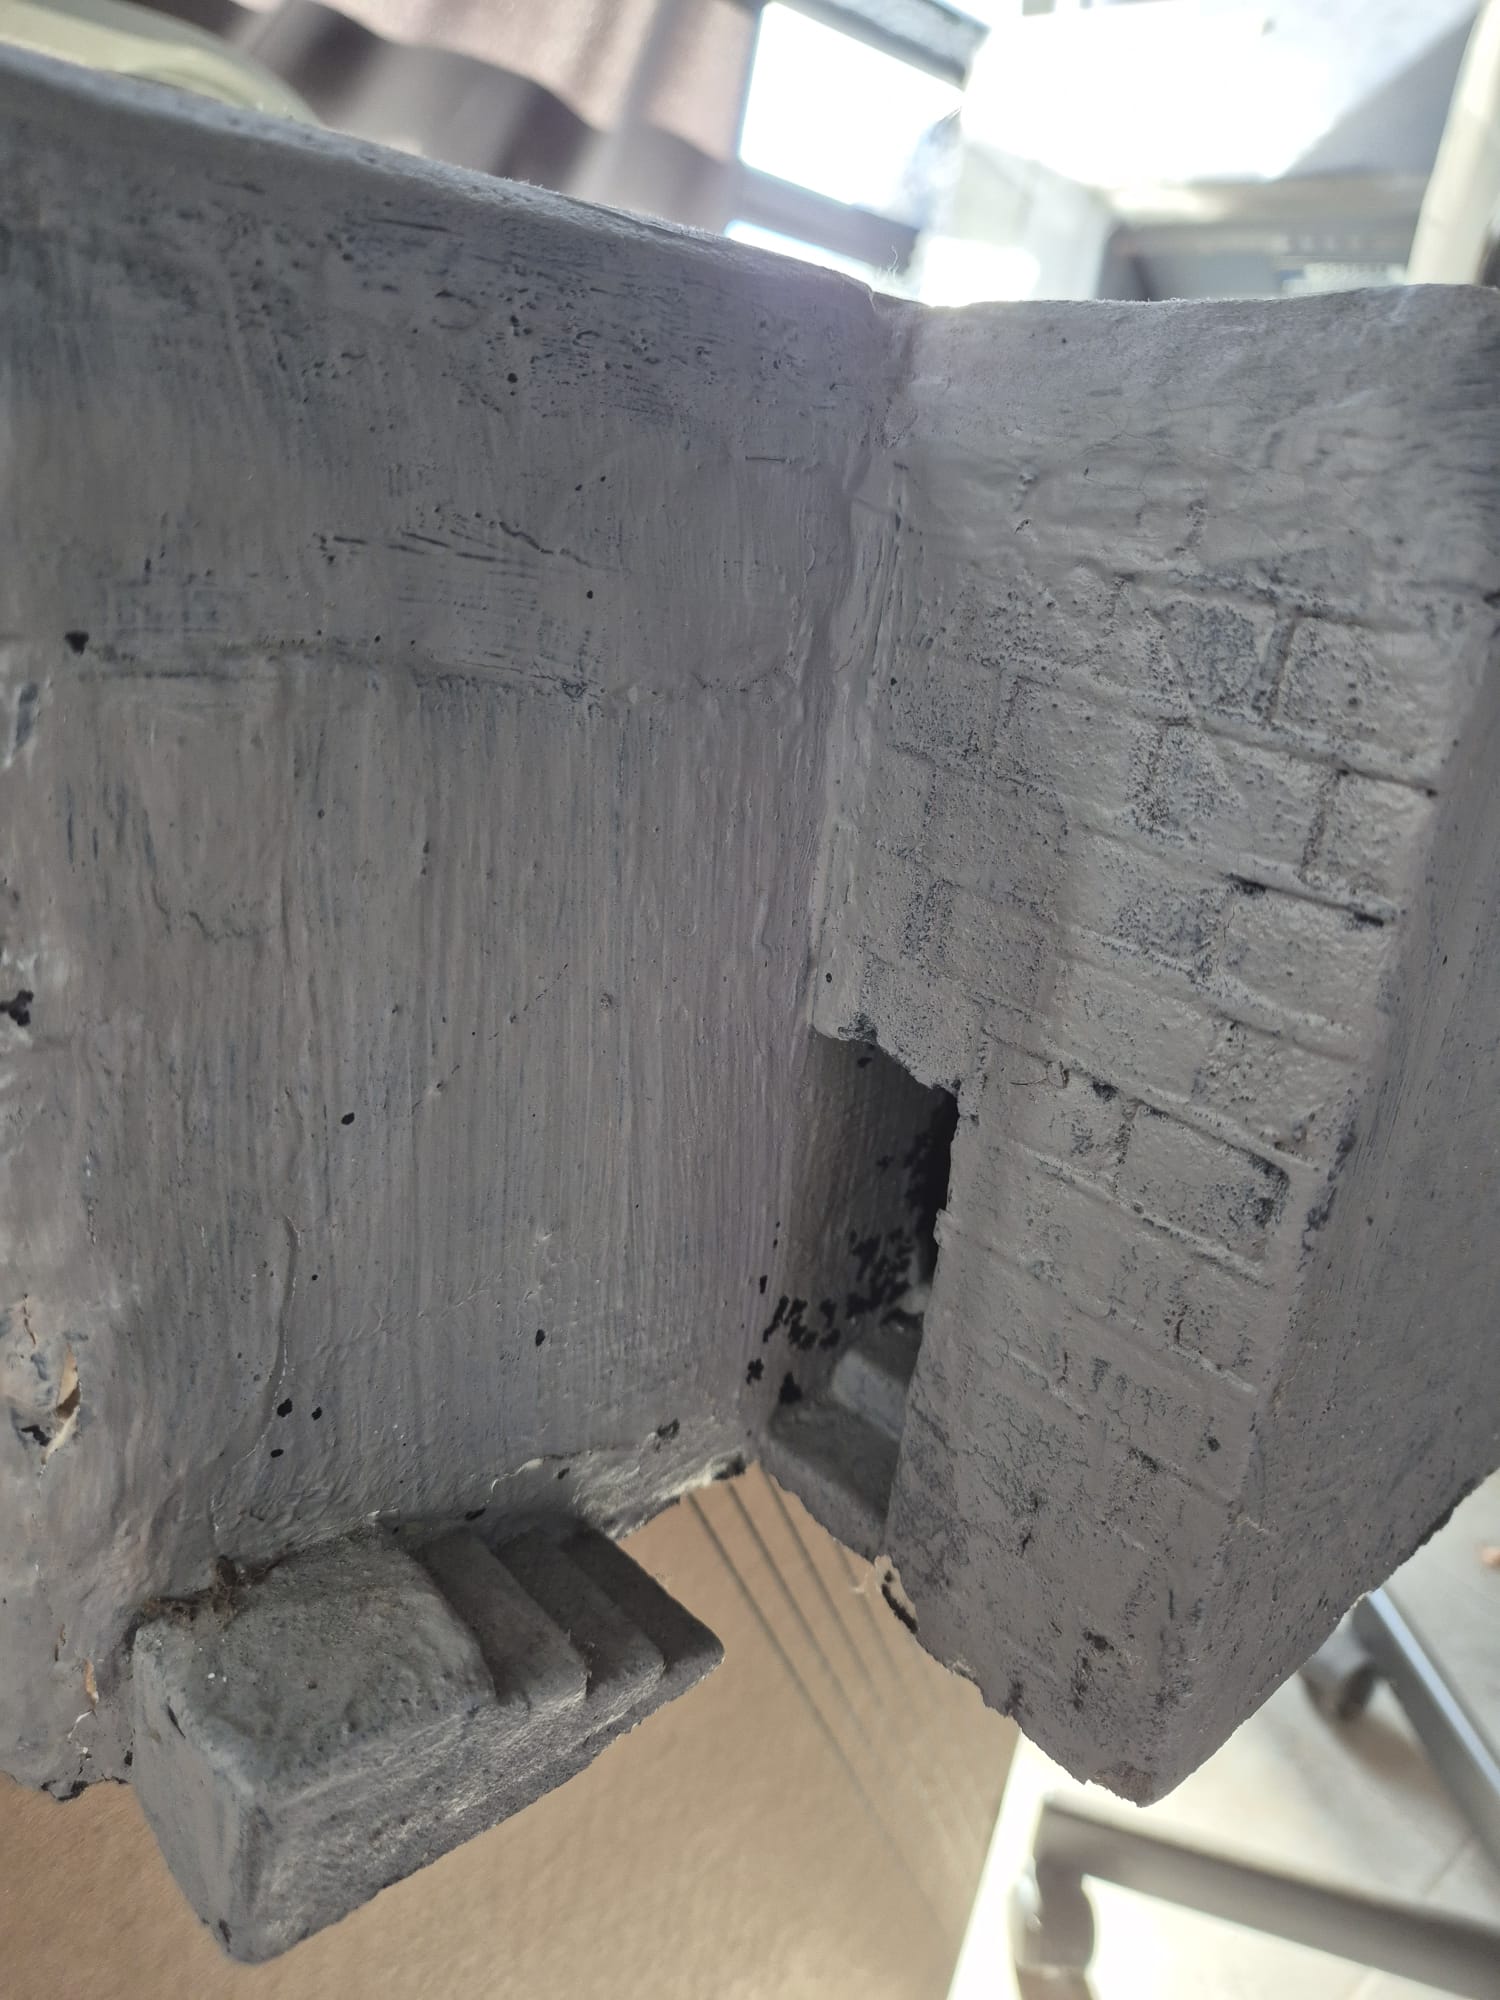
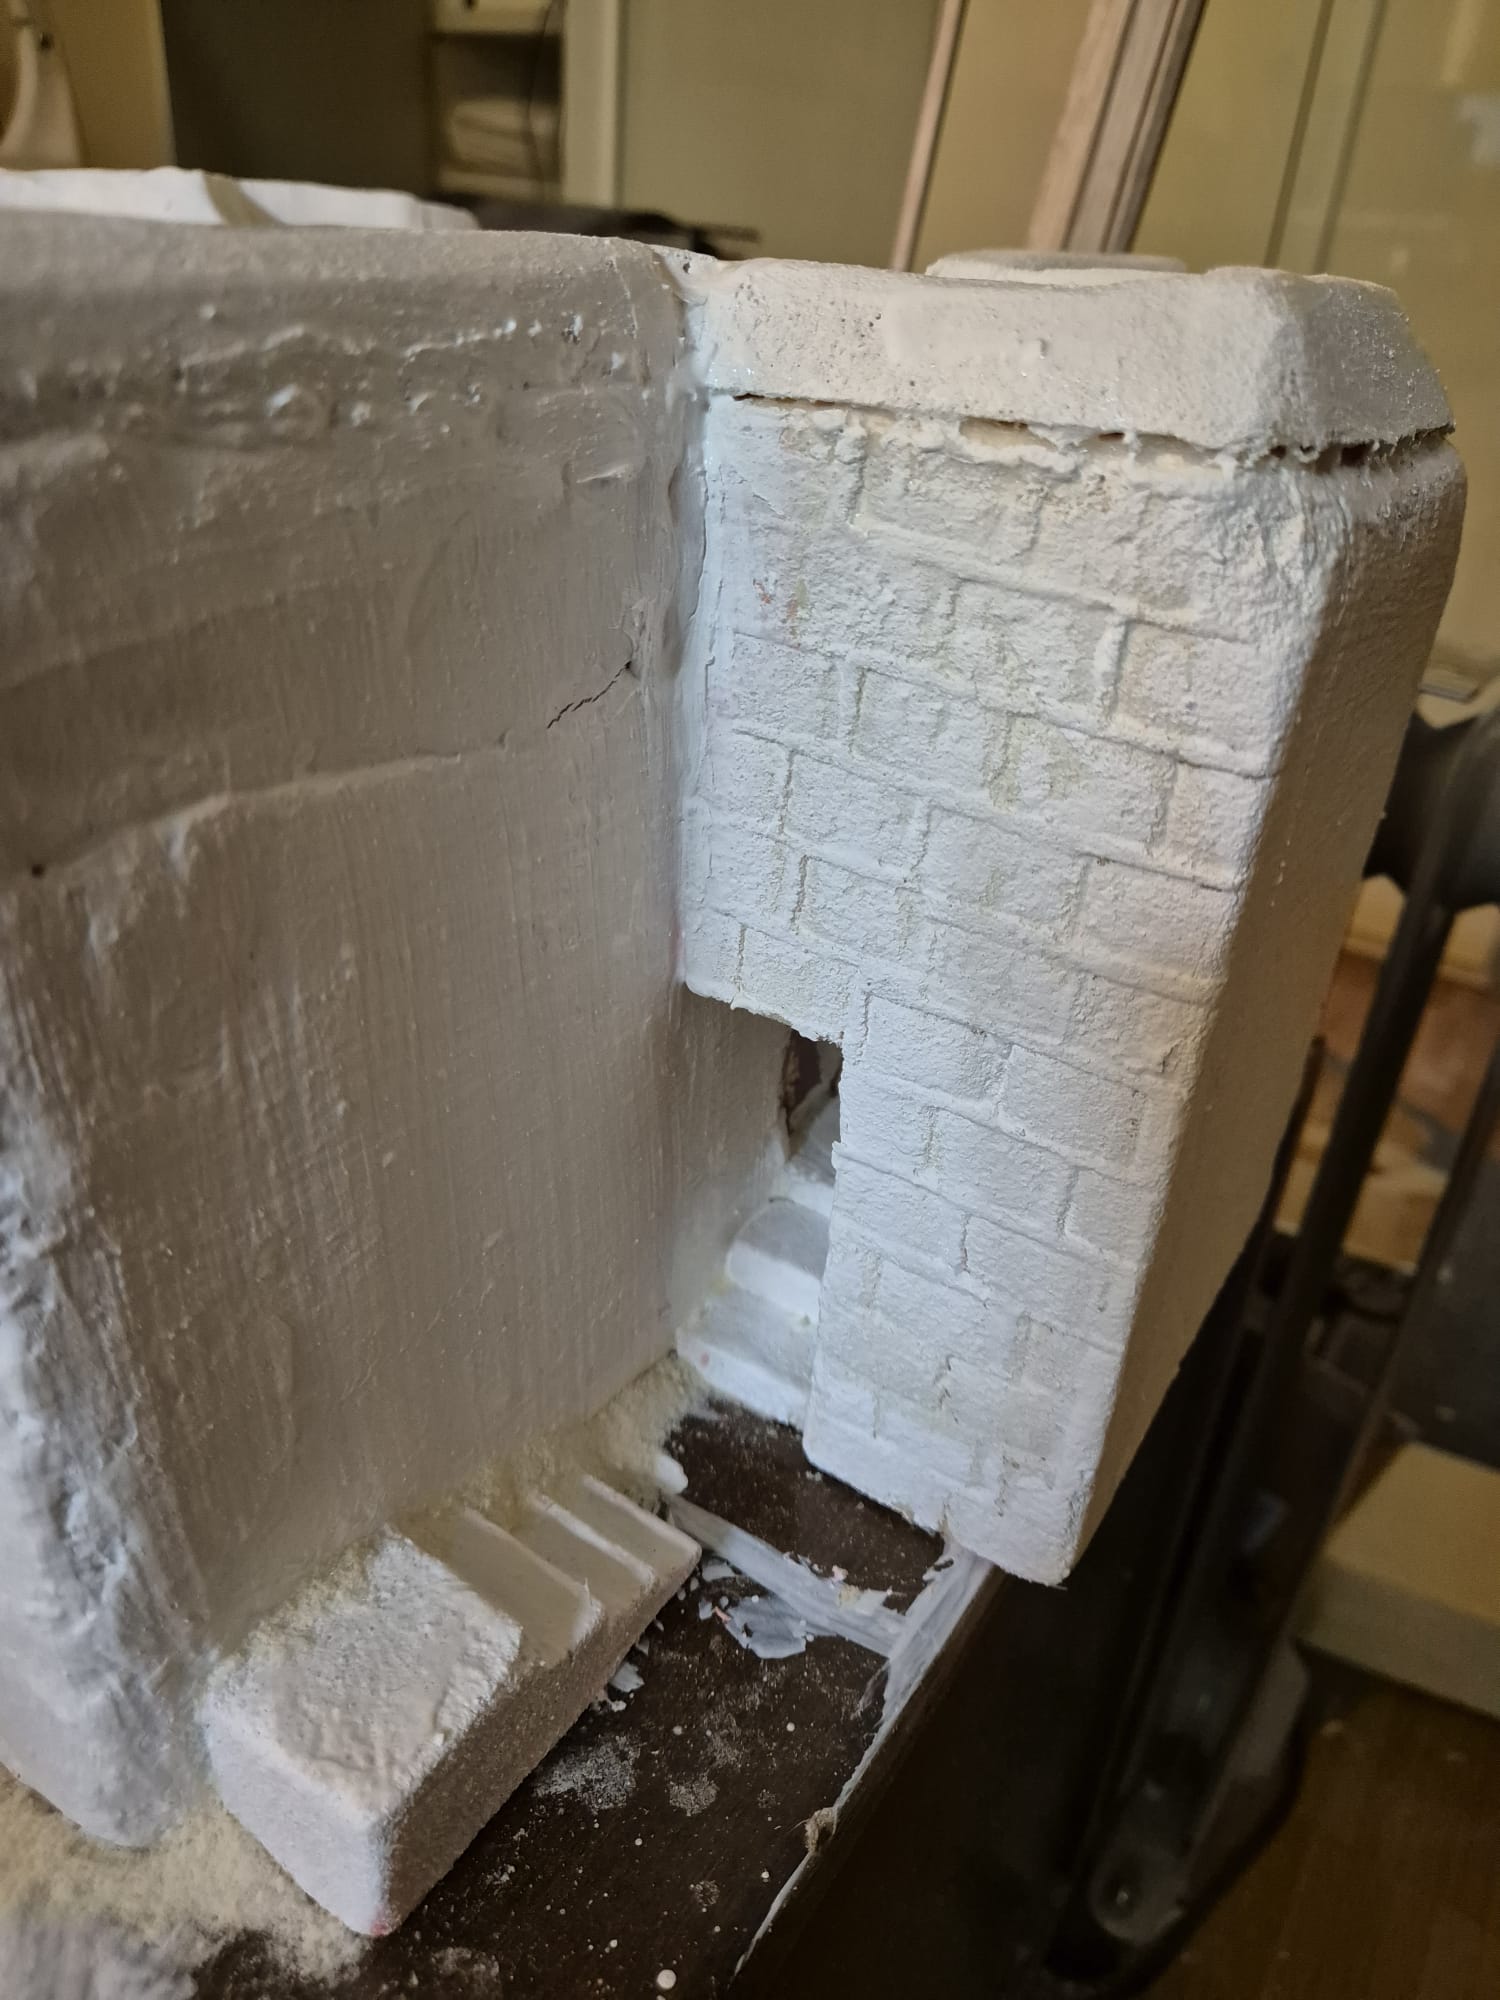
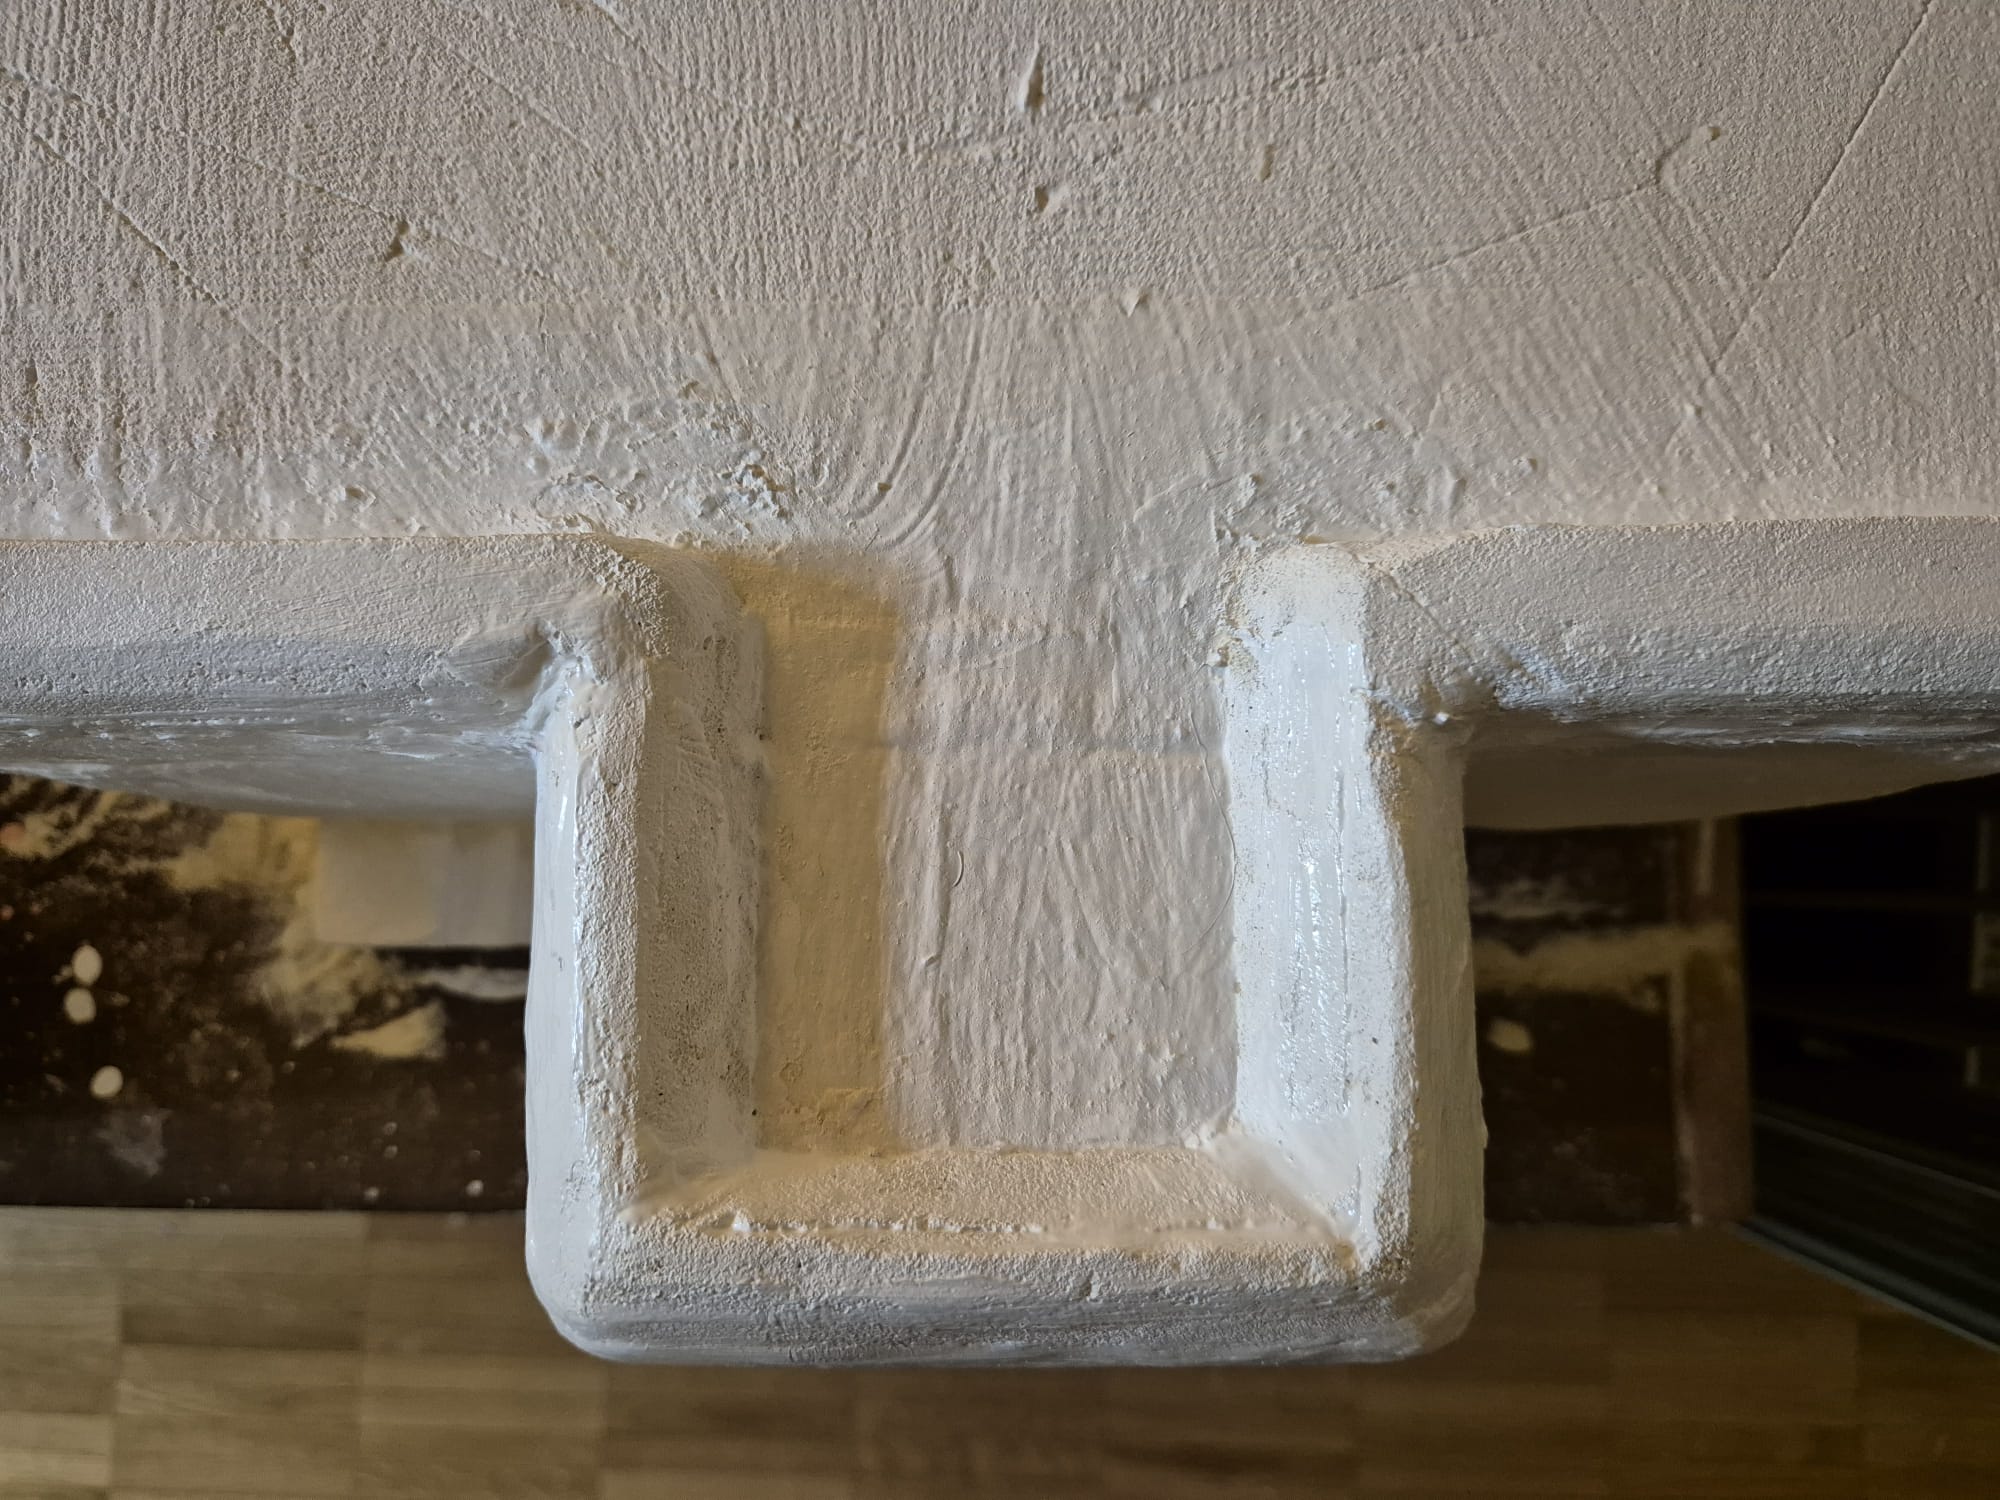
The same was performed to scratch build the massive protective rear entrance wall with a reinforcement with plaster cloth.
The side stone relief reproduction was made by pressing a rectangular piece of wood into the foam and then covering it all with plaster.

Here are the pictures of that work:


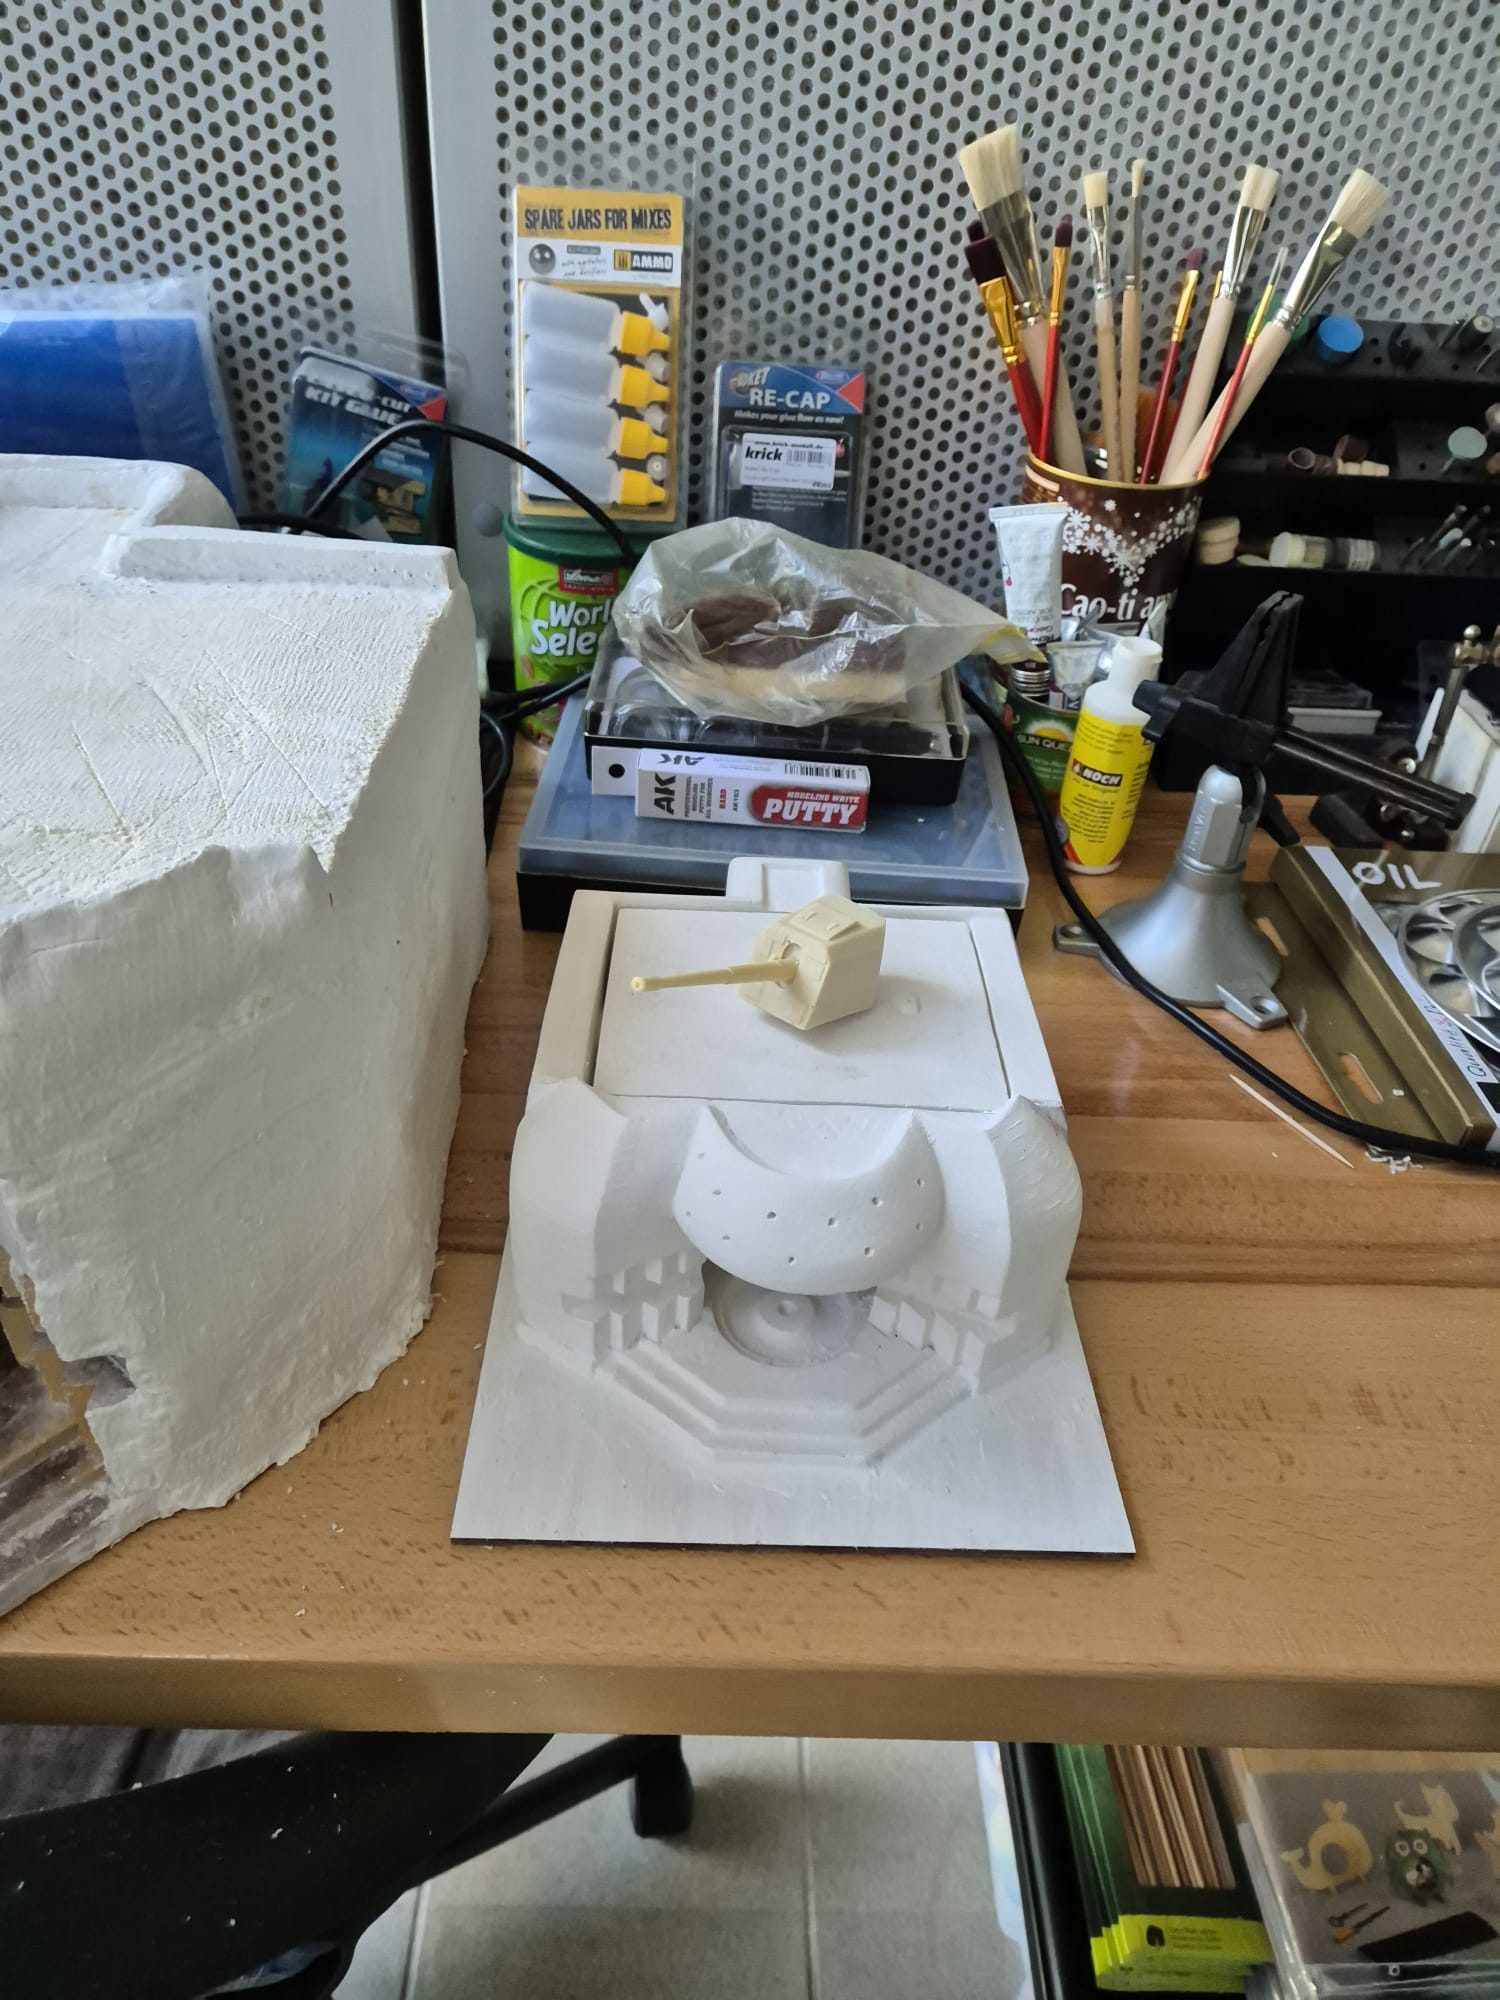
Now on my painting bench on my terrace it is awaiting a preliminary painting job..

Its cousin in 1/72 scale is also waiting, also acquired from PN Sud Modellisme, for a nice hand of filler and an appropriate painting. This one though did not require any further work and came in all the correct detailing parts.

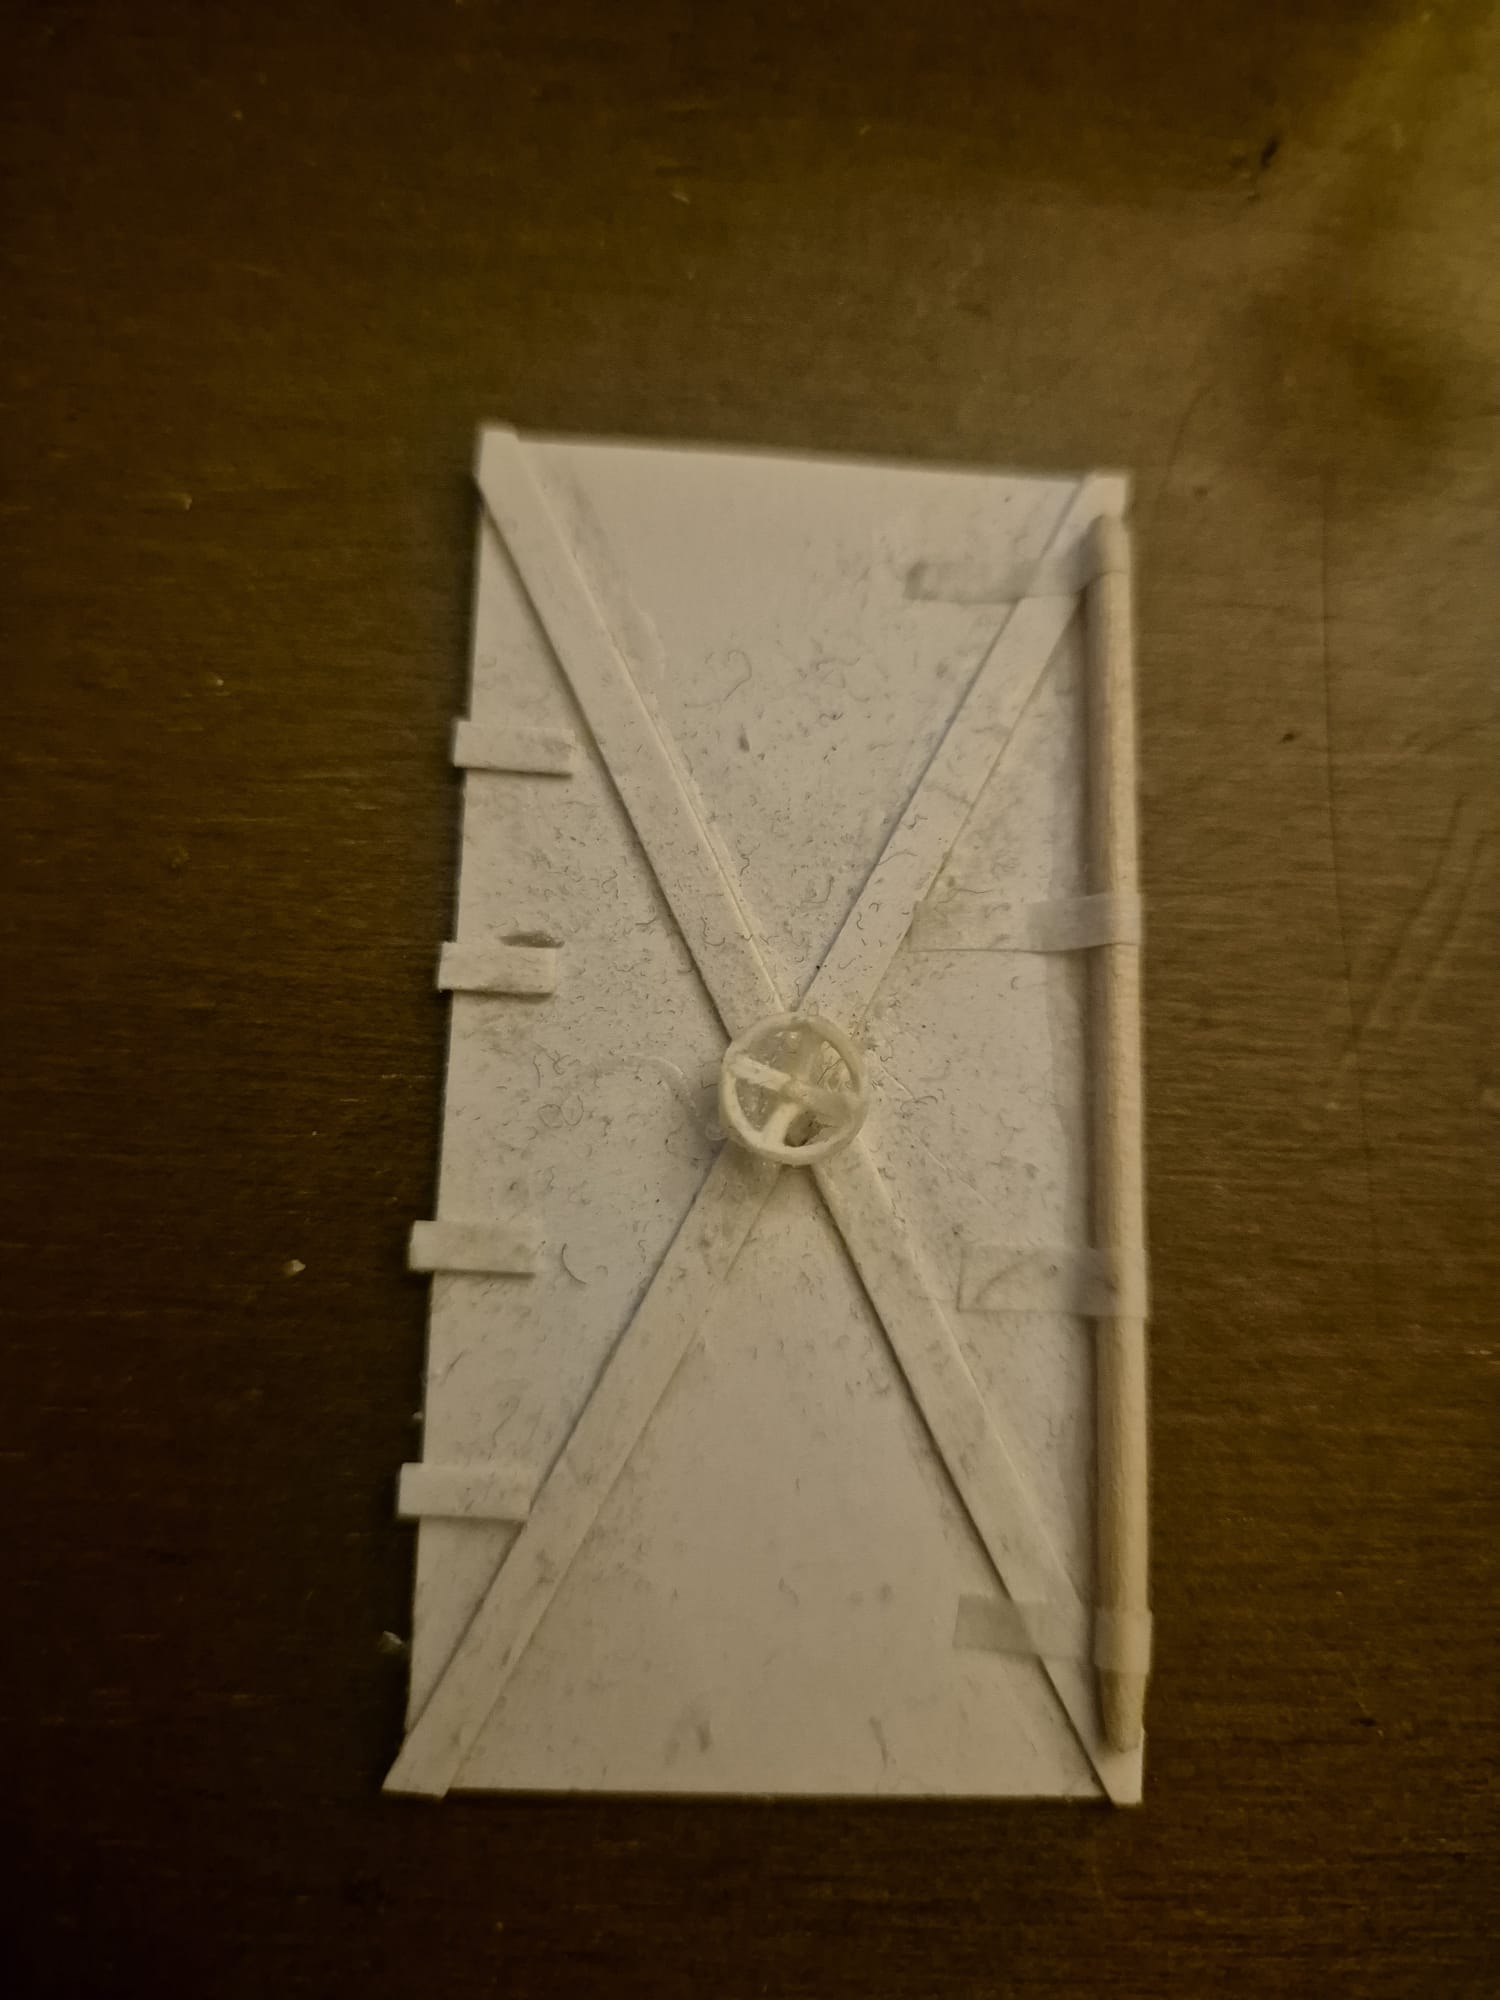
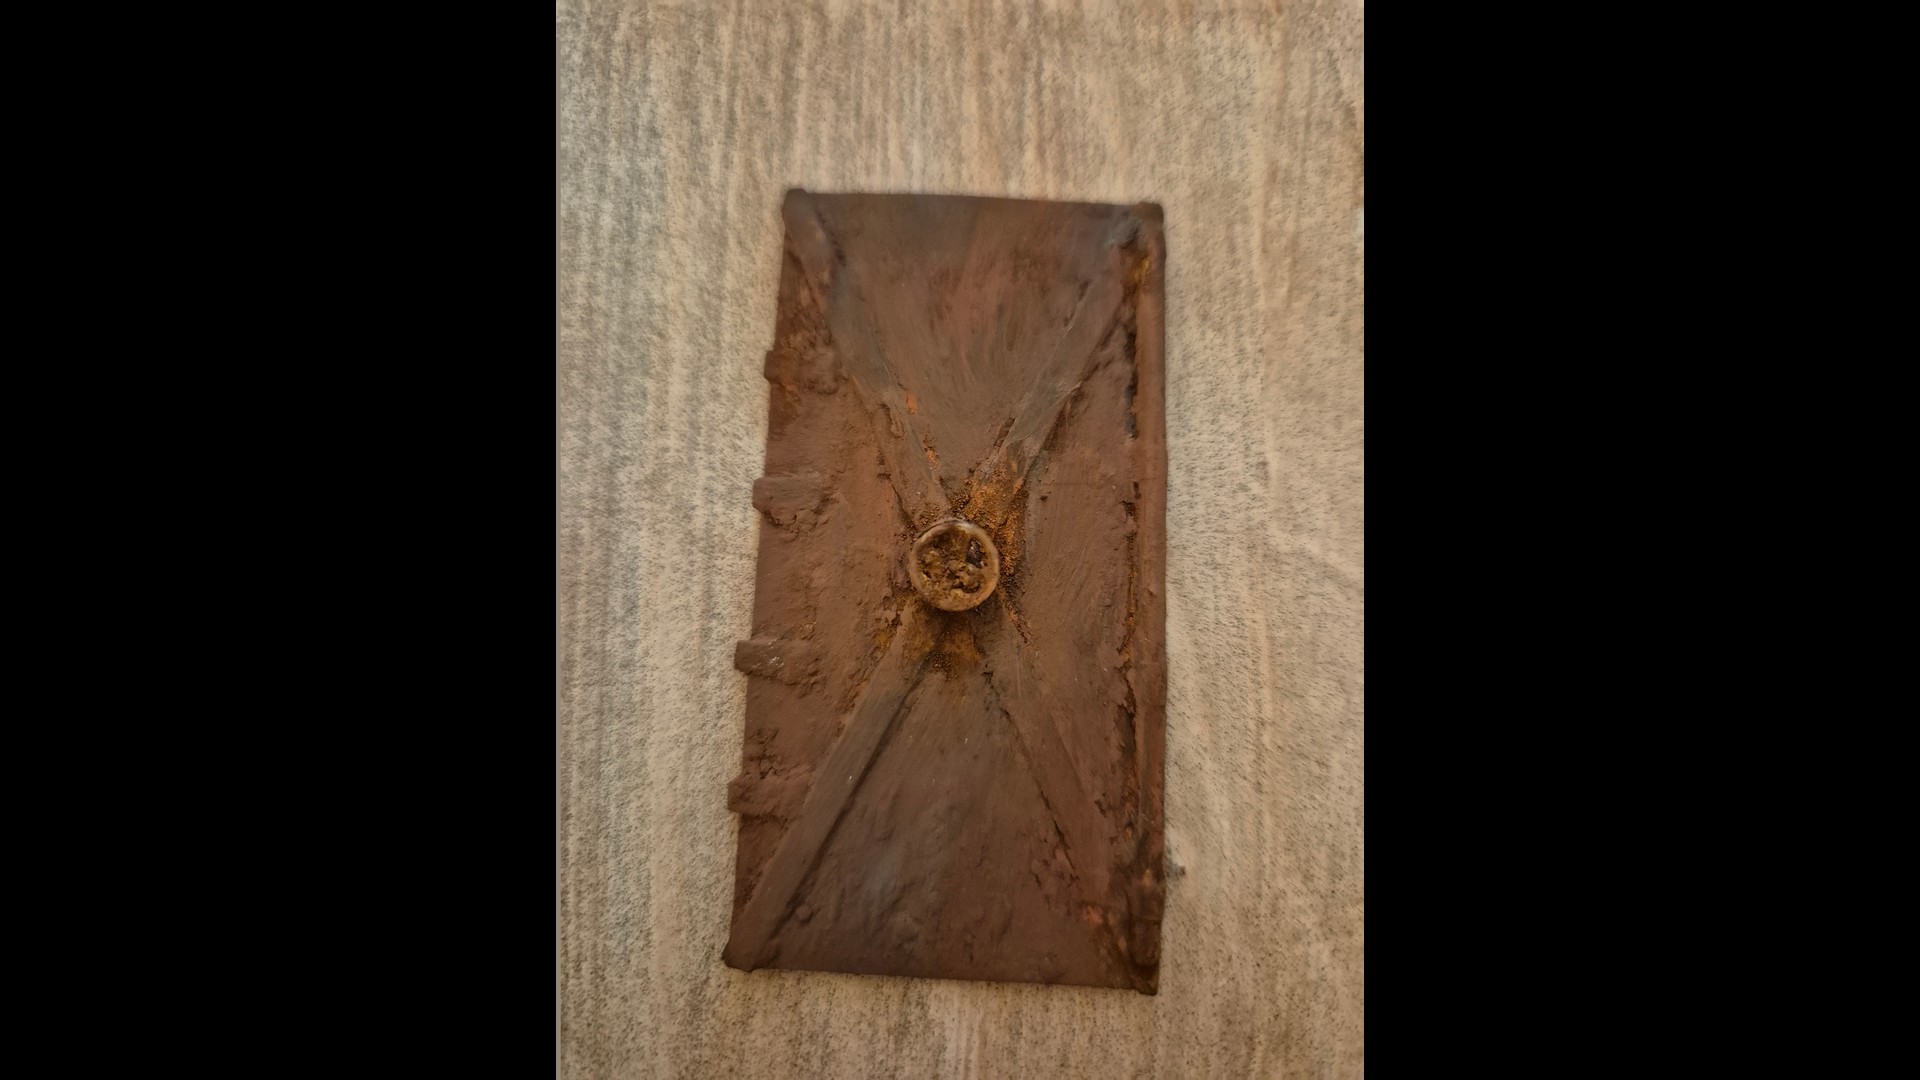
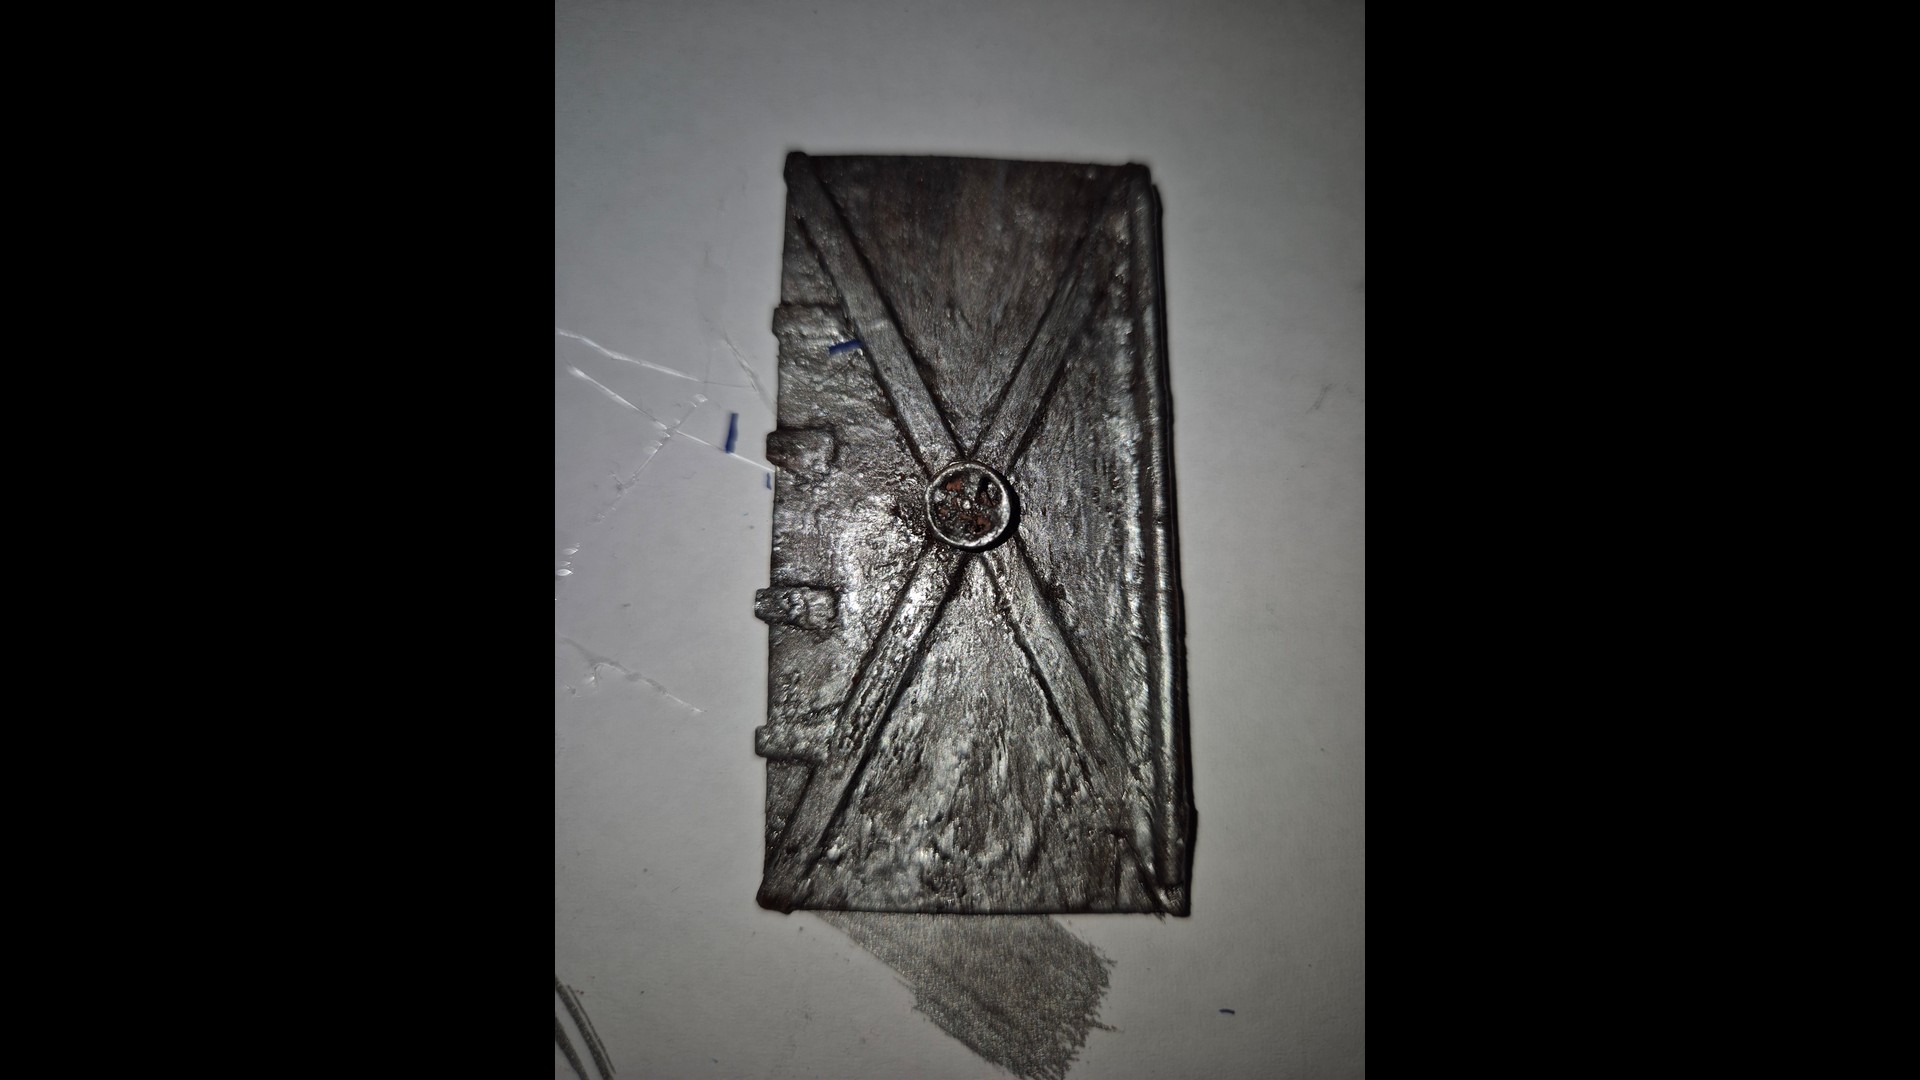
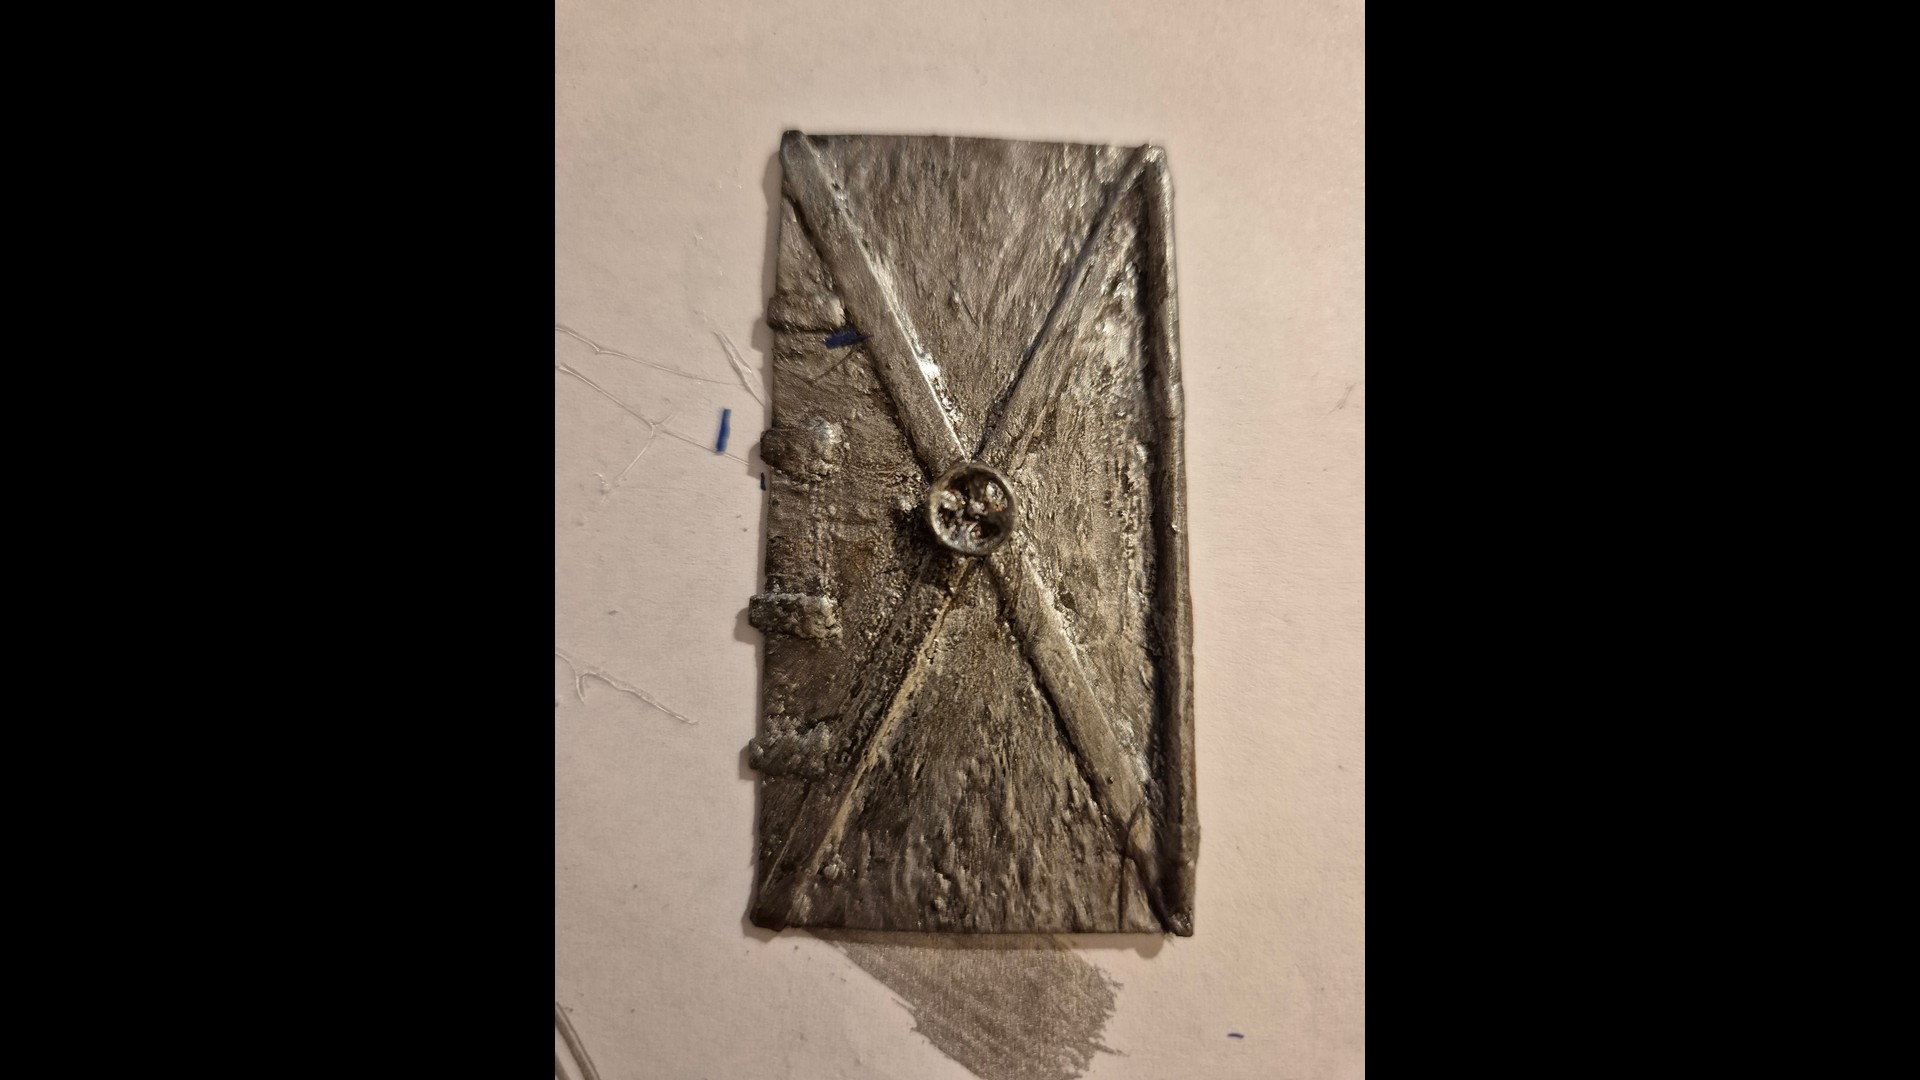
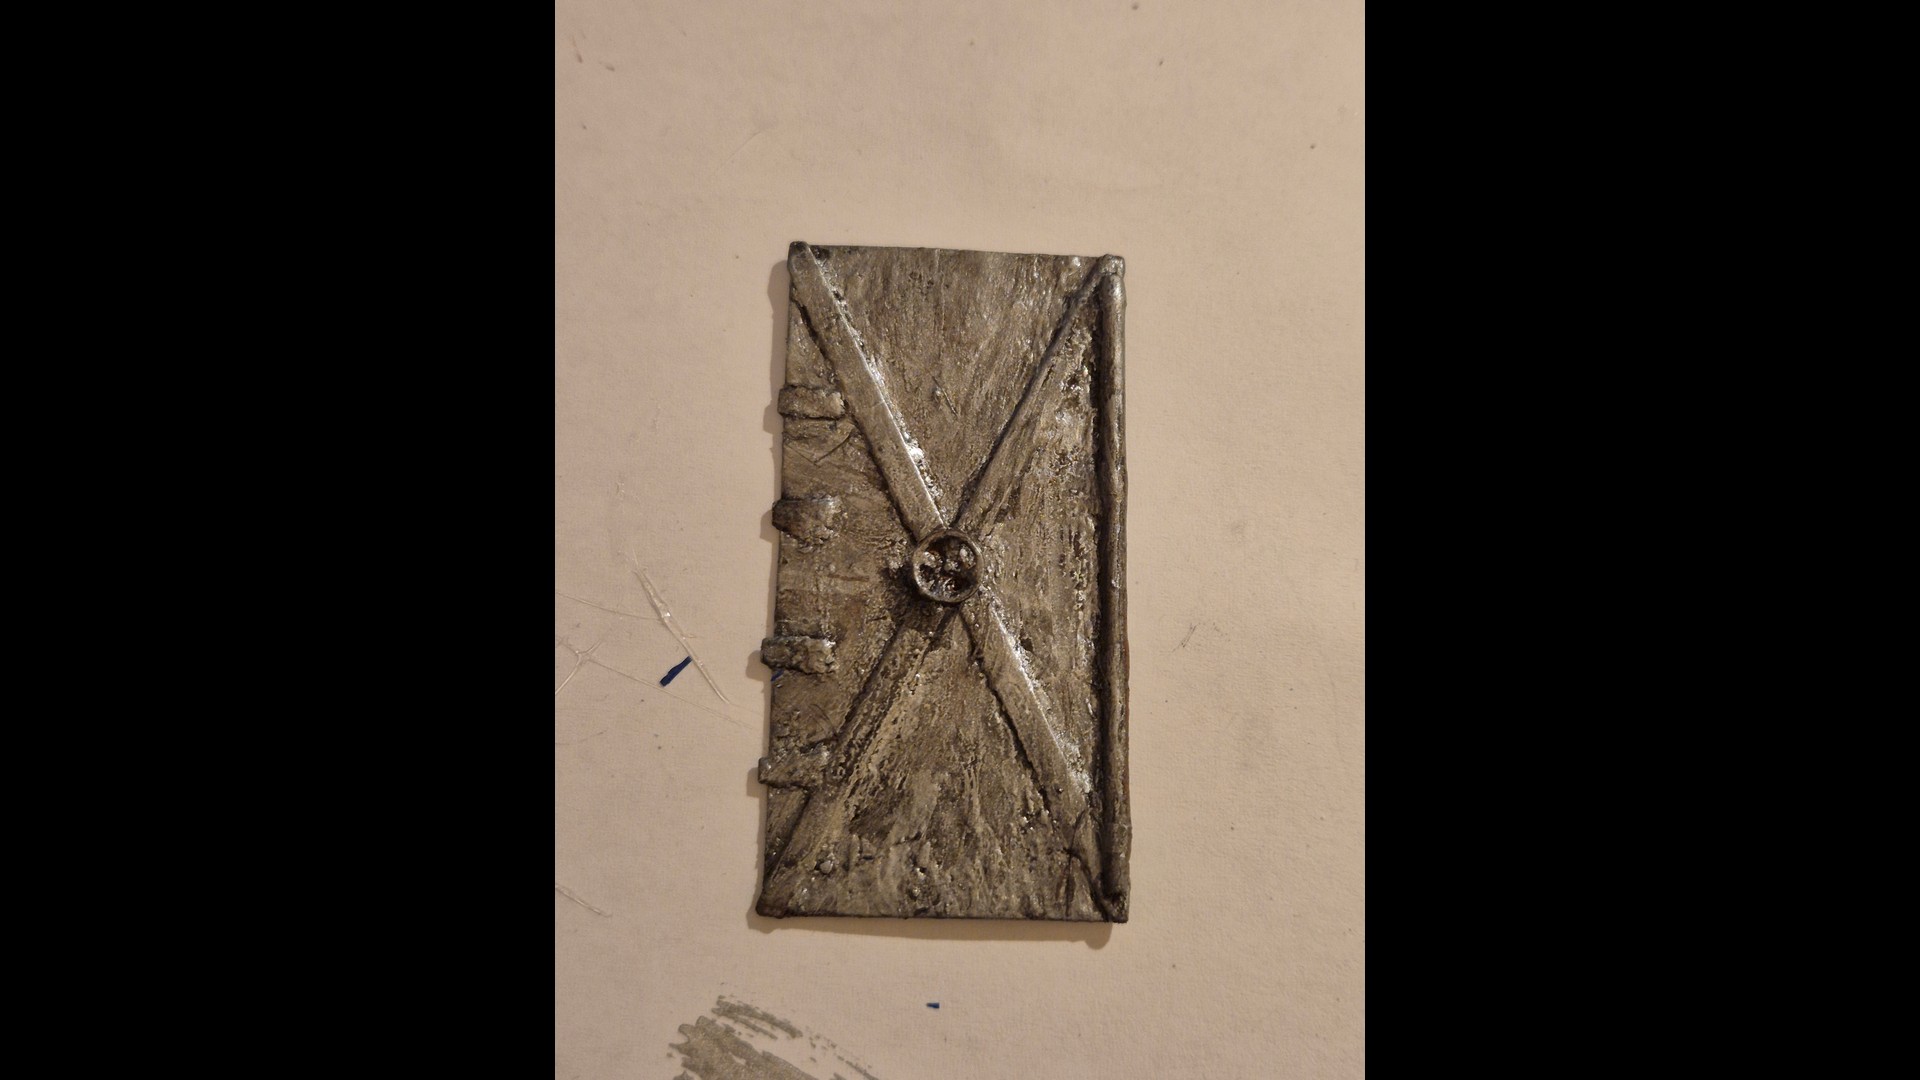
I also scratch built an iron door for the rear entrance to the Bunker. Remains to apply the square niches on the front face of the roof, air vents to the rear, and hooks and rings planted into the frontal and rear parapets.
The roof will be filled with terrain and vegetation.


6 Likes

And this is how the Bunker looks right now, after the first preliminary painting in Gray. When temperatures will allow I will return to it and add the missing details as I have specified here on top and finish both the exterior and interior painting which are looking totally differently.
The outer walls are rather a Dark Grayish and looking worn (they also appeared like that in WWII), but the interior was in sandstone and will be painted accordingly. Also to be painted will be the turret and the 150mm gun. I found out that they were originally painted in a Medium Sea Gray but repainted in German Field Gray in a zig-zag pattern, while the gun itself remained in Medium Sea Gray.
They will also be washed and weathered accordingly.


4 Likes

Wow, that’s quite a project. It looks very legit! Are you planning on weathering it to look like now or when it was new?

One thing that amazes me is how those were built so quickly in real life. In today’s world, it would take years to build bunkers like that. I don’t know how long it took the Germans (maybe you do?), but I’m guessing it was quick considering the time line of WWII.

3 Likes

That is one impressive project indeed! Great work on the texture of the concrete. Now I must ask where will you display such a large build once it is completed?

4 Likes

Very impressed with your work Pat along with the research that you have done!
I am really looking forward to see this completed!
I did a little digging and I am blown away with the construction timeframe of WN48!
So the construction of the WN48 German battery at Longues-sur-Mer(part of the Atlantic Wall), began in September 1943 and was completed by April 1944. This intensive building project, carried out by the Organisation Todt, took approximately seven to eight months to complete before the D-Day landings.

So yeah @Samphoto, I don’t think any of our construction businesses today could match this timeline!

Happy Modeling,
Mike

3 Likes

Nope, they would spend 9 months on the land survey and permits

5 Likes

The Todt organization didn’t have to worry about things like environmental impact studies, coastal commission approval, or OSHA regulations. :wink:

6 Likes

Hi Samphoto and thank you for your kind comment.
Now, about the construction of the real ones. I

t took six months to do so, since they were already built in late 1943 and finished early 1944.
The foundations were laid as usual, but the walls were made out of heavy rectangular stones carried to the site by heavy trucks and placed in place using heavy cranes by sealing them in armed concrete.
The top instead, was in one piece and was prefabricated in a German led factory in France. That too was then lifted and carefully positioned with four heavy cranes.
The whole operation, from design to finished building was in the hands of the Organization Todt and was partially made by slave workers.
Contrary to what many believe, these were not Wehrmacht Bunkers but rather a commission by the Kriegsmarine. In fact the guns were leftovers of naval guns and the same can be said for its turret.

Regarding the painting, although today’s bunkers are rather kept well, they nevertheless are constantly exposed to the capricious weather conditions in Normandy, especially in the Autumn/Winter seasons, but also partially in the Springtime, since rainfall comes an goes often, as well as being exposed to winds and the salinity of the coastline.

But contrary to what some believe, that they looked splendid when first built, I must disappoint them, since after all, these were not holiday resorts but real fortresses and therefore very often roughly built, although very sturdy to protect the operators in case of aerial or naval attacks.

But I repeat, due to the harsh weather conditions in Normandy already in early 1944 these bunkers acquired already a rather battered aspect already back then. Also a misconception was that the Bunkers in Normandy were all painted in camouflage colors. This does not correspond to reality.
Much rather and also due to time constraints and to chronic paint shortages Germans preferred using camouflage nets to cover the front of these gun laden bunkers.

They wouldn’t bother to camouflage them in a painted pattern also because all heavy bunkers were usually encased in the surrounding terrain and their tops, such as here, in the Longues-sur-Mer Battery were completely covered with earth and rich vegetation. No better method as to hide them with the surrounding terrain.

And to your first question (I am answering your questions like a crab, in reverse order :laughing:), there’s no doubt that I will have to mess the bunker up after having paint it throughly and correctly. So, yes, I will not only weathering it, but prior to that give it various washes of Black, Brown, Earth and even Olive Green to simulate various natural effects on it, like sooth, dirt, dust, mold and grime. I will also add some rust stains to the following applications of the hooks and rings holding the frontal camouflage net.

I usually finish such heavy bunkers with a mixture of all above named acrylic colors heavily thinned in water and generously letting them flow down from the walls. Should the final effect be too strong, I can easily tone it down with a sponge first and with a paper towel later.

Finally, I will use an airbrush to evenly apply a dead flat varnish overall.

I hope I have given you an idea on how much more work still remains to be done on it.

Once the painting and weathering will be done, I will bury the entire structure into faithfully recreated mounds encasing it as you have seen in the pictures above with added vegetation all around it.

The scene will then be filled with British/Canadian troops having found them abandoned by its German crews. There will also be some vehicles involved in it.

But all this is reserved for a future build. I am still busy with “The Last Warning (April 14th, 1944)” and then preparing a larger one of the second landing on Omaha Beach under WN61, in the American sector between Fox Green and Easy Red.

Be well and do great things. The sky is just the limit!

4 Likes

:sweat_smile: Stikpusher,… in my living room, of course, and wait until you will get to see my next project. The second landing on Omaha Beach between Fox Green and Easy Red. That one will indeed be an ordeal and a half. :rofl:

4 Likes

Thank you Butz. Historic Dioramas to be really worth the build, just require such attention to detail, since there is always someone out there, especially historians or history scholars ready to nail you to the wall if you do not do your homework correctly.
I am sorry to say that this specific diorama will have to wait its full construction at a later date, since I am still building the first of a series dedicated to the D-Day landings called “The Last Warning (April 14th, 1944)” involving one of the many Normandy inspections to the Bunkers by Field Marshal Erwin Rommel. See my articles about it under “Modeling subjects” and “Dioramas”.
This will then be followed by a complicated and rather detailed second landing on Omaha Beach between sectors Fox Green and Easy Red, where the Germans had a huge Bunker harboring an 88mm PAK 43/41 in it and various others on top of the bluffs where the American Cemetery now lies.
Following that, there will be two dioramas dedicated to the Battle at Carentan.
So, as you can see, pretty darned busy schedule already.
Please be patient and enjoy my other work.
Be well and do whatever brings you joy and happiness.

5 Likes

Absolutely true and they didn’t even care about labor infringements like for instance a worker suddenly dying. They had so many slave laborers that reengaging someone else was very easy for them. :wink:

3 Likes

All the cracks you may have seen in the parapets will obviously be sealed with modelers putty once I will rededicate myself to it. I will also add some coarse material over it like mixing scenic sand with some plaster and applying it in very thin layers.
The square niches appearing in the real thing to the front of the top facade were meant to apply further hooks for the camouflage net but were left empty due to those that had been fixed on top of the frontal parapet which seemed to egregiously do the job by themselves and were easier to hold it once lowered over the embrasure.
There were also times in which they removed the camouflage net completely, especially during firing exercises in order not to be encumbered by a possible accidental falling of the net.

There is a photograph of one of the bunkers having its camo net lowered in front of it. This was a post facto picture taken by the British and Canadian forces to show how it worked. In reality, on D-Day, they were completely removed and were never used again.

Here are more pictures of the site and a set of frames taken from Allied military footage after the capture of the Battery. As you will see, the camouflage nets are either absent or just hanging loosely to one side.


And if you think that these casemates were undefended on land, think again. The entire rear and side pathways to the Battery were constellated by dug in Tobruk bunkers, either armed with heavy machine guns or indeed with field mortars barely to be seen by an occasional passerby and were highly lethal to anyone attempting an approach.


Today’s episode of M * A * S * H WWII was kindly offered to you by your faithful Doctor Crazy Creator always ready to cure a mental disease. Simply dial 999-3945-4077 and don’t forget, madness is not contagious, just convenient.

5 Likes

I really like where you are going with this and the amount of work you are doing. While the individual bunker is quite imposing, it’s not until you posted the pictures from above, showing the entire battery, that the scale of the fortifications becomes clear. That would have been a very daunting task to assault this line.

As someone who hasn’t had the chance to see this in person I want to say thanks for including these amazing images along with your work.

4 Likes

This is fascinating - I’m particularly taken by the way the gun was installed and then the concrete structure built around it afterwards - This probably doesn’t aid modularity or facilitate a versatile mission package or employ other buzzwords of modern military parlance, but it certainly gets you an effective 15,0cm coastal battery that’ll do everything it says on the (concrete) tin!

2 Likes

I will be watching these builds. A member of the wife’s family was in M Company 116th Infantry and landed about 7:25 am that morning between Fox Green and Easy Red, 1400 yards east of their designated landing area on Dog Red. He was killed by artillery or mortar fire ten days later near Couvains,

2 Likes

The_Longest_Day_1962_Contact

Don’t forget to add the dog :wink:

2 Likes

Frozin Regular, thank you for your compliment and your observations. When I had the idea to build the Battery, I didn’t realize how big these monsters were and therefore I decided just to build one and mount a scene around it. I believe one can do quite an interesting display with it, which, believe me, will take much more space than I thought, since it won’t just be the Bunker that will take space, but rather the entire terrain surrounding it which will make it one hell of a bullwork.
At first, I wanted to include the entire crew manning it and preparing to fire the gun, but that would have been rather difficult to see from the inside and so I changed my mind and switched unto placing some British and Canadian vehicles around it and soldiers intent to take some German prisoners and inspect the Bunker.

But this will all come at a later date. Currently I am still building models for my current diorama and next will come an enormous one dedicated to the second landing on Omaha Beach, between Fox Green and Easy Red. The third project will be the entering of Carentan by men of the 101st Airborne Division “Screaming Eagles” facing heavy German fire.
This one will be the fourth in line, so please be patient and enjoy my other builds in the meanwhile.
Have a great day and have fun with whatever you are planning to do.

1 Like

Well pr154, this one was indeed an ordeal and a half because I had to completely restructure it and almost completely rebuild it and as said, find a better model of the 15cm coastal gun. Actually, the gun assembling was the easy part, except maybe for the blinders which I decided to show widely open to allow a peak into it. Being in resin and rather thin they didn’t want to stay in place by themselves and I had to reapply them at least five times before they finally were in the desired position. Plus, since they didn’t just stay open just by miracle, but were connected to a manual lever from the inside I had at least to reproduce their external rod holding them open. This required a firm and steady hand to place a tiny bit of stretched sprue between the blinder and the gun hull. It took me two hours to finally manage this feat on both of them.

This particular one will be the fourth in line in my D-Day dioramas planned and the Bunker still needs many details to it, such as the tiny square niches in the frontal wall, the sides and the back wall being covered with a thin layer of air drying clay which will further be refined by pressing rectangular wooden sticks into the fresh clay to simulate the stones and mortar with which the lower structure was erected. This though won’t take too much effort since a great part of it will be covered with terrain and vegetation.
To the rear I will also drill four holes on each side of the protection wall and insert air vents into them, and under the ceiling of the rear protection wall I will place two iron beams simulated with balsa wood sticks cut to size and repainted in metal and rust colors. The rest will be to repaint once more the bunker outside walls and the interior hall in which the Gun will be, which are indeed two completely contrasting colors. To finish it off I will then wash spray it and weather it all appropriately. The gun will also be painted over leaving at least the barrel partially metallic and showing clear signs of having been fired.

So, please be patient and enjoy my other build in the meantime. I promise to set up a build log to this one as soon as I start it.

Be well and have a happy day with whatever you are building right now/

2 Likes

siiirhd88 thank you for your comment and let me express my sadness with the loss of that member of your wife’s family. Imagine having survived that landing ordeal only to be trapped by enemy fire just a few days later. What a lousy destiny, but I tip my hat to anyone like him because they sacrificed their lives for us to have that kind of freedom we are still enjoying these days.

Said that though, it will still be some time before I will start the second diorama precisely dedicated to the second landing in that sector of Omaha Beach. Pre-planning has already been done, also based on some pictures and some filmed footage I have been researching.
Understand though that I will compress three or even four actions into just one large diorama.

The first will the landing itself which I will try to depict as much accurately as possible (four landing crafts in 1/35 scale with crews and vehicles) and of course the actual German emplacements and Bunkers existing there; the second will be the depiction of medics and nurses leaning against one of the embankments attending wounded soldiers and seeing some exhausted ones as well; the third is the first attempt to take out the R677 bunker harboring the 88mm PAK43/41 lethal gun, which actually failed; the fourth will be the heroic action taken by the two groups of Captain Dawson of G Company and Lieutenant Spalding of E Company, 16th Infantry Regiment by silencing the German defenses.
I have already gathered all the necessary vehicles, bunkers and emplacements, as well as accurate figures, Allied and German, to populate the entire diorama.

So, it will indeed be historically accurate but somewhat time compressed into four distinctive moments which did not happen all at once.
I believe that anyone who has read about that specific action on Omaha Beach will immediately understand what I have done.
In a way, this is a dedication to all those men, not just involved with WN61 or WN64, but all over the Beaches in Normandy, and a reminder what the will of free men can do when put into action against a terror regime like the Third Reich.

I will post a Build Log for this diorama as soon as I am ready to begin the work. For the time being I am still stuck with my first effort which will probably take me another month or two.

Please follow my other build until then and have fun with whatever project you may have as well.

1 Like

:laughing: :rofl: Well, I indeed have some German Shepard dogs in my collection, but since I don’t plan to also build the Longues-sur-Mer Observation Post - besides, no decent scale model does as yet exist, at least not in 1/35 (I wished there was one) - and scratch building it is by far beyond my means and skills. If ever, I reserve them for patrolling German Military Police doing the rounds. One will be included in my current project and will be placed in the Parking Lot of my diorama.

Be well and always do what pleases you the most, in this case, building and creating stuff.

2 Likes