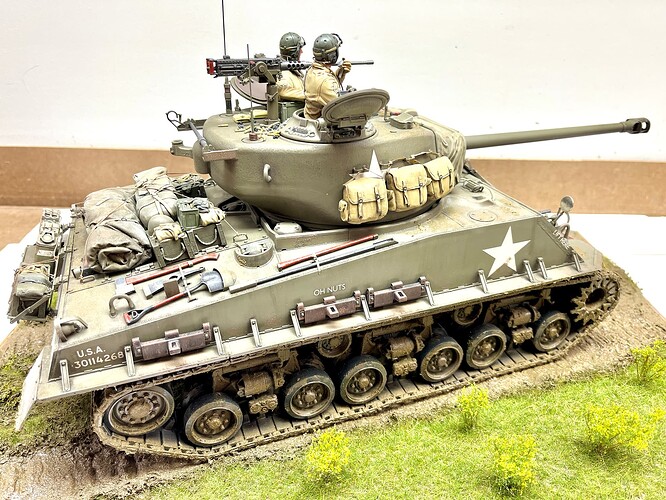
This was my first 1/16th scale armor piece I’ve done. It went together beautifully, especially the track. One figure comes with a kit. I purchased two classy, hobby figures and modified them. The simulated mud is Vallejo European mud. It was painted with a Tamiya custom mix.
I still have issues doing flesh, but I’m working on it. If I can either put gloves on their hands and a full mask on their face, I’m good with it, lol. The base is foam pieces molded with a foam cutter. Once that was dry, I covered it over with pre-mixed sanded grout. The grass and flowers are from Woodland scenic.
After a heavy coating of Vallejo mud, I added a shine to simulator a wet look using Alclad clear gloss. If there’s anything you see wrong, please let me know so I can try and fix it
I’m not an armor guy, but Superb Work!
Rob
Iwata Padawan
Very nice job. I really like the muted finish on the tank itself and your figures look great.
That is fantastic. The one thing I’ve never been able to do right are faces. Maybe because they tend to be 1/48 or 1/35 scale, but they’ve always come out looking like extras for The Walking Dead. Best I ever did was probably 1/8 scale Captain America (most of his face is covered) or Thor, but they both had big eyes that didn’t really look right.
Great job on the Sherman, @Cbowling! So realistic looking!
Man Chris. That really turned out sharp! I have their M8 Greyhound and I’m really looking more forward to building it now!
What paints/method did you use on the figures as they turned out great!
Thanks so much. Tamiya paints, followed be brown/black accent colors from Tamiya. Once the accent colors dried, I took a Q-tip soaked with mineral spirits and wiped the excess off. after all of the mineral spirits evaporated, I dry brushed the high spots with Naples yellow hue oil paint.
All the flesh colors are from Vallejo.
I look forward to seeing the build process of your M8 Greyhound. You’re gonna love the way the kit goes together.
That technique seems simple enough and would you mind taking a few more pics of the figs please?
I forget how many, maybe 4 or 5 but I have all the skin tones from Vallejo!
Thank you once again for the feedback!
I didn’t buy any additional figures at the moment but I got a few aftermarket stowage sets from Value Gear and seat cushions.
But yes, I am really looking forward to it as well! Stay tuned!
I’ll be more than happy to send them to you in a message. (Just don’t zoom in to close on the flesh painting ![]()
![]() ) I’ll send you the Vallejo paints that i use, and in what order
) I’ll send you the Vallejo paints that i use, and in what order
Haha I won’t and that would be cool! Thank you Chris!
Excellent work! Your color modulation and weathering is so realistic and your figure painting is fantastic. I got Andys’ 1/16 Achilles at the Nationals last year and I hope that mine goes together as nice as your Sherman did and I’ll try to make mine as great as yours turned out.
Excellent Job… Been searching.. can’t find… How big is the finished model… What are it’s dimensions?
Thanks
Thank you. The width of the tank is 7 1/2 inches.(fender to fender). The length is 19 inches. (from the tip of the barrel to the back of the rack above the engine exhaust.)The height to the top of the turret is 6 1/2 inches(From the tank treads to the very top of the turret).
Very nice.. thanks for taking the time!
I’m getting to the point where I’m very interested in building armor and I really like seeing good works like this one Christopher. Some GREAT efforts going into this one and love the figure painting.
Wow… everything about this build is amazing! The enrire build highlights your sills in numerous levels. The paint work is perfect and the amazing details in the figures and the facial details are outstanding.
Well done Christopher
![]()
![]()
![]()
![]()
Thank you! I had a really good teacher when I got serious about improving my skills.


