I bought this ‘New Bedford Whaler’ kit by Academy (ex Pyro I understand) with the intention of having a first dive into plastic shipbuilding before I go onto something a little more complicated for an intended model railroad diorama.
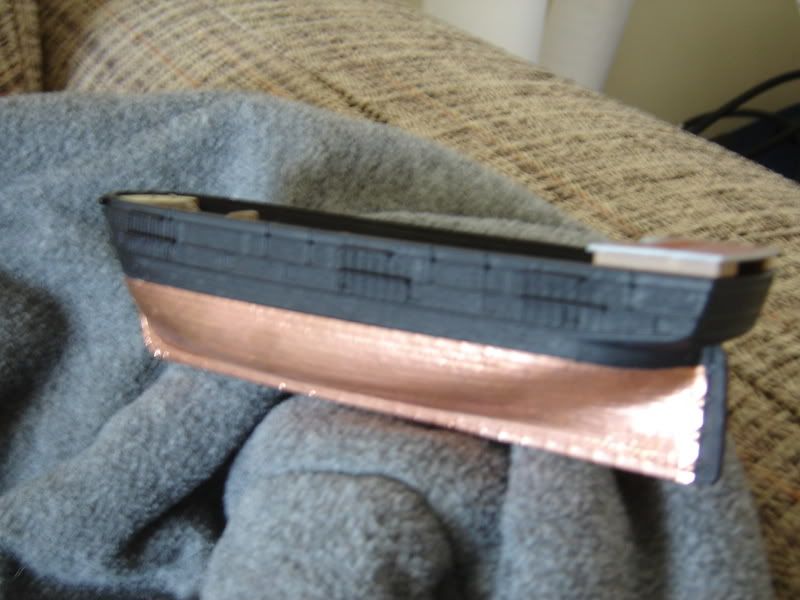
I bought a cheap roll (£1) of copper tape 3.5mm wide, and ‘planked’ the lower hull with it as best as possible. Even though each line of tape is much wider than a 1:200 individual plate of copper would be, the effect is quite pleasing. After 1 day the tape has tarnished nicely , and I would imagine a week or so will have it showing a nice patina. In other modelling applications I have found that it is wise to wait for it to tarnish as much as you need it to, and then seal with a spray of mat acrylic varnish to prevent further tarnishing.
I tried to follow the method you would ue to plank a real hull (tapering, etc) in order to keep the visible overlap lines flowing along the hull, but any pointers or a word from the experts who have tried this technique would be marvellous. This is my first model ship kit, so I just thought I would post here to try and provoke a bit of a debate about the use of real copper for model ships hulls!
Next job(seeing as all the deck detail is moulded on)- is working out how to rig it- th plastic shrouds look awful!
A good trick to speed up the tarnishing process is to float the boat in a basin of salt water, rinsing with fresh and then sealing as mentioned after the desired level of verdigris is obtained… And don’t forget to copper the rudder!
Placing Copper on the rudder may be incorrect, most ships did not put copper on the rudder as it made them a bit too heavy to handle. Nor all ships were like this, but a lot were not coppered. The Constitution is one.
That’s most interesting Jake, has Marquardt got it wrong in his book The 44-gun frigate USS Constitution which shows the rudder coppered in the illustrations and drawings?
Most British and American warships back in the early 19th century were coppered and their rudders were coppered.
With merchant ships it probably varied quite a bit depending on the ship’s trade routes and how much budget the owners had for copper sheathing. Chances are, though, if they coppered the hull, they also coppered the rudder.
Constitution’s rudder was certainly coppered as it is now. Copper sheathing was just as important to protect that wooden rudder as it was to protect the rest of the wood below the waterline.
I agree. All of my references point to ships having coppered hulls also having coppered rudders. However, the argument made above about merchant ships seems interesting and bears further look.
The following is off a bit on a tangent, but…One goof a surprising number of modelers make is to put copper sheathing on the rudder and paint the pintles, gudgeons, and braces (i.e., the hinges on which the rudder is hung) black, as though they were made out of iron. That won’t work. When a piece of iron and a piece of copper are placed next to each other and flooded with saltwater, galvanic corrosion takes place and the copper dissolves. (One of the first things the shipwrights discovered when they were experimenting with copper sheathing was that it couldn’t be put on with iron nails. The nails have to be copper; if they’re iron, the copper surrounding them gets eaten away, the nail holes get enlarged, and the sheathing falls off the ship.)
Pintles, gudgeons, and braces on a copper-sheathed ship have to be made out of copper or bronze. To be accurate, they ought to be painted or otherwise treated to look just about like the copper sheathing surrounding them.
cheers for the replies chaps, very interesting stuff. I have a photograph in a book of a small (300 ton) ship with no copper on the rudder, but plenty of ones that at least suggest coppering was put on. The Academy kit had a wood-grained rudder which is why I left it off. May have another think
jtilley thanks for the info re the pintels and gudgeons. It never occurred to me!
I’m glad I stumbled upon this thread. I just received the Old Steam Navy USS New Ironsides kit and I was wondering about how to do the copper. The tape seems like a great idea, as I won’t have to scribe anything.
I’ve used copper tape with great success on past projects. It offers several options; (1) cutting individual plates to shape and scale, or (2) laying down lines of tape in a correct pattern and scribing individual plate lines. But, don’t forget a nice extra touch . . . use a sewing pattern maker on the back side of the tape to form nail heads.