Airfix F6F-5 Hellcat in Massive 1/24 Scale COMPLETE 20-April-2025

The engine in photographs.


I have made a mistake on this thing. I did not align the center ring between the Wasps correctly, so the pipe that comes out of the bottom of the crank case attaches to … air. Not anything that I can do about it at this point, so I’ll go with it and pretend that problem doesn’t exists.

I am in the process of painting the piping that adorns the backside of this monster. Still a long way to go before I can call the engine done.

8 Likes

Ok now you’re showing off Steven :laughing::laughing: Out-Freaking-Standing! Absolutely fantastic!! I am definitely going to have to ramp up my modeling game :laughing::laughing:. Well done Sir

Question: what type of wire did you use? Thank you Steven

2 Likes

That looks awesome @Aggieman. It’s often said with big builds like this, but that Wasp is essentially a kit in itself.

Are you using a bending tool for the wire, or just doing it by hand/with pliers? It’s very cleanly done.

:wink:

1 Like

@ScaleModeler66 @Toimi_Tom I highly recommend UMM-USA for detailing materials like this. They sell a bunch of other stuff as well. I’m using hobby pliers and even tweezers to bend the wire, so it’s easily pliable but not so pliable that it doesn’t stay in whatever position it is put into.

2 Likes

That’s impressive! Your work never ceases to amaze. I’m happy if I can just get an engine together!

Gary

Thank you Steven for the insight, and website information. Again, stellar job on your engine details :fire::fire:

Got some more work done on the engine tonight by attaching all the pipes I painted last night to the rear of the engine. I’m not really sure what these pipes did. Were they part of the exhaust system? I’m sure there are experts on these engines who might know.

I’m not real thrilled with either the performance of the AK Interactive Xtreme Metal paint that I used here, or my painting skills. I probably should have hit these with a dark primer so that the burnt metal paint would have had something better to adhere to than just the Airfix plastic. But, once I close up the cowling, these will never be seen again.

I also added whatever those things are on top of the crank case, and what I’ll call a mounting brace.

This is maybe the halfway point on this engine. It could be sold as a kit in and of itself.


5 Likes

Wow that looks great. This is coming along nicely! Can’t imagine building a kit this big.

1 Like

@Aggieman … thank you again for pointing me towards UMM-USA. Great website with a lot of fantastic stuff at affordable prices. :raised_hands:t3:

1 Like

Well I have to say that this is the kit that just keeps on giving, and giving, and giving - headaches, that is. I know where I’ve made mistakes, but I cannot fathom making one so big that the exhaust piping that attaches to the rear of both Wasps will contribute to this headache. The engine is a double Wasp engine, with pipes attached to the rear side of each Wasp. There was literally no room to slide those pipes through to the attachment point on the rear of the forward Wasp. None.

The ring that goes between the Wasps is probably the culprit. I know I had to work some modeling magic to even get that part installed, but I don’t honestly believe that my solution caused this current issue. I can’t shake the fact, however, that at least one other modeler in this world managed to get all those pipes into position (the guy with the blog I’ve referenced many times during this build). Unfortunately, his blog was not much help as he didn’t reference any issues in this area. It went from here are the parts all painted to poof, they are installed.

After much quiet thinking and dry fitting, I ended up cutting off significant portions of the pipes. The reason being, is that these pipes all circle around the back side of the rear Wasp and jut out to the exhaust nozzles, which are very much visible on a Hellcat. So I was able to get the pipes installed sufficiently to mount the nozzles, but that did present yet another dilemma.

The instructions are woefully inadequate in telling you exactly where these pipes go, or at least how the nozzle ends of these pipes (separate parts that require the pipes to be properly aligned). The exhausts on the belly of the Hellcat looked to be correctly installed and aligned, but the side exhausts proved more difficult to ascertain exactly how to align them to where there would not have been an issue when it comes time to install the cowling.

As it turned out, I read ahead a few steps in the instructions to see where all of this is heading, and found the firewall piece is the aligning mechanism. So I dry-fit that piece into position (remarkably, it went on with no problem) and used it to position the side exhaust pipes where they needed to be. Now that engine is sitting on the workbench while the glue cures, and I’m done for the day.

1 Like

Nice day at the bench today. This was my self reward for getting some much-needed yard work done first thing this morning. I’ll set the stage, though: with my experience up to this point, I really just wanted to get this engine behind me, come hell or high water. I’ve run into too many fit issues, at least one self-inflicted issue that cascaded into a mistake that will be visible if one knows where to look but was irrecoverable by the time I discovered it.

So as I like to do when I anticipate some lengthy time at the bench, I turned on my TV and found some appropriate movies to watch - first Pearl Harbor (yeah, I get it, bad movie but I’ll never not love the various warbird action in the movie) and then 633 Squadron (clearly George Lucas enjoyed this one, as he basically lifted the who idea of the attack on that fjord for the Death Star trench run). With these movies playing, I set to beating this engine into submission.

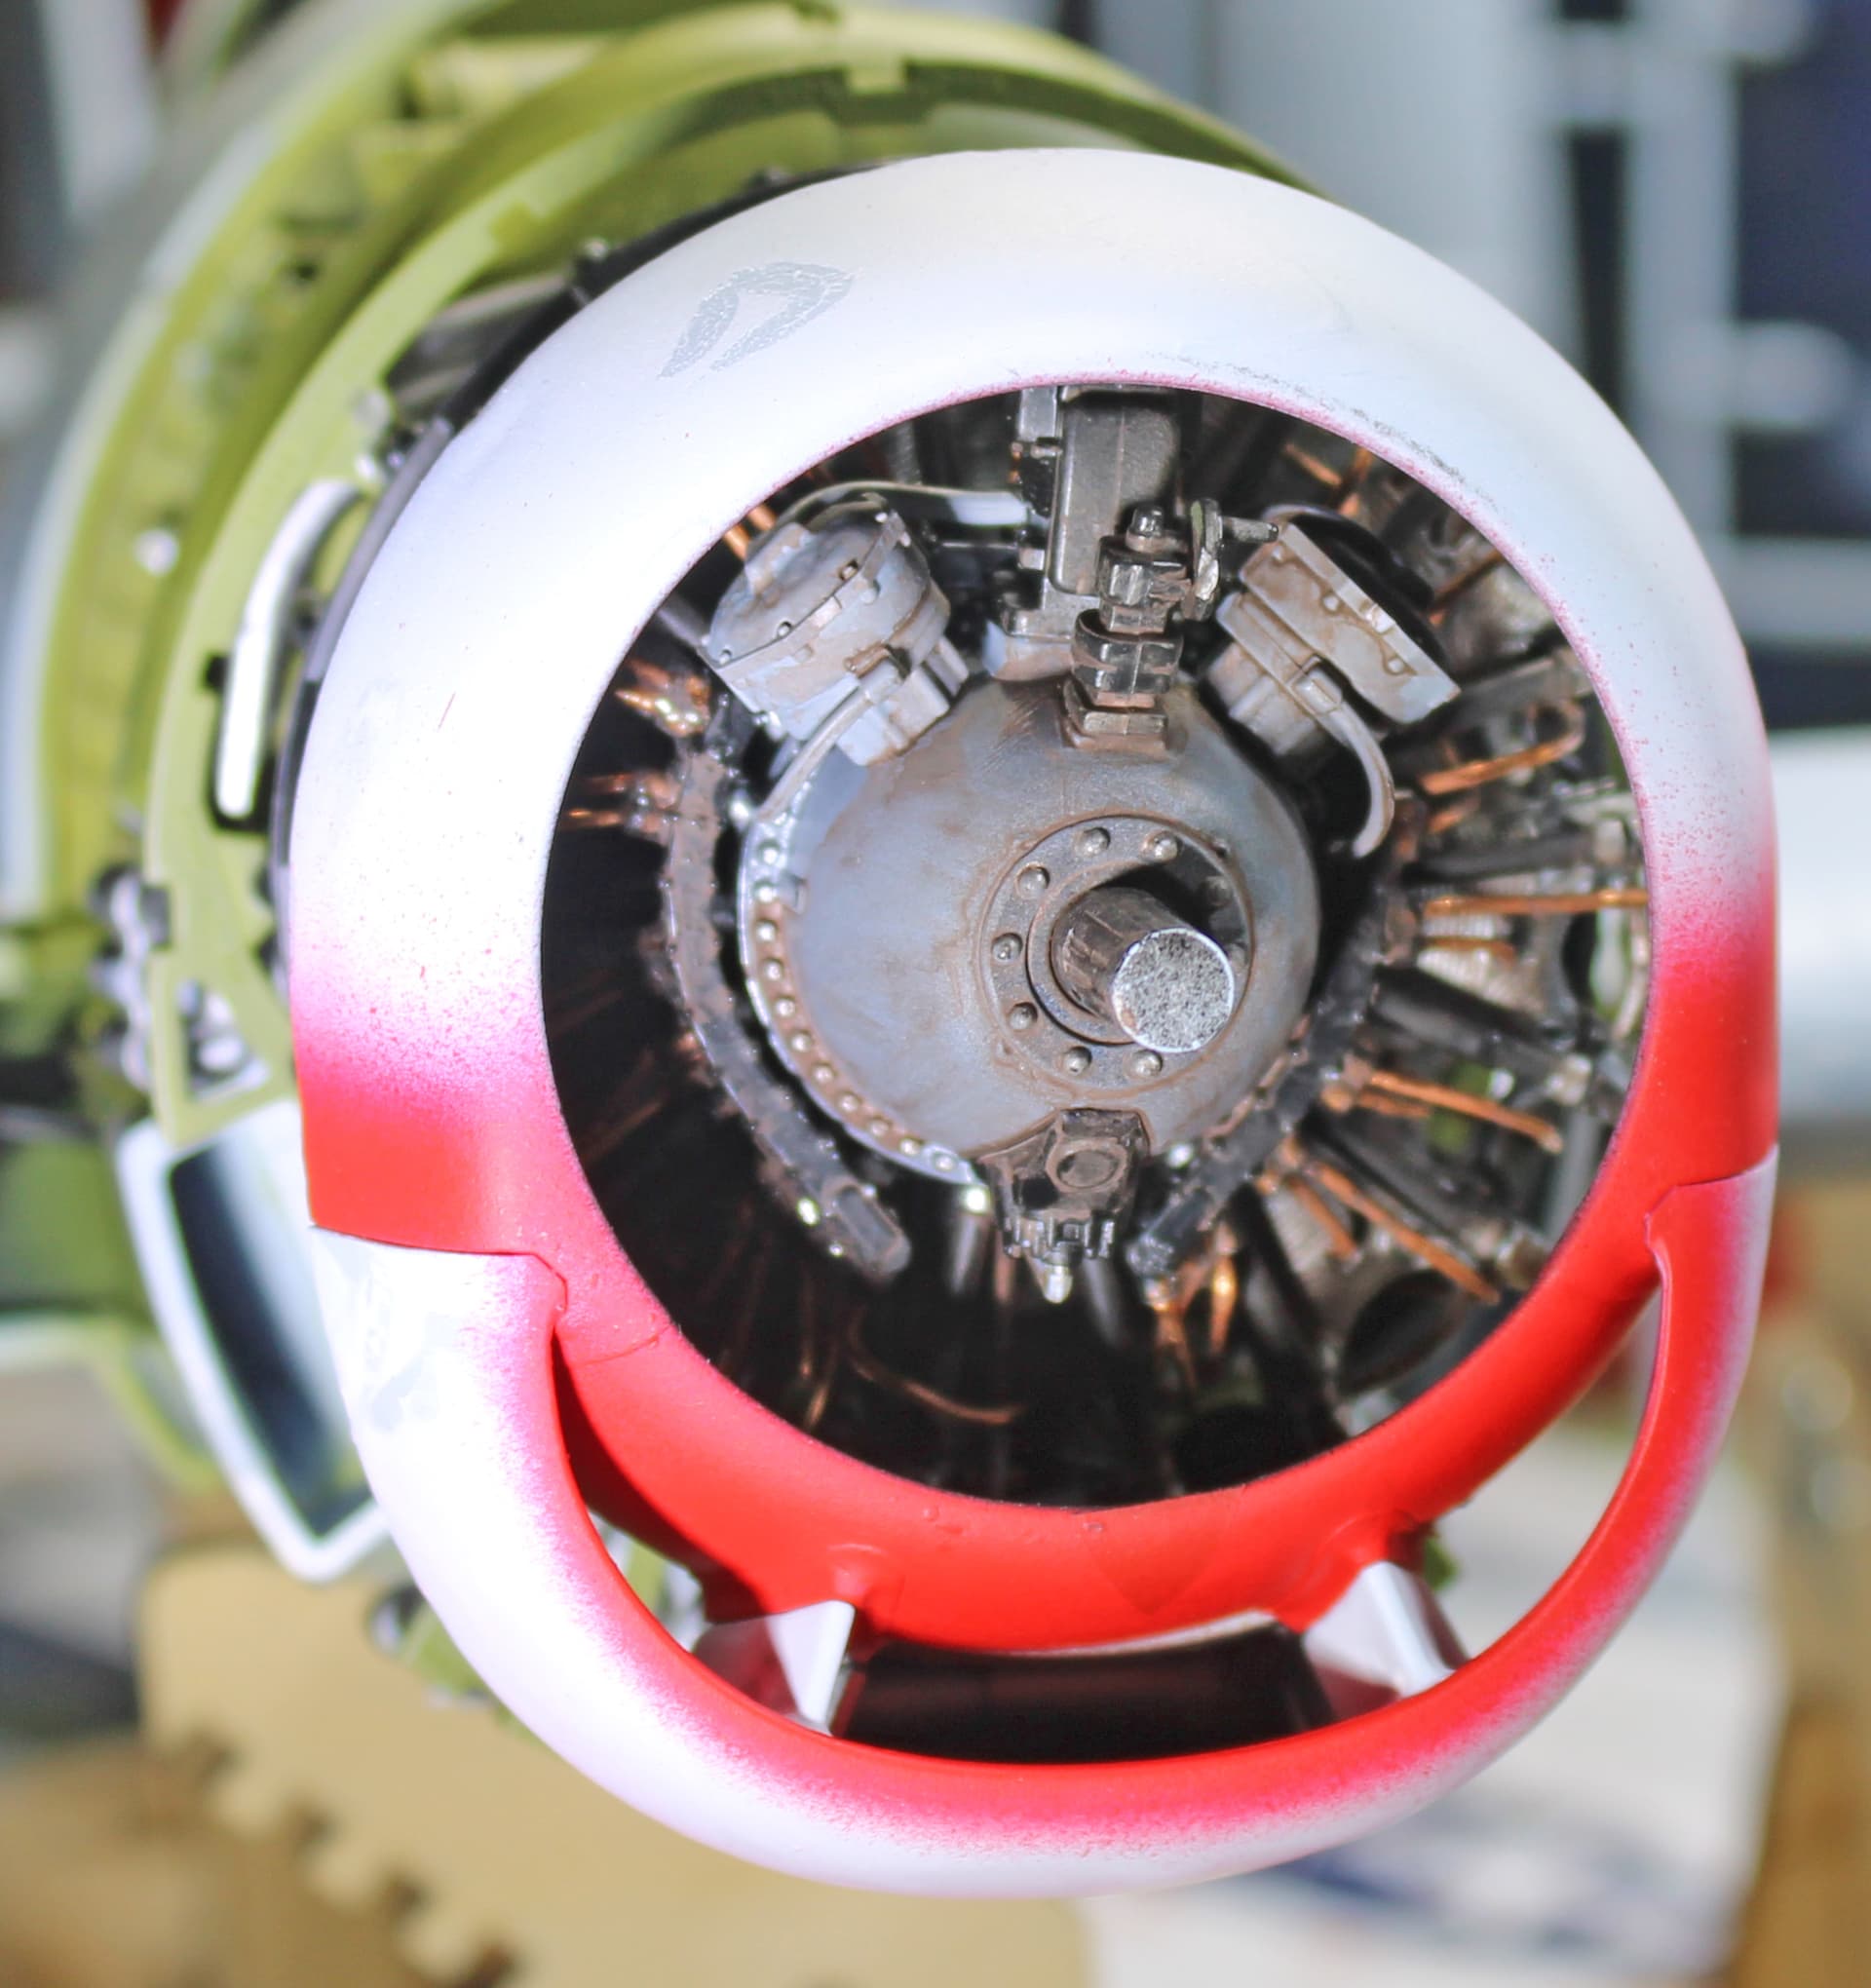
I came into the day thinking that I could leave certain parts off, given that I intend to close up the engine with the cowling panels. But before I opted for that, I wanted to dry-fit everything to see where any problematic areas were. As it turns out, there was a grand total of one.

I have no idea what this part represents - an intake of some sort, perhaps? It is a Y-shaped piece that attaches to the chin intake trunk on the front end, with the Y trunks attaching to the main engine cylinder. You are to install it after you have put the engine support beams into position - and there is absolutely no way to get that piece into position.

I was properly prepared for this by the blog author’s experience. He said it would not fit, and he was absolutely correct. But he didn’t expound on how he solved the problem in his own build. Since it would not be visible once I have the Hellcat done, I was thinking that I’d just leave the part off. Then that engineer in me came out, and I spent a few minutes to come up with a solution.

The solution involved a saw. I cut a slit in the part right at the base of the Y, but opted not to simply cut the part in half. My thinking was the slit would give the part just enough slack to allow me to get it into position over those support beams. And it turned out to work perfectly.

With that done, it was clear that I would get every thing attached to the back side of this engine rather than omit anything. So today turned out to be quite a good day at the bench, as I have largely completed the engine. Still needs a few parts on the firewall behind the engine, as well as some more trunking related to that chin intake. I have also dry-fit the entire assembly to the Hellcat’s firewall, which surprisingly is simple and will be a strong connection.


5 Likes

The engine is mounted. I snuck away from my desk (working from home today) to clean up the Flory brown wash I slathered onto the crank case of the engine and photograph it. I plan to do a bit more weathering on the exhaust stacks, hit some of the big bolt heads with aluminum paint, and other similar detail work before I start putting the cowling pieces into position. The cowling ring is only dry fit to the front of the engine in these photos. I did paint the white and red for the snarling mouth markings to come.

5 Likes

Absolutely stunning Steven… Well done Sir.

1 Like

Well whatever issues you’ve been having with the engine, @Aggieman, they’re not showing now. It looks great with a little grime on it. Keep on going!

1 Like

Sometimes they make things too complicated for their own good. Well, it’s done and now no one will be the wiser. :grin:

Gary

This has become one of those builds where one mistake cascades all the way to the aircraft’s surface. I went to start installing the cowling panels over the last couple of days. Those in the rear that go over the area near the firewall were somewhat problematic, due I believe to a mis-alignment with the firewall inside the fuselage right in front of the cockpit. But I was able to get those into position to where all I will need is a bit of strip styrene and putty to deal with the minimal gaps.

But the forward cowling panels - NOPE. Not a one of them fits correctly. Now while this could be yet another issue with the kit, I rather believe it is an issue of my own making. When I look at it directly from either side, it appears that the engine is not fully parallel to the firewall; there is a slight angle there with the top portion drooping a bit and causing more space than should be there. Consequently, the panels along the sides and top can be positioned but not without significant gaps. These gaps will be too wide to fill with putty and styrene, not to mention that the gaps are in very visible places. Simply filling them like a gap in the wing root is not really an option since there are engine components right there. And further, the underside of the engine is 100% out of position, as I cannot even get the panel for that section to position itself either flush or without significant gaps.

So rather than giving up on this, I am going to change my desired outcome. I’ll have to display this with none of these panels in place. I will put the open cowling flaps to help conceal where I had to cut pieces off the exhaust pipes (that is very visible to the naked eye otherwise).

I am also considering a scheme change. I had been planning to build this as “Paper Doll”, as flown by Lt. Carl A. Brown Jr off the USS Princeton in October 1944 with the snarling mouth and big angry eyes. But since much of the real estate where those markings go will not be present, I might change to a Hellcat that flew from the USS Randolph in May 1945 that has a lot of white stripes and white ailerons (this is the one that the guy in the blog did).

I have markings masks for this kit, as I had read that the decals do not perform well. So I’ll test fit where those eyes/mouth go as far as the cowling ring goes to determine how much will be visible. That might be enough to stay with the “Paper Doll” scheme, but otherwise I’ll go with the alternate. And since I really wanted a Hellcat with the “Paper Doll” scheme, I’ll have to check the other kits to see if those markings are appropriate or included. I have an Eduard 1/48 F6F-5 in the stash, as well as a couple of old Monogram Hellcats, which I believe were -5 variants.

4 Likes

Absolutely stunning work Steven… the amount of details in your build is fantastic!! :fire::fire::fire::fire:

I’ve had this kind of stuff happen in the past where panels didn’t want to fit no matter what I tried and like you, I was left with leaving entire panels off in order to proceed. It’s still going to be a good-looking build when it’s all said and done but I can definitely identify with not getting the desired outcome.

Hang with 'er bud.

1 Like

Sometimes you just gotta pivot. I think it’ll work out – and more of that wonderful engine detail will now be visible, right? I’m having fun following along with this – thanks for posting as you go!

1 Like

The panels made the necessary decision for me. Yeah, I could just slap them on, but that’s not going to look right at all. I will attach the cowling ring since my favorite feature of the Hellcat has always been that smiling intake. I have to clean up the intake trunk on the underside that was originally intended to not be visible - now that piece will be clearly visible. Big ugly seam on the middle of it, plus I need to paint it interior green.

I am getting close to entering the painting stage. I will spend some time at the bench this weekend cleaning up seams on the ordinance and landing gear struts. Once that’s done, I’ll get the engine and cockpit masked and then start the painting.

I will be painting this one in the alternate scheme that I mentioned the other day, as not much of that snarling mouth and big eyes will be on the cowling ring, at least not enough to bother with the masks that I have for that scheme. Plus, I checked my stash for a 48th scale Hellcat I have by Eduard. That one includes the Paper Doll scheme, so I’m good to go with that particular Hellcat.

2 Likes