Airfix F6F-5 Hellcat in Massive 1/24 Scale COMPLETE 20-April-2025

I am getting my airbrush back from Iwata some time tomorrow, so hopefully this weekend I can get a lot of good bench time on this **** Hellcat.

The reason for the *** is to convey my disappointment in this expensive kit. I did get the wings together, but they fought me every step of the way. I won’t blame the kit 100% for the issues that I’ve seen, but with how one has to sand pieces just to get them into position otherwise they are way too tight fitting, that just amazes me Airfix would consider this a releasable product. That’s a rant on my part, but I’m in this now, so I just have to find work-arounds and do what I can to put together a presentable Hellcat.

This morning I filled the big gaps in the wings and a couple of spots on the fuselage with strip styrene. Even so, the photos will show that I have considerable work to do on the seams. They are all ugly. Lots of filling and sanding to come. Hopefully I won’t lose too much of this wonderful molded in detail.


2 Likes

Sure am sorry to hear about the difficulty with the wing seams. That does seem absurd for what is should be a modern, well-engineered kit, especially for the price.

But if you can get over this speed bump, judging from the reviews, you’ll get some momentum going again. That cockpit still looks great, of course!

That’s an interesting way of using sheet styrene to fill a thin gap like that. Seems obvious now that I see it but it’s never occurred to me. I suppose you can sand it into a wedge shape to get a nice complete fill/fit, and then just trim the extra off. Filing this away for a future gap.

I’m curious what was wrong with your airbrush, btw. Looking forward to the next update!

With regard to the airbrush, I’d just like to know what I’m doing wrong all of a sudden. I run Tamiya Airbrush Cleaner through between paint colors. When I’m done with a painting session, I tear the entire thing down and clean it with lacquer thinner. I take care to not get lacquer thinner where it shouldn’t go, like to the O-rings. I never soak the body in any such cleaners.

I have 3 different Iwata airbrushes. The CS stopped spraying about a year ago. The CR started acting wonky during my last build, and the Hi-Line quit during this Hellcat build. A small metal rod fell out of the body while I was taking the Hi-Line apart for cleaning, which is why I sent that one back to Iwata first. I don’t know what the rod was, perhaps it was part of the trigger mechanism.

I just sent the CS back this morning. The CR will go once they are done with the CS.

2 Likes

You are going through your fair share of difficulties with this kit but I’ve gotta say that you are pulling through them in good fashion. I’ve got no doubt that you’ll whup this kit into submission in the end.

1 Like

Today was a beautiful day here in SE Texas. Very pleasant weather for this time of year. I could have done a lot of different outdoor-related activities, but with the tax accountant wife working on this fine day, I opted for bench time while watching a couple of movies from the early 1970s - The Man With The Golden Gun, and The Day Of The Jackal, both of which I have seen multiple times but not at all in at least two decades.

Today I started to see an actual Hellcat on my bench. I managed to get the wings attached to the fuselage with little difficulty, although there is a slight gap along one wing root as well as the continuous piece that runs along the fuselage right above the wing that Airfix thought should have a cutout in it (as pointed out in the blog I’ve referenced).

I also attached the stabilizers and rudder, addressed ugly seams in the flap bays that will likely be visible since I will be building this with lowered flaps, and started work on the engine.

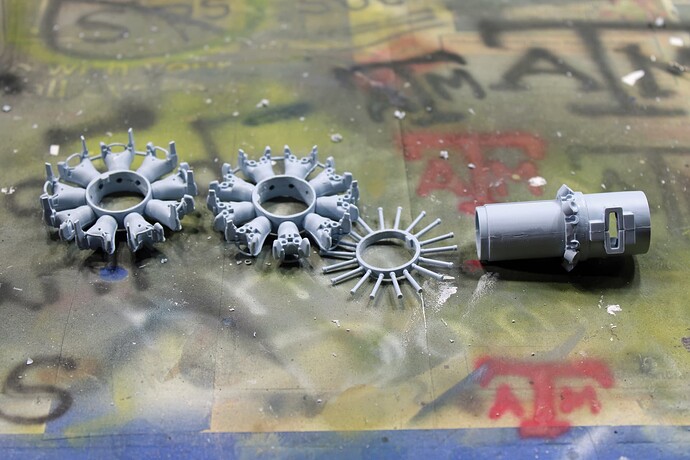
As with many other areas of this kit, the fit tolerances are really tight. I have used my Dremel more in the last month than I had in all the years I’ve owned it. Just to get the engine pistons (if that’s what those are called) onto the center shaft piece, I had to grind away a considerable amount of plastic from the inside of the circle that the pistons come out of. It’s almost as if Airfix didn’t even bother to do a test build of their Hellcat before releasing it to the modeling public.

I think I’ve weathered the difficulties reasonably well, but I’ve already made one mistake that hopefully won’t bite me in the butt when it comes time to mounting the engine. The rear set of pistons did not get properly aligned with the mounting tab that slides over the center shaft. It’ll probably end up being a nothing burger, and even if it is, I’m not displaying the engine on this build so whatever I have to do to get it into position won’t be visible anyway.


The last photo of the engine is not glued, other than the center shaft. And I clearly don’t have the piston pieces on correctly.

Finally, I started inspecting the windscreen and canopy. I sanded down the interior contact points on the windscreen (as I read about in the blog) to get a more flush fit. Both these parts are ridiculous, however. I"ll get pictures next time out to show this, but the windscreen is going to be a bit of fun to get attached correctly, even after that sanding. Both parts appear to be splayed out too far, especially the canopy. I believe I’ll be able to get them into proper position with the dry fitting that I’ve done on them, but this is just another example of the frustration I have had with this build.

7 Likes

Nice! Beginning to take shape.

Gary

Very cool!

One question: where did you get that laser cut stand? Or did you make it? It looks pretty neat. I’ll have to make something similar.

@Schmidty13 I got that several years ago via eBay. I believe it came from overseas, Ukraine before that country was a daily news story in the US.

https://www.ebay.com/itm/404754013126?skw=Laser+cut+jig+for+model+airplanes&itmmeta=01JNBFZT071D4K3BSZP2M4BZTR&hash=item5e3d381bc6:g:X7gAAOSwWohlq-j6&itmprp=enc%3AAQAKAAABAFkggFvd1GGDu0w3yXCmi1c2zQPCTVm%2FN25zwJVLon73ydgvnV8G%2FuE35ddh5iSIiVZEna3oWPF0V4gyM3RvdluZ6v17ksKS48%2FrBkSY0AWr6hreaSkrw4snsU6b3MDmgzAsoGY5nEK2xltdhkZLATP4F7dMYOn6heXZzV%2FR%2BB1PI1Kye6HN3cj8LexSRzhy7ltB1J6Jpl0rmn%2FMFPzUdPbXoUSz%2BmucGkd2ZOWGy2PugUGfadFDjesZqajhH5ZG5TPGvRgUNxQEEYNP5zHQPEzSZpIg6rdSkIyFbh4xjLt%2FRwkqx0xEhn7mrER9svR%2FbHpw59C%2BcWg4uXRRhnsU1I4%3D%7Ctkp%3ABk9SR6ig–qZQ

3 Likes

First off, you were right about it being a beautiful day in south Texas yesterday. It was that way Friday too and I took full advantage of it.
You’re addressing the shortcomings very well on this kit and it is indeed starting to take on the shape of a Hellcat. It’s crazy how the thick the fuselage is at the engine area and you’re right…quality control must’ve been off that day.

Coming together very nicely and I’m definitely looking forward to the next steps Steven.

1 Like

Nice detail work! Very clean, looks great.

Good job on the leading edges – results look nice. And the overall shot on that stand really does a nice job of showing how big this cat will be! Is that “oil-canning” effect on the fuselage panels molded in? It looks just great.

I’d say it looks like you’ve turned the corner on this one. Only one last big fit-up to do.

I really need to get one of these. As long as I’ve been doing this, I should’ve had one long before now. Thanks for posting that link up Steven.

For these with 3D printers, here is a free file to make one. I can’t decide if I will print it or tweak the files and make it from wood on my laser like the eBay offering.

@Toimi_Tom Yes, that effect is molded in. Airfix did a great job of representing that facet of the Hellcat. Just not as great a job as ensuring that the kit is actually buildable without modifications.

So another great day in SE Texas (weather is going down-hill early this week), another two-plus hour bench session whilst watching a movie (Enemy of the State).

Today was mostly about gap / seam filling, and continuing work on the engine. The piece that fits in on the underside of the fuselage is what I believe should be called the oil cooler. It has four prongs that slot into tight holes on the pieces of the wings that are linked together via a snap-feature that made the wings essentially a one-piece thing once you install it to the fuselage. This is actually a nice design feature of the kit. I don’t know if the problem was mine, or yet another issue with the kit, but that oil cooler was not going into place with those prongs / holes without leaving a Death Star trench between it and the fuselage.

My attempt at solving this problem involved widening the holes toward the fear of the aircraft with the hope that would narrow if not eliminate the gap. It was successful insofar as it narrowed the gap. So I glued a piece of sheet styrene in there to fill more of it.

I followed all of that up with placing strips of tape along all these seams (oil cooler but also the wing and stabilizer roots) so that the putty work I would do would not cover all the great surface detail.

Once I had the seams puttied, I put a coat of semi-gloss black on the engine parts that I built yesterday. Next up, I’ll need to smooth out the puttied seams, maybe do a little touch-up with more putty.


6 Likes

You’re off to a great start Steven. I’m alone for the entire ride.

I do not have one, but I know that UMM-USA sells them, too.

After work last night, I did some painting on the engine cylinders. Nothing much there. But I got a nice surprise later last night when I opened my e-mail to find I had received a reward for being near the top of the leaderboard as a top contributor. They sent me a gift card to use in the FSM store, so I picked up a new modeling apron that I’ll be sporting from here on.

A bit of a problem encountered this morning while building the engine. I don’t know what this part is named, but I’ll call it a separator bracket between the wasps. The instructions suggest that it should buttress against the rear wasp, with the forward wasp doing the same. But the part is not going to do that. I will check the blog to see if that guy ran into this issue, and how he solved it. But ultimately, I am building this Hellcat fully ready for flight, so the engine will be concealed beneath the cowling and this part’s presence won’t be noticeable.


3 Likes

Your progress on this Hellcat is looking very good. I had this kit in my hands at the 2019 Nationals in Chattanooga when it first came out and I ended up putting it back and I really regret that decision. Good luck with the rest of this build.