A lot has already been done. This build was first in the 80 Years of Airfix group build thread.
This morning the weather is good enough, so I shot some primer, in this case Tamiya XF-2 Flat White. Tomorrow, I’ll spray the color, Tamiya Flat Red XF-7. After that the overall color for the airplane will be AK Xtreme Metal Dark Aluminum. Thanks for looking in.
.
The big yellow thing is the pilot pod for a Bandai TIE Striker…
The Trimotor can carry anything you can strap on it!! Here is a completely unapologetic thread hijack - did you know there actually was a bomber version of the Trimotor? One airplane built for contract competition, crashed and killed Ford’s chief test pilot. I have 3 of the Revell 1/77 trimotors under construction now, want to model each of the Fords I flew for EAA.
Looking forward to seeing how it comes out. Tried building the Monogram version years ago and wasn’t very successful. My father saw the aircraft flying from time to time during his youth and said you’d always think the plane was about to fall out of the sky as the top speed was 132mph or 213km. Not a fast plane by any measure.
132 would be a godsend! Normal cruise is about 100mph at 1800 rpm, we would fly ride trips at 90 turning 1700. Going cross country, we would use 1800 rpm, leaned out it will burn a little under 60 gallons an hour, and there is about 5 hours of fuel aboard at that consumption. The payoff, though, is the airplane only needs about 1500 feet of runway to operate. They are just a boatload of fun to fly.
I would cordially suggest working slowly and carefully when it comes to fitting the various struts between the engine nacelles and the wings and fuselage, as that seems to be the notorious ‘wonky’ bit of the kit assembly. When I built mine, I wasn’t entirely sure that the instructions hadn’t mis-numbered some of the parts; I think I had to flip or swap the ‘Z’ struts (from nacelles to wings) to make things match photos of the real thing. I also had to trim the landing gear struts a bit to get things ‘square,’ as I recall.
Also…in case you weren’t already aware…Airfix apparently molded the kit’s props ‘backwards,’ i.e., with the concave surface facing forward. If you choose to, it’s easy enough to simply flip them front-to-back, trim down the stem to be the new prop hub, and use the old hubs to mount them to the engine.
A little care and patience, and you should do just fine! [:D]
Yeah, Greg, not rushing here. It took a while but the nacelles and the struts are assembled. I’ll paint them before I attach them to the wings. This kit has been kind of build then paint then build a little more, like a Bandai Star Wars kit. The decals arrived the other day and they are very colorful from DrawDecal. A couple of weeks ago, at Jaxcon, a vendor had three of these Ford kits complete at $5.00 each. Shoulda bought 'em. I hope mine looks this good…
Red, then aluminum? I’ve heard of black undercoat, then whatever colour to add “depth,” apparently, but red as an undercoat? This beginner needs an explanation, please.
I think the meaning was that the nose red gets painted first, then mask and paint the aluminum. Probably because that particular aluminum paint doesn’t take tape well.
My guess.
That model is a challenge to paint because of the corrugations.
Yeah, Bob, Mr. Morrison is right. When I get back to it I’ll paint the red on the nose and cowlings then mask for the aluminum paint. I’ll probably use AK Xtreme Metal Duraluminum for the overall color. Thanks for looking in.
Re: Red & black paint — Thanks for the explanations. Obviously I misunderstood the other post that I mentioned.
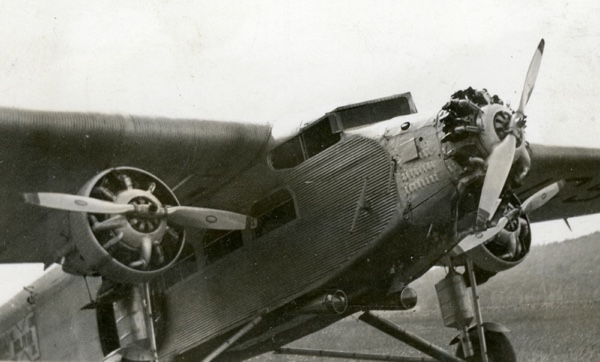
@fotofrank: I thought that these Ford Trimotor photographs, taken by my father in the 1930s, might be useful for you (and anyone who might want to build a Ford Trimotor model, such as me!)
Thanks for the photo, Bob. When your dad flew on the Ford they were still pretty new airplanes. I flew on EAA’s Ford two years ago. I took this photo as we were turning final for 36 at Space Center Executive, Titusville, FL.
I don’t always use black as an undercoat, I use flat black and polish it so I don’t have to wait so long for it to dry. I’ve had good luck with gloss dark blues. When you look at shiny aluminum a lot of what you see is the reflection of the sky.

 .
.