I am working on the RB PE and metal miniguns for my 1/35 UH-1B right now. They might look great but they are a pain in the butt to build. ALL the holes need to be drilled to fit the barrels! I really wish someone would have mentioned this fact before i started assembling mine. If I ever get a set finished, I’ll post a photo. However, I agree that the MRC/Academy minis are crap.
Ray
Unlike the M2 .50 cal the mini-gun was right hand feed only. I think this is due to the complex feed mechanism so you just couldn’t change the rotation of the electric drive motor to change the rotation of the barrels.
Thanks for the heads up on those Ray, I was looking at them on ebay last night, they do seem quite good when completed but they’re only the barrels as I understand it. And they would be too fiddly for me I fear, I’m all thumbs these days.
I’ve just bought a set of Legend XM-134 (LF1038) instead, they cost me <£5 (<$7.74ish). They might be a little too large (I’ve seen another thread around here where someone posted comparison pics of the Cobra Company M134, a pic of a real one scaled down and the Legend ones), but at that price I can’t complain and they’re not that much larger that it’ll look ridiculous.
Only thing I’m concerned about is all the pics I’ve seen of the individual parts seem to have a bent barrel section (they look a bit like bananas!) - if they come like that I’m not sure of how to remedy that issue, presumably I’d have to heat them up and bend them back. Hopefully they’ll come all nice and straight.
Progress report.
I’ve removed the magnets that were holding the fuselage together and I’m building this kit normally, although I have had to rip the roof off as it was warped on one half, but I plan on sorting that out and fixing it back and putty up the join…
Got most of the cockpit done today, nothing fancy, just a basic paintjob as you won’t really see it when I’ve buttoned up the fuselage. Still need to add the cyclics, collectives, the two fire extinguishers, and the first aid kits that go on the pillars aft of the pilot/co-pilot. All of which I’m painting then attaching.
Not sure how to paint those first aid kits though, but the instructions indicate they have a decal to go on them?
Once I’ve done those few bits I’m ready to button up the fuselage, it’s painted on the inside all ready to go (except the interior ceiling which I’ve attached to the two halves of the roof to try to fix the warpage).
I’m not too keen on the Model Master Acryl Olive Drab, it’s supposed to be the correct FS number but it looks too light to me on the ammo box under the rear seat. It’s more like the Vallejo Russian Uniform Green that I used on the seat in the rear cabin. It went on over a bit of a grey undercoat so I’m hoping it dries darker over a black undercoat.
Perhaps I bought the wrong one, I bought MM Acryl 4728 which is supposed to be FS34087, and I understand that to be the correct OD for Vietnam era Hueys?
Here’s some pics -


Progress report.
Not much I’m afraid, done about 3.5 hours work today on this and I don’t feel I’ve accomplished much.
I’ve painted the fire extinguishers, undercoated the co-pilots flexi-sight, the gunners ammo can, and the minigun feed belts (which you can’t see in the pics below), painted the cyclic and collective sticks, and assembled the crew, although I’ve left the crew chief figure to one side as he’s standing upright and as I’m hanging this on my ceiling he won’t really go with the helicopter (he’s supposed to stand on the ground). I’ve also had to reposition the pillars behind the front seats as they weren’t touching the fuselage in the right places.
The fit of the fuselage doesn’t seem to be too good at all, the fuselage halves don’t seem to like meeting up level at all. I will have some gaps to fill and major ridges to file/sand off, especially along the centre seam and where I’ve removed the roof (the roof itself has a big ridge along the centre where the halves have warped and don’t meet up properly), I also think I should have thought a bit more carefully about where to cut so it was neater, probably left the pilots doors off and taken the roof off with the the front pillars down where they meet the nose, hopefully Liquid Green Stuff will fill those gaps nicely. I think I will also need to invest in some model clamps to squeeze the fuselage shut.
Here’s some pics of the test fit I’ve done (nothing is glued, just held together with Tamiya tape, and the crew just “drop in” and sit nicely) -


More progress on this -


The Tamiya tape you see attached to the roof is holding it down and in place whilst some poly cement I put into the gaps sets. I’ve “spot welded” the two halves of the fuselage at the nose (you can see there’s a gap in the nose, it’s actually not as bad as that now I’ve squeezed it together a bit but I plan on filling any gaps present (especially where I’ve had to rejoin the roof with Citadel Liquid Green Stuff) and along the top of the engine and behind the exhaust (although you can’t see those two points in the pics).
The peg is holding the roof down onto the ceiling to cure some of the warpage.
The crew are all painted up.
The windscreen isn’t attached (I hope, no poly cement looks like it’s got down that far), I hope to be able to pull that out so that I can put in the anti-glare roof windows that I’ve yet to clear green and fit in place (I should have done that first methinks!!!).
I’ll be attacking the side windows with Fairy Power spray (via a brush to make sure I don’t overdo it) to see if I can remove the marks on them and then I’ll recoat them with future. I dipped all the windows (except the roof anti-glare ones) in Klear, put them in a clean ice cream tub with a lid on to cure, and I still managed to get marks on all but the nose windows and windscreen, although the windscreen appears to have some speckles in the pic above!!
Looking forward to this. Interior looks great.
Thanks. I’ve got the fuselage properly buttoned up now and I’ve puttied up the gaps using liquid green stuff (although it may need more as it tends to shrink quite a lot, especially on the roof where I’ve got gaps from where I cut it off).
Need to move on to sanding the green stuff now to get a nice smooth flat transition between the plastic and the green stuff and remove any ridges/seam lines.
Still need to add some bits to the exterior before I start painting also.
The gunner has also sadly fallen off his perch. No big deal though, the patch where he was glued is not noticeable and I can easily glue him back on. Plus it’s probably better he’s not attached as I don’t think I could have masked the space off for painting with him there without a bit of unnecessary difficulty.
Getting there, slowly…


Added some of the exterior detail I hadn’t yet put on, did some putty work on the gaps, mostly in the rear of the cabin, and tidied up the Tamiya tape on the nose windows.
The Liquid Green Stuff doesn’t look too smooth on camera but hopefully it’ll look better once I’ve got primer over it. Fantastic stuff though, as a veteran GW gamer I was aware of the existence of LGS but had never used it…
I’ve removed all the other windows and fairy power sprayed them and I intend to re-dip them in Klear and reattach them. I’m flipping a coin in my head as to whether or not I want to reattach them prior to airbrushing the body or after…
I’ve built but I won’t be adding the co-pilots sight, for some reason it just doesn’t seem to fit. You’re supposed to position it so that the co-pilot is holding in his hand, but then if I do that it doesn’t attach on the ceiling where it’s supposed to!?!
Getting a bit frustrated though as I’m now at the point where I need to start painting but I am waiting on delivery of some grey primer and I’ve run out of Klear! Might get back to working on this on Thursday…
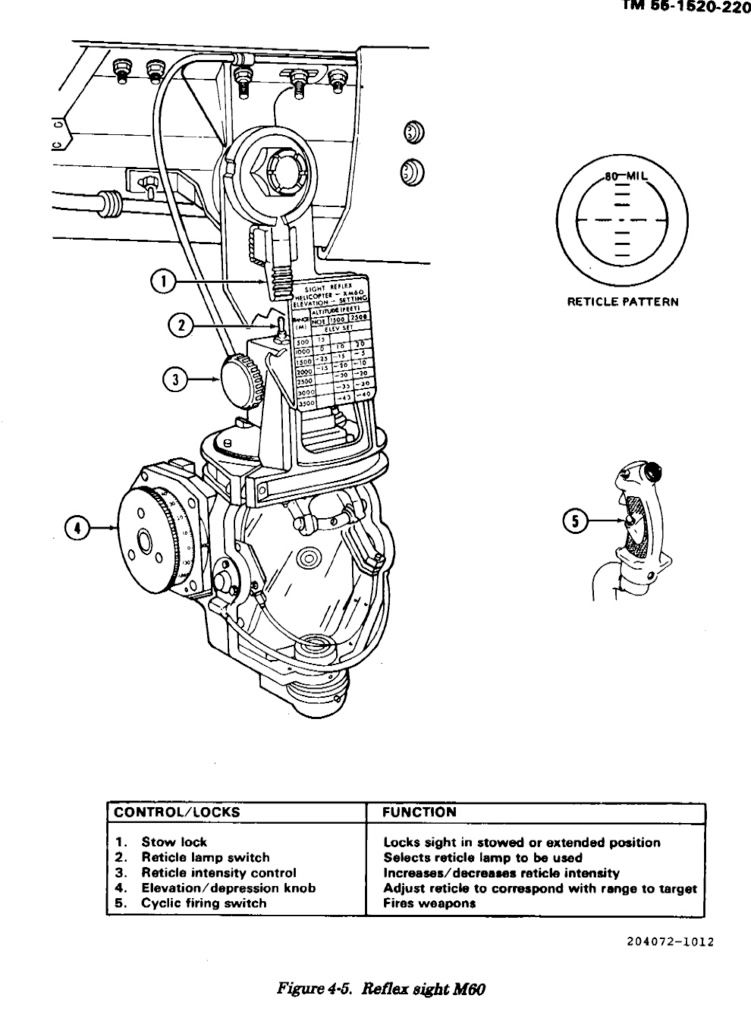
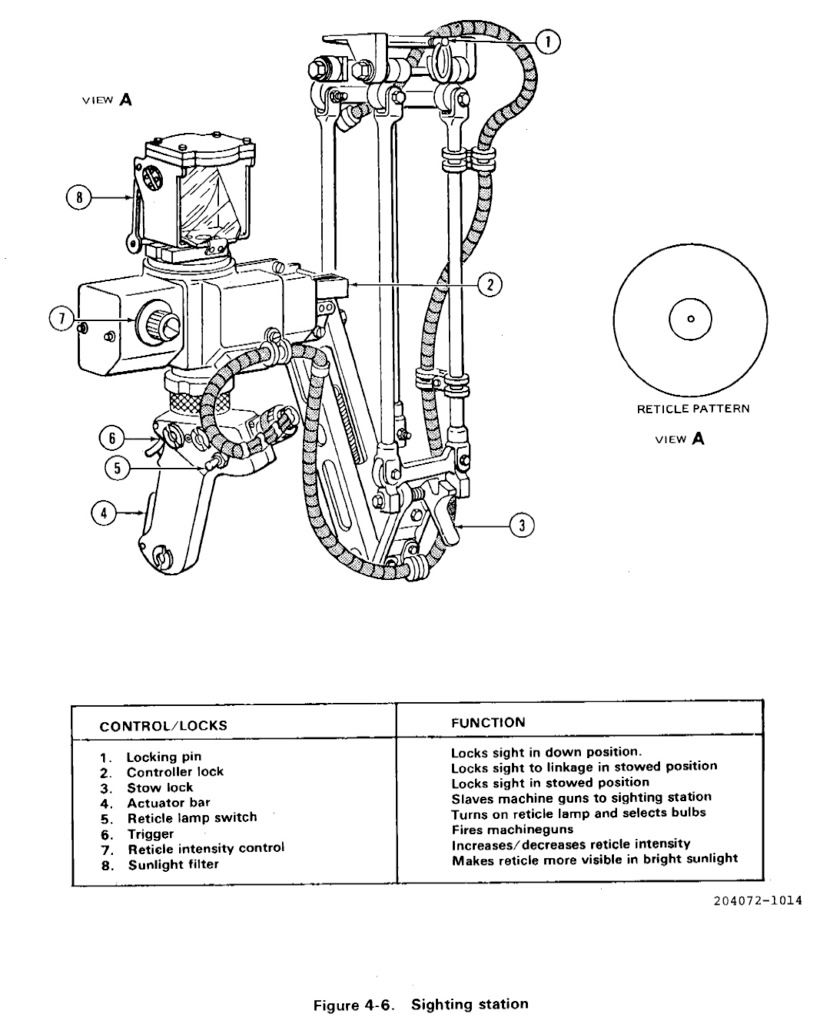
The weapons sights rotated down from the overhead just near the crash pads that cover the windshield wiper motor. The M60 reflex sight for the pilot rotated down to the right and was used by the AC (Aircraft Commander) to fire the rockets. The Peter Pilot (left seater) had the M21 sight and could fire the guns (traverse & elevation) as well the FFAR rockets.
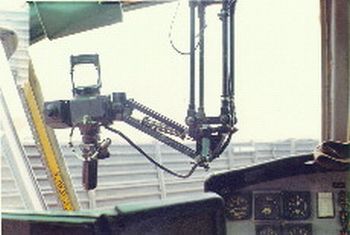
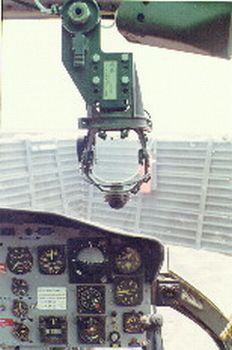
Here a few images I took of the static display on Redstone UH-1M 64-14185 showing the sights and as mentioned previously the right side minigun feed system with de-linker.


You’ll notice the electric motors on the M134 mini are missing. The rest is there though and the barrels are rifled. Someone ungraciously stole one off the other side. Also of note are the front mounting pins are missing. I used to eat my lunch in this Mike model when it was a static display at the US Space and Rocket Center before being moved to Redstone. At that time it was completely intact to include the L13 engine. It was repainted by the same group that restored Guns-A-Go-Go.


Sitrep! Apologies for the grainy pics, I changed my camera settings the other week, and as you can see by the pics above, the changes made for slightly better pics, not today it seems!!


Unfortunately I don’t appear to have disquised my putty work as well as I had hoped, need to improve on that methinks, despite having watched/read a ton of info about how to do it!!
Just waiting for the paint on the weapon mounts to dry now before I attach them, but I’m a little bit bemused by them as they don’t seem to fit properly, the tabs don’t seem to want to go into the slits in the fuselage, and when they do the weapon mounts aren’t at the right angle! Hmm…
Looking good. Man I love this kit. One day I’ll grab a box myself.
Thanks.
If you do get one make sure the fuselage isn’t as bad a fit/warped as mine was around the roof…
Also, if I were to build this kit again myself I’d cut a slot in the ammo box for the minigun ammo belts to feed into, feed them in a little and CA glue them into place, then feed them through the hole in the cabin floor prior to putting the cabin floor into the fuselage and when putting the cabin into the fuselage I would then push the ammo feed belts through the corresponding holes in the fuselage and I’d glue them onto the miniguns before I glue them to the mounts…
Reason? Because I’ve just spent 2hrs wrestling with the little rubber ammo feed belts trying to get them to go through the holes in the fuselage and cabin floor, and to attach to the ammo box and the miniguns.
As it is now I have the weapon mounts attached (and the glue is drying) and the ammo belts are attached at both ends, but I had to take the miniguns off the mounts to attach them to the belts, so I’ve got the ammo belts glued at one end to the ammo box, and the other end of each belt is loose with a minigun glued on.
I’m hoping the CA glue holding the ammo belts to the miniguns dries rock solid and by tomorrow I can bend the ammo belts around to the position where I can attach the miniguns to the weapon mounts!!
It’s great having those belts but so far they’ve been a PITA for me. Just hope they turn out better once the miniguns are in place and the belts are painted…
With any luck the rotors/mast/head etc. will be nice and easy to build (that’s about the only major assembly I’ve yet to build).
More progress this afternoon, nearly ready for a gloss coat and then decals and maybe a dirt wash all over, still waiting on my Tamiya Clear Red though, and I also have some paint to tidy up (the white marks) where I had to do an emergency superglue repair…
Got the weapons on now -


That’s a neat kit, it reminds me of the airfix 1/24 scale stuka kits that I have. I like the way you are using the after-market parts, and the scratch building with fine copper wire. Makes your model look so real. It seems like you have a lot of knowledge about your subject too. This is what I signed on to this forum for, to see how a real pro does things. model on dude
Those mini guns look wicked on that old chopper your using as a reference. I’ll bet that the guys in the black pajamas were terrified when they heard one coming.