Hey everyone. This is a plane that’s been done for quite a while now but I never posted. I put her on the side to complete a base before taking pictures and never exactly got around to making one. I’ve been carving out some time here and there and managed to finally get it ready. In lieu of doing a WIP, which already exists on a Mustang GB from about two years back, I settled for just posting a few pictures of the cockpit and canopy setup since I did a lot to correct all the radio equipment and what not. Since I wasn’t brave enough at the time to cut the Squadron canopy and open it up (plus I didn’t want to ruin the lines it makes closed) I thought it’d be worth it to show better what’s going on underneath.
The Kit
 Untitled by Britt Vallot, on Flickr
The kit is Accurate Miniatures P-51A. It’s a great kit with a few issues that need to be addressed. Perhaps the most obvious is the prop which looks like boat paddles. A little sanding takes care of it with little fuss. I could’ve probably pushed it a little more. Ultracast makes a replacement, but really it’s not necessary…a little elbow grease will do it. Apart from that there are a few extra bits you can do to spruce her up and sand things down to scale, open up vents, etc. and she makes a remarkable looking early mustang. =]
The Man
 Untitled by Britt Vallot, on Flickr
It’s difficult to find much on James John England. Most of what I have on him is from an Osprey book about Mustang and Thunderbolt Aces of the Pacific Theather and CBI. He was a 10 kill ace with the 530th FBS of the 311th Fighter Bomber Group. By the middle of 1944 all three squadrons of the 311th FBG were outfitted with the P-51A mustang due to its beautiful operational ability below 15,000 ft which happened to be primarily where the Japanese were looking to fly and maneuver between island bases. The accounts listed in Osprey’s don’t mention any stories of heroic efforts against all odds, but do reflect a group of men that were accomplished pilots putting in the time and winning the day one scirmmish at a time. JJ England was absolutely a vital part of victory in the PTO.
 Untitled by Britt Vallot, on Flickr
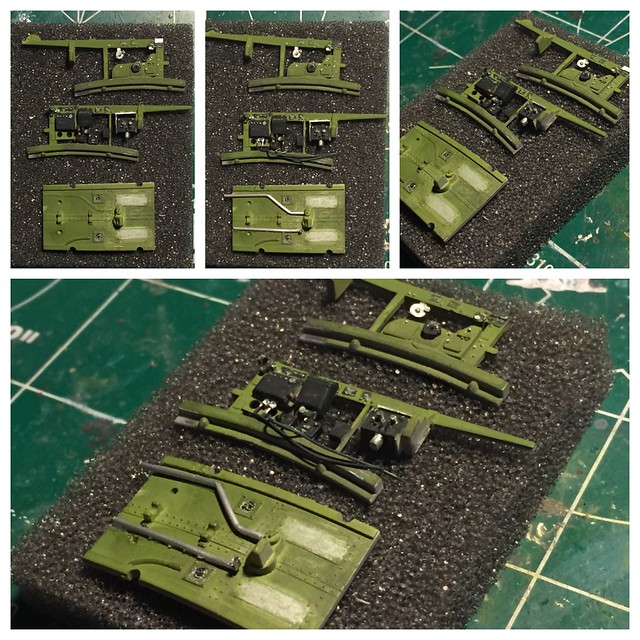
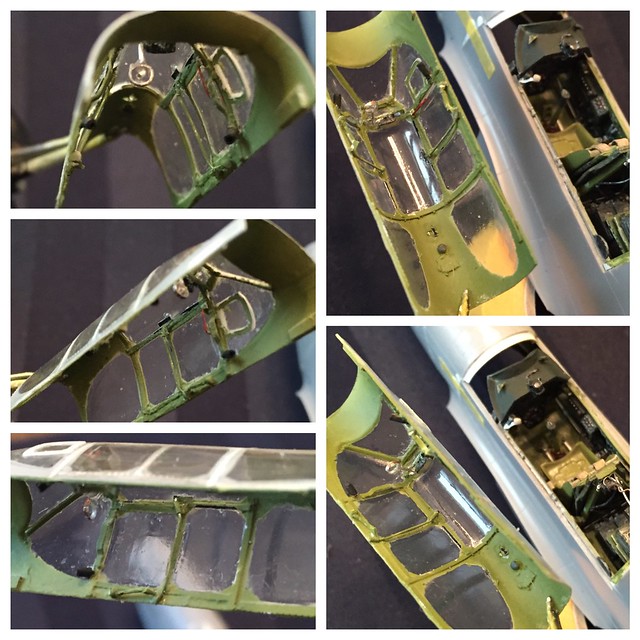
I recall looking over the front office parts and felt they were underdetailed and not as accurate as they could be. Fine for some sure, but if I ever only build one (fill in the blank) I always want it to be my best one. So I went to work with scratching out some new parts and upgrading existing parts. In hindsight, some of this is a little larger in scale than what it should be. That’s just part of the learning curve. Mostly speaks for itself. I don’t want to be too long winded here. I referenced as much as I could for P-51A radio equipment and gave it my best shot. Anything that is remotely visible, I built. The Squadron canopy was a tricky SOB to marry to the fuselage, but absolutely worth it in the end. I left it closed because it just makes absolutely beautiful lines that way, plus it is much thinner than the AccuMin parts. This makes viewing the interior much easier without all the warping of light that would otherwise make more difficult.
Cockpit
 Untitled by Britt Vallot, on Flickr
 Untitled by Britt Vallot, on Flickr
 Untitled by Britt Vallot, on Flickr
 Untitled by Britt Vallot, on Flickr
Cowling opened up…
 Untitled by Britt Vallot, on Flickr
Radio equipment
 Untitled by Britt Vallot, on Flickr
 Untitled by Britt Vallot, on Flickr
Radiator
Sort of speaks for itself. If it looks like I shoved a bunch of plastic rod in here to create a textured look of a radiator, then yes. I was a little out of my mind apparently and yes, I did that. I still do like the look.
 Untitled by Britt Vallot, on Flickr
 Untitled by Britt Vallot, on Flickr
 Untitled by Britt Vallot, on Flickr
cockpit parts
 Untitled by Britt Vallot, on Flickr
 Untitled by Britt Vallot, on Flickr
Tail gear
I wanted to beef this part up to keep it strong and also try improving the detail/scale while adding a little more life. One of the first times doing something like this. Wasn’t too bad.
 Untitled by Britt Vallot, on Flickr
Here’s more from the cockpit/canopy/cowling areas.
 Untitled by Britt Vallot, on Flickr
 Untitled by Britt Vallot, on Flickr
 Untitled by Britt Vallot, on Flickr
 Untitled by Britt Vallot, on Flickr
 Untitled by Britt Vallot, on Flickr
 Untitled by Britt Vallot, on Flickr
 Untitled by Britt Vallot, on Flickr
 Untitled by Britt Vallot, on Flickr
 Untitled by Britt Vallot, on Flickr
 Untitled by Britt Vallot, on Flickr
 Untitled by Britt Vallot, on Flickr
 Untitled by Britt Vallot, on Flickr
radiator…
 Untitled by Britt Vallot, on Flickr
elevators…
 Untitled by Britt Vallot, on Flickr
props…
 Untitled by Britt Vallot, on Flickr
landing light…
 Untitled by Britt Vallot, on Flickr
radiator door…if this thing had an onboard espresso machine I’d likely build that too. LOL =]
 Untitled by Britt Vallot, on Flickr
I’ll end the first part of this post here and include completed pictures next. I’m having an issue getting photos to load onto Flickr as well. They seem to be busy today.
=]


