Academy 1/72 Storch done within 24 working hours.

Hi Guys,

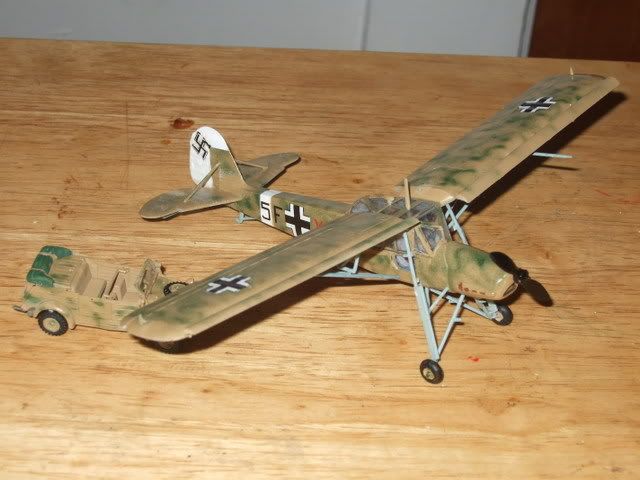
Someone in the group suggested that we build something within 24 working hours as the deadline was approaching. Also because most of the modelers weren’t finishing their builds and progress was slow. My contribution to the local LHS last day celebration was the Academy Fiesler Storch done in between travelling up North to the island of Penang for the holiday.

A simple kit with enough detail to make it a quick build. The only tricky area was the canopy assembly.

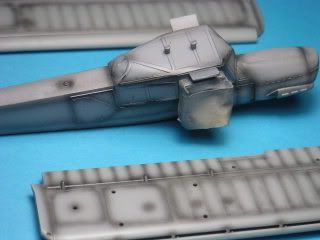
I started the night before I went up to Penang with the addition of the ribbing in the cockpit interior (itchy fingers) …got up early to spray a coat of RLM grey and packed the whole shebang and toolkit and headed off up North. Altogether 2 1/2 hours

Had about 2hours free time to add a wash and some darker pin washes to the ribbing.

I then dry brushed and highlighted the raised detail including the flight console.

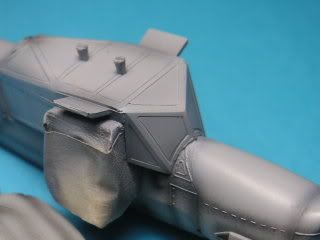
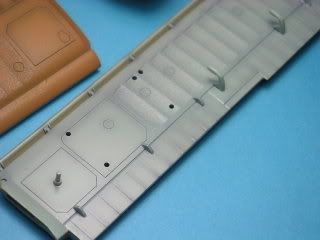
Close up detail. The amount of open area around the cockpit needed the extra details or else it would look empty.

Next…if I’ve come this far means the seats will need belts <_< and that had to be done back in KL.

Here’s the progress so far.

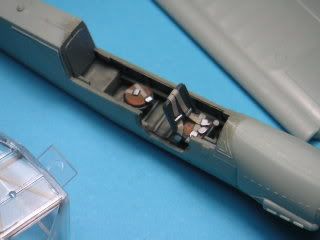
I added the seat belts from masking tape and the buckles from plastic strip.

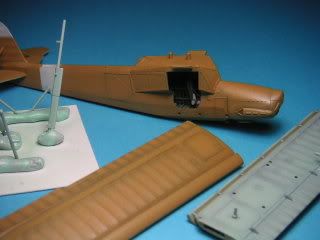
Test fitting the canopy.

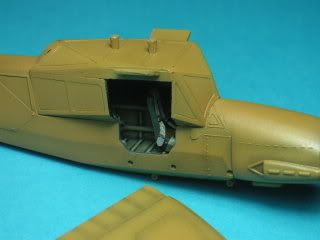
Everything was painted and washed and made ready to be sealed up with the canopy.

I’m really enjoying this build. Planes are a diversion I make every now and then whenever there is a window of modeling in between a hard days work. I prefer dio’s but for the focus on the quick build for the LHS this was the simplest kit in my stash that didn’t need scribing and the fit is acceptable with very little putty…actually none so far(phew! lucky me). My Dio’s take ages to complete and passion normally fades after a while. Planes are pep pills for me to kick start the juices. :smiley:

More in the next post.

Cheers,

Richard

Managed to do more progress work on the Storch…I glued down the canopy to the body and masked the gap left by the door and sprayed RLM grey to simulate the frame color of the interior then I coated the whole fuselage with Mr Surfacer 1000.

Noticed some gaps in the frame and hairline seams that needed filling and sanding which was done with Tamiya putty.

Then I tried some pre-shading compliments of Kenny… :lol:

I noticed after sanding the canopy edge, the grey and parts of the clear plastic showed so I re-coated with grey and Mr Surfacer.

At this point I glued the rest of the spindly stuff on the wing. I intended to glue the wings after spraying the main top and bottom colors including the camo as the wing fit to the canopy was pretty good for this scale(saves on masking)…just imagine if this was a Matchbox kit…man I’ll die. :lol:

Sprayed this first as masking this was simpler than the reverse.

Much better after the puttying, sanding and painting the canopy.

I was going to attempt painting the rest of the kit the next day in between preparing a Christmas spread for Boxing day. Incidently I cook also.

Managed to paint the Storch and add the camo the next day, all in all about 5hrs in total for the painting and gluing the wings and undercarraige.

All base coats of the main color in dessert sand.

All the little components were treated to a spray of sky blue.

Same with all undersides.

I then sprayed the zig zag pattern of the camo with dark green at the lowest pressure.

Finally with my build titled “Babies don’t come via the Stork” the Feisler Storch delivered a B-24D Liberator for my efforts at the recent 24hr build MG…B. So who says Storks don’t deliver babes.

Thanks to this rush job, I had actually completed a kit that year. Can’t remember any others.

The only difference to these pictures from the last is that the decals are on including the wash, colored prop and wheels plus the odds and end sticking out of the aircraft.

Notice the gap has been filled and painted over at the canopy joints.
The wash was done with Buncho poster colors mixed with water and brushed on. When dried, I just used a damp cotton bud to wipe off the excess.

I would recommend this kit as the build was smooth. The canopy only needs a little more attention and if you’re not steady with the airbrush yet you can go for the splinter camo with simple straight masking.

Signing off, and thanks for looking.

Cheers,

Richard.

Excellent Build Richard, especially for a quick build. The camo is impressive.

Regards, Rick

All that in 24 hours. Looks pretty good to be a quick build.[t$t]

Thanks Rick and Jetmodeler,

I surprised myself with the challenge so anybody can do it if they put their minds to it. Another thing is the kit had very few parts and detail was accurate enough for the parts to fit snuggly. I did the camo in one sitting in roughly one hour a section at a time often spraying into a tissue to clean off paint build up on the needle.

Cheers,

Richard

I didn’t have swastikas for the tail during the GB and only recently got a sheet of after market decals.

Here is a shot of the Feisler Storch with the swastika on the tail:

Thanks for looking.

Cheers,

Richard

Wow shes impresive. She looks so delicate. almost like if you blew on it too hard it would come apart. I like

Thanks for the kind word Scorpiomikey.

Yes, she does look flimsy. I bet the 1/48 scale Tamiya would be a beaut to build if only it didn’t cost so much. Glad you like.

Cheers,

Richard

Blazing fast build and good quality too! Did you make the Kubelwagen too?

Thanks Philo426,

Yes, I built the Kubelwagen but did not paint it. I’ve also got the Opel Maltier, Jeep, Kettenkraftrad and Dodge Ambulance.

Your Storch looks really good too.

Cheers,

Richard.

THanks! It sure was a neat little kit! Very well designed!

there’s a 35th scale one out there id like to get for my dad one day. Hes fascinated by… Germany. Its kinda weird really. if Germany was a person dad would be its creepy stalker lol

Hey man! German PLanes really rock! You have to admit it!

Scorpiomikey, I think you mean 1/32 from Hasegawa. It’s quite an old kit ,p-erhaps you might still find it on Ebay.

Phil - Another nice build. What scale is it?

Cheers,

Richard

!/32 Revell BF-109 G-6

Did the kit go together well? I just completed a 1/24 scale Airfix BF-109E and I thoughrally enjoyed it. The WIP is posted in the forum if you’re interested.

Cheers,

Richard

Well it was the older tool so it requires filler at the wing root and fuselage seam but it wasn’t too bad.

Cool, I was thinking of getting either this in 1/32 or the Trumpeter kit in 1/24.

Cheers,

Richard.

Yes the 1/32 Revell “Gustav” has always been one of my fave models.I remember my Dad making it in the early '70s. So i built this one in tribute to my late Father.

No, im pretty sure its 35th, its not theres anymore but it was deffinatly 35th, came with 2 types of undercarriage (extended and compressed) and 2 canopies. It was an oddball brand, cant remember who made it