I’m feeling the modeling urge flow again to start a new “quick” build to knock out before the year ends, so I started this little one on Saturday evening.
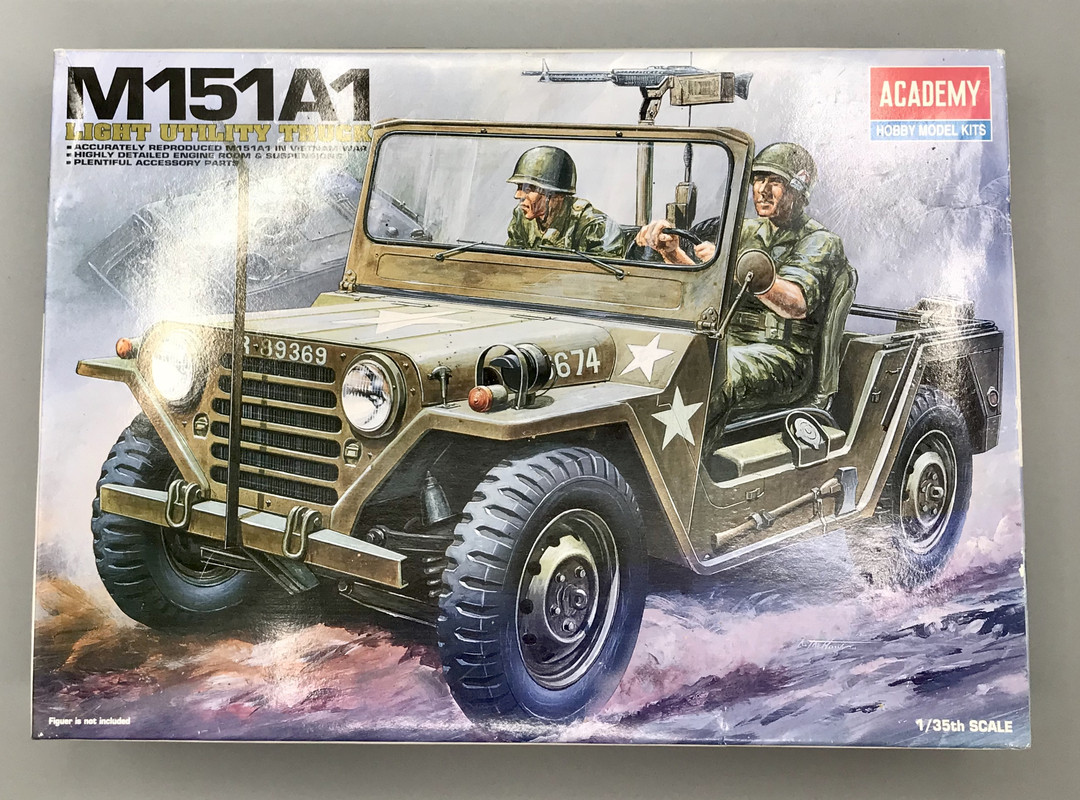
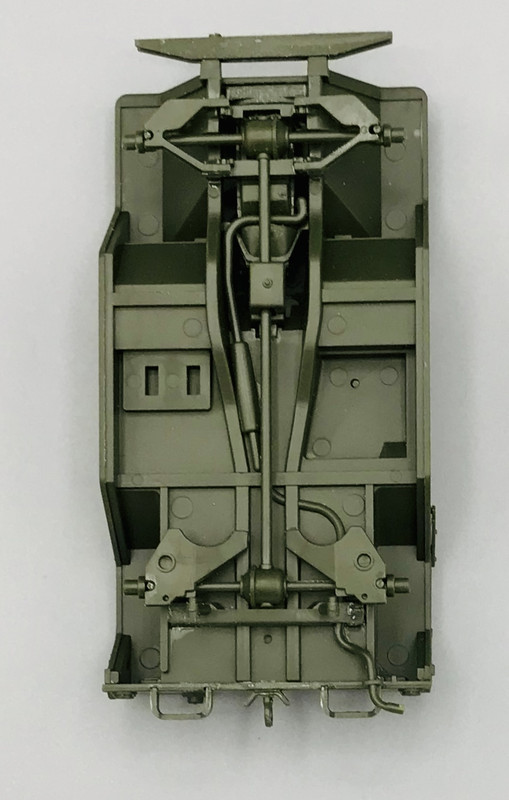
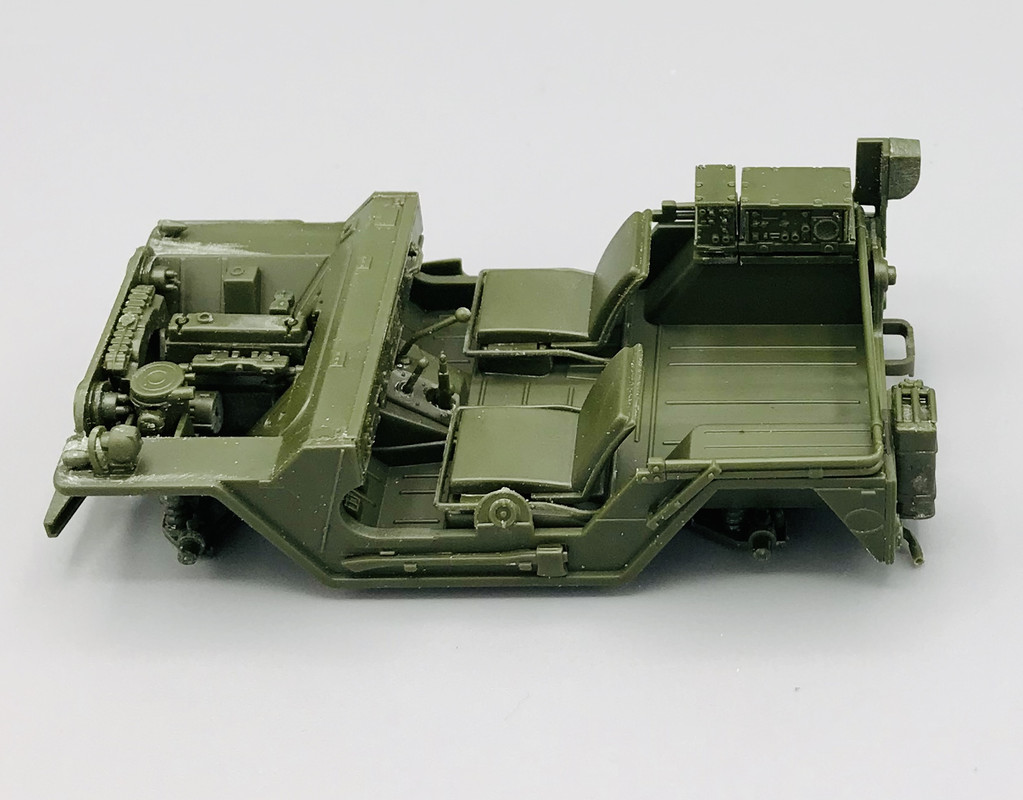
After two hours I had the engine, suspension/drivetrain, and most of the main basic assembly completed
I should have construction done in a few more days then be on to painting immediately after that…
Looking good so far. Academy did not backdate the rear suspension though; it is still an A2 suspension. If you want to correct the rear suspension, it isn’t too difficult.
There are a few other A2 details they left as well.
Missing front suspension details on all M151 kits.
Looking good stik, looks like you are moving fast with this one.
There was one guy back in the 90s when living in Miami that had one of these fully restored and as I recall had 2 or 3 old military radios mounted and had a very long antenna looping down to the front bumper. It looked brand spanking new. He displayed it at local car shows getting lots of attention.
Brandon, it is surprising that we don’t see more jeeps, quarter tons, land rovers, utility trucks/cars, etc. on here as quick builds. There are so many kits available.
Gino, thanks for the info on the corrections needed for this kit. I’m not gonna address the suspension, since I’m past that stage already, and to go back and correct it all would slow this project down and defeat its’ intent. But I’ll definitly use the info on the other kit of this in my stash.
PJ, that jeep you’ve seen sounds cool. I know that the Air Force use to cram these things full of all sorts of radios for their Combat Controller Teams to communicate with ground and air elements.
Gamera, this one is progressing quickly indeed. Exactly as intended!
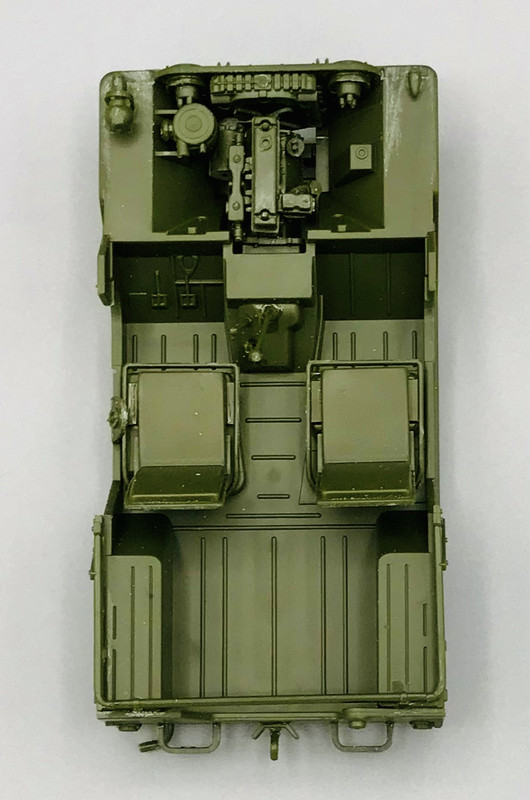
I only got in an hour or less in at the bench this morning, so some quick work. Based off what I was told by Gino regarding the rear body shape around the wheels, I sanded the shape of the sides to correct the profile of the rear wheel area
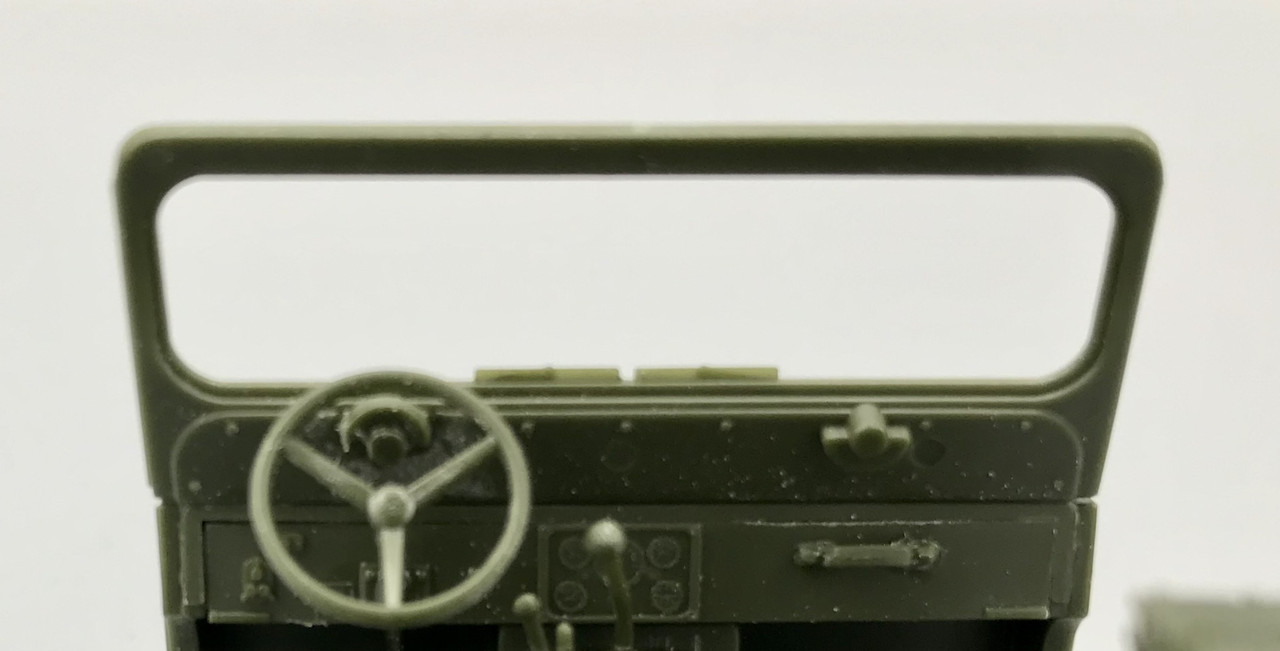
Then I built and added added the radios, antenna mount, and dash area
One more longer session and gluing will be complete. Then comes the fun part… painting!
Since I’ve got an M151A1 in my avatar, I just had to chime in haven’t I?
I understand your decision to let the suspension be - since you want it to be a quick build. On the other hand when you look at the Academy model - it’s a lot better than the first Tamiya and still it’s full of bugs. It was such a big surprise, that Tamiya brought out their new -A1, and it’s mostly correct!
I hope this can help you and maybe give you some ideas. There are two things you shoud look out for to make the model more accurate - easy. One thing is the NATO electrical connector under the windshield - do not install it, it’s an -A2 feature. Another thing is that V-shaped part under the trailer towing hook - do not install it neither, another -A2 feature. It’s for hooking up the trailer’s safety chains, on the -A1 the manual had you hook them up to the towing shackles. Now I didn’t have the info at the time so those two things are wrong on my model.
Also - the Academy kit instructions got the hood star wrong - it should be pointing forward.
And for those interested - the M151 was the most produced jeep of them all. But you don’t get to see a lot of them on the streets - because of that dang rear suspension. It made the M151 dangerous to careless drivers. In tight turns there was a risk of the jeep tipping over, and with no roof to protect the people inside… So when the Army sold those jeeps, they initially sold them cut in two… People started to weld them up… Army noticed it and changed the procedure to removing all the major parts and riding the body over with a tracked vehicle - not a nice thing to do, eh?
One more thing - to see that Air Force FAC jeep, google for MRC-108 communications set.
Stik - good luck with your build and have a nice day
Pawel! Thanks for looking in and your feedback. The connector under the windscreen looks like a slave cable receptacle. I can deal with that easy enough - leave it off, fill the attachment slot, and sand smooth. The tow chain points by the tow pintle are already attached, but can be hacked off easy enough. As for the star orientation, I remember earlier posts you’ve made about that. Plus I’m doing a 7th Army/MASSTER camo on this one, so no kit decals for markings. I just need to look thru my decal spares for black stars and such.
Well, here is a photo, and one of my references/inspirations for this project, showing not all of the Academy errors mentioned are errors.
The slave cable receptacle is present on both A1s, so I do not need to correct that. Then look at the windshield wipers. One jeep has the meet in the middle, as mentioned in the post by Gino. But the other jeep has both wipers oriented to the same side at the same time. So either way will work.
Rob - you’re perfectly right! I never served under no military commander! I always forget to add a disclaimer under my “correction” posts - and this disclaimer would read “unless you have proof to the contrary”. Didn’t Hans von Hammer alwys say: “…some day some private will prove you wrong!”. Life! I just don’t have the feeling for US Army how much the commanders are willing to see the manuals as “inspiration” as opposed to “the law”. A few people can tell me about it better than you, Rob.
And Stik - you have a proof to the contrary like I wrote above - a very nice photo, by the way! With such nice references I don’t have to worry about how your models turn out. So good luck with your build and have a nice day!
Pawel, it’s always nice to have good photo reference. But lord knows we don’t always have that luxury!
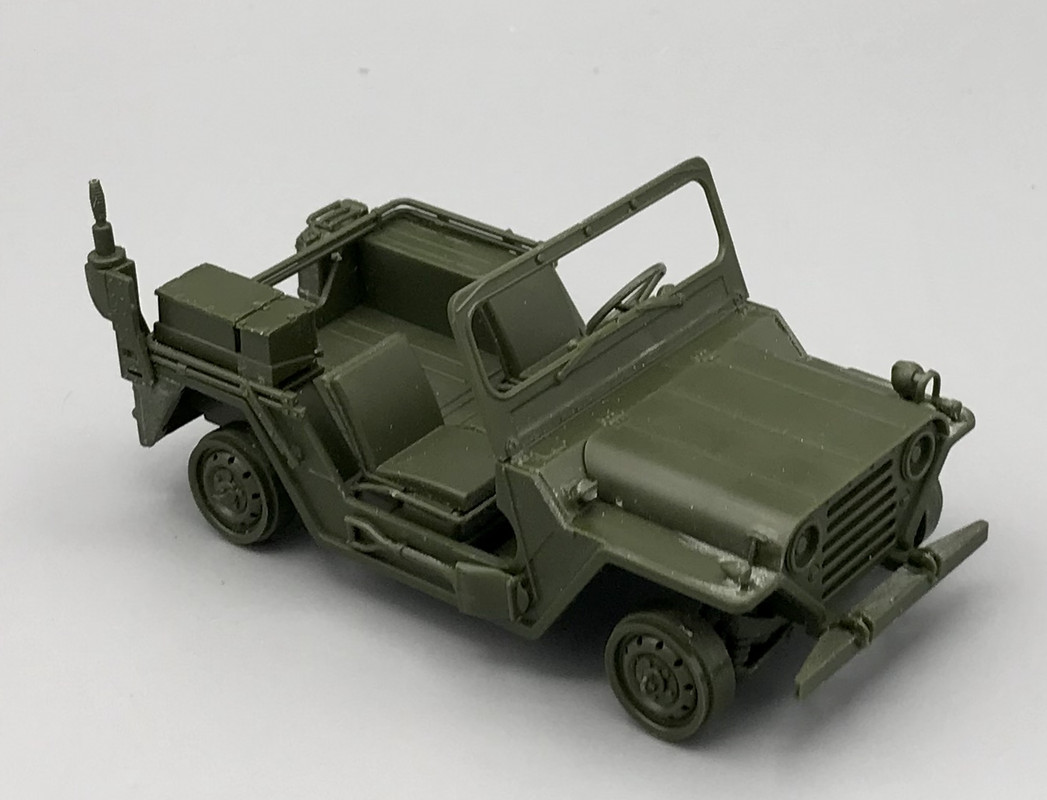
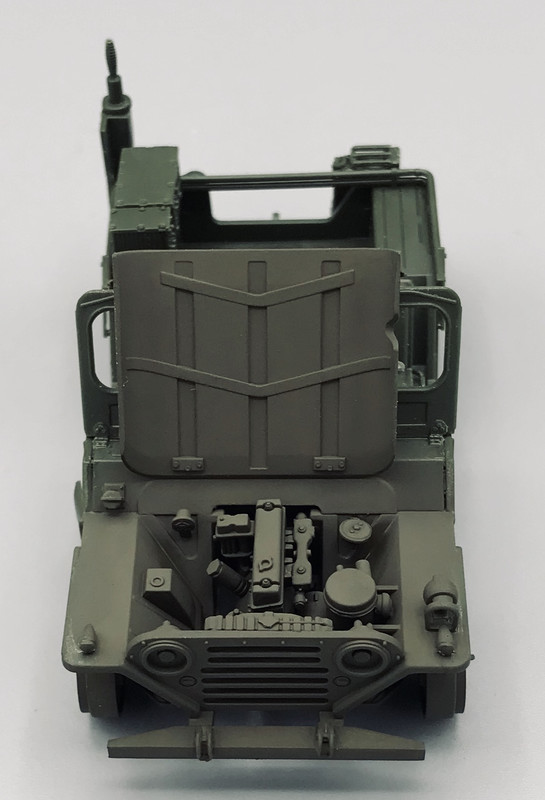
So, this afternoon I finished up construction. Aside from a few small parts such as the rear view mirror, which I will add soon.
Based upon the information provided here earlier by Gino/Heavy Arty, and compared to my reference photo, the windshield wiper motors have an issue. The motors are molded for the type that both swing left to right and back at the same time. But the blades are molded with the type that meet in the middle on each cycle, so one motor has to be inverted on the backside of the windshield. Or the blades have to be repositioned. Which one to address? I opted for shaving off the driver side wiper motor and inverting it. 99.9% of people who see this build will not know any different.
About those “Land Rovers” I was in the Hobby Lobby store near me yesterday. They have one. But it’s not the military or short version. Plus it’s over Thirty Bucks! I always liked the small mobility vehicles armies had. You are right, we need more!
Hey there TB. I had a look at the Hobby Lobby website, and I guess that they are carrying the 1/24 scale Rover, and it’s currently on sale, along with the rest of their boxed model kits. No, it is not one of the strictly military versions, but I bet it can be made into a basic utility/liaison type. Just slap on a coat of Bronze Green and boom. And ya know, I do have a 1/25 scale Centurion in my stash. Might be nice to have a little brother alongside on the shelf. Thanks for the heads up!
Gamera and M1, thank you. And yes, you guys are right about the good advice and 99.9%… I would not have known either without it being pointed out.
And the painting has begun! You can have your jeep in any colorful want…as long as it’s Olive Drab. Out of the factory, they were delivered in OD. The 7th Army MASSTER camo was applied in Europe at the unit level over the original OD. Based on a few photos and typical GI behavior, I’m going with the underside and engine compartment still in original OD. I used Revell enamel NATO Olive in this case. 20 years old and my little tin is still going strong.
I’ll let it dry overnite then start on the MASSTER camo colors tomorrow using Humbrol enamels.
Cool about the Revell paint, the only enamel I used much is Testors in the little square bottles and it always seemed to turn gummy and unusable after awhile.