About Bf-109K-4 engine cowling

I’ve read somewhere that the Bf-109K-4 has an asymmetrical engine cowling… Is that true?.. I have a 1/48 Bf-109G-10 (From Revell of Germany, I think it is the old Monogram reboxing), and I want to convert it to a K-4, I know I must scratchbuild the instrument panel and other interior issues, and re-scribe the panel lines for the K-4 version, but what about the engine cowling, How is it?.. Any clear pics that prove that? So I can compare it with my G-10 cowling and made the modifications… Thanks a bunch in advance. Most regards.

josé

Here’s an interesting article on the subject:

Click here!

HTH! [tup]

Without writing a book here on the subject, trying to turn a G anything into an accurate K-4 would be a huge undertaking. My advice is just buy a K-4.

The K-4 was not in improvment or a upgraded G, but basically a whole new mechine all togther. Other than very basic shape it has little in common with it’s G brothers.

Now knowing your in for a big project, If your still wanting to go ahead with this I would have to see the Revell front fuselage to see what you have as I don’t have one of these on hand. Second how accurate of a K-4 do you want to build out of it? This saves me from posting a ton of info no one is interested in. If your lucky revell molded the common rivited cuff style like hasegawa and you will not have to change much up front. This was used on some G-10’s and all K-4’s. If your unlucky you got the rare what most modelers call “type 110” cowling like that hasegawa 1/32 G-10[:(!].

[#ditto]

Interestingly enough I got one from a local Wal-Mart as a finished model before they stopped selling them, and if you look hard enough there should be unbuilt Hobby Craft 1/48 '109K’s still around.

Tom [C):-)]

Thank you guys for your input… The kit I have is this:

http://hsfeatures.com/bf109g10ss_1.htm

A lot of after market in this build, but the fuselage shape is original. It looks like the K-4 fuselage, but I don’t know… Maybe I’ll build it as a G-10 instead of a major conversion… Thanks a lot again. Most regards.

José

Well here’s the good news, that is the cuffed rivited D cowling. This means it’s basically the same as the standered D powered K-4’s. It also has the most common K-4 style tail as well.The question still stands how accurate do you want to be? Are you good with a scribe tool?

You looking at rescribing all the hatches and fuel filler ports on the fuseloge. Next filling and rescribing some of the wing detail along with adding some new parts. Then your going to have to deal with the landing gear problem. Depending on the K-4 you wish to build about half of them had main gear doors still in operation. this means you would have to scratch build these. Most K-4 had the retractable tail gear disabled in the field. But still you will have to either scratchbuild the clam shell doors or fill and rescribe the doors in the closed position. Now to the cockpit, the K-4’s was basically all new. This could be solved by simply using a resin K-4 cockpit. Finally by adding the other details in the K-4 position instead of the G-10 placement your going to have most people convinced it’s a K-4. (quick version)

The G-10 that guy built represents a D powered Late model G-10. Most of the features point to a WNF build. It’s odd that this late WNF build got both the K-4 wooden tail and entended tail gear along with flutter and trim tabs installed. This is not to say it’s wrong, with a G-10 anything goes.

Let me know if you still want to go through with it and I’ll post detailed drawing and instructions on what and where to modify/delete all that junk. If you already have a K-4 picked out you may want to check your references to see if it had the operational gear doors.

Ahh, yes…

Gotta love those G-10’s… as long as you pick an obscure aircraft with difficult to document markings and no visible werk number, you’re pretty much Ok with anything! [:D]

So that conversion is posible with the kit I have… Well, then I’ll do it… Hey phoenix7187! Any help will be welcome… I’m not so good at scribing, but I’ll practice, I have a lot of plastic bits where to practice… As I was thinking about scratchbuilding the interior for the G-10 version, now I’ll scratchbuild the interior for the K-4 version… Thanks a lot for your help. Most regards.

José

With G10s you also have to watch out for the wheels and wing bulges as some G10s had the full cord wheel well bulge, while others had the small bulges as found on G6s.

G10s also came with at least two different engine cowling designs, dependent upon the manufacturer, and I believe some of the G10 AS’ had small fairings on the front lower engine cover.

In short, if you’re doing a G10 work from a photo, as I’ve been caught by this before.

Karl

The reason I asked what kit you had was to see what tail and cowling you were working with. G-10’s are like Baskin Robbins ice cream, they come in 31 flavors[:P]. If you had one that required a new tail, extensive cowling work this would not be worth it. There are kits out there some with obscure details on them. Second not knowing your level of skill I didn’t want to say, yah just scribe some new lines and add a all this detail. To some this is no big deal, to others this might be above there skill level. It just so happens this mold has what you want already on it.

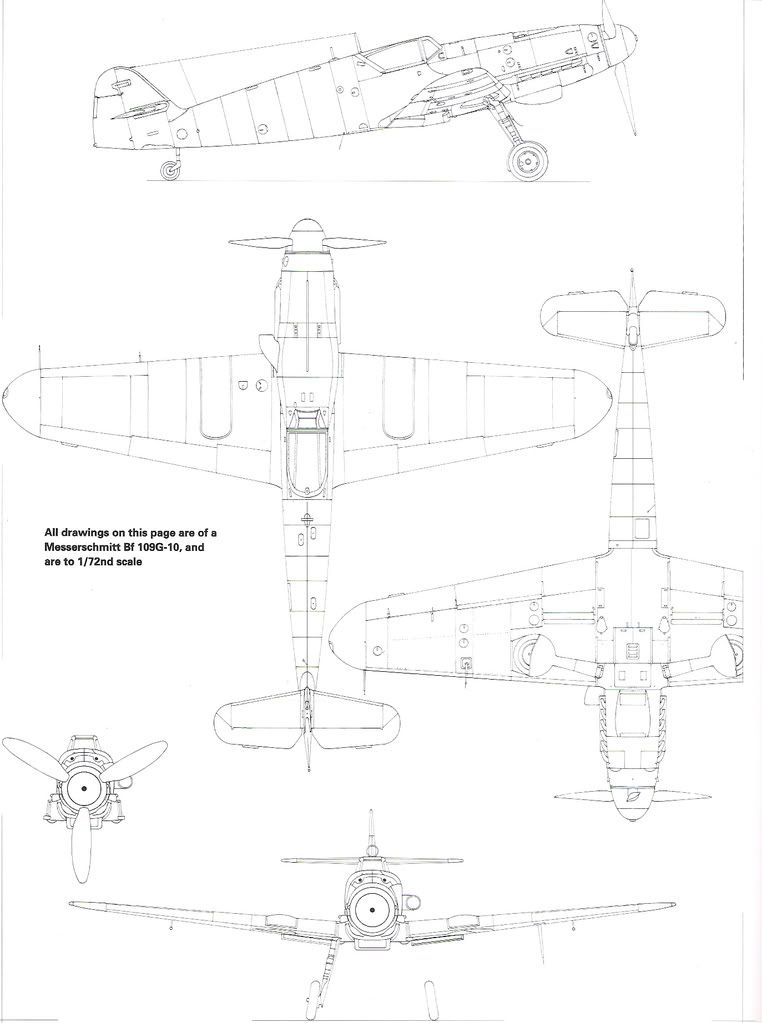
This is what I did. I scaned 2 copies of the 3 view line drawing of the G-10 and K-4. One set had numbers that I will used to explain what to do. the second set is clear so you can get a clear view of what your working with. These drawing should be big enough for you to blow up and print out. This will allow to ue them at the bench.

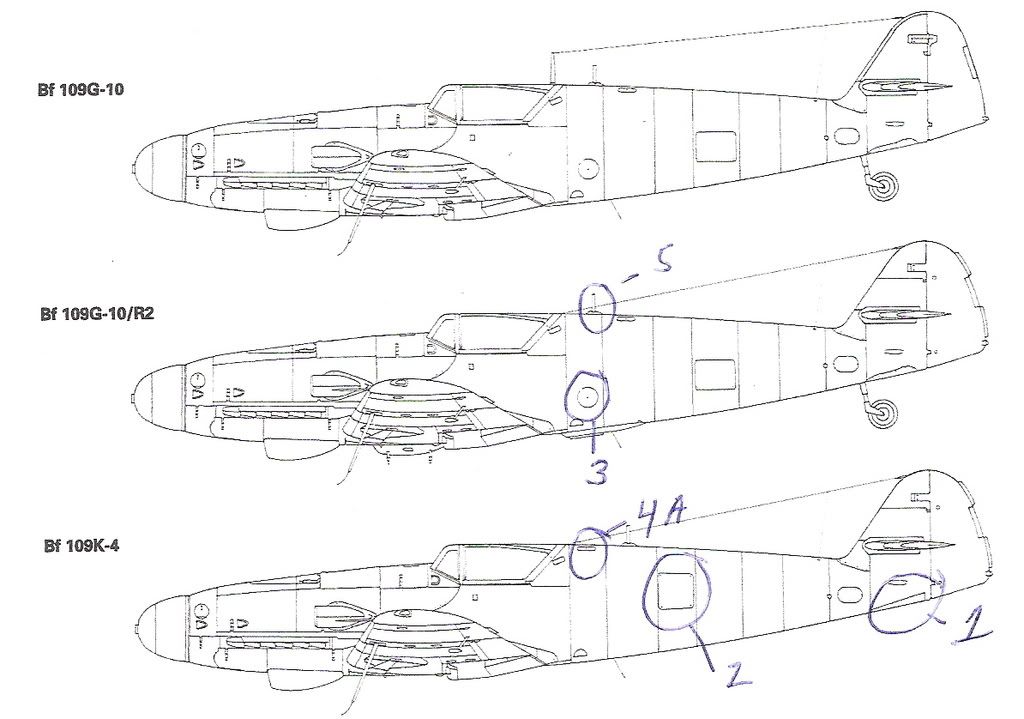
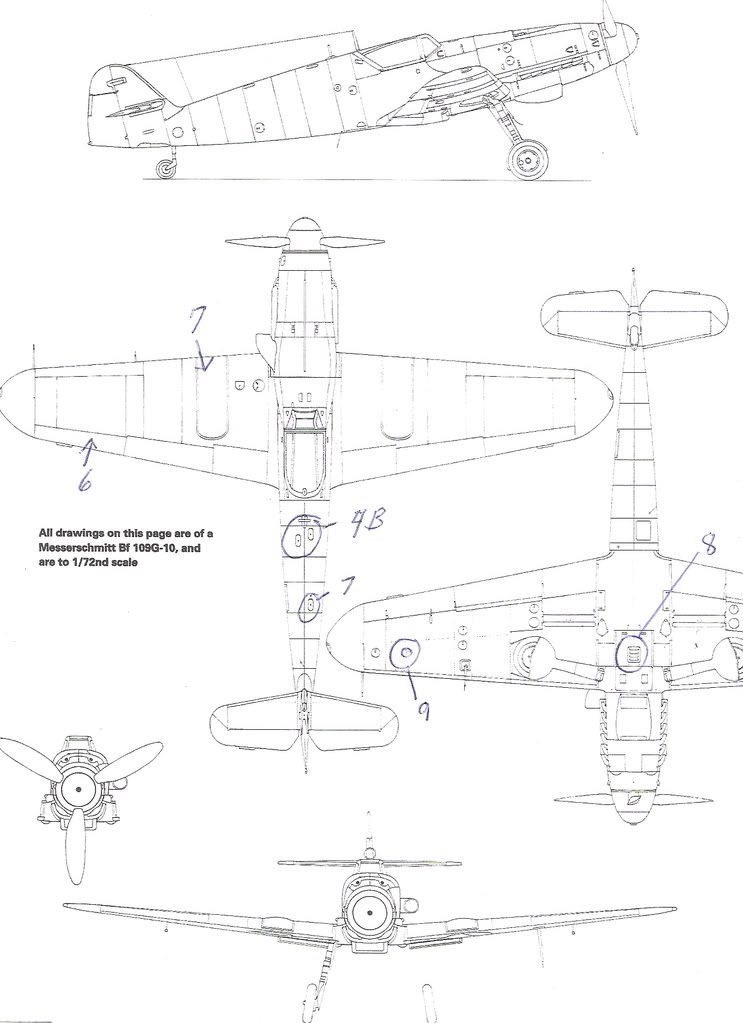
  1. Tail wheel gear door. Most were shut at all times. You can either fill and rescribe doors in closed postion. option 2 cut away and make clam shell doors from styrene. Don’t forget to use the extended tail wheel, as G-10 kits may give you both.

2.Radio equiptment hatch, fill and rescribe. Note: Changed shape, moved foward and slightly higher on frame 4.

  1. Master compass hatch, fiil and remove not on K-4.

4A and 4B. fuel filler port and MW50 filler port. Move foward to frame 1. Like G-10 view 4B keep staggered on K-4.

  1. DF loop. relocate to rear part of frame 2.

  2. Ailerons. if fabric detail is present remove. K-4 wing all steel, Dural and some wood. no frabic used. Slants now steel sheet.

  3. Tire relief buldges. G-10 kits usually give you choice of small and large. The K-4 only had t he large.

  4. Vent on bottom wing. sand and fill. not present on K-4.

  5. oxygen filler hatch. part of K-4 new wing set up. oxygen Bottles moved to right wing. Scribe small hatch just like one next to it.

  6. tires. K-4 had the largest tires used on the 109 series 660x190. Most G-10 kits give you these tires. they have raised tread pattern.

  7. main wheel gear doors. Another feature of the new K-4 wing. About half of operational K-4’s had them removed. You going to have to build one that has them removed of scratch build you own.

Fuel filler #7. I messed upon ther numbering. but this filler port stays there.[D)]

Other details. The K-4 wing was completely new and one thing that sticks out even if the gear doors are removed is the mechanical gear indcators. The K-4 did away with the insterment panel indcators and went with ones like those seen on FW190’s. I think this is a important detail as this is often missed by modelers.

The cockpit like I said I would just use a resin detail set for this.

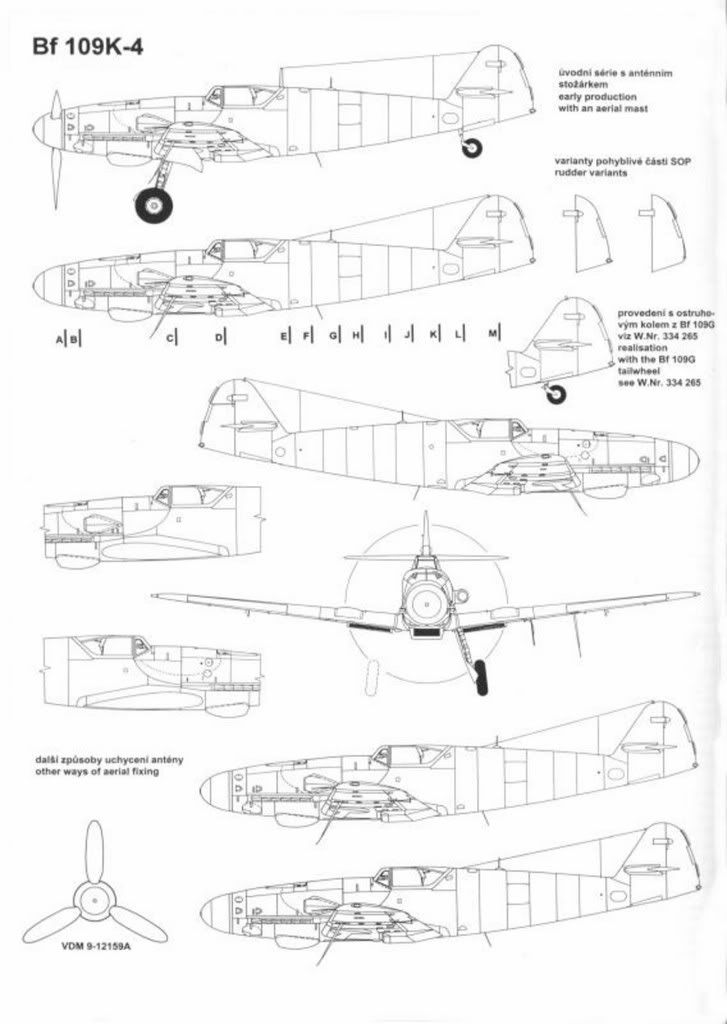
Prop. Some G-10 kits give you 2 props. The K-4 would of used the broad cord VDM 12159. This will be the fatter one of the two.

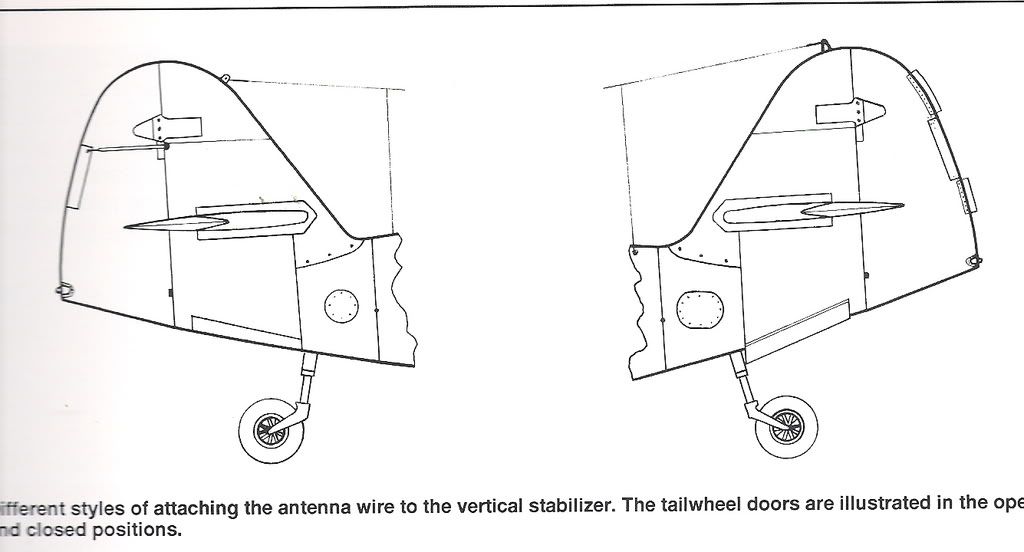
Yes the antenna line does pass through the DF loop. On most examples no tension spring was used on the tail.

A better view of the doors.

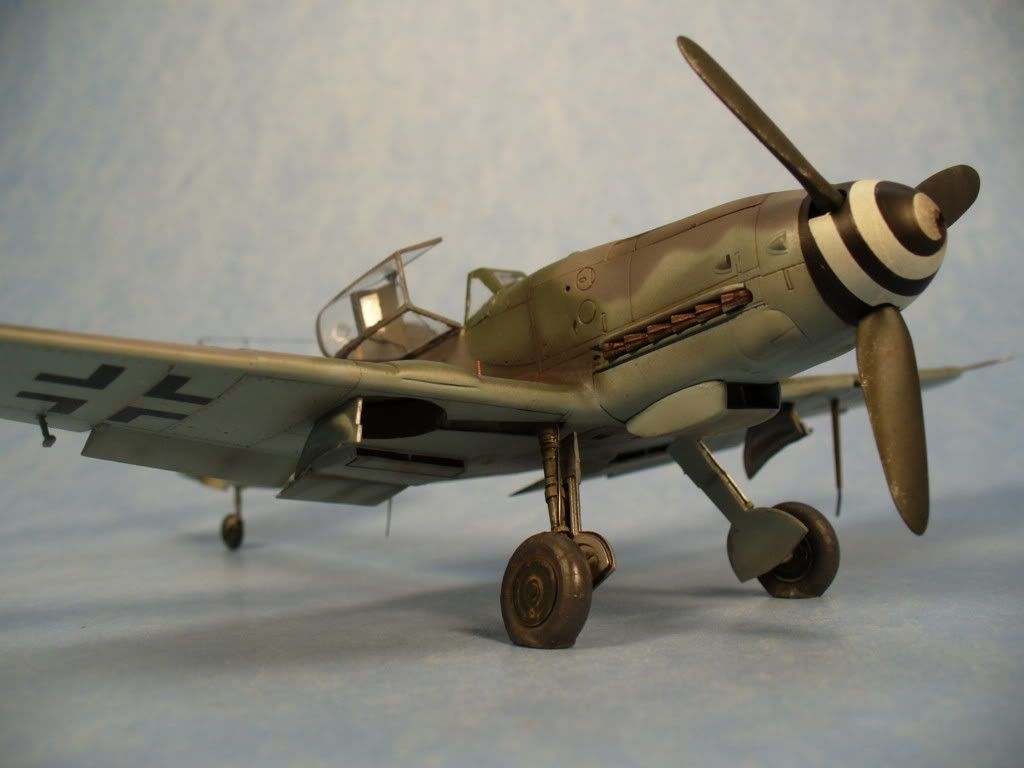
The gear indcator is the red thing on the high part of the wing just inside the relief buldge.

These changes should be enough to fool most anyone looking that it’s a K-4. There are some very small minor details that really don’t matter when it comes to a 1/48 scale model. My advice is do what you feel comfortable doing and do it to your liking. There is no completely accurate model so don’t worry about it. Some people accuracy is very high on the list. others as long as it look like it there OK with it.

If something not clear let me know. Sometimes I don’t translate well on the net. Good luck building the ultimate variant of the 109.

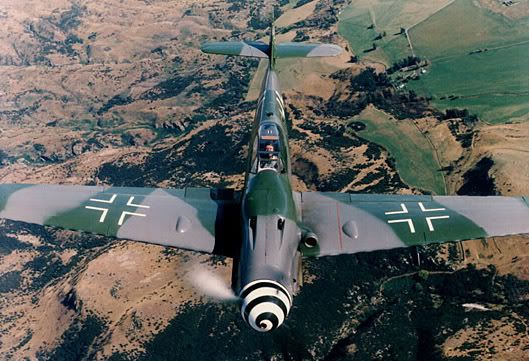
K-4 Best of the Breed!

My favorite 109[:D]

Wow! That’s a lot of cool info!.. I think It’s all I needed, I’ve found some interior drawings on the net… Thanks a lot, I’ll start that building as soon as I finish my current project (a science fiction project). Most regards.

José

For no other reason than i found this pic while wandering the net, and its a late one, with what looks like it has an assymetrical engine cowl. Ta daaaaa.

…Guy

That actually a good pic showing the shape of the upper forward engine cowling on late 109’s. That may be a pic of the one that had the landing accident recently.

In VERY BASIC terms there were 2 major variations of what most call the “assymetrical cowling”. Both had the same basic shape but hatches, buldges and panels were different. only one was used on the K-4. The other was D powered G-10’s. Actually there were 2 other less produced cowling used on G-10/14AS. To make thing more confussing there were also 2 rare assymetrical cowling used on the G-6/AS only and the G-14/AS. It is unclear if the rare G-14 cowling were used on the G-10 variant. That makes 6 different cowling total used over 2 engines, and 4 sub variants of 109. Yes this is very confussing.

Most 1/48 hasegawa kits use the late build cuff rivited cowling common to both the G-10 and K-4. But 2 other flavors can be had. One is actually a AS powered mechine If I remember. This is just what I know about there could be more. Hasegawa molds 2 variants in 1/32 scale as well. If you guys are interested in this I’ll start another thread, but your looking at opening a BIG can of worms[;)]. You’ll never look at a late 109 the same. Unless you wanted to build a super accurate/detailed late 109 knowing this is only slightly usefull to modelers in 1/48 scale.