hasagawa 1/48 kit. looking for the proper color numbers in Model Master or Tamiya.
Plus, any weathering/painting suggestions, thanks
hasagawa 1/48 kit. looking for the proper color numbers in Model Master or Tamiya.
Plus, any weathering/painting suggestions, thanks
Here is my 1/48 Hasa A6m2 I painted with Tamiya Acrylic XF 12 IJN Grey. I used the salt chipping tacnique and it works pretty well.

Personally I prefere the grey over the dark green Zero , or if I want to be pedantic it is a Zeke LOL!
If it is the same kit you will have fun building it, no problems atall.
Theuns
I don’t know the numbers,but if you prefer enamel,Model Master has the IJN Gray and green in their line also
I know if you want to do a green zero Tamiya has two colours XF - 11 and 12 called IJN green and grey for the upper and lower surfaces.
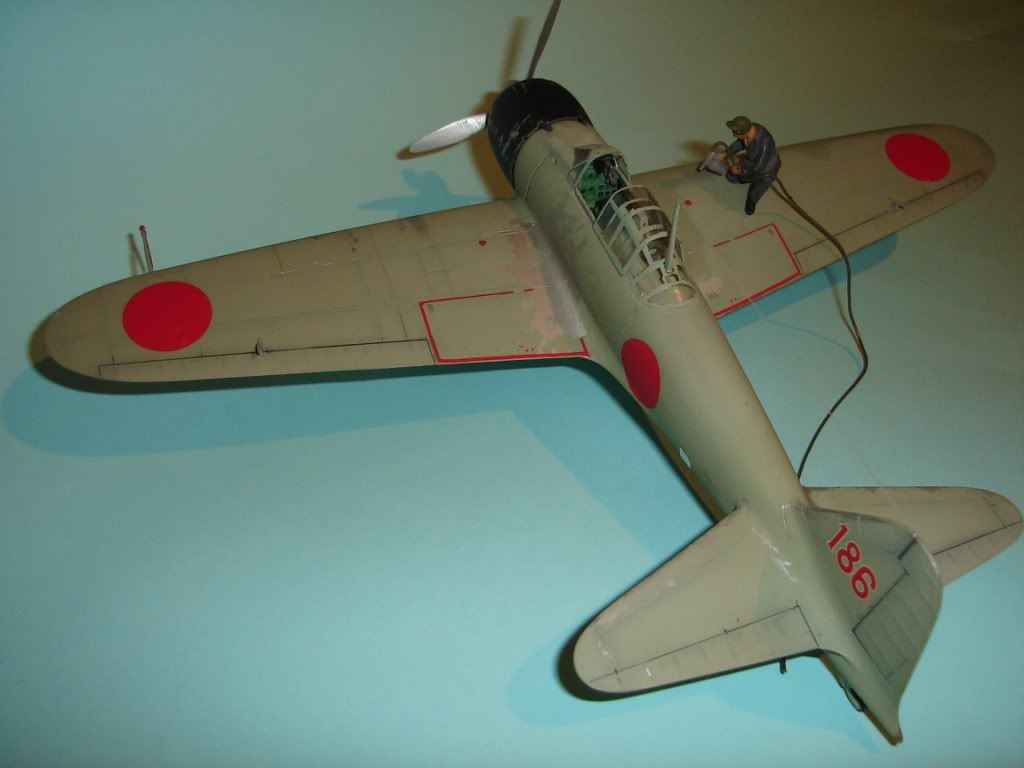
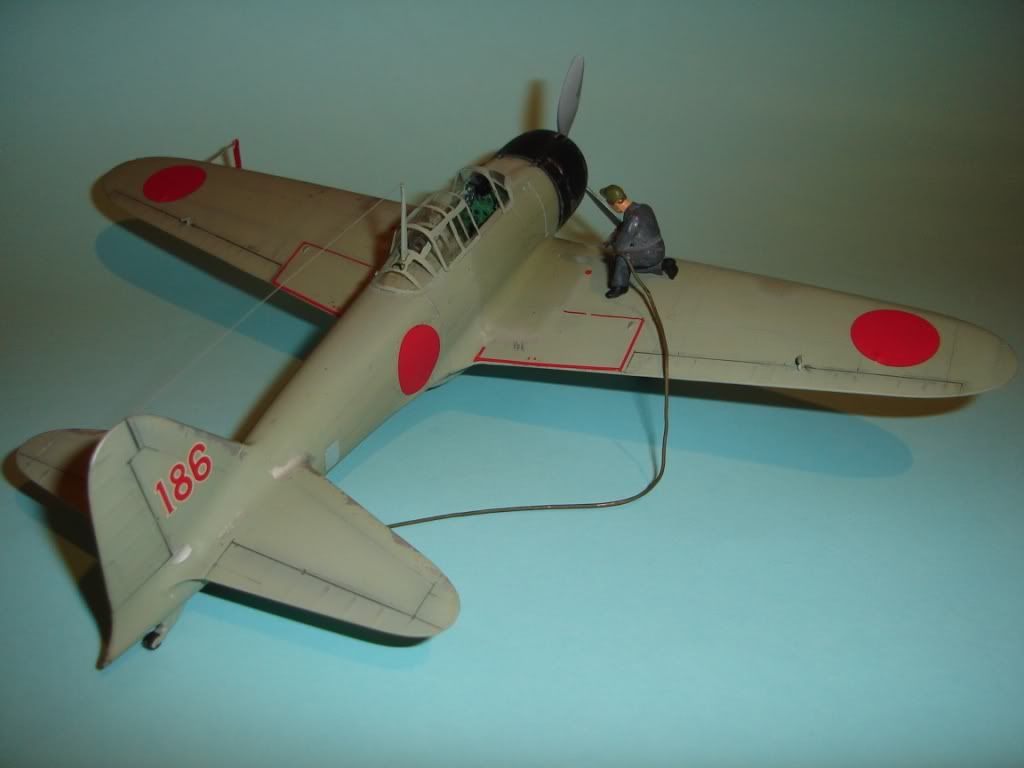
VERY nice job, humper491. I like the idea of showing it being refueled, too. However, I have one small
suggestion. Aircraft fuel hoses are pretty heavy so they are always pulled up over the wing’s leading edge to
avoid damaging the trailing edge…
Keep up the good work
Ray
Thanks, but i can’t take credit for someone elses work!! i appreciate the pictures though, they’ll certainly help. i hope mine will turn out that good!
you going with IJN green over IJN gray or overall IJN gray?
for tamiya
XF-12 for the gray and XF-70 for the green.
model master has IJN colors in their enamel line but not the acrylic.
codes for MM enamel
2116 for IJN green
2117 for IJN gray
going to try green/gray. expanding out from my normal U.S. aircraft, thanks for the colors
Might consider Rubber cement-masking instead of salt…
!(http://img.photobucket.com/albums/v233/HansvonHammer/Screenshots/Models/D3A Val Fujimi/Val005-Copy.jpg)
!(http://img.photobucket.com/albums/v233/HansvonHammer/Screenshots/Models/D3A Val Fujimi/Val004.jpg)
!(http://img.photobucket.com/albums/v233/HansvonHammer/Screenshots/Models/D3A Val Fujimi/Val004-Copy.jpg)
'Course, it’s Old School… You know, proven decades ago, way less-messy, controlable, faster, & easier… That kinda stuff… [;)]
If you are refering to the plane “being refuled” in my first pix, you are absolutely correct about the fuel hose not going over the trailing edge.
That is why this machanic is actually spraypainting (spraygun maybe not clear in this pic angle) ,hence the darker gloss “still wet” paint patch LOL!
Theuns
Humper: You might try a search of the aircraft forum, seems this comes up about every month or so. Just scroll down and you’ll see ‘Search Our Community’ on the right, enter zero and a list of topics should come up.
If I may recap there were several schemes but the two major ones were the all grey or Ameiro which no one still knows exactly which the specific shade is.
http://www.j-aircraft.com/research/amerio/out_of_ameiro.htm
The green over grey there are two versions - the original Mitsubishi zeros and the ones built by Nakajima were slightly different shades of green and grey.
I don’t have the information on hand here with me but I’m certain someone can help you out. If you use the paints MM and Tamiya have listed as Japanese WWII green and grey you shouldn’t be too far off.
I like the action pose, very nice work on the weathering. [Y]
BTW, don’t Zeros typically use the Aotake color for interior, wheel wells?
this may help even though it’s for the m2a.
http://s362974870.onlinehome.us/forums/air/index.php?showtopic=172153
WOW!!! those look great! i’m not near as good to make anything like that, but i like your "old school’ comment. obviously never tried the rubber cement, nor the salt.
i’m a tad nervious about the salt(due to the scraping and what not), but per your recommendation, could you give me further instruction on that. i think i might have the jist. base coat, cemen then rub off?
wanting to learn more weathering tactics, so thanks much!!
Just paint the base-coat you want (I used Krylon rattle-can aluminum in both cases above) and let it cure… Then, when you’re ready to paint, you just apply light coats of rubber cement in a stabbing-stippling motion, using varius-sizes of old brushes trimmed a bit (the Testor’s White-handle nylon brushes are great for that)…
Then let the rubber dry…
Once that’s done, paint the aircraft it’s finish-color, and when it’s cured, rube the rubber cement off with your thumb…
You’ll need to experiment a bit on some old hulks or something… That’s just to get the “feel” for the stippling, see how much rubber to apply for what effects, and to find what length the bristles on the brushes make the effect you want… Anything that’s made of styrene will do, doesn’t have to be a model) …