A pleasant surprise. The Bluenose II.

A couple of weeks ago, my wifes nephew paid us a visit. After talking with us for a while he said he had something in his car and he’d be right back. He came in carrying a large box that turned out to be the Artesania Latina Bluenose II kit. Someone he knew got it as a gift and didn’t want it. He didn’t want it either and the nephew said “My uncle Jim builds these.” The guy said “OK. Here. Give it to him.” Soooo, he did.

https://photos.app.goo.gl/4NDgGVcrry5LBzcM7

It’s a typical AL (Artists in the Latrine) kit but with a few changes. There are no full size plans. There is a large book with instructions for a step at a time and full size (maybe a tad less sometimes) photos of the step.

https://photos.app.goo.gl/2GyQeaqdfp71WT3V9

When you get finished with the hull, you go to book #2. That is the same type as the other book. Full instructions and full size photos of the step.

https://photos.app.goo.gl/UtwbgMKCqdHvJYQ5A

Well, I was having a ball taking a break from plastic models and building stick-n-tissue kits. But, having this kit dropped in my lap was too great a temptation. So, I cleared the decks and prepared for battle stations.

https://photos.app.goo.gl/YKEADC9tmoD1XDXK8

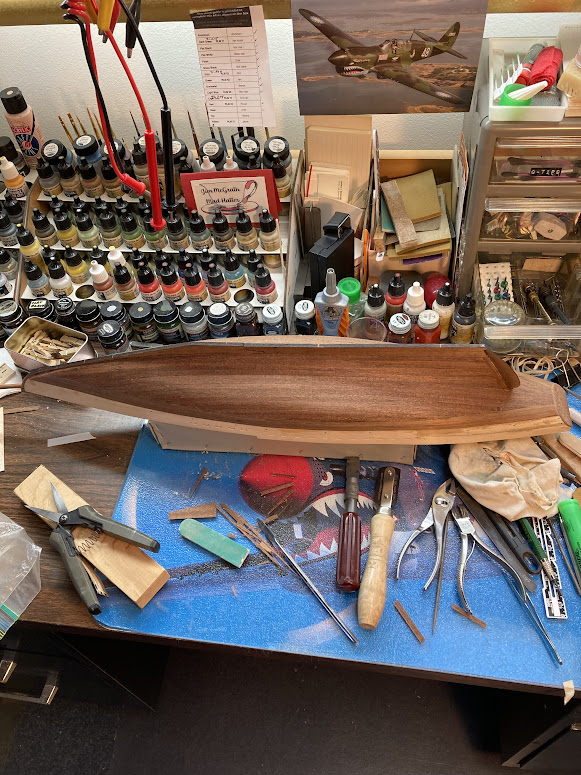
The keel and bulkheads went together great. Every one of the bulkheads lined up perfectly with no help from me. The 2 deck pieces went on just as easy. Then I started planking the deck. I rubbed the edge of the plank with a charcoal pencil hoping to make it look like the planks were caulked. I did every other one so as not to look too heavily caulked. While they were drying, I started to build the stern cabin. Working on and off between glueing down planks it’s done and looks pretty good.

https://photos.app.goo.gl/CfnhCcPGGDFihF6r6

The deck is planked now, and according to the instructions (which I always follow to the letter [;)]) it’s time to start preparing the bulkheads for planking.

https://photos.app.goo.gl/hLyj5eguePAV4KgY7

Stay safe.

Jim [cptn]

!http://www.sherv.net/cm/emo/word/good-luck-emoticon.gif

This is gonn’a be good.

Hmmm.

This is interesting. I didn’t know there was even a “Bluenose-2” I guess she was more poppular than I thought. One thing I will say is this. I have always thought that the original was a beautiful ship! Once you get her done you will see what I mean.

If memory serves (and it may not) there’s actually a Bluenose III, with Two having been retired after many decades cruising. I remember some controversy about the rig for III.

I made a plastic model of the Bluenose a while back (way, way back). I guess it is the original Bluenose. I don’t remember the name of the manufacturer. Here’s a photo I took last night of it sitting on top of the one I’m working on now. The new one will be roughly about 6 to 7 inches longer.

https://photos.app.goo.gl/mKyDSzt6rw7TnWF28

I also have a print that I’ve had hanging over my workbench for many years of the Bluenose. I’m guessing that it is of the Original. CapnMac will probably know if that is correct.

https://photos.app.goo.gl/L6WVBSirXtona1Px6

TB, Here’s is a photo you might enjoy. It’s a print of the oil tanker Atlantic Heritage. It was given to me back somewhere in the '60s while I was down your way attending a fire school. I was in the Fire Brigade at the Phila. Refinery at the time and they sent me down with a couple other members to get some training on fighting oil fires. Don’t remember the name of the town but we had to work our butts off at the school and had some great times at night in town.

https://photos.app.goo.gl/mJN5tGNTe8qRBpub7

Stay safe.

Jim [cptn]

I’m no expert on Bluenose. I do know that there’s controversy about her rig and appearance.

Some of that will be that is was common to change the rig over the life of a ship.

Many of the depictions of Bluenose include a “Fisherman’s Staysail” (occasionally called a ‘spanker’ too) spanning from the foremast to the main topmast, so that the broadside sial plane resembles a near-continuous triangle of sail. From memory, that’s the image on the Canadian coin.

Now, she probably sailed with topsails only when needed.

I know there’s debate on whether the fore staysail was fit with a boom, the contemporary images differ. Having sailed with one of those vile devices, they are more work than they are worth, but, on a working vessel, the one or two hands saved were profit made.

Thanks for the info CapnMac. I made a copy of your post and I’m going to keep it with the Instruction book for future reference. It will come in handy when I’m working on the sails and deciding what I’m going to do with them. It’s great having different options available.

Stay safe.

Jim [cptn]

Hey JIM!

That photo really brought back some memories.Ships like her, were for a while considered the "Most Beautiful " tank ships in existence. I have a photo of the original ship they used for the “Texaco Tanker” Toy/Model.

In my time in service I belive I saw at least four different types in Refueling at sea situations.The most common for a while was a Grey version of the Texaco which I believe was a T3 version. I could be mistaken.

i do remember one that was strange In all regards. She was a true Deckhouse aft type, BUT, she sat so low in the water the crew were using Lifelines to move around the deck.When we came along side. The bow wave we made, washed over their deck! When we finished our topping off, She didn’t even look like we had gotten anything.

The oddball part? When we made to move away our overflows spilled oil everywhere including into the sea! The ship it seems had pressurized our bunkers for some reason! We ran at high speed away fron the fleet for twelve hours, coming back only when the pressure had been bled off.

Thought it was about time for an update.

Well, true to tales of “Artists in the Latrine” kits, I started out seeing a beautiful kit. The instructions seemed great. The wood was beautiful. Parts were laser cut and just popped out easily. Bulkheads slid into place easily and fit was spot on. Deck went together easily and fit was again spot on. Then the storm with the lightning hit. [st] [li]

Started sanding the bulkheads in preparation for the 1st layer of planking. Had to work slowly due to hand pain so I sanded a little and took breaks working on the deck pieces. It seems that the bulkheads were not solid pieces but plywood and they were splitting as I sanded. That ticked me off as I had to stop sanding, glue them back together and let them sit while the glue set.

While the glue set, I worked on deck fittings. As i studied the instructions, something didn’t look right. Measurements didn’t match and placement where they would go on the deck didn’t seem to match up. Found the problem. The instructions were not made from 1 boat. They were made from 2 different ships. The bulwarks on 1 ship were Ivory white and the Bulwarks on the other were stained and clear coated so that looking at a small section of the deck to see where a fitting was to be placed, the fitting looked different from one pic to the next. The more I looked, the more I found to prove there were 2 different ships used for the instructions.

After finishing the sanding of the bulkheads, the next step is to install the bulwarks. Well, that’s where I’m at now. The notches on the bulwarks for placement do not match up with the step on the deck and the bulkheads they are supposed to line up with. Ah…there’s the other ship again. Well, if I can’t make them fit right, I’ll just have to make new ones. Luckily I have a large box full of assorted wood scraps from all the kits I’ve built in the past so I shouild be able to replace the bulwarks.

I was thinking (can you smell the wood burning?) the other day that I was going to post something about how great the kit is and that we would have to change our opinion of AL kits. Well, guess I’ll go wash out my mouth with soap for that.

Going up to the loft to get some work done tonight. Will try to get some pics up soon.

Stay safe.

Jim [cptn]

I remember building the plastic Bluenose kit with my Dad when I was a kid, and thinking with the black sewing thread rigging and vacuum-formed sails, it looked pretty darn good! Even unpainted, the dark green and tan plastics made it look like an actual sailing ship. And I even managed to not get too many gluey fingerprints on the hull.

It’s easy–all too easy–to bash AL kits. I’ve done plenty, and with good reason from my point of view.

I find that they make decent “jumping off” points. The planking? Yeah, “spares box” along with about half the deck furnishings. The metal fittings are not horrible. Cordage and blocks–iffy, but, with much sanding and beeswax, acceptable.

For the planking, I’m more likely to go get batches of bass strip wood and just shape them to fit. Some of that is kit experience, and an equal amount from 1:1 planking experinece. So, you taper the ends, and back out the planks (at least as much as a 1/72 or 1/64 model will allow).

And, like 1:1 practice, I’ll start from the garboad (next to keel) plank and work up to the wales.

But, we each find a way to get what we want out of the process.

Capn, the plans call for the bulwarks to be put on first, then the planking started from below them down to the keel. While getting the bulkheads sanded and using one of the planks to check the fit of the planks as I went, it just seemed to me that working from the keel would definitely be easier just as you suggested. Now that I think about it, I did my Scottish Maid their way, from the top down to the keel and I remember having a lot of trouble at that point.

I’ve started attaching the new bulwarks and managed to get them to fit. When finished, I think I’ll follow your advice and start planking at the keel. Thanks Capn, I apreciate the advice.

Stay safe.

Jim [cptn]

Model Shipways instructions for their Bluenose kit can be downloaded and I think that you will find their rigging instructions very helpful.

There is a book by author Lennart Petersen about fore and aft rigging.

Also there is a book from the Bluenose 2 Trust named ‘Bluenose 2, Saga of the Great Fishing Schooners’ that will give you all the rigging details you will need.

And not forgetting Howard Chappelle’s very comprehensive book about the North Atlantic Schooners.

Hope these suggestions help.

CapnMac, I have been following your suggestion on planking the Bluenose. I started at the garboard and worked up to the bulwarks. It has made the planking a lot easier. I’ve been very slow doing the planking as life got in the way and really slowed my modeling time down to a crawl. The first planking is done and I will have photos up soon.

Bugatti Fan, thanks for all that info. It’s much appreciated. I’m building up quite a folder of info on this build.

Stay safe.

Jim [cptn]

Hi everyone! Sorry for the delay. Life and old age is doing a number on me. Had problems getting the photos from my wifes phone to my computer also. Got the pics moved over tonight.

After following CapnMacs suggestions, the first planking went well. Gave it a good sanding and fixed a few imperfections. Coming along nicely. Put 2 of the second planks under the bulwarks to establish a line for the remaining planks and started planking from the keel up.

https://photos.app.goo.gl/vbeWqssWWvQ5tNpu8

The planking went very well. Did 1 plank on each side at a time and held in place with strips of masking tape overnight. Finished the planking and gave it a good sanding. While waiting between planks, I worked on some of the deck furnishings.

https://photos.app.goo.gl/mr5YaGDcrWKhU4jS8

Installed the rudder and I’m now working on tapering the bowsprit. My small lathe is really getting a workout. Used it to polish the parts of the windlass and capstan too. There were no hinges supplied for the rudder so I’m using some thin brass to make them.

We think we found the trick to getting the pics over to my computer a little easier, so, hopefully I’ll get photos over to here faster.

Stay safe.

Jim [cptn]

It can be very satisfying to follow the full-size method (if only for doubling the number of books a person can consult.

And part of it is in, functionally, treating each plank almost as a model unto itself.

For example, in 1:1 construction, the garboards are huge bits of timber, often foot or more in width rough cut. The bottom edge is left square to be fit to the rabbet in the keel. The top edge is narrowed fore and aft to the planking interval at stem, midships, and stern. The upper back edge is “backed out,” e.g., tapered to about half its thickness and half the backside width in 1:1 to reduce the beding stresses (this is seldome needed in model construction).

It can be slow going, but, as you have seen, you can put the time between planks to good end in building deck furniture, or roughing out spars and the like.

Now, a set (or three) of these is very handy, too:

Model Expo (and similar vendors) used to have a set with like a 1mm “step” so the holding-down “toe” would lay more flat upon the plank, more like these from MicroMark:

The next step is the slow-going bit of inserting them in the text. Which an be sore counter-intuittive here.

I went to your link, picked the middle photo, then right-clicked “save image link”

Then, pasted that link in the “Source” box of the Image Tab:

I specified 600 pixels wide, as that pretty much neatly “fits” the default page size here at Kalmbach (you need not specify a height, it will be proportional)

Sorry for the long absence. Got quite a bit of work done. The basic hull is completed. The bowsprit has been installed. The prop shafts and props are in place. There were no hinges on the rudder so I made some out of a thin piece of brass in the scrap box. Don’t have any bolts on the hinges (YET). The kit stand kept breaking with any movement of the hull. The uprights were made with the grain running horizontally so I made a new one. Seems to be doing the job. Starting to add the deck “furniture”. The measurements for placement of a few of the parts was really off. One of the “cowls” that send fresh air to below deck, if I followed the measurement on the plan, would have been placed directly in front of a door leading from below deck. I used the photo of the completed ship for placement. I’ll have those photos in a couple of days.

https://photos.app.goo.gl/HLLaiMNiNtRQ7aYx5

Stay safe.

Jim [cptn]

Hello Jim!

Looks very good to me. I think you are taking great care of a kit that is not so straightforward to build… Good luck with it and have a nice day!

Paweł

Thanks Pawel! Heard that AL kits were sometimes a very big problem. This one seems to have just enough problems to make me really try harder to solve the problems without letting it show in the finished build. The next photos will let you see it really taking shape.

Stay safe.

Jim [cptn]

Here are the latest photos of the Bluenose.

Most of the deck “furniture” is on now. When I started working on the ships boats, the small size gave me a lot of trouble so I’ve put them aside for the time being. Still thinking about them and I think I’ve come up with a solution but it’ll keep for now. I can work on them later. The railings in the aft end of the boat were fun too. The “rope” is twisted stainless steel and makes bending and seizing the loop at each end slightly difficult. The wire used to do the seizing did not take well to bending more than once. Soooo, I looked through my extensive wire collection and found a reel of each size wire that was clear plastic coated, left-over from my R/C boat days. That went so much easier. That’s good because I now have 6 lines to attach to the bowsprit. Then there’s all those white metal fittings that need to be “Polished”. It’s tough holding a fitting that is 1/8" long in your hand and polishing it at the same time. Lots of work done and lots of work still ahead.

https://photos.app.goo.gl/SDDaCmBSWwoqKp4N8

If I can be of any help to anyone just ask. If you see anything you think I need help with just let me know. I’m always open to help, giving and/or receiving. And, I accept constructive criticism readily.

Stay safe.

Jim [cptn]