#98 Italeri RSO w/ Pak 40 COMPLETE Pics p.5*

Another weekend gone by means another kit to start! #98 is Italeri’s RSO with Pak 40 and a hodge-podge of goodies including Aber and Eduard PE for the kit, DML’s Pak 40 for the gun with Griffon PE, and Model Kasten replacement tracks to replace the awful Italeri rubber-bands.

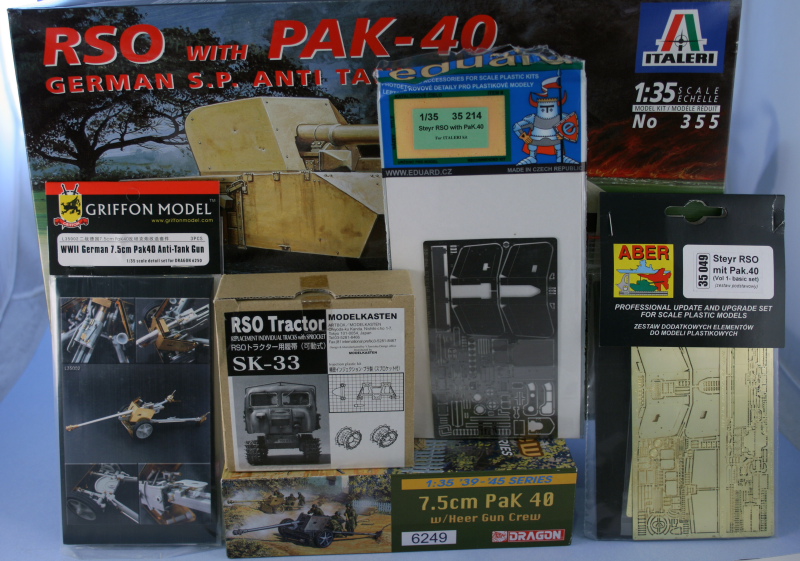
I’ve been wanting to tackle this kit for a while and finally decided its turn at the bench had come. As you can see from the materials used, this is going to be a kit-bash and PE buffet approach, taking a little bit from here and there to get the desired result that I want. I had at one time contemplated doing the full Aber route and replacing the cab and fighting platform but common sense got the better of me and I settled for a somewhat less ambitious project in the end.

Work began in the Italeri instructions with Step 1 which deals with the construction of the chassis box. This is a multi-part affair with the floor, top, sides, front, and rear parts all separate. The fit was generally good but there was some flash to deal with and of course ejector marks in various places but nothing out of the ordinary for a kit of this age. I did have to use some rubber bands in a couple of places to insure everything lined up square and a combination of liquid glue and regular glue did the trick.

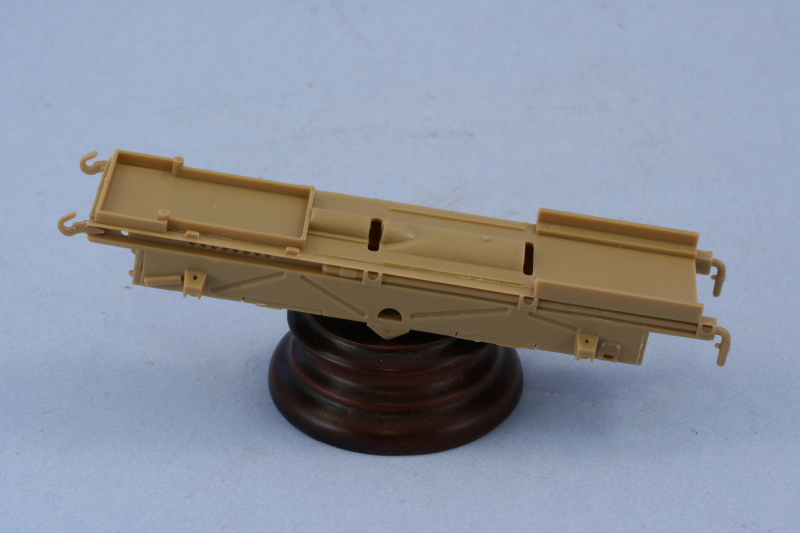
Step 2 began work on the suspension and running gear. I filled the sink marks on the spring mount points with Squadron white putty and sanded smooth. The suspension elements were a tight fit into the hull sides and had to be coaxed a bit to get them all the way up against the sides. The road wheel arms were added next and some Aber PE used to dress up various points that were lacking in detail.

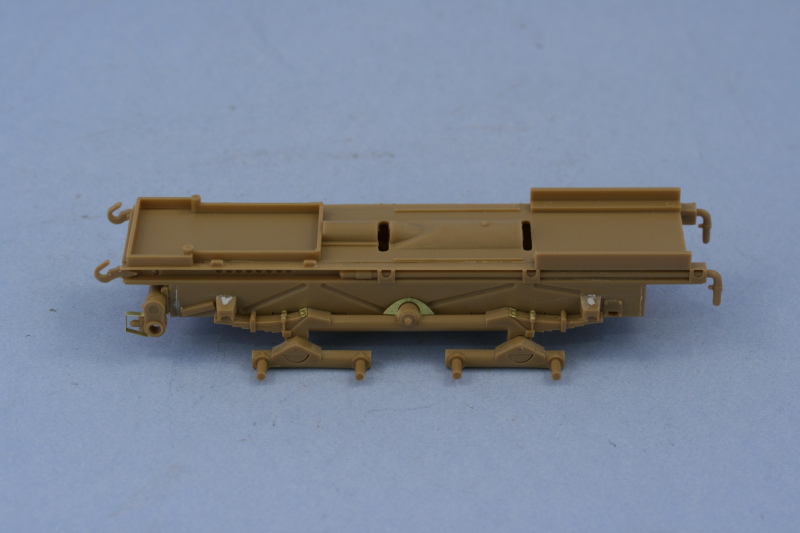
Continuing on with the step, I removed the eight road wheels from the sprues and cleaned up their prominent sprue points and sanded down the large mold seam on each. Some flash had to be removed in the lightening holes as well with a sharp #11 blade. The wheels were then mounted using the cap bolts so that they could fully rotate. They sit a little wobbly but that will be addressed later on after painting when they are glued into their final position and alignment.

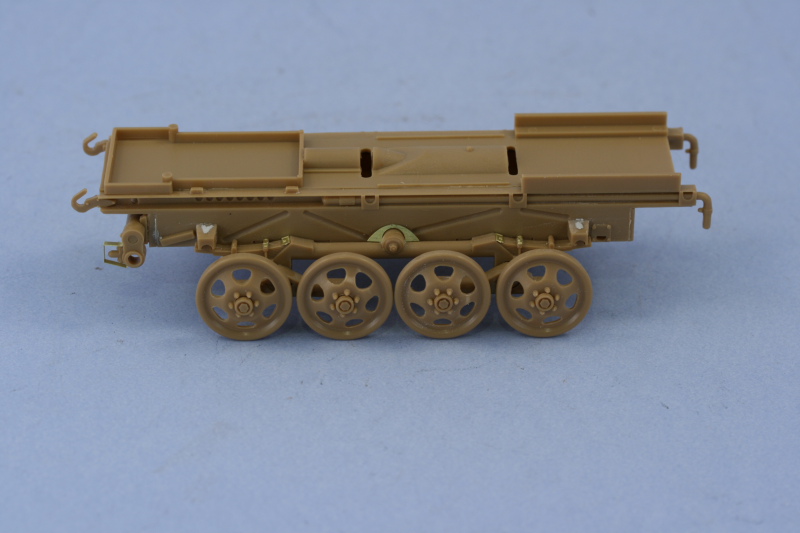
Skipping around a bit in Steps 3 and 4, I went ahead and made the necessary sprocket replacements using the MK parts since the kit-supplied parts have the wrong pitch and won’t work with the MK links. The MK parts were mated up with the sprocket backing parts from the kit and test fit front and back.

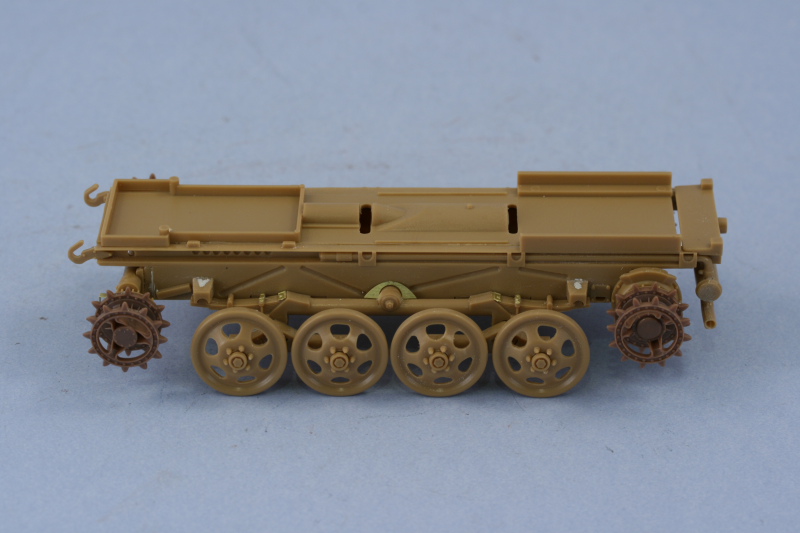
The MK tracks were assembled, a straightforward process since one of the link pins is already molded on and all that’s needed is to add the 2nd pin to assemble the workable links. I assembled two runs of 60 each and then test fit as I added more links with the magic number ending up at 66 for each side despite the instructions calling for 67-68 per side.

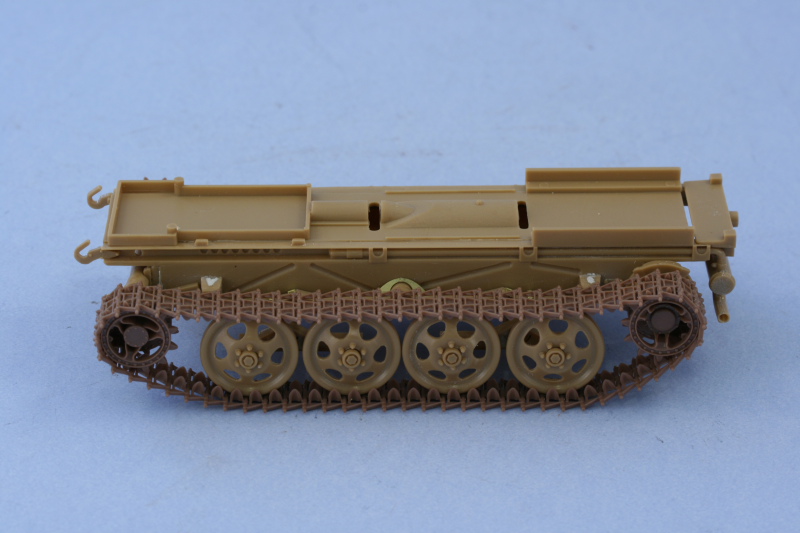
The front set of sprockets were left removable while the rear sprockets are in place due to the mud-scrapers that prevent them from being removable. They aren’t glued into position yet so, like the road wheels, are still a little wobbly but that will be taken care of later. Reference photos showed that the mounts for the mud scrapers had hollow circular ends so I drilled out the molded-solid parts with a pin vise to add a little detail before installing them. The left side scraper interfered with the sprocket teeth so I had to sand it down while the right side had no issues at all.

On the front end, I installed the lower hull front cover and added the Eduard key-hole plate between the towing hooks instead of the kit supplied part. The tow hooks were too thick to allow this plate to fit so they were carefully sanded down to correct that and also give them a more in-scale appearance.

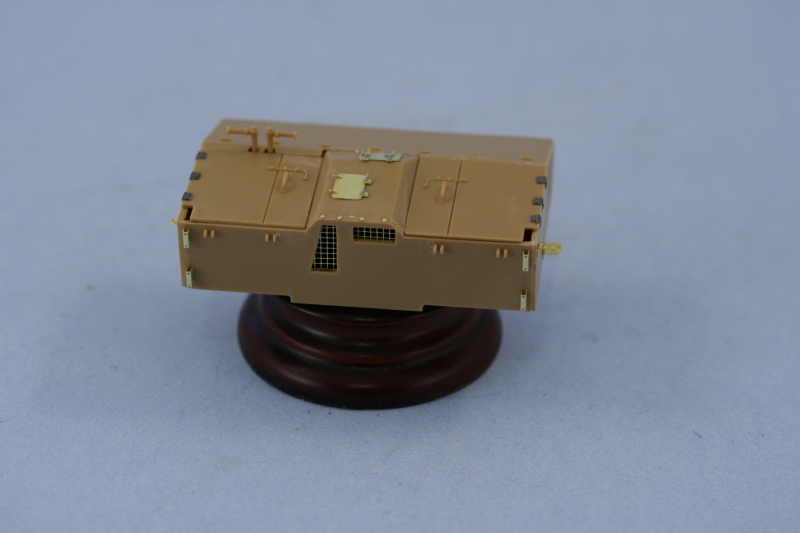
That moved me on to Step 5 which dealt with the assembly of the front cab. Like the chassis box, this is a multi-part assembly with the cab floor, sides, roof, and back as separate pieces. I assembled the cab using liquid glue and once dried used putty to fill some minor gaps and then sanded all the edges smooth to replicate the sheet metal construction as seen in reference photos. I decided I was going to pose the gun in the combat position so that meant closing up the driver’s station since this was not manned when the gun was in action. I removed all the molded on detail on the cab exterior sides and replaced it with a combination of Aber and Eduard details. The Aber hinges were designed to be workable but were plain…so this is one case where the Eduard details were superior at least. I also removed the molded on hatches for the engine compartment and replaced them with the Aber hatches. The Aber wing-nuts were a little anemic so I used some left-over styrene parts from a DML Pz IV build in the spares bin instead. The 9 blots that secured the engine compartment cover were added courtesy of the Aber set to round out the front side. Since the right side compartment hatches were molded in one piece with the cab roof, I added the missing panel line at the front with a triangular needle file as well.

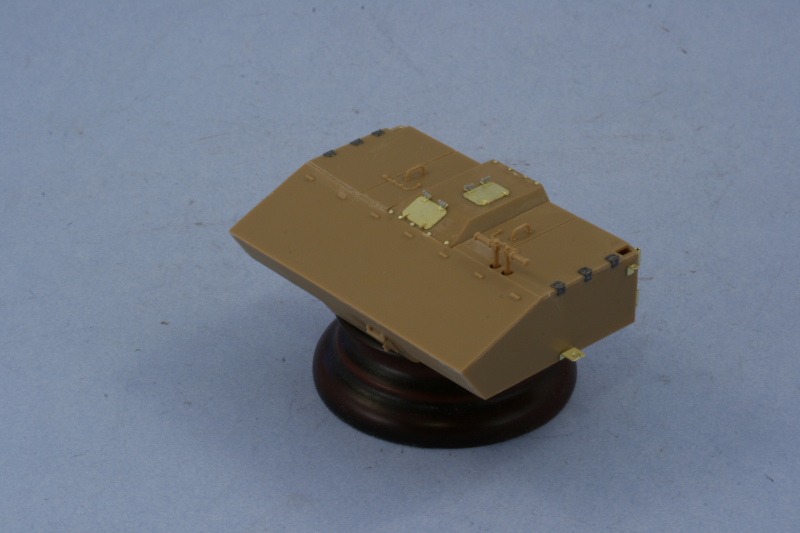
Before constructing the cab, I had removed the molded on detail from the inside that did a poor job of replicating the mesh screens for the engine air intake vents. I used a #70 finger drill to drill a series of holes around the perimeter of each opening and then used the point of a #11 blade to cut through each hole. The opening this created was then carefully cleaned up and the mesh screens added using liquid glue. The screens were extremely delicate but Aber did a great job replicating them IMHO as the reference photos show these were a large mesh type and not the smaller type more commonly seen on tank intakes for example.

Next up will be the work on the Pak 40.

Wow, that is looking very nice, I really want to see that Pak 40 in action! Where did you get your Model Kasten tracks?

Thanks, Jim

Bill… you don’t give grass any chance to grow under your feet buddy. Looks like another interesting build. I just picked one of these up not long ago. Looking good.

doc

Hey, what a change! I’m finally catching you at the beginning of a project. Great subject, Bill. The base kit leaves a little (or maybe a lot) to be desired, but that were the fun is, right?

I’ll see you along the way.

Rick

Man, what a smorgosboard (sp?) of goods! You are putting everything, but the kitchen sink into this guy. I couldn’t agree more that AM tracks are the way to go. Looking forward to it.

That’s a lot of after market add-ons Bill, will be interesting to see how they add to the build.

Julian [:)]

Thanks guys for the comments!

Jim, I normally get my MK tracks from RZM Imports, http://www.rzm.com/ . Very reliable, well stocked, and in the US. [;)]

Doc, got to stay busy! I build one project at a time so it’s a RO/RO process, as soon as one rolls off the bench another rolls on! [(-D] I’ve had this particular kit for a long time, picked it up at an LHS sale a long time ago for less than $20, so it’s been waiting a while for its turn.

Rick, glad to have you along for the ride from the beginning! [;)] You’re right the base kit definitely shows its age and needs some help in various areas but is definitely where the fun is in “dressing it up”!

Erik, Julian, I had originally planned only to use the Eduard set…but it’s more limited than I expected so I got the Aber set to fill the gaps especially as it relates to the fighting platform. While both sets addressed the Pak 40, neither had a very satisfactory approach to the gun shields and the Griffon set includes turned brass bolts for the spaced plates, so that’s why it got drafted along with the fact it’s custom-made for the DML Pak 40.

Very cool…I remember Biffa doing one a year or so ago—where is he, by the way?

Thanks MR, I remember Ron did his as an OOB build and in fact it was his build that kind of jumped this ahead in the schedule a little bit. Not sure what Ron’s up to these days…hope he pops up again soon!

OK, thanks!

Thanks, Jim

Looking good on the RSO- we don’t see too many of those around here.

Good luck with the Griffon gun shield- I nearly lost all patience for mine and it came this close to being squashed flat.

Very cool–and brave—project, Bill. I have almost the same collection of godies for this one, but have just put it off for the amount of work involved.

I have to ask–what, no cab correction? I thought the ABER set has the correct dimensions for the cab laid out–you’re supposed to do some cutting and whatnot. I am surprised to see you omit this step as you’re usually so thorough…?

I’ll have this one bookmarked for sure–make sure you take lots of pics for us mere mortals, ok? lol!

Thanks Dre, we’ll see if I can make it work! If not, there’s always the styrene option as a back-up! [(-D]

Karl, thanks for the encouragement! I had to draw the line somewhere with the Aber stuff as you could quite literally replace virtually everything except half the gun and the chassis in brass if you were so inclined. Aber has a great scheme going where you have to purchase 3 different sets if you want to go whole hog on this one…and the cost in brass was more than I wanted to go in for. I went with the detail set as it has the most stuff I wanted out of the 3 they have available. While the kit cab doesn’t have the right dimensions when compared to scale plans in PT 7-3, I decided to live with it instead of replace it outright and instead focus on the detail corrections where appropriate in order to keep my sanity and actually get it built! [(-D]

Well it looks like your gonna have youreself a kit-bashing extravaganza with the PE to provide extra entertainment. Now you just need to throw in something resin(that way it doesn’t feel left out.)[;)]

Overall look like your off to a great start and I’ll for sure be watching this build.

Come on admit it… your just doing that project because it is so much fun opening all those little bags and boxes.

Ahhhh…a kit with lots of toys…fun!!!

Sometimes discression is the better part of valor…you can go so far being a bolt counter that you spend a lifetime trying to make the “perfect” model. It’s perfect if you like it…

This should keep Bill busy for a while…ok maybe two months.

Rounds Complete!!

Man Bill looked in Saturday night and NOTHING[:O]! Got a chance to take a quick peek on Sunday afternoon still nothing (starting to get worried). I was beginning to think we would have to wait for #98[:(]. But once again you come through. And I see you’re not holding back on this guy either.

I’ve never built one of the RSO’s or it’s variants but quite a few of the pak40’s. Imo one of the best anti tank guns ever. It’s one of those pieces that are as versatile as the 38(T)[;)].

Michael, you’re right…only thing missing is some resin! Maybe I should slip an old pour block on the underside just so it’s got representation. [(-D]

Marc, it definitely makes for an exciting workbench…I’ve got all the different instructions sheets out, frets in different spots, boxes open, etc. Definitely has that “all the presents opened after Christmas” feel to it!

Mike, very true. Once I got the box open and saw how few parts there really were on this guy it was “now or never” in terms of what to do with it. I’m picking and choosing what to use from the Aber set as, in typical Aber fashion, there’s some insanely complicated things included if you really really want to go down that road. [;)]

Steve, didn’t meant to keep you in suspense buddy! I almost posted on Saturday but got side-tracked with the arrival of the final season of Battlestar Galactica so held off until Sunday night instead. Got to keep a balance after all! [8-] I agree with you on the Pak 40, definitely the workhorse AT gun of the German forces and something they were always trying to mobilize/mount/arm anything and everything they could with it!

Doog! Check your PM’s!!!

wbill76: I can’t keep up with you man! I have a “note-to-self” to go check out your finished 251/9 and now you got this baby rolling! OK…note-to-self edited…go see 251 AND come back here soon!