Your photos are all missing. The recent ones. Nice engine work. A suggestion on the chassis, a factory stock chassis would be red oxide primer with body color overstay.
The photos are showing up on my browser. I don’t know what to do about that. Re: the undercarriage… I think that horse has left the barn. If I build it again, I’ll do that.
With the hinges attached at both ends I had to fit the rest of the inner pieces to the hinges. I had to cut some clearance notches in the kick panel on the left side, and later, after fitting the dashboard, found that it too would need relief.

With all the fitting complete I needed to close up the door’s gaps with jambs front and back. I used thin 0.010" styrene I traced the internal curvature using a compass with the point tracing the curve and the pencil to draw the curve on the styrene. This method is a good way to trace oddball curves onto sheets to fit things. I learned this trick many, many years ago working a summer job at a stainless steel sheet metal plant in 1970.
After gluing the rough shaped sheet into place, I let it dry and then trimmed it close with a sharp #11 and then filed and sanded it to a perfect fit.

Here was the trimmed jamb in place on the lack and hinge ends. I went back and filled the remaining gaps with Tamiya filler although I think this might be overkill.


t was time to paint the interior pieces and I did so with Tamiya semi-gloss black which nicely simulates the sheen of leather. After it dried I went back and picked out some of the shiny details with Vallejo “real metal” silver. I used some Tamiya clear red to paint the door handle reflector.

For the instrument panel I attempted to do some metal foiling. I’m not too good at this and this is the first car I’ve ever attempted using Bare Metal Foil. At first I cut the strips, lifted the end and peeled it off the backing paper to promptly see the stuff curl all over itself and become a mess. After I added the foil to the bottom strip on the dash that I decided to read the instructions since there must be a better way. There was! You lift one edge and and attach a slip of paper to it, then you lift the other end of the strip and attach another piece of paper. Then you lift the foil from the both ends while keeping some tension and Voila, you can keep it from curling.

The dask came out just ok. The instrument cluster was hard to bring out any details since the relief was very shallow, and the foil could have been better… much better.
The door sides also have chrome shiny trim. And now that I look at this picture…

I realize that I put the chrome on the wrong part of the door and will have to fix that.
The chrome is a bit of a hassle. I need practice. I picked the separate door to try first. Doing the rest of the interior will be harder since it will be done at an oblique angle.

To make matters worse. In working to remove the excess foil I took off a lot of black paint that I’ll now have to hand paint back to a semblance of decency.
Tomorrow, I’ll strip the incorrect foil and get it right. As I went along it did get easier to get the foil on better. I will also try to do the rest of the interior. I may end up painting the striping. I’ve used old-style drafting inking pens to do fine striping on models. These are the kinds that have two springy blades ending in very sharp points where the distance between them is adjusted with a vernier screw.
Back to work on the door trim. After stripping Monday’s foil, I touched up all the places where I scraped off the paint. The touch up ruined the beautiful initital air brushed semi-gloss black. But, I was able to get the foil into the right trim on the door. I’m not 100% satisfied with the foil’s appearance, but it’s going to have to work.

I then added some trim to the venta-pane window insuides. The outside will have to wait until the outside is finished since I would have to mask the chrome and woud assuradly remove the trim with the tape when unmasking.

The door doesn’t look as rough in person as it does in these pictures. It does look pretty rough. Next time, I might just painting the trim with Vallejo Real Metal using a fine pointed brush.
Finally getting the hang of putting on the foil. I did the chrome seat bands and am pleased with the results. It was an easier install and I took my time.

I painted the carpeting a Tamiya medium gray, but it will need some flat spray since the paint has a little bit of sheen.
I opened the relief holes in the under-dash side wall to better clear the door hinges.
I then decided to add some heater hoses. I used some small guage electric hookup wire. I didn’t have any more black so I took a Sharpied and ‘painted’ the red wire black. After installation I went back over it with some Tamiya Rubber Black. It’s a great color since it’s a black with just a hit of gray in it. I used a #50 drill to make the holes in the water pump, intake manifold and then the firewall. I used a tiny 0.010 carbide bit as a starter hole so the “bigger” drill went where I wanted it to.

I still have to install the battery and I’ll probably put in some battery cables too. Secondary wiring is such a small gauge that when you do it in 1:24 you’d barely see it. I’m sure some guys add them too, but this engine bay is getting busy enough.
Man this is looking good. And cool youre reference photo is you! Looking forward to the finished product. Btw, big gear head/car fan so love the subject.
Thanks! I found another great broadside of my original car. The date was Memorial Day 1967 in Muskegon, MI State Park.

The kit has chrome steel wheels, but my car had hubcabs. My car and the kit have red-line wide-oval tires.
Had a very short work session today since we took the grandkids to see Coco. If you haven’t seen it, it’s another Pixar masterpiece. Even without a plot, dialog or music, the art and creativity is worth the price of admisision. At times it was breathtaking.
I glued the seats and inner panels to the floor after adding another coat of gray, a coat of Dull Coat and a brush coat of Tamiya Flat Clear, to try and dull down the shine on the gray. For some reason it’s still showing a sheen.

My LHS clued me into another great product. It’s called Liquid Chrome and it’s produced by Chartpak. It’s a 1mm tip and lays down an alcohol-based liquid metal that’s truly reflective and smooth like metal, not like pigmented paint. It’s as bright and smooth as the foil without the wrinkles. I touched up some of the door panel trim with it, used it on the reamining trim on the driver’s side rear, and then tried it on the edging on the console. The center of the console is brushed metal, but the edges are polished. It’s not a good use for foil. I did it backwards, trying to the marker on the edges before painting the center, but I wanted to see how it looked and it looks great. If you haven’t tried it, I would highly recomment it.

I painted the outer sections with the semi-gloss black (by brush) and then did the trim with the chrome pen. It’s hard to catch the reflecitivity in the picture, but believe me, it’s really terrific.

More work tomorrow.
Using more standard aluminum foil (actually some product that I bought in Germany 15 years ago which is a thinner gauge than standard US foil) and Microscale foil adhesive I applied the foil to the broader surfaces of the console. The outer edges are bright and the inner sections are brushed on the real car. I used the non-shiny side of the foil for this to give a little contrast. The bright, as I noted yesterday, was provided by that really cool Liquid Chrome pen.

I used Tamiya Clear Blue and Clear Red to detail that little GTA emblam on the upper console.
I added the auto trans shift level and then CA’d the console into the car.

The dashboard needed some modification. Becuase of the shape of the door hinges I had to cut relief holes in the kick plate on the interior sides, but I also need to add this clearance to the dash component itself. There’s already very little stock left on the left side, so if I cut some of the dash away in that area, there will be effectively nothing holding the dash on the left side. I needed to add more material onto the dash which would then be glued to the inner left panel.

I added another piece of styrene stock under this piece to add some more meat and then glued the dash into place.

The dash tab will be cut away, but the new stock will hold it in place. To add more strength I’m going to drill and put some 0.021" brass pins through the inner panel into the added stock. That should tie it all together when I take a small router and cut the dash tab away to clear the hinge bulge.
The last thing I did was prepare the steering wheel and column. This was a perfect use for the Liquid Chrome pen to “chrome” the horn ring. The picture doesn’t do it justice. It looks absolutely like chrome, not paint. Tomorrow I’ll install the wheel.

I painted and installed the battery, and the master cylinder. I’m going to add some battery leads. Any suggestions on making a realistic battery lead connector?
I’m quickly getting to the point where I’m going to have to paint the exterior. I’m using lacquer and don’t want to use it indoors and I don’t have a spray booth (yet), and usually do this work outside, but the weather’s getting like Winter and that doesn’t work.
No pics my friend
I don’t know what to say, they’re showing up on my machine.
Today, I split my session doing some train work (attempting to replace a broken headlight with an LED) and some GTA work.
I routed the dash to give proper clearance for the door hinges. I’ve purchased some 1/16" solid carbide router bits from Drill Bits Unlimited that work nicely in the Dremel. I didn’t ahve to remove much, just enough to let the hinge loop sit inside so the inner panel and outer body don’t get pushed out of position.

The cut in this picture is a bit ragged. I cleaned it up a bit and then painted it semi-gloss black. I also installed the steering column today, but the pics don’t show it.
I needed to make door jambs for the body side of the door opening. I didn’t attempt to have the rear jamb sit inside the body. Instead I installed it so it fit flush with the body. My door is fitting a bit big some a little bit of extra stock wouldn’t hurt. In this picture, I filed it to fit and then added some Tamiya putty to fill in any noticeable blemishes. In the real world, there is some kind of lock system on the body and door jams. I don’t think I’m going to add that, but then I’ve been known to do this silly stuff.

For the hinge side body jamb I had to inset this piece since the door hinges into the body space. I used thin 0.010" sytrene for these parts and it was easy to get them to conform to any curves. After using liquid cement I went back and reinforced the joints with med CA. After which I again added some filler to close the gaps that were left.

I took another picture with the door fitted. I used the flash so you’re getting a lot of specular reflections. You can barely see te front jamb and you can see that the dash area is now painted.

What’s going to be fun is putting the outside body color onto these jamb areas. I’ve been looking at a lot of videos of people building model cars, and generally folks don’t open up the doors. It greatly complicates the process since the door, which is now a single piece has the inner and outer panels glued together. The inner is interior trim colors and the outer body color and the jamb is body color. The flash shows some interior space behind the dash that needs to have come color. On second thought, that’s the firewall and without the flash blast you would’nt see it since it’s going to be very dark under there. Sometimes it’s good to take pictures of your work for evaluation purposes.
Without digital photography, all this journaling and posting would be nearly impossibe and very, very expensive.
No pics here either, whether on the desktop, phone or tablet.
I’ll keep trying. I’m using Google Photo to load the pictures since Image Shack was behaving badly.
I have reached the point where the body painting needs to be done. Lacquer is a no-no indoors and it’s not good for outside painting now. I did some odds and ends today. Got the battery wired up, finished the door jambs, painted the wheels and taillights, and blacked out all the grills and trim that had black lines in them.
I cobbled some battery connectors out of wine bottle foil. They’re a bit crude and oversized, but they convey the feeling. The leads are 28 gauge black iron wire painted red for the positive lead going over to the molded on started relay. I also did some more detail painting in the engine compartment.

So now the engine is completely finished.
I sanded off the excess filler on the door jambs and they’re ready for paint. I also found and removed some mold lines on the body. This is ready for paint.

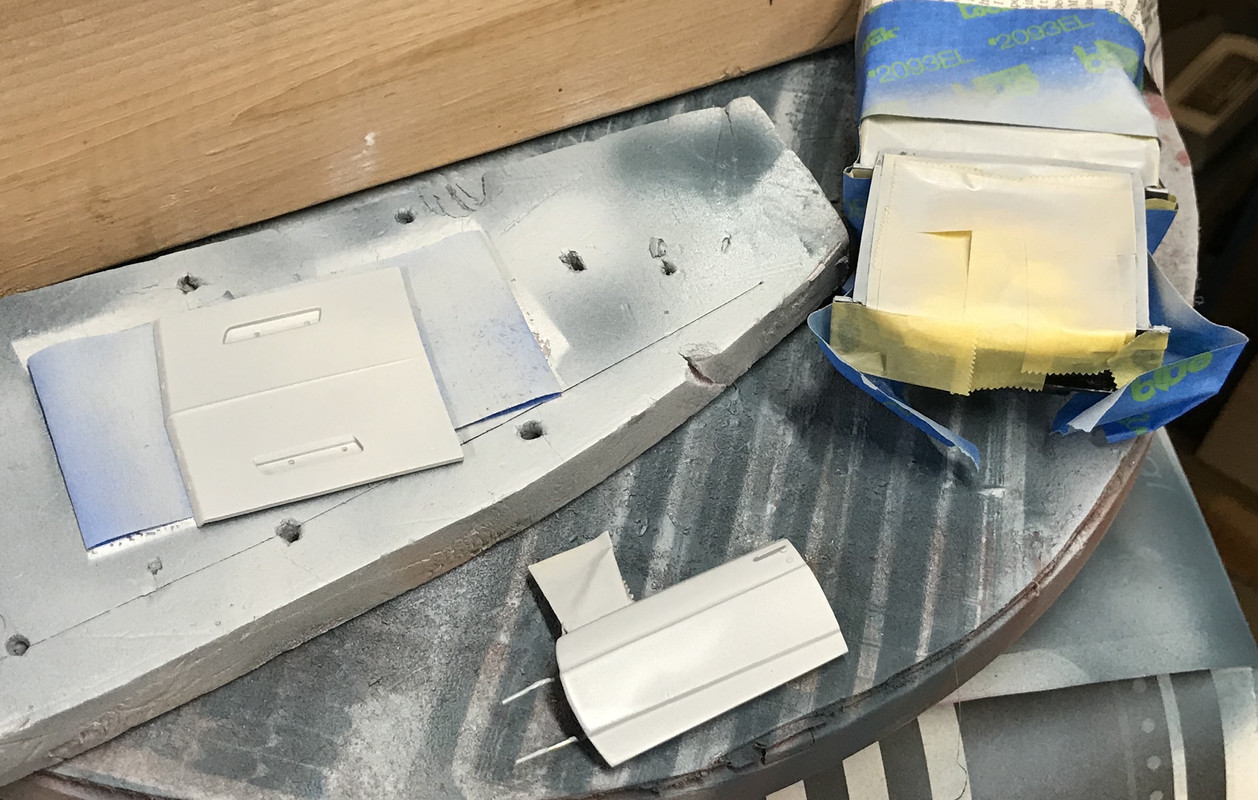
I removed the vinyl wheel centers and built the four wheels. The chrome steel wheels had open spokes and blacked out areas between. I painted the blacked out areas flat black. I actually enjoy doing detail painting. I find it calming.

To black out the open areas of the grill and on some of the trim, I simply used some thinned Tamiya flat black which I let run down the grooves and used a cotton bud to remove the excess from the chrome. If I had some Tamiya panel line color in black I would have used that. I have that product in brown and it wouldn’t work.


The last thing I did was use the Liquid Chrome pen to detail the backup light section of the red taillight lenses. The chrome pen was the perfect tool to add some real bright effects to these tiny parts.
So, if I can’t figure out how to effectively do the exterior color in the winter, I might put this aside until Spring. I have another kit to build, a Trumpeter 1:350 scale USS Essex. I have some Photoetched leftover from the Missouri project and may be able to detail the Essex without having to buy more. Most of the color for the Essex will be water-based and can be applied in the basement. I’m lobbying the CEO to get a spray booth which would be a wonderful addition to the shop.
With the weather not cooperating and me not having a spray booth (yet… still working on it), I’m starting a new project on a new thread; the 2002 Trumpeter issue of the USS Essex. See you there. When I can spray outside (lacquer-based paint) I’ll get back to the GTA.
Well… the weather may actually be mild enough in the next couple days to enable me to spray some GTA parts. So to get ahead of this eventuality, I did a few minutes work on the model masking the engine compartment and the inner door panel so I could spray the primer and light yellow outside. It’s all predicated on the temps hitting 60 degrees or more. The fender panels actually wrap over that flange in the engine compartment and it’s painted body color which accounts for all that masking to expose such a little bit of paint area.
Incidentally, I’ve switched picture sharing sites and have settled on PostImage which is free, solid, and has no annoying ads (hear that Photobucket!).

Until next time, meanwhile keep tracking my Essex build on the Ships category on this forum.
Uh Oh !
I don’t see a tanker offloading .What scale are you running . I have at least two that need a home .They are H.O. Nice job on both the R/R LAYOUT and the engine .
Hi gang! Winter’s almost over here in Louisville so I can get back to work finishing the Ford.
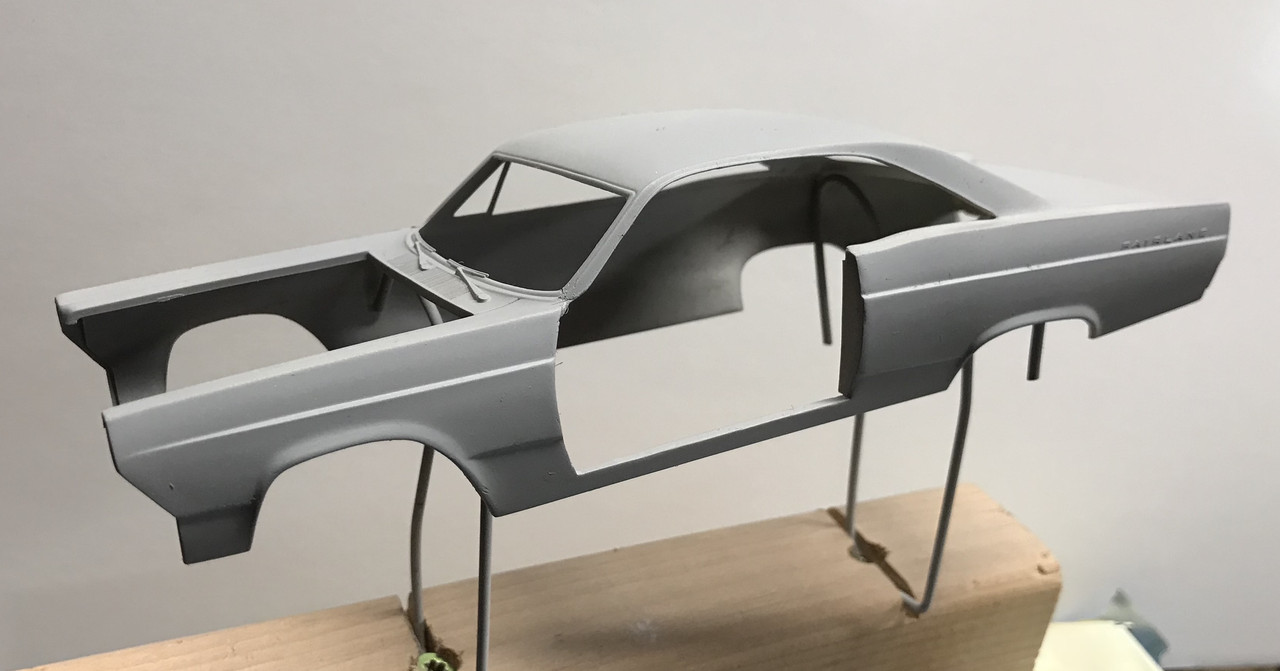
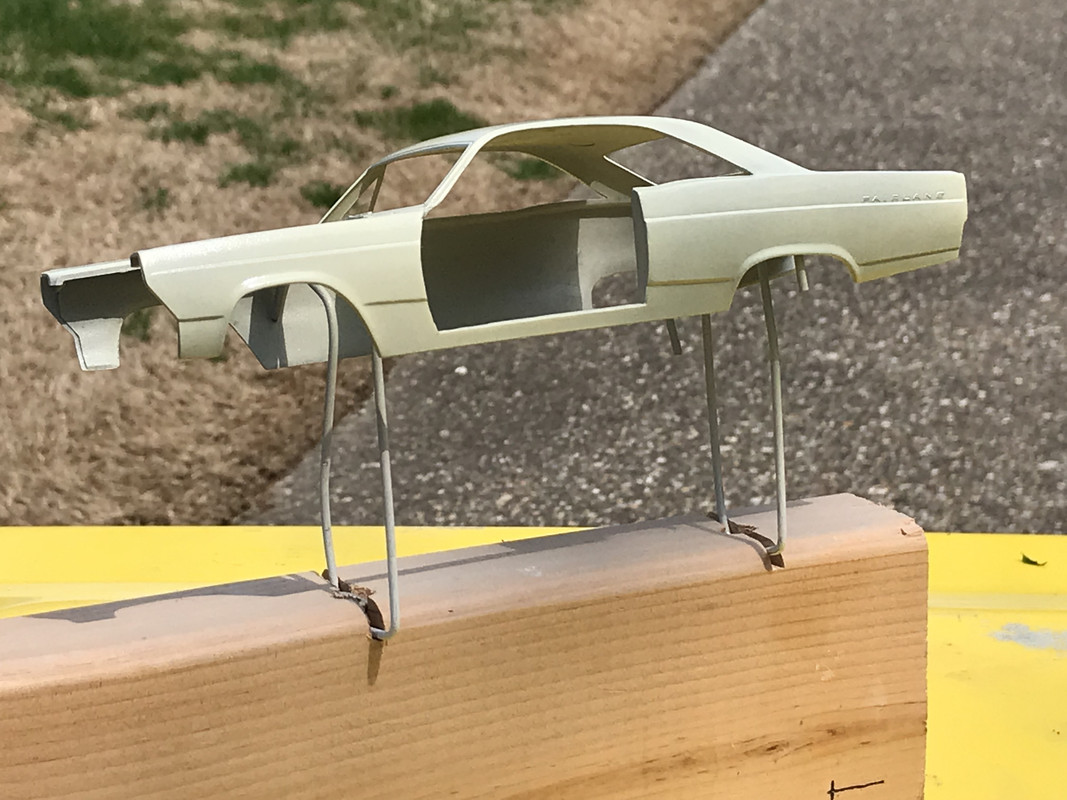
Weather was lovely today… a bit windy, but i worked around it and finally got the primer coat onto the Ford GTA. First I needed to make a body clamp to hold it for painting. I know there are commercially available ones, but it’s so simple to make one in house. I used a scrap piece of 2X4, and some old coat hangers. After cutting the hangers apart and bending them to a useful shape, I stuck them into the body and got a spacing measurement. I cut some notches in the chop saw and fastened the hanger clamps into the grooves with some self-drilling, star headed wood screws. Those clamps are not going anywhere.
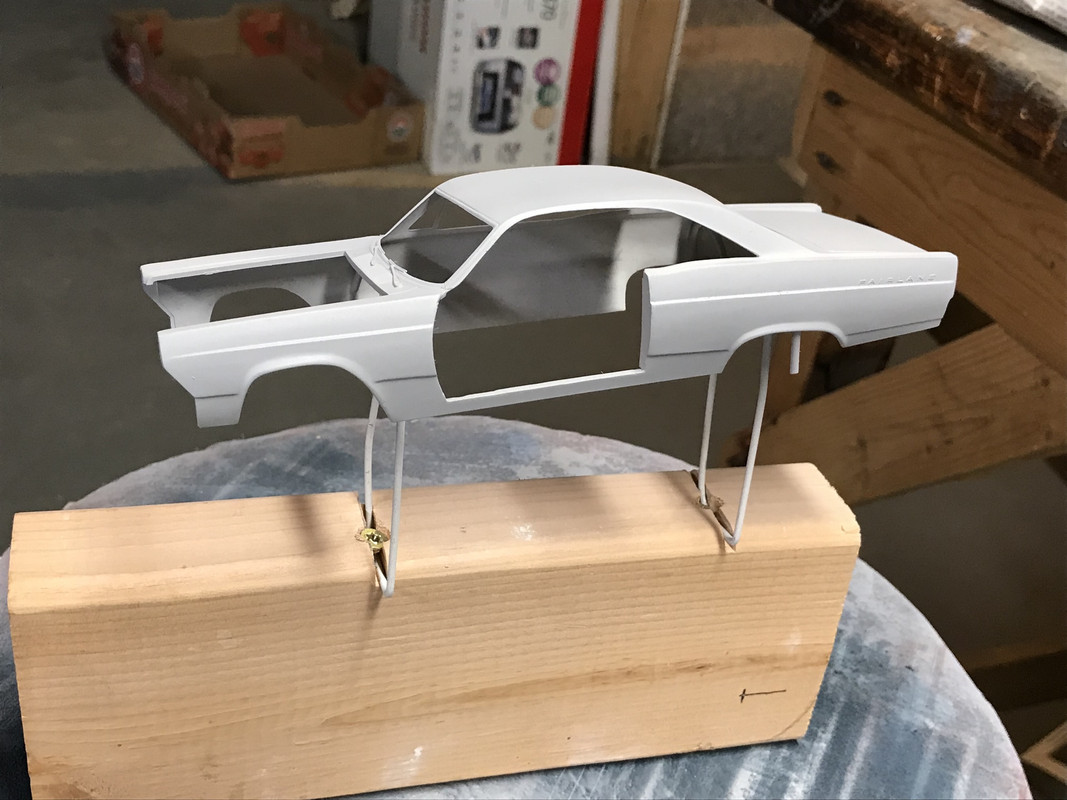
A closeup slowing the clamping method.
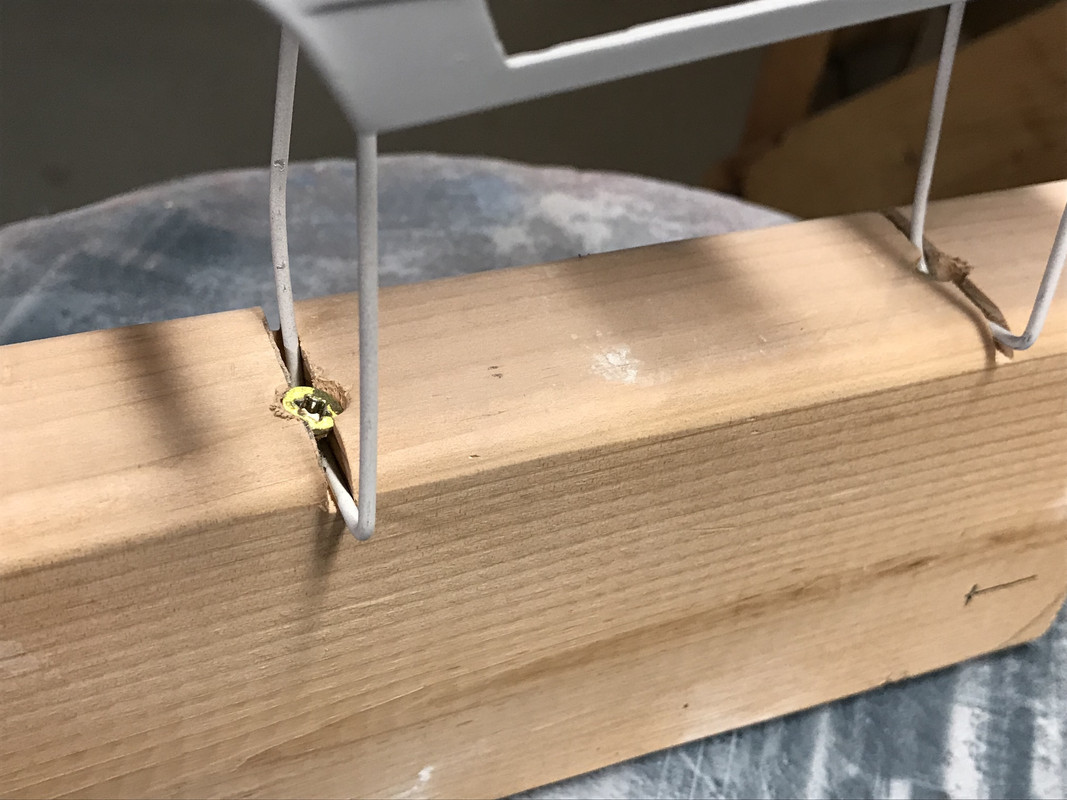
It didn’t have to be pretty, just functional. And it works great!
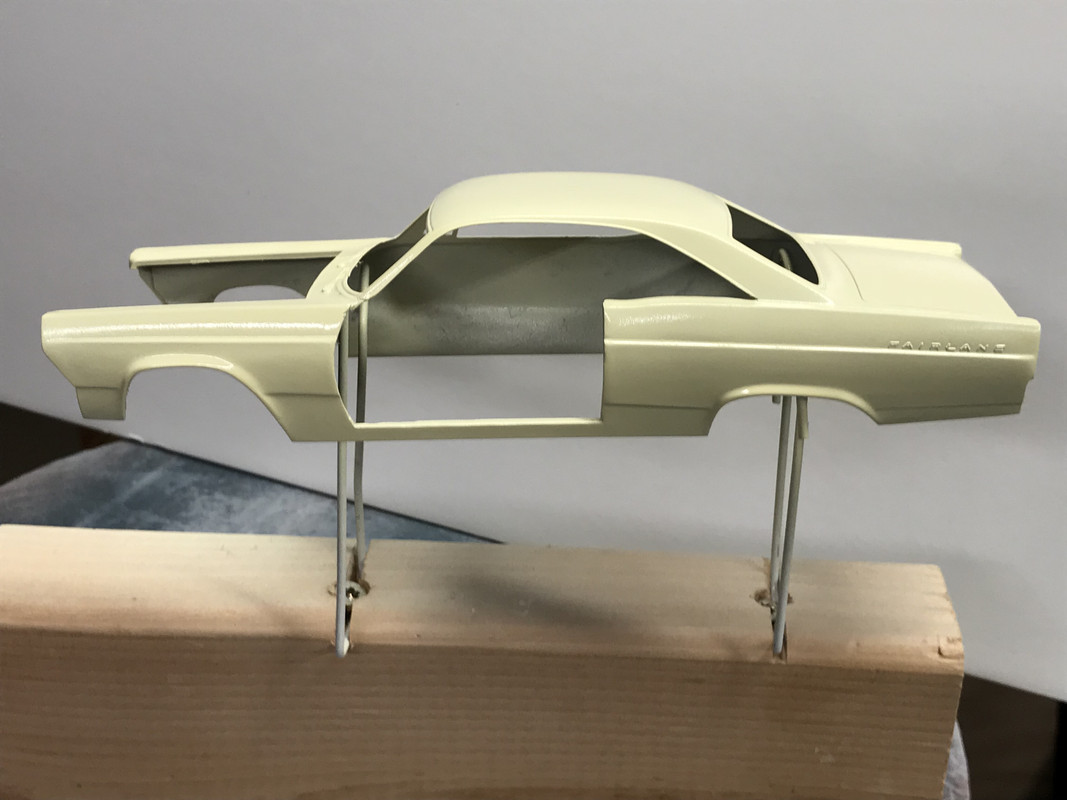
I sprayed the body, the separate door, the hood and the little masked area around the fender wells.
I then sprayed some of the Ford light yellow on the fender wells just to test the paint and see how it looks. The color is terrific, very close to my car’s color in 1966. The Testor paint is a lacquer (supposedly), but did take several hours to dry. I will have to protect the body from dust during this drying cycle and it means an extended time to do two coats, plus clear coat with sanding/polishing steps in between. It’s okay since I’m working on two other projects at the same time.
I’ll sand the primer and see if I need a second coat and get ready for the first color coat, but the weather’s going to change tomorrow with rain and colder so color will have to wait for a while.
I don’t know what is going on with your photos, but, the ones above do show up. Most everything before this, back to Dec. 5, shows a minus sign.
I don’t know either since they’re stable on the WW2 aircraft website where I also post the same thread. There’s something funny with Kalmbach’s site. I had trouble loading the site tonight. Could be related.
It was warm (80) today and the winds hadn’t started up again, so I was able to get the first color coats onto the Ford. I’m not so good with spray can lacquers. I did some light coats on and noted on the instructions on the can that you should wait a couple of minutes to do additional coats. So I hit it again and got a nice color coverage.
I brought it inside to dry and got a good look at it. Coverage is good, but there’s some orange peel which I’ll sand out. It will then need additional color. According to the Revell Car Finishing Kit that I bought, you should wait one week before sanding the paint. It will remove some color and may require additional coats. I can use some guidance here since this is not one of the things I know a lot about. The last car kits I spray painted was when I was at Michigan State in 1964 and spray painted Revell’s Orange Crate candy orange 2-part lacquer in the incinerator room at Bryan Hall. Yes… I actually built some models while in college and thoroughly enjoyed it. I rediscovered them one day when cruising a local hobby shop. I hadn’t built anything from when I turned 16 (Cars, girls and guitars). No dust got into the finish. It’s a pretty good color match to my 66 GTA.
Is there anything I need to worry about when recoating after the paint is completely cured?
I also sprayed the hood and door in the basement since it took very little paint and didn’t smell up the house too badly. They too will need sanding.
I’m going to try and use the Molotow Chrome Pen to chrome the various raised lettering and the wipers. I’m having good luck with this tool and look forward to using it again.
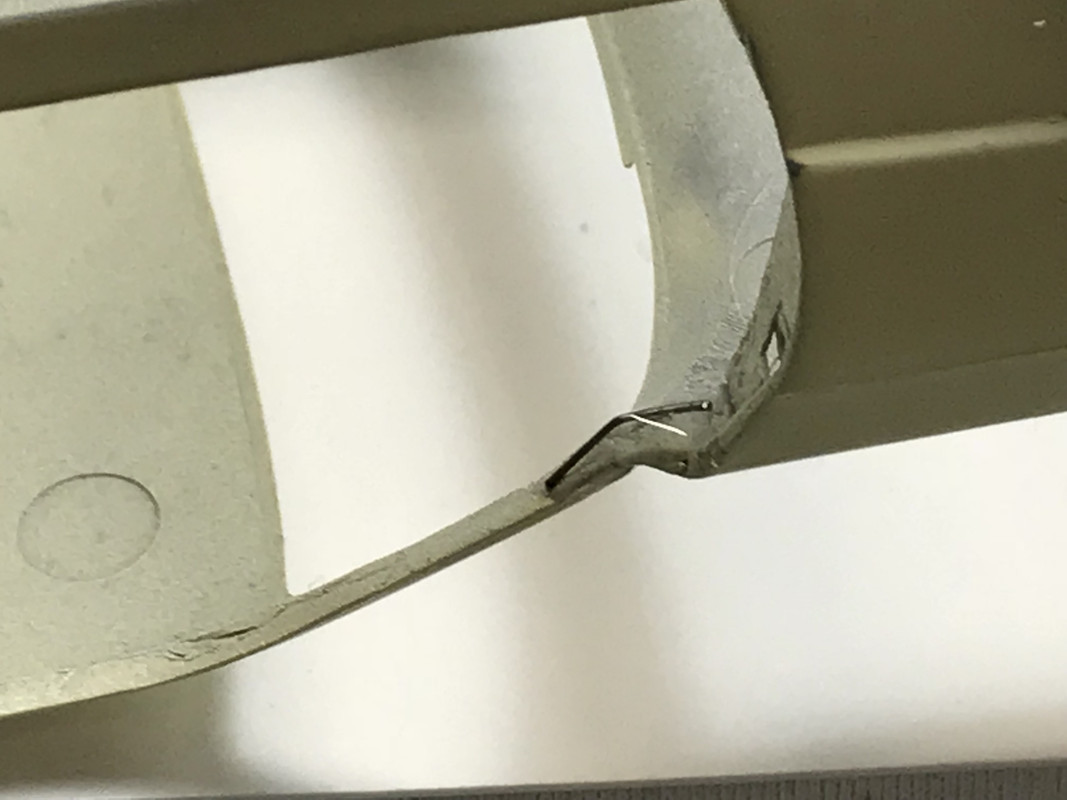
It’s been a week so I decided to start fine sanding the paint while some paint on the Essex was drying. It was going well with the 2000 grit starting media and then the driver’s side roof pillar separated at the lower corner next to the body. This is the side that was drastically cut away when I opened the driver’s door. I initially glued it with solvent cement and then some med. CA, but realized that probably wouldn’t hold up through the rest of the sanding and polishing steps to come, so I epoxied a small piece of music wire (guitar B string) and will let that set before messing with it again. It might be visible, but it will be strong and I can’t chance that it breaks again further in the finishing phase. After this sanding, which did move all the minor orange peel and any included dust, I will have to re-shoot another color coat since it’s quite thin at the creases and edges.