Fabulous scratch building I must say. You Sir, have some mad skills. What a model building advantage to have actually worked in and on this aircraft. Also to rebuild the canopy structure is just above and beyond .[:D[
Thanks, John, and thanks for looking in!
Cheers,
Russ
Thanks, Tanker - Builder!
Cheers,
Russ
You’re most welcome, Ultra. And thank you for your support, and for the good words!
Cheers,
Russ
Hi, Bish, and welcome! Many thanks for the good words!
Are you talking about a stretched version of one of the special ops C-130s? The Flightpath conversion I bought was really not correct for any Herc with the Fulton pickup system. None of them, as far as I know, had those two grooves in the radome to accomodate the yoke forks. And the radome is not the right shape for either the Rivet Clamp or the Talon I, although it looks about right for the Talon II. You would just need to fill in those gooves and you might have to widen it a bit toward the top on both sides.
The J-model Herc looks to have the traditionaly shaped nose so you shouldn’t need the conversion.
Cheers,
Russ
Thanks, Jay Jay! I really appreciate the compliments!
Cheers,
Russ
Hi, Steve and welcome! Thanks for coming aboard! Sorry if I missed your post earlier.
Cheers,
Russ
No, its not a special Op version, just a standard transport. The RAF use both lengthered and standard versions and Flightpath does the extension plug for it. I have never used any of there resins sets and just woundered what you thought it it.
The other option i have is from Wingman models which is a lot morte epensive but includes engines and other resin parts so just looking at the options.
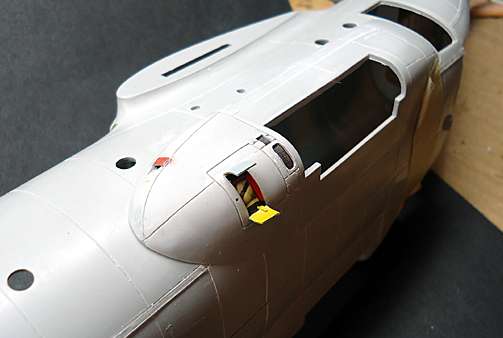
One correction I forgot to mention - the kit rendering of the auxilary power unit (APU) at the front of the left sponson was almost non existant. I cut open the air intake port and added a recessed compartment and the doors. I also drilled out the two exhaust ports and scribed the panels around them. The “guts” of the APU that appear through the intake port is actually just a photo reproduction glued to the inside. So too are the mesh screens for the exhausts.

Also, the ram air vent above the APU was too big so I filled it in from the back (red color).
Oh, sorry Bish [:$]. I’ve got nose radomes on the brain…[:)]. I haven’t tried that particular mod yet. But my old Pappy always told me… buy the best you can afford [:D]
Cheers,
Russ
Good advice. Though i always like to check as paying more doesn’t always get you better. But the extra parts in the wingman set certaintly makes it look worth while.
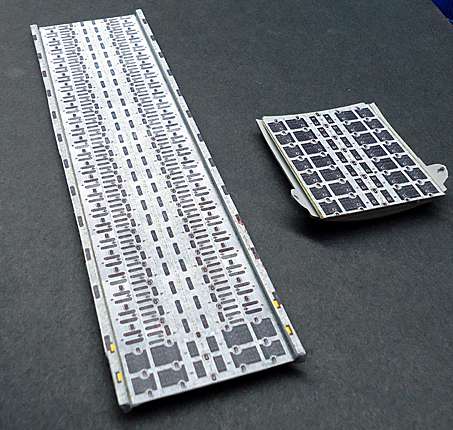
And now we come to two other issues with the Italeri kit - the cargo deck and the ramp door. The cargo deck was shaped wrong and it didn’t have raised edges all the way down both sides as in the real aircraft. So I tossed it and made my own, as shown in the second photo.

The pattern on the deck and the ramp door is pieced together from various pictures and then printed out on photo paper and glued to the parts. I sprayed the surface with dull cote to reduce the shine.
The front of the ramp was not right either (why Italeri couldn’t get it right the first time, I just can’t understand). I filled and reshaped it, then added some of the PE parts. I added the ramp pattern and some detail along the sides, although because of the flattened shape, it wasn’t possible to get it exactly right.


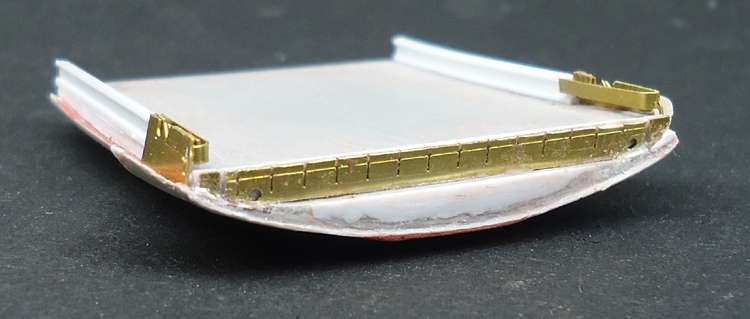


Finally, I scribed over the raised panel lines on the outside of the door and added a “bumper” (what I call it). The bumper is a raised piece attached to the bottom-most part of a C-130 ramp door where it contacts the ground. This is to protect the door from damage. I don’t know what it’s made of - maybe hard rubber, or possible solid aluminum. I formed mine using auto body filler. It’s a very shallow object and difficult to see on the airplane. The kit just shows it as a rectangle.


Wow, this is some exemplary work! All the details you’re putting in and the amount of scratch-building to acheive it, is truly impressive. Bravo. [Y]
Cheers, Mark
Hi, Mark!
Thanks for the good words!
Cheers,
Russ
Hello Russ!
Those cargo bay floor and ram just look pretty! Very pretty to be exact. Is it to much to ask - would you share the patterns you printed? I’ve got a printer too and making a cargo bay floor like that some day would really be something for me. Good luck with your build and have a nice day
Paweł
The last issue I addressed with the kit was the size of the engines. They are shorter than the T56, which was the standard engine for the E model. I considered buying the correct engines in an AM kit, but it happens that I have two of the Italeri C-130 kits so I was able to cut off the back end of the spare engines and glue them onto the original engines to bring them up to the required length. Then I corrected the panel lines.

Also, the air intakes on the kit engines are the wrong shape. I modified them with some putty and glue. The modified engine is on the right in the picture below.

But there was still a problem - the propellers did not line up when the engines were mounted to the wings. To correct this, I cut the inboard engine mounts back about 3mm.


Hi, Pawel!
Thanks for the the good words!
No problem, my friend. PM me and I’ll send you the image. One thing, it’s sized for my scratch built cargo deck so you may have to resize it. Same for the ramp floor.
Cheers,
Russ
Once I had everything attached and cleaned up, I sprayed the model overall with a dark gray primer. Then I outlined all the panel lines with India ink and sealed them with a clear coat. Now it’s on to painting the camouflage pattern.

This brings the build up to the present.


That is completly amazing work there Russ, just what we expect from you. Stunning job on the floor.
It seems to me we arelong overdue a new tooled and more accurate Herc.
You do fantastic wok sir, I wish I was Half as good as you!
Toshi