Wow! Brings back memories. Two things you can’t feel from the video are the rumbling through the ground and the shock waves through the air. Altogether, an awesome experience! Thanks, Jim!
Russ
Wow! Brings back memories. Two things you can’t feel from the video are the rumbling through the ground and the shock waves through the air. Altogether, an awesome experience! Thanks, Jim!
Russ
That was just way too cool!! [H] Thank you for sharing that!
Ken
Russ: Wow, almost wish you could display her upside down so viewers can check out all the detail you added in there! My A-20 barely came with a bomb bay at all, no detail so I glued the doors in the closed position. Love what you’ve done detailing the whole thing up!
Duke: Now that’s an awesome collection of big bombers!!! Think I see the prows of a few ships and subs there too.
Thanks Gamera! I appreciate the compliments on my larger aircraft. Yes, I have quite a sizable ‘navy’ numbering approximately 370+ ships and over 625 small scale armor models, in addition to another 300 or so smaller aircraft that are sitting on shelves.
Buffirn, those were some awesome vids! I’d never seen B-52’s take off before; that was a real treat! Thanks for posting those links!
Thanks, Cliff! [:D]
As a matter of fact, Dom is cutting a small mirror for me that will fit onto a utility trailer. I’m going to experiment with using it to place under the model to show underside detail. Not quite sure if it will be big enough to see much though.
Cheers,
Russ
Duke: They’re pretty cool, I wish I had room for large models but hanging them from the ceiling isn’t really an option here.
Russ: I did see that but yeah, I’m not sure the mirror will show that much of the detail you’ve added. And turning such a large model over to show her off seems like a recipe for disaster.
Hi Guys,
Yeah, Russ does have a ton of detail under that Old Crow, and even a small mirror would help a bit.
One suggestion Russ, seeing as how the mirror is an innovation, does it make sense to
think of building a bigger trailer, one that doesn’t necessarily represent a piece of real equipment?
I have a mirror that’s about 1.25" by 2" and it is pretty good for viewing something like that,
yes, I tried it out. A bit of ‘window dressing’ just so it doesn’t mess with the diorama would
allow a decent sized view.
Just a thought.
Dom
Hey, Dom,
I do have a trailer that is 1.3 in. W x 1.75 in. L (33.0 mm x 44.5 mm). If you can trim the mirror to 1.6 in. in length, I could use that. I don’t want something that looks obviously out of place in the diorama. Otherwise, I could use the full-size mirror and mount it at an angle on the end of a handle, or just purchase an inspection mirror with an extendable handle.
Russ
Nice badge Russ![:P]
I’m gonna miss your grin…[:D]
Yeah, I can do that, that’s a good size reflection and still obscure. That would be an idea for a placed reflection in your diorama, under the bomb bay to see all the baby crater eggs…[whstl]
i.e. you wouldn’t want strangers walking up and moving it around…ahem…
Having an inspection mirror handy for a judge is a good idea, wouldn’t want some klutz[clwn]
smacking off those antennas.
Dom
Thanks, Dom! Lol, don’t worry - the crow is grinning too [:D]. Frankly, I kinda like the old avatar better too. I might put it back and maybe move the crow patch down to the bottom if I can figure out how. Ken told me once but I’ve lost track of the post - along with my car keys…
Moved from Page 2 and updated 8/3/19 from my notes.
Adding Steps to the Main Hatch
The steps on the kit main hatch are only represented by slightly raised lines while the actual hatch steps were substantially deeper.

1.) Carefully remove the step outline on the hatch, as shown below. Then fill and sand the mold marks.

2.) From 0.5 mm thick styrene or equivalent stock, cut out two side pieces 3.5 mm x 19 mm.
3.) As shown in the diagram below, trim the top and bottom edges with an angled offset of 1.5 mm.
4.) Starting from the bottom of each side piece, locate 3 hole centers as indicated in the diagram and drill a 0.5 mm dia. hole at each.
5.) From 0.5 mm stock, cut 4 each step pieces 3.5 mm x 7.25 mm.
6.) Glue the two side pieces in place on the hatch cover.
7.) Glue each step piece in place.
8.) From 0.5 mm stock, cut out 3 ea step guards 1 mm x 8 mm.
9.) Glue the step guards in place as shown to the top three steps only. Bevel the the top edges of the guards with sandpaper.

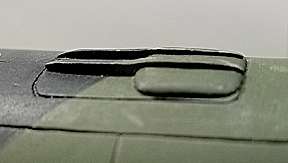
Also missing from the kit hatch cover is the hatch lifter detail. The hatch lifters were part of the seat ejection system. When the ejection sequence was initiated, the front end of the hatch lifter was forced up into the air stream, creating a heavy drag that helped pull the top hatch clear before the ejection seat fired.
The hatch lifter “scoop” shape was created with a piece of 1 mm thick styrene 11 mm x 13 mm, sanded to shape.The reinforcing ribs were made from 1.5 mm strip sanded to shape per the photos below.
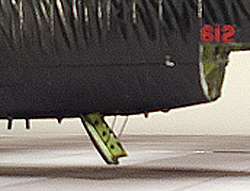
My main hatch lifter “scoop” (shown in the first photo below) is not quite the correct shape, as I discovered later. The front part should be more squarish at the corners, as shown in the second and third photos of the EWO hatch.


Finally, if you’ve gone this far, you will probably want to add the hatch lifting cables, as shown below. I made mine from 0.3 mm round stock (Plastruct #90709) painted black.
Cheers,
Russ
I think that is a brilliant idea! I do hope you can make it work. I want to see pics when it is ready.
That looks superb! The stressed skin effect is fabulous!
In the first one, you can really see the low pressure generated by the wings - humid day.
This weekend I’m going to time those Crows myself…lol
Thanks Jim, great videos.
Dom
Duke:
Just about the most impressive number of built kits I’ve ever heard of, anywhere.
Where’d you find the time?[Y]
I need a new house.
Dom
Russ:
I think you do deserve your own badge for this build, of course you’ll be the only guy on the threads
to display it…lol
If you have any ideas, let me know, we might be able to klooge something up. Maybe something like a big crow carrying a clip of those crater eggs.
Dom
Thanks, Duke! I’ll sure do that.
Russ
Thanks, Stikpusher! [:D]
Lol! Thanks, Dom [:D] However, there’s no need for it to be my badge. If you come up with a badge like that, that would be totally awesome! It would sure come in handy if there’s a B-52 group build someday.
Russ
Well, Russ;
Rich and I were thinking about it, so we would have to give you one
for inspirational support.
I’ll page him and see if he’s still on board for that. Now is a good time to
put out a feeler for the OFFICIAL BIG UGLY FAT FELLER GROUP BUILD.[:P]
Dom
Late Breaking news;
The scribers arrived. The diamond one is light plastic, and
you almost cannot see the tiny industrial diamond embedded
in the point.
The tungsten carbide scratcher is different; a solid stainless
steel body, and a TC point on it that, if projected at the right
velocity, could penetrate a Tiger Tank’s front glacis. Yikes,
sharp as a needle, if you drop it, it’ll nail your foot to the floor!..lol
I am now in the glass cutting business.
Dom